To avoid these ads, REGISTER NOW!

wood workers.... dowel joints?

greenbikemike

Well-known member
Joined
Mar 24, 2014
Messages
252
Location
Twin Cities,Minnesota
can I use a bisket joint instead of a dowel on this,I'm restoring a bench for a friend and the original part had 2 dowels on each end of the slates and I can't figure out how to line up the dowel pins in the curved part of the frame so I was thinking about using biskets instead,good idea or......I did add a cleat under the slates to make it stronger... thanks for any ideas

Greenbikemike
 

Attachments

  • 001.jpg
    001.jpg
    139.2 KB · Views: 199
  • Bench 2014 036.jpg
    Bench 2014 036.jpg
    144.4 KB · Views: 186
To avoid these ads, REGISTER NOW!

transplant_wi

Well-known member
Joined
Jul 30, 2010
Messages
191
Location
Madison, WI
Try dowel centers to mark where you need to drill holes, but it will be tricky to line-up exactly. Cleats may be the best way to go. Dowels seem to walk out of their holes over the years, as well as being a PITA to do well.
 

Hawk

Well-known member
Joined
Oct 21, 2009
Messages
1,019
Location
Kannapolis, NC
can I use a bisket joint instead of a dowel on this,I'm restoring a bench for a friend and the original part had 2 dowels on each end of the slates and I can't figure out how to line up the dowel pins in the curved part of the frame so I was thinking about using biskets instead,good idea or......I did add a cleat under the slates to make it stronger... thanks for any ideas

Greenbikemike

Yes biskets will work, just use a good outdoor glue. I have used them in many outdoor projects with no problems.
 

G McKay

Well-known member
Joined
Mar 6, 2014
Messages
6,849
Location
In the garage in Bremerton
Yes, you can use a bisket instead of a dowel. I do it all the time. A dowel would probably be stronger/deeper, though. After you use the dowel, just belt sand the corner. But either way, use a lot of wood glue with either and wipe off the excess.
 
Last edited:
OP
G

greenbikemike

Well-known member
Joined
Mar 24, 2014
Messages
252
Location
Twin Cities,Minnesota
If this is outdoor furniture use solid wood dowels.

It is outdoor furniture,and thats my problem,I can dowel the straight ends,and thats gonna be a pain,thats 36 dowels that have to line up and the curved ends????? wish me luck,I like play'n with wood but I'm not a "woodworker" by any means...but thanks for the reply

Try dowel centers to mark where you need to drill holes, but it will be tricky to line-up exactly. Cleats may be the best way to go. Dowels seem to walk out of their holes over the years, as well as being a PITA to do well.

I have dowel center pins,but HOW in the hell am I gonna drill'm in the curved end and get'm straight AND lined up....hell,I'm doing this for a free "home cooked meal"....thank god the woman is a good cook!
thanks....


keep the ideas coming guys and gals

thanks guys....I was typing when you were posting.....
 
OP
G

greenbikemike

Well-known member
Joined
Mar 24, 2014
Messages
252
Location
Twin Cities,Minnesota
So you think I could use biskets on all of them....it sure would make it easier but I'm worried about strength,but I did add cleats under the slates so that should help

thanks again

Greenbikemike
 

McFarmer

Well-known member
Joined
Aug 29, 2009
Messages
2,139
I have gone back to using dowels, good quality ones. I would tempted to drill all the way through from the back, I don't really know how wide the rear piece is.

I get mine from Cincinnati Dowels.
 

transplant_wi

Well-known member
Joined
Jul 30, 2010
Messages
191
Location
Madison, WI
OK, how about drilling through the curved rail from the outside, into the ends of the slats, drive screws through to join slats to rail, then plug the screw holes and trim/sand the plugs flush?

Did I mention I don't like doing dowels ;)
 

Gizmosity

Well-known member
Joined
Jun 17, 2014
Messages
376
Location
SW Wisconsin
If the steel back splat is removable and will hide it, how about drilling from the outside of the frame through the frame and into the slats? Put some gorilla glue in there and use a mallet to drive in the dowels, sand flush, finish and re-install the back splat. You'd want to make sure you were drilling as horizontal as possible. I'd put masking tape on the outside frame and mark where I wanted to drill on it to avoid tear out and use a good sharp brad point bit that is sized right for the dowel.
 

transplant_wi

Well-known member
Joined
Jul 30, 2010
Messages
191
Location
Madison, WI
Oh, and it you have brad-point bits, run them backwards first to sever the wood fibers and start a clean hole, then go forwards to drill the hole proper.

Some good exterior grade deck screws will be way stronger than doweled joints, then cover the heads with wood plugs, if you can match the wood. Otherwise drive the dowels through like Gizmosity suggested.
 
Last edited:

ctb

Well-known member
Joined
May 8, 2011
Messages
1,121
Location
Central Europe
Seeing you've put the cleats on, make up some wooden angle brackets and put two under each slat, screwed to the slat and the cleat. Or you could buy the little metal angle bracket thingies and do the same thing. Won't be seen from above.
 

rieferman

Well-known member
Joined
May 18, 2009
Messages
2,586
Location
Collegeville PA (30 min west of Philly)
You mention it's a restoration - are you re-using existing parts to reassemble, or are you making new parts? Is there an opportunity to "copy" dowel placement from the old parts? If new parts, you could consider drilling for dowel placement while the boards are still rectangular, before cutting the curve profile.

edit: In my opinion, I view biscuits as being primarily for aligment purposes (e.g. for aligning table top boards), not for strength purposes.
 
Last edited:

theoldwizard1

Well-known member
Joined
Feb 22, 2011
Messages
43,198
Location
SE MI
Okay, not fine wood working, but this is a good place for pocket screws.

If you are going to use biscuits, wouldn't you have to make a continuous dado in the curved back rail. A jig and a router would handle it and I don't think the slot would be noticeable/objectionable.

(BTW, dadoing the the face of cabinet carcasses for biscuits is Norm Abrams new "fast" way of applying face frames. Pre-finished 3/4" plywood makes things go fast also ! $$$)
 

HAY YOU

Well-known member
Joined
Nov 19, 2012
Messages
585
I presume you have a dowel jig, I would cut some radius wood scrapes so the jig fits at the correct 90 degree angle to the dowel holes you want to drill. Drill all the way thru the scrap wood into the curved wood. Then set you're dowels.
 

Angelfire

Well-known member
Joined
Mar 22, 2012
Messages
1,367
Location
New Mexico and Ireland
Biscuits are great for alignment purposes. For strength, not so much particularly as you are gluing end grain here. I would personally go with floating tenons or actually just tenons if I was building from scratch. Dowels will work but tenons would be much stronger and I have not always had good luck getting my boards to align perfectly with dowels. I'm sure it's my error.
 

C96

Well-known member
Joined
Nov 30, 2013
Messages
1,251
36 dowels for the front and 36 dowels for the back, forget about it. Trying to dowel each slat in place especially around the back curve will be a huge headache and easy to F things up.

Honestly, since you have the cleats underneath, I would think just gluing the slats down with something like PL Premium would be more than adequate.

After all, its only one good meal….Lol :beer:
 
OP
G

greenbikemike

Well-known member
Joined
Mar 24, 2014
Messages
252
Location
Twin Cities,Minnesota
Thanks for all the replies and ideas....I'm learning alot thats for sure.....heres what I've had to work with,not much left of it so I'm fly'n pretty blind....but I'n get'n there...the kreg jig sounds like a winner.....never used one so will that make it stronger,sure would make it easier for sure. I'm using oak and the slats are 5/8",I can go from the bottom and just glue it and screw it? If that sounds like a winner,looks like I get to buy MORE tools,so maybe its all worth it after all!

Thanks,
Greenbikemike

heres what I started with and was play'n with how to use a jig for going in the back side
Just saw the the date is wrong on the pics.
 

Attachments

  • Bench 2014 008.jpg
    Bench 2014 008.jpg
    142.2 KB · Views: 125
  • Bench 2014 002.jpg
    Bench 2014 002.jpg
    135.8 KB · Views: 129
  • Bench 2014 009.jpg
    Bench 2014 009.jpg
    142.8 KB · Views: 109
Last edited:
To avoid these ads, REGISTER NOW!

C96

Well-known member
Joined
Nov 30, 2013
Messages
1,251
attachment.php

attachment.php

Greenbikemike,

Sorry, but suddenly after looking at these latest pictures, I don’t have much interest in what your doing with the bench anymore….Lol. I am more concerned with what’s lurking in the background of the first two pictures.

Oh my! ‘58, ‘59, or ’60. Which is it Mike, those are my absolute favorite of all time, the ‘58 being the apple of my eye!

Please, if you will, post some pics of that bad boy.

I just cant get enough of those, some day though!
 

theoldwizard1

Well-known member
Joined
Feb 22, 2011
Messages
43,198
Location
SE MI
...the kreg jig sounds like a winner.....never used one so will that make it stronger,sure would make it easier for sure. I'm using oak and the slats are 5/8",I can go from the bottom and just glue it and screw it? If that sounds like a winner,looks like I get to buy MORE tools,so maybe its all worth it after all!
Once you have a Kreg Pocket Hole Jig you will find more and more uses for it and start wondering how you got along with out it ! You will be surprised how any places where you can use it.

If you are going into hardwood, use the fine screws.
 

KenC

Well-known member
Joined
Dec 20, 2009
Messages
2,590
Location
oklahoma
I would cut a thin piece of wood that matches the frame, say 1/8" or so. Use that to veneer, with epoxy glue over the holes I drilled from the outside after assembly.

Assemble it with glue and **** joints, drill the dowel holes from the outside, drive the dowels into the holes, lots of glue. Then cover that mess with the thin piece, sand and finish.

No one will ever know how you cheated.
 

McFarmer

Well-known member
Joined
Aug 29, 2009
Messages
2,139
I would cut a thin piece of wood that matches the frame, say 1/8" or so. Use that to veneer, with epoxy glue over the holes I drilled from the outside after assembly.

Assemble it with glue and **** joints, drill the dowel holes from the outside, drive the dowels into the holes, lots of glue. Then cover that mess with the thin piece, sand and finish.

No one will ever know how you cheated.

I second all that, except I would use good drill bits, a contrasting dowel and let them show.

But that's just me.
 
OP
G

greenbikemike

Well-known member
Joined
Mar 24, 2014
Messages
252
Location
Twin Cities,Minnesota
Thanks guys....a veneer is another opition,but if that kreg will be strong enough,thats the way I'll go. As for drilling thru the frame and then driving dowels in and letting them show,she doesn't want that look.I was thinking of maybe cover them with a wood or brass contrasting strip,but she doesn't want that either.....women!

As for the car,good eye....its a 60,had it since 74.....paid $1400.00....running a beefed up 327,dyno was 340HP....alot of fun for sure,hell I should be out driving it instead of working on the bench....heres a pic...thanks
Greenbikemike
 

Attachments

  • misc. pics. Bike,roof,tank 049.jpg
    misc. pics. Bike,roof,tank 049.jpg
    143.9 KB · Views: 57
Last edited:

C96

Well-known member
Joined
Nov 30, 2013
Messages
1,251
attachment.php


Thanks for posting the pics mike. This is a great one, love the old station too!

Those old Vetts were definitely a hotrod back in the day and today, well what can I say, still badass!

Oh, and Good Luck with the bench :beer:
 

Fury5

Active member
Joined
Jan 22, 2012
Messages
39
Location
Milan, NY
While most all of the suggestions other folks have given you will work, they will require a lot of time, some skill, and a bit of luck to get all of the slats to line up evenly. One way to think about it: using dowels will give you 32 unique opportunities for a misaligned hole. While my grandfather would have achieved perfection with a brace and an auger bit, I would not try this with a handheld drill and would be nervous even with a good drill press.

If you like doing woodwork, you might consider one of these: http://www.festoolusa.com/power-tools/joiners/domino-df-500-mortise-and-tenon-joiner-574332. They are not cheap and definitely not worth buying for a one - off project. But you would be able to lay out and cut all your joinery for this bench in under an hour. You can also get outdoor tenon stock for them. I have used dowels and biscuit joiners for years, but bought one of these earlier this year and it has radically increased both the speed and accuracy of all my joinery.

Cheers.
 

MoonRise

Well-known member
Joined
Nov 5, 2010
Messages
4,030
Location
NJ
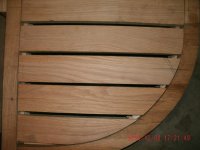
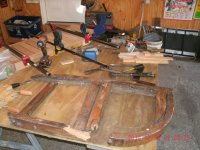
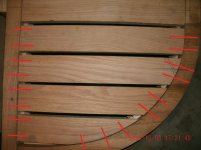
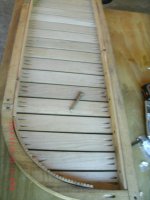
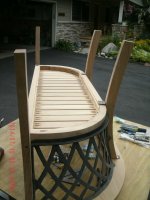
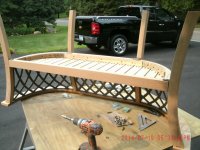
Make curved frame (already done), make slats with the curved ends (already done), dry-fit everything in place (no dowels or holes yet, already done), clamp some cross-slats on top of the 'real' slats for alignment reference, make a jig-block (shop-made dowel jig) and align it off your 'reference' cross-slats, drill holes in the slats, put dowel centers in the holes and transfer position from slats to frame, drill holes in frame, check fit/alignment (tip: use undersize slightly loose dowels), remove temp dowels and install real dowels and assemble with outdoor-rated glue. Done.

Cause it's either that or go with some stub tenons and blind mortises. :D Unless you want to all out and do some wedged through tenons with maybe a contasting wood for the wedges? :D :D

Hmmm, maybe use some floating tenons and then just cut the mortises in the frame and the slats and epoxy it all together (epoxy for the gap-filling properties, maybe a 'thick' gel or filled epoxy)? A little bit 'loose' on the mortises and the epoxy will fill the gaps and be hidden anyway.

Quickest would probably just be the pocket holes underneath the slats and then fill the pocket holes with plugs. Not visible from the top or the front or back, just from underneath.
 

lilscorpion

Well-known member
Joined
Mar 15, 2010
Messages
3,600
Location
Colorado
If you like doing woodwork, you might consider one of these: http://www.festoolusa.com/power-tools/joiners/domino-df-500-mortise-and-tenon-joiner-574332. They are not cheap and definitely not worth buying for a one - off project. But you would be able to lay out and cut all your joinery for this bench in under an hour. You can also get outdoor tenon stock for them. I have used dowels and biscuit joiners for years, but bought one of these earlier this year and it has radically increased both the speed and accuracy of all my joinery.

Cheers.

From the first post I've been thinking - this guy needs a Domino Joiner. It's the ticket and would make easy work of what you're attempting to do. On the flip side, if you don't have another use for one down the road it may just be cheaper to pay someone who has one to do the cuts and then go about your business. Slick tools they are regardless.
 
OP
G

greenbikemike

Well-known member
Joined
Mar 24, 2014
Messages
252
Location
Twin Cities,Minnesota
Thanks guys,I'm a sucker for a pretty woman with a great smile.....:drool:
I'd love to buy new tools but,damn,that there $$$$$$! Not gonna happen,so,
will that kreg jeg work for this? if not,I'll dowel it....
thanks again,
Greenbikemike
 

Burgerkong

Well-known member
Joined
Apr 17, 2010
Messages
2,501
Location
Markham, Ontario, Canada
Are these thru dowels? Or Blind? You have cleats underneath already, I'd think drilling them so they are normal to the ends (that way the dowel jig can sit flat) is fine.
 

Attachments

  • 001.jpg
    001.jpg
    134.5 KB · Views: 25
OP
G

greenbikemike

Well-known member
Joined
Mar 24, 2014
Messages
252
Location
Twin Cities,Minnesota
Thanks for the idea,but I stopped at Rockler woodwork'n store and ended up with a Kreg jig.....I'll go long on the screws[fine thread] and glue it and screw it.......and if that doesn't work......I say SCREW it.....I'm done.....I don't care how good a cook or cute....lol,I love to help people but......I have alot of irons in the fire and I need to cross some off the list....
Thanks
Greenbikemike
 
OP
G

greenbikemike

Well-known member
Joined
Mar 24, 2014
Messages
252
Location
Twin Cities,Minnesota
Well,the Kreg Jeg saved me,damn nice tool......I finished up the bench,shes happy with it and I get to cross it off my list....couple of pics.I had to bend some wood for the cleats...ripped down some oak,nerf cut,then soak in water for 2-3 days,did 'poor mans way of bending them.....glued'em and screwed 'em...done deal....it was alot of work,but I think it came out pretty good.....
so,on to the next project....
Greenbikemike
 

Attachments

  • Bench 2014 013.jpg
    Bench 2014 013.jpg
    141.7 KB · Views: 53
  • Bench 2014 003.jpg
    Bench 2014 003.jpg
    125.4 KB · Views: 57
  • Bench 2014 006.jpg
    Bench 2014 006.jpg
    136.3 KB · Views: 48
  • Bench 2014 018.jpg
    Bench 2014 018.jpg
    149.8 KB · Views: 49
  • Bench 2014 007.jpg
    Bench 2014 007.jpg
    142.5 KB · Views: 53

C96

Well-known member
Joined
Nov 30, 2013
Messages
1,251
Damn nice work Mike! :beer:

Maybe you’ll get a little more than just a meal and a cute smile for all your efforts….:evil:

Again, great job looks fantastic…………..but, still like looking at the car more ;)
 

signcrafter

Well-known member
Joined
May 9, 2012
Messages
12,362
Looks great. I love my Kreg jig and use it all the time for random things. You'll be surprised at how many situations you find it helpful for.
 

MoonRise

Well-known member
Joined
Nov 5, 2010
Messages
4,030
Location
NJ
Well,the Kreg Jeg saved me,damn nice tool......I finished up the bench,shes happy with it and I get to cross it off my list....couple of pics.I had to bend some wood for the cleats...ripped down some oak,nerf cut,then soak in water for 2-3 days,did 'poor mans way of bending them.....glued'em and screwed 'em...done deal....it was alot of work,but I think it came out pretty good.....
so,on to the next project....
Greenbikemike

pssst "kerf bending", not 'nerf'. :lol_hitti

The gap in the piece after you make a cut is the "kerf". The wood that was (formerly) there is what got turned into sawdust or shavings.

Looks pretty nice, and with all the pocket screws I don't think the seat slats are going anywhere. :beer:

Still think you should have gone with the exposed wedged mortise and tenon joints. Contrasting woods and all. With "pillowed" tenon ends. :evil:
 
To avoid these ads, REGISTER NOW!
Top Bottom