To avoid these ads, REGISTER NOW!

Woodbineman's Shop

kjk46

Member
Joined
Oct 30, 2013
Messages
22
Location
North Vancouver BC
As they all say, long time lurker, first time poster. I'm not usually huge on posting as I am mechanically inclined and computer declined, so will see how this works out.

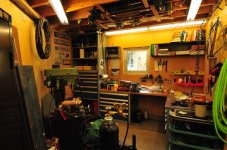
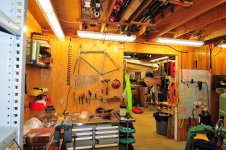
This is a documentation in garage lifestyle as I rebuild my Mid-Century modern house and free standing double (plus tool room) garage. I live in North Vancouver BC where free standing is quite a rarity these days and I firmly believe that a shop should stand alone and not attach to the house. Both from an asthetic point of view (I enjoy good house design) and practical sense, which is why it took me nearly 10 years to find the place. I also belive in making due with what you have and have restored a car in earlier years (while living in San Francisco...another not-so-cheap-property-city) in a laundry room. It was a 71 Saab 96. I love tools and love things that are usually made for the masses, but well designed (my car list is long but my favorite ones I've owned are a Mercedes 300TD, Saab 900, Toyota Hilux pickup, Beetle and FJ62 LandCruiser. Something about timeless design and utility that really speaks to me.

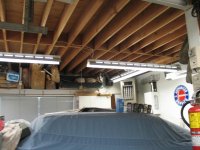
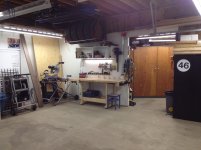
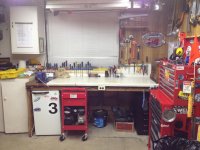
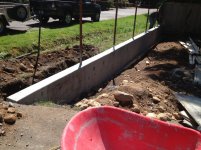
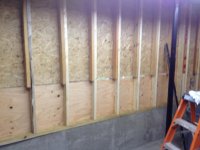
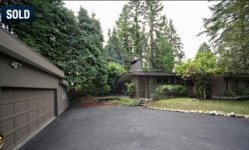
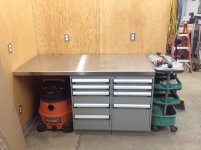
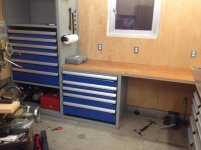
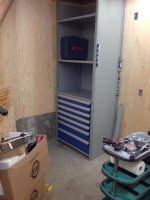
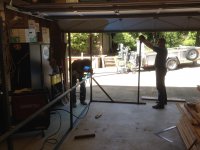
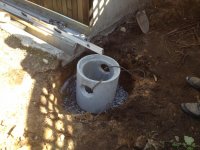
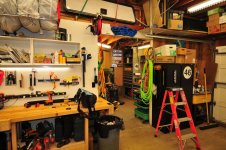
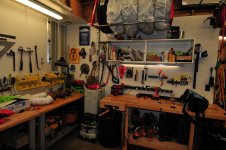
Anyway, enough of the soft sh^t here is the garage....as it started in 2010. We bought the house of a lovely couple who lived in the neigbouhood for years and ran an independent tire shop down the road.....for me it does not get better than that. No Kal Tire, no Tire Rack, but good old "Tom's Tires" (not actual name). Garage is a structure built on a 4" center slab double with an attached pie shaped 1/2 single that I simply call "toolroom" Here is how we found it at time of purchase
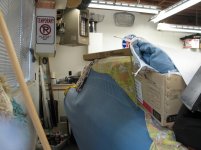
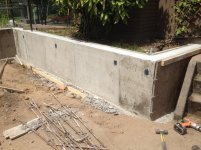
 

Attachments

  • IMG_0131.jpg
    IMG_0131.jpg
    136.3 KB · Views: 177
  • IMG_0127.jpg
    IMG_0127.jpg
    133.1 KB · Views: 150
  • IMG_0130.jpg
    IMG_0130.jpg
    123.6 KB · Views: 135
  • IMG_0132.jpg
    IMG_0132.jpg
    131.9 KB · Views: 143
To avoid these ads, REGISTER NOW!

ODIS

Well-known member
Joined
Apr 30, 2012
Messages
2,110
Location
Pacific Northwest
Have spent many days in Vancouver. "North Van" has always been a favorite place of mine. Believe you are lucky to have such a unique property there.

Looking forward to your progress.
 
OP
K

kjk46

Member
Joined
Oct 30, 2013
Messages
22
Location
North Vancouver BC
Woodbineman's Shop...part 2

I spent the first year in awe of what my friend's refered to as "awesome old man shop" and of course it got crowded as we slowly started working on the house (more on the speed of restoring a 50's mid-century old house and what I've learned) and just organized.

As most old places in the Pacific Northwest it was "musty"....read "moldy and bug infested. Most of the issue is poor drainage from the constant "liquid sunshine" we have here.

Dear old dad (one of my best friends and a true hero of mine that has truly taught me everyting...even if it's by trial and error) and I decided to put in a retention wall first (more parking!) and lay a couple of slabs down in front of the main entrance. Also a couple of pictures of sprucing up the toolroom.
 

Attachments

  • IMG_0020.jpg
    IMG_0020.jpg
    135.8 KB · Views: 162
  • IMG_0016.jpg
    IMG_0016.jpg
    142.4 KB · Views: 174
  • 043.jpg
    043.jpg
    149.8 KB · Views: 110
  • 039.jpg
    039.jpg
    146.6 KB · Views: 112
  • 027.jpg
    027.jpg
    145.8 KB · Views: 132
  • 013.jpg
    013.jpg
    148.7 KB · Views: 126
  • 011.jpg
    011.jpg
    148.1 KB · Views: 139
OP
K

kjk46

Member
Joined
Oct 30, 2013
Messages
22
Location
North Vancouver BC
Woodbineman's Shop...part 3

The toolroom was rotten about 3ft from the bottom as the wall was just sitting on the slab. So I replaced the front wall as visible in the first picture above (by red wheelbarrow) and built a small (6") curb for the new wall to sit on.

Next was replacing the rest of the walls in the toolroom and fixing the roof (I torched on new roofing) and installed insulation etc.

The briliance (in my mind of course) of the toolroom is that although it is an ackward (single garage cut diaonally to make a "pie" due to lot restriction....built by prior owner not me) shape, it can be organized to hold the majority of the tools I own and provide a sperate space for smaller projects. I planned to house the air compressor, welder, all the tool cabinets, metal stock and my milling machine etc. in this room and leave the big double garage for the major tools (I have a lot of woodworking tools such as planers, saws, jointers, wood bench and automotive tools such as a lift, workbenches) and project space.

I'm also utilizing the garage build to experiment (in both function and style) with materials for the rebuild of the house. So I burned my outside cedar siding (called Shou-sugi-ban in Japanese) to not have to paint. I think it gives a really nice texture and effect against oiled or waxes cedar. I also clad the entire tool room in "factory grade" 1/2" plywood as I hate looking for studs when hanging things
 

Attachments

  • IMG_0581.jpg
    IMG_0581.jpg
    138.1 KB · Views: 68
  • IMG_0403.jpg
    IMG_0403.jpg
    136.2 KB · Views: 66
  • 042.jpg
    042.jpg
    146.6 KB · Views: 65
  • 2013-03-30 13.47.55.jpg
    2013-03-30 13.47.55.jpg
    147 KB · Views: 76
  • IMG_0423.jpg
    IMG_0423.jpg
    13 KB · Views: 22
  • IMG_0723.jpg
    IMG_0723.jpg
    145.1 KB · Views: 68
OP
K

kjk46

Member
Joined
Oct 30, 2013
Messages
22
Location
North Vancouver BC
Woodbineman's Shop...part 4

Next, in a wave of enthusiasm that only an empty garage can inspire I decided to mill my own fenceboards for my uber cool slatted fence.....it was a bit nuts as it turns out and a lot of work. you see...milled boards (by a novice miller (?)) are by design not standard size (I made them from rough sawn lumber from a lumberjack. Slatted fences on the other hand, get their handsome uber cool looks from perfect lines. Do you see where I'm going here?

Anyway, it all turned out in the end. Oiled with what they use on boats here (it's late and I forget the name now) but it's holding up so far.
 

Attachments

  • IMG_0423.jpg
    IMG_0423.jpg
    13 KB · Views: 32
  • IMG_0424.jpg
    IMG_0424.jpg
    9.4 KB · Views: 27
  • IMG_1529.jpg
    IMG_1529.jpg
    147.8 KB · Views: 168
  • IMG_1528.jpg
    IMG_1528.jpg
    147.2 KB · Views: 146
  • IMG_1518.jpg
    IMG_1518.jpg
    149.6 KB · Views: 135
  • IMG_0770.jpg
    IMG_0770.jpg
    144.5 KB · Views: 108
  • IMG_0768.jpg
    IMG_0768.jpg
    145.2 KB · Views: 127
OP
K

kjk46

Member
Joined
Oct 30, 2013
Messages
22
Location
North Vancouver BC
Welcome from Edmonton! Nice job so far! I miss the Vancouver area....

Sean, thanks! I am an ex-Edmonton guy myself and still have many great friends from there. I used to ice race and rally race while living out there so was into the motorsports scene a bit.

Love the engine build.

Konrad
 
OP
K

kjk46

Member
Joined
Oct 30, 2013
Messages
22
Location
North Vancouver BC
Just found this, nice!

And subscribed.

Gregor

Gregor! Thanks for looking me up in my little corner! I am really enjoying this forum and displays of craftsmanship here, such as yours.

Do you have some pics of the house? Love the MCM look...

Thanks, here is one from when we bought it...err...now that I look at it, I've made it significantly worse on it's long journey to making it better of course.

Do you have a bigger picture of the Saab 96? Looks cool enough in your avatar!

Oh the Saab...I miss that car a lot. I restored the whole thing in a laundry room in a small house in San Francisco. I made a lot of friends in the Bay Area that I still have to this day though that crazy car. One day I'll post the crazy journey that involved actually tracking down the guy who prepped the Baja Saab's for Saab in the 70's and having Isky Cams make me a set for free from the old blueprints. I'll have to dig a bit for those.
 

Attachments

  • SOLD.jpg
    SOLD.jpg
    20.7 KB · Views: 20
To avoid these ads, REGISTER NOW!
OP
K

kjk46

Member
Joined
Oct 30, 2013
Messages
22
Location
North Vancouver BC
Ha! I found in-progress ones. I sold to a fellow in Ohio before I moved back to Canada and I've been looking for it ever since.
 

Attachments

  • IMG_3460.jpg
    IMG_3460.jpg
    131.8 KB · Views: 46
  • IMG_3445.jpg
    IMG_3445.jpg
    134.1 KB · Views: 52

wasfast

Well-known member
Joined
Apr 10, 2014
Messages
874
Location
San Diego CA
Part of the issue with the rot on the toolroom bottom may be the grade of the earth outside. It looks like the wall is well below grade. At least digging the dirt back would help some, adding some drain rock or a drain line might also be in order.
 
OP
K

kjk46

Member
Joined
Oct 30, 2013
Messages
22
Location
North Vancouver BC
Here is a quick snapshot of my cabinet install in the tool room. I searched, planned and pined over these cabinets for months. They are a Rousseau brand (Canadian!) and are in my opinion on par with Lista (I actually prefer them, but don't want to start a war over this because it dosn't matter). 400lbs per drawer, modular and I'm really happy with them....huge jump from the 25 year old Husky toolbox I had.

I combined with a used Rousseau bench with stainless steel top into a nice corner cabinet. The green shop tool cart is one of my favorite pieces - it is a early (70's) Japanese knock off of a Hazet Assistant!
 

Attachments

  • IMG_0281.JPG
    IMG_0281.JPG
    47.2 KB · Views: 43
  • 2014-04-21 20.34.18.jpg
    2014-04-21 20.34.18.jpg
    128.8 KB · Views: 39
  • 2014-03-25 17.02.58.jpg
    2014-03-25 17.02.58.jpg
    134 KB · Views: 43
  • 2014-04-21 20.34.08.jpg
    2014-04-21 20.34.08.jpg
    127.5 KB · Views: 40
  • 2014-01-23 22.54.57.jpg
    2014-01-23 22.54.57.jpg
    132.8 KB · Views: 38
OP
K

kjk46

Member
Joined
Oct 30, 2013
Messages
22
Location
North Vancouver BC
Part of the issue with the rot on the toolroom bottom may be the grade of the earth outside. It looks like the wall is well below grade. At least digging the dirt back would help some, adding some drain rock or a drain line might also be in order.

You are absolutley right. I removed about 6 truckloads of dirt (mostly by hand) and build a retaining wall that is well beyond the garage wall. I did it this fall and since that time I've also poured a pad for an external (bear proof - we have lots of bears around here) garbage enclosure.
 

Attachments

  • IMG_1733 - Copy.jpg
    IMG_1733 - Copy.jpg
    147.4 KB · Views: 33
  • IMG_1731.jpg
    IMG_1731.jpg
    147.8 KB · Views: 33
  • IMG_1694.jpg
    IMG_1694.jpg
    150.5 KB · Views: 31
  • IMG_1686.jpg
    IMG_1686.jpg
    140.3 KB · Views: 38
  • IMG_1677.jpg
    IMG_1677.jpg
    149 KB · Views: 31
  • IMG_1665.jpg
    IMG_1665.jpg
    145.9 KB · Views: 39
OP
K

kjk46

Member
Joined
Oct 30, 2013
Messages
22
Location
North Vancouver BC
Lastly, here is the latest progress on the inside. Toolroom basically finished (at least ready to work), all new lights wired in, 100 amp panel upgrade and air lines installed in the critical places. Loving the space and as you can see, I've decided to pull out most of my frequently used tools on toolboards instead of hiding. I find this much easier to consistently put stuff away.

I've since installed a Max Jax lift as well (sweet deal from a demo sale) as I am doing a fresh up on my Land Cruiser (Fj62) but I'm having issues with the anchors pulling out, so back to square one....need to pour in new/thicker floor pads (mine is 4") and reset the anchors which is super annoying.

Time to work on the house....my wife certainly thinks the garage is ready to start cranking out serious house related projects just about right now.
 

Attachments

  • DSC_8295.jpg
    DSC_8295.jpg
    146.8 KB · Views: 80
  • DSC_8297.jpg
    DSC_8297.jpg
    153.4 KB · Views: 73
  • DSC_8301.jpg
    DSC_8301.jpg
    151.1 KB · Views: 75
  • DSC_8302.jpg
    DSC_8302.jpg
    143.1 KB · Views: 72

bj383ss

Well-known member
Joined
Sep 29, 2011
Messages
3,166
Location
TX
Just read through your post. What a great garage you have. The tool room has an awesome warmth to it. I have debated hanging plywood in my future woodshop versus drywall. It would be costly but look awesome.

Love the Saab and your fence is outstanding. I agree with you on the milling of wood. Even though it looks very simple to most people it is very time consuming and hard work. But to me very rewarding in the end knowing you did all the work. I have spent the last 2 weeks milling 48 pieces to make drawers for some new cabinets I am making.

Look forward to your next update.
 
OP
K

kjk46

Member
Joined
Oct 30, 2013
Messages
22
Location
North Vancouver BC
Thanks! I've read through your build a while back, you've got an amazing space as well and a bittersweet story, nice to see you've made it work so great. I think plywood is great - I've used what they call "factory grade" 1/2" - one good side and much cheaper than "one good side 1/2" you usually see. At least here in British Columbia it's about the same price as drywall. I used it because I hate looking for studs, it's wet here all the time and I loved the look of a lot of shops in Scandinavian countries (I work there sometimes) that use this to give the space a more natural feel.

Looks like I'll have to get some advice on truck paint from you as well :) I am just repainting my Land Cruiser and at the point of cleaning my rails (Some pics in my album).
 
OP
K

kjk46

Member
Joined
Oct 30, 2013
Messages
22
Location
North Vancouver BC
My latest progress. I backfilled behind my retention wall and built some stairs and put up a temporary fence from wire mesh. We like the mesh, so going to draw inspiration from this and probably go for a welded wire fence as permanent. You can see the tool room is clad and refinished from the outside (burned cedar siding). It's coming along! Next step is to finish the rest of the garage exterior (more burning cedar) and pour new pad.
 

Attachments

  • image.jpg
    image.jpg
    150.1 KB · Views: 53
To avoid these ads, REGISTER NOW!
Top Bottom