To avoid these ads, REGISTER NOW!

Between 265 & 485 SQ/FT Woody's Works Garage

Workspaces sized between 265 and 485 squarefeet.

nicholam77

Well-known member
Joined
Dec 18, 2016
Messages
2,677
Location
Minneapolis, MN
Thanks Strouty :)

I'm not a fan of lifting from the reinforced quarter panel areas of the Audi A3. After finding out that Audi has provisions for lift pads on reinforced body areas, I ordered up a set from ECS tuning. After quick inspection of the body areas hidden by the lift pad points, I also figured this was a good time to hit them with cavity wax. I did a fair bit of research on long term corrosion tests last year and came up with Mike Sander's "grease", ordering up a 25kg can. It is a bit of a pain to use as it must be heated. I came up with a pretty slick solution..heat tape on my cavity gun. Pics are pretty self explanatory.

pad1.jpg

I recently installed these on my GTI. Even without a lift they are awesome for floor jacking.

Your space really turned out amazing. And this thread has so much information and good ideas I will have to keep revisiting. I found the FLIR pics to be pretty interesting.

P.S. Your former Scirocco is awesome, in case you didn't know!
 
To avoid these ads, REGISTER NOW!
OP
D

Denwood

Well-known member
Joined
Sep 22, 2014
Messages
4,219
Location
Thunder Bay, Ontario, Canada
Nich, thanks for checking in :) The lift point pads do keep the sills in much better shape for sure. I've been quite happy with them :)

I do miss the Scirocco for sure. It was a blast to drive, simple to work on and these days quite unique as a road going vehicle. The new owner in Toronto area has done an excellent restoration and is actively auto crossing the vehicle as well. He still sends the odd picture.

I can't say enough how much more usable the shop is now that it is organised. I spent all of 30 minutes cleaning up on the weekend and it's right back in shape. The next project for the shop will be a stow-able torsion box worktable. I'm currently using a piece of plywood with a few table legs which is not so great at all. I was contemplating using the hoist as a table support, but I've found a table accessible from all sides very useful during any kind of shop projects...this is hard to do with a hoist post in the way.
 

G20-Budo

Well-known member
Joined
May 31, 2013
Messages
987
Location
Chandler, AZ
Woody,

I'll be honest.. I didn't know what a "torsion box worktable" was until I googled it. Are you planning to make one? I found this design online (I'm guessing you've seen it, and 10 others and have a cool one picked out already).
 

bj383ss

Well-known member
Joined
Sep 29, 2011
Messages
3,166
Location
TX
Look forward to your table build Dennis. I have wanted to make one for sometime but never got around to it.

Bret
 

drivesitfar

Well-known member
Joined
Oct 23, 2013
Messages
36,075
Location
Pacific Northwest
Woody: thanks for the good words as per usual. you will have your turn some day in the future to not only shed maybe a tear or two when one of your girls walks down the aisle with you, but you will most likely gain another helper in the shop with your new son in law(s).

thanks to G20 i also didn't know a Woodworking bench was called a Torsion box worktable. wow and you are going to make one that will be able to not only work on in your garage, but will also be able to be tucked away? i'm here to watch all of that and i wish you the best.

if you have any questions or want to show off a few of the pictures during and after the build here is a great place to do so on the Woodworking 101 thread. http://www.garagejournal.com/forum/showthread.php?t=344153

also Jim (the host and thread starter) has so many good hand planes and tutorials it's a fun read if you have some time.

take care and again thank you for all the good words and help with my daughter's wedding chair.
 
OP
D

Denwood

Well-known member
Joined
Sep 22, 2014
Messages
4,219
Location
Thunder Bay, Ontario, Canada
Kyle[/B], I've looked at quite a few torsion box google images and found none yet that would exactly match my needs. There is one fellow who did a foam core work table, but his YouTube videos don't show any actual load testing. I like the idea of a strict foam core, simply because it would be fast to make panels this way. There is a company, Singcore, that does foam/wood ribbed composite panels that would be perfect, but don't do direct retail :-(

Bret, aside from 3/4" holes in the table, is there a standard for hole spacing? Also, are there hold down clamps that you prefer to work with the 3/4" holes? I figure you'll have an opinion on this stuff.

Drives, I will post the table build likely well before building it to get opinions on leg, surfaces, build etc. I'd like to do a two-sided table, one side for light metal work, the other for wood projects. It needs to be light, compact, easy to stow, but flat and strong.

I know my time will come walking the aisle with my two girls. You've set the bar rather high on this endeavor :)
 
Last edited:

tjpavlov

Well-known member
Joined
May 18, 2012
Messages
1,280
Location
Providence, RI
I've been thinking about a torsion box worktable myself. The last time I bought something from Ikea, I got a ton of nice pieces of honeycomb cardboard. I've been thinking that something along these lines might be a good filler.

Here's a link to an example of what I'm talking about, but you'd have to buy a whole pallet here: https://www.uline.com/BL_1856/Honeycomb-Pads
 

txusa03

Well-known member
Joined
Sep 16, 2011
Messages
479
Woody, I agreed with everyone that I learned a lot from visiting your thread. I had to do a triple take when you say you have 9 of them Ecobee. I believe you have 8 remote sensors plus the actual thermostat.

I don't know how many remote sensor you can have/per thermostat b/c the max remote sensor for me would be 2 for the house. It would be nice to have a remote sensor in each room but cost is a factor for me. Plus I am still not sure how Ecobee manages all its remote sensors when the house has only a single zone furnace/AC meaning when the unit run, it runs for the whole house.

I also did not understand set backs so I googled it and found "This Old House" video talking about set backs.

Thanks for sharing.
 
OP
D

Denwood

Well-known member
Joined
Sep 22, 2014
Messages
4,219
Location
Thunder Bay, Ontario, Canada
TJ, I did see the uline cardboard, and just found a video of IKEAs cardboard composite factory in Poland:


TX, Each Ecobee can have up to 32 remote sensors attached. We have about 15 in our building attached to the 9 Ecobee stats. Previous to this week, Ecobee could only run the system (or turn it off) based on the sensor input, so in some cases might overheat (or cool) a room that is not occupied. Just a few days ago Ecobee announced integration with Keen smart vents (vents can be automatically adjusted), so this would effectively turn your system into a zoned system..although HVAC experts caution against using too many of these vents in one system due to balancing concerns. Keen Smart Vents with Ecobee remote sensors is not a replacement for a proper multi-zone system, however it for sure will help bias temps up or down in indivisible rooms based on "external" automation.
 
Last edited:

bj383ss

Well-known member
Joined
Sep 29, 2011
Messages
3,166
Location
TX
Dennis I spaced mine 2" apart. I don't think there is a standard more of a preference.

Bret
 
OP
D

Denwood

Well-known member
Joined
Sep 22, 2014
Messages
4,219
Location
Thunder Bay, Ontario, Canada
Bret, I figure I'll have to guess a bit on the torsion table hole pattern, as it can't be completely populated without adding a lot of wood internal framing..and we're looking for a light table.

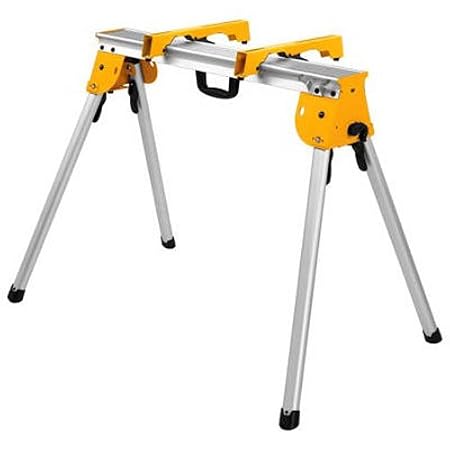
The torsion box foam core project is officially underway. I was searching for a robust leg system that would either fold up or stow and found a great solution today. I already have the Dewalt DWX723 chop saw stand and am thoroughly impressed with the leg system and overall robustness. It's a beast that extends to support 16ft material.

Not surprisingly, Dewalt uses the same bits to offer serious work stands (DWX725) with a 1000lb capacity each. The stand's aluminium beam extrusion also accepts the Dewalt DW7231 chop saw brackets which strikes me as a really efficient way to lock the table to the stands.

41y6GwTbrZL._SY450_.jpg


All said and done, two stands and the chop saw brackets (which will be attached to each end of the work table) will make for a crazy strong leg system..and I'll have the work stands to use when the table is stowed, either as a compact chop saw stand, or as very robust "saw" horses.

I have various 4x8 sheets coming tomorrow including 3/4" shop birch (my go to for cabinets), 1/4" birch, 1/4" MDF, and 1/2" MDF. I already have few liters of West System Epoxy. The first foam core torsion box table attempt will have a 1/2" MDF top, 2" foam core and 1/2" bottom skin. I'll post some load tests etc. when it's done as I've found zero of this information on the web.
 
Last edited:

dchance

Well-known member
Joined
Oct 3, 2016
Messages
614
Location
OKC
Dennis enjoyed your thread and all of the work and information. Looking forward to your
torsion box worktable.

Dwight
 
OP
D

Denwood

Well-known member
Joined
Sep 22, 2014
Messages
4,219
Location
Thunder Bay, Ontario, Canada
Thanks for the comments Dwight. After doing some research it's clear that a combination of a few internal bonded stringers (to tie the two faces together and address sheer/buckling) along with 100% void fills with high density foam is the best bet. I've ordered 100 psi Polystyrene (the blue stuff) sheets in 2" thickness to fully support the 1/4" birch ply faces. You can order purpose designed sandwich foam up to 235psi which works well for more critical applications...but it's not cheap. As it is, a 2' x 8' 100 psi DOW sheet is $80! Because I could find very little in terms of torsion box foam sandwiches, I'll likely try a few test panels and post up some load tests with deflection measurements. I figure the table will be 30 to 40lbs.

I have 1/4" birch ply, 3/4" Birch ply, 1/4" MDF, and 1/2" MDF to test.
 
Last edited:
OP
D

Denwood

Well-known member
Joined
Sep 22, 2014
Messages
4,219
Location
Thunder Bay, Ontario, Canada
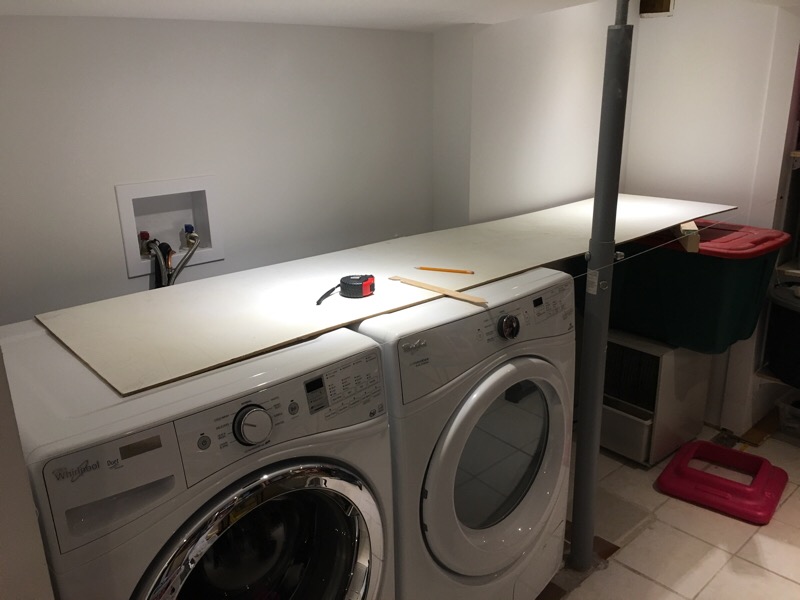
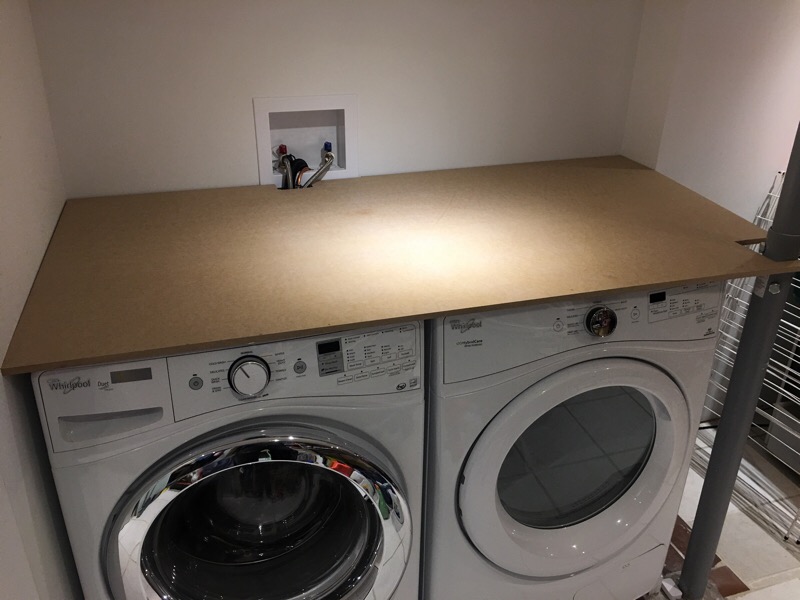
This new laundry area will be done in a mostly clear span torsion box surface. I've been trying to figure out a way to transcribe this ~ 9' x 3' irregular space (it's not square, plumb or all that level)space in a highly accurate way so that I can do a 1 or 2 section "torsion" box work surface. The same will be done in the new computer nook which is a 3 sided space. With an old house, this is a constant challenge that generally drives me a bit crazy.

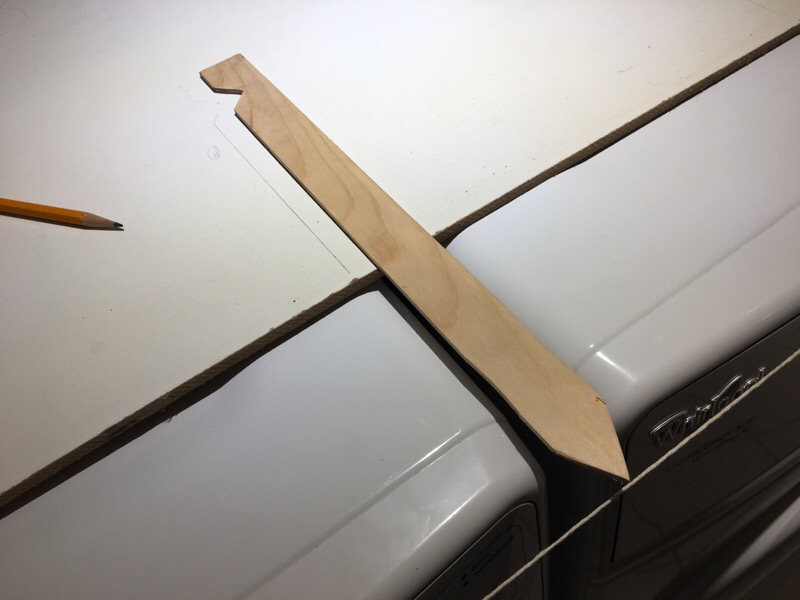
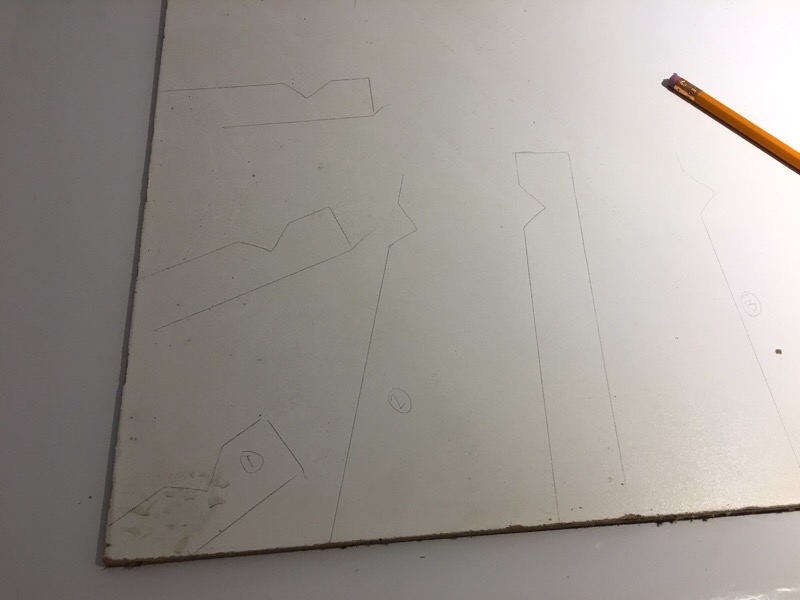
This simple technique from the boat building world is pretty awesome...perhaps one of the most useful "tricks" I've run across. "Tick Sticks" are very simple, and you can collect as many data points as desired for very high accuracy. You basically point the arrow to the desired edge, and trace the notch area onto a reference board. This reference board then drops on top of your panel stock, and you recreate the end points by reversing the process. It's pretty hard to mess this up.

tickstick1.jpg


It's hard to see here but the tick stick is pointing to a string stretched across the front of the appliances and around the teleport. The front counter edge will not be straight but changes angles slightly at the telepost (to be boxed in) for a clean finished look.

tickstick2.jpg


tickstick3.jpg


Last edited:

bj383ss

Well-known member
Joined
Sep 29, 2011
Messages
3,166
Location
TX
Interesting method Dennis. You could also use a compass and scribe against the wall I would think. I will have to try this method out next time the need arises.

Bret
 

drivesitfar

Well-known member
Joined
Oct 23, 2013
Messages
36,075
Location
Pacific Northwest
Woody: not sure i'll ever need that method, but OMG it does work. thanks again for passing on your wisdom as you have time.

hope all is warming up a bit in your part of the world. is it?

also did your new Dewalt track saw arrive yet?

cheers
 
OP
D

Denwood

Well-known member
Joined
Sep 22, 2014
Messages
4,219
Location
Thunder Bay, Ontario, Canada
Bret, for sure you could scribe to a template, but keeping the scribe at 90 degrees on a large irregular surface would be a bit harder. This technique is how boat builders do bulkheads etc as the angle of the tick stick is irrelevant. You just need to gather enough points. It took all of 2-3 minutes to get the "data" I need.

Drives, the Dewalt track saw was back ordered ... waited for a week :-( so I went for a Makita instead. It ranks better in the reviews, comes with a very good carbide blade and is a few pounds lighter in magnesium. The Festool TS55 is more expensive and has a lot of plastic parts, including the base. Should be here Monday. I have something like 25 4x8 sheets and a pile of 100psi foam (for the foam core torsion bits) ready to go.

10C predicted tomorrow which is "tropical" at this time of year :)
 
Last edited:

starckie

Well-known member
Joined
Apr 15, 2013
Messages
53
Location
Central PA
Woody, when you stained your floor white you noted that you were really happy with how bright it made your workspace, but I notice that you went with a darker color for your racedeck - was there a specific reason for that? Are you happy with the graphite/alloy or would you go lighter/darker if you were to do it again?

Looking forward to your review of the Makita tracksaw - I've had my eye on it for a few months now.
 
To avoid these ads, REGISTER NOW!

drivesitfar

Well-known member
Joined
Oct 23, 2013
Messages
36,075
Location
Pacific Northwest
Woody: while i like Makita as well or maybe better than any other brand i've been hearing so many good things about FESTOOL from the pros that use theirs daily i'm leaning towards buying some after i pay off the wedding. i've heard the settings on Festool's track saw are so fine that you don't have to tape your wood to keep it from chipping if you are cutting a finished edge. i've also seen Festool's sander in action with the vacuum system and the user didn't even need a mask.

that said i hope your Makita works as well for you as other Makita tools have for me. sounds like you have your garage or basement full of plywood ready for the next phase.

how did that cool measuring idea (Tick Sticks) work for your non square laundry area you needed to cut pieces for?
 
OP
D

Denwood

Well-known member
Joined
Sep 22, 2014
Messages
4,219
Location
Thunder Bay, Ontario, Canada
Starckie, I choose the bulk of the parking pad in silver to keep things as bright as possible, then used white EPDM as the base. Overall, it's still pretty bright. Doing it again, white porcelain and a proper graded drain would be the way to go.

Drives, the saw and tracks have not arrived yet...I ordered them locally and it's taking forever. What I gleaned looking at the reviews is that all the saws perform pretty much the same with a good blade..and the Makita standard blade is apparently very good. We'll see. We spent the weekend in Minneapolis, taking the eldest to a "Panic at the Disco" concert...so no work was done. Right now my efforts have been directed to the old laundry area, now a mudroom as we get the area planned and organized. The tall cabinet that went in there is being removed as the Missus wants clean and simple.

You're right..my shop has 25 odd sheets of material, plus a pile of high density foam for the torsion boxes. The tick stick template is waiting for the track saw...
 
OP
D

Denwood

Well-known member
Joined
Sep 22, 2014
Messages
4,219
Location
Thunder Bay, Ontario, Canada
Makita SP6000X2 Track Saw Review

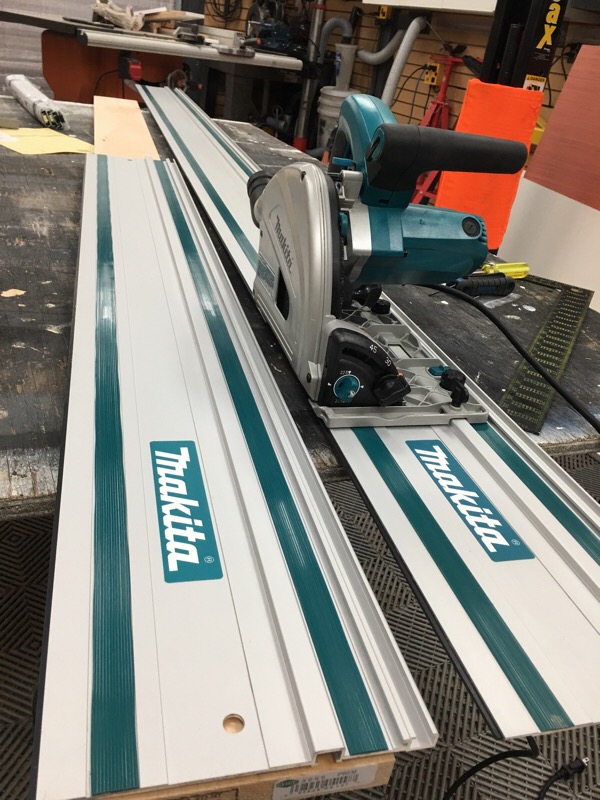
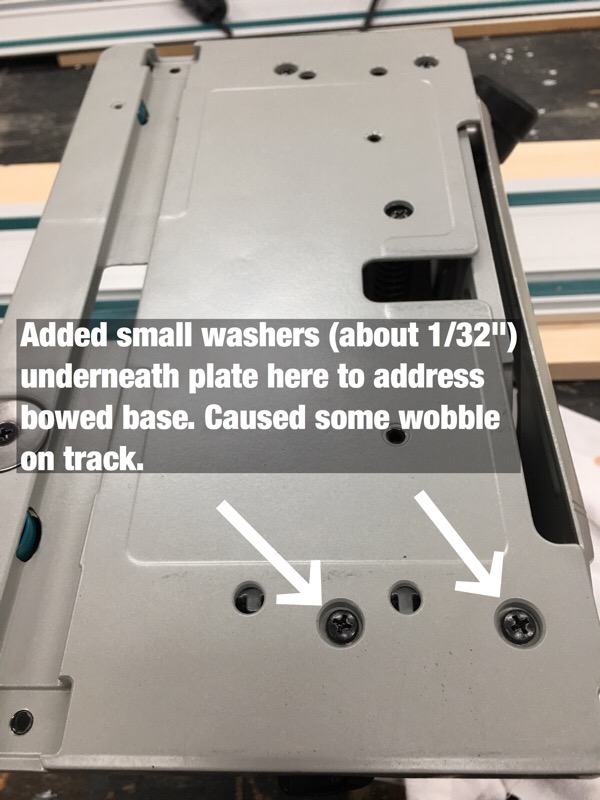
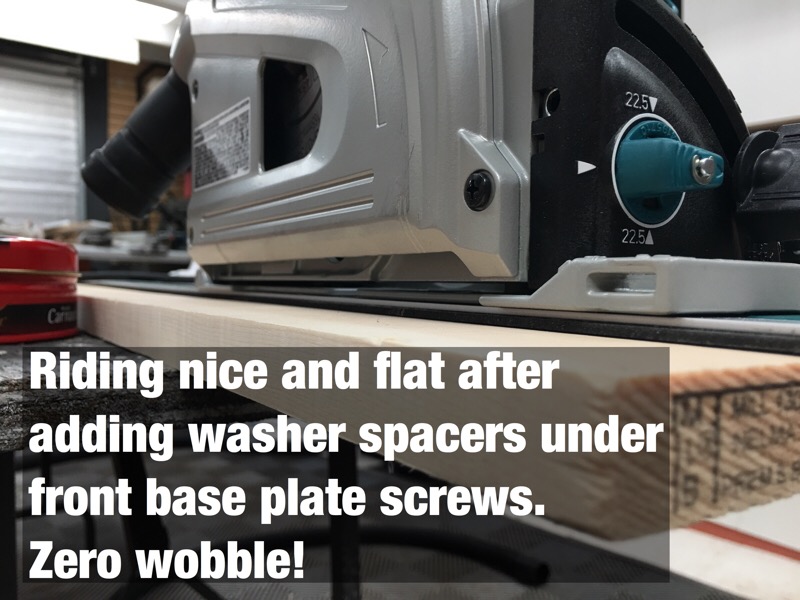
The Makita bits showed up today and were immediately put to work. Before firing up the saw, I carefully checked the blade to see that it was square and true to the base. The saw base had a small bow in it which was also reported by a few other customers in reviews. This bow resulted in a slight wobble on the track, so it needed to be addressed. I fixed it by removing the saw base (four screws) and shimming the front of the plate up about 1/32" with two small washers underneath the front two screws. The plate is pretty much perfect now. Makita should really make this a basic quality control check as it likely would affect cut quality if not addressed.

After spending some time sorting the base plate issue and squaring the blade, the saw is working exactly as expected. There's no question that it is both more accurate, cuts cleaner, and produces less dust than cutting on my table saw. The ability to plunk the track down, align the track edge and cut is an amazing improvement over my previous straight edge/measure offset/circular saw/clamping method. On the first cut through some 5/8" melamine, I was surprised by how easily the saw moved through the material...so easily in fact that I stopped to make sure the depth was set correctly (it was!).

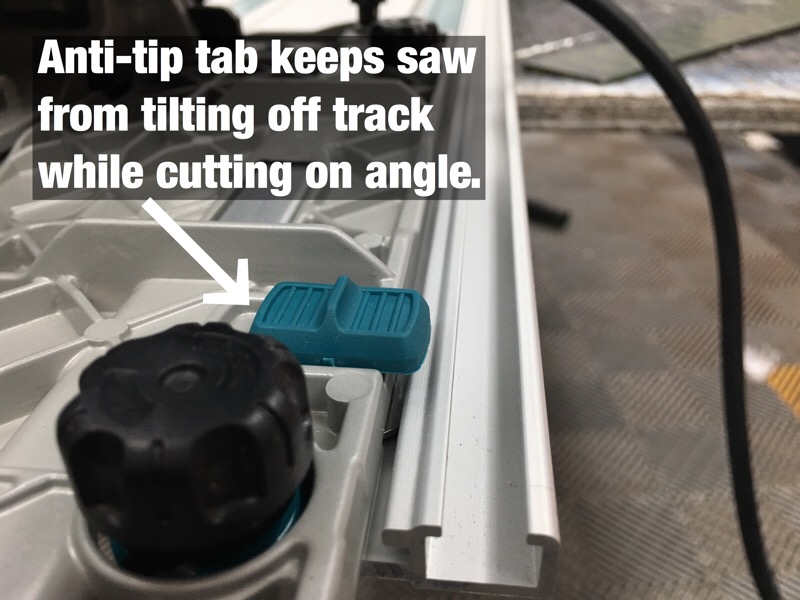
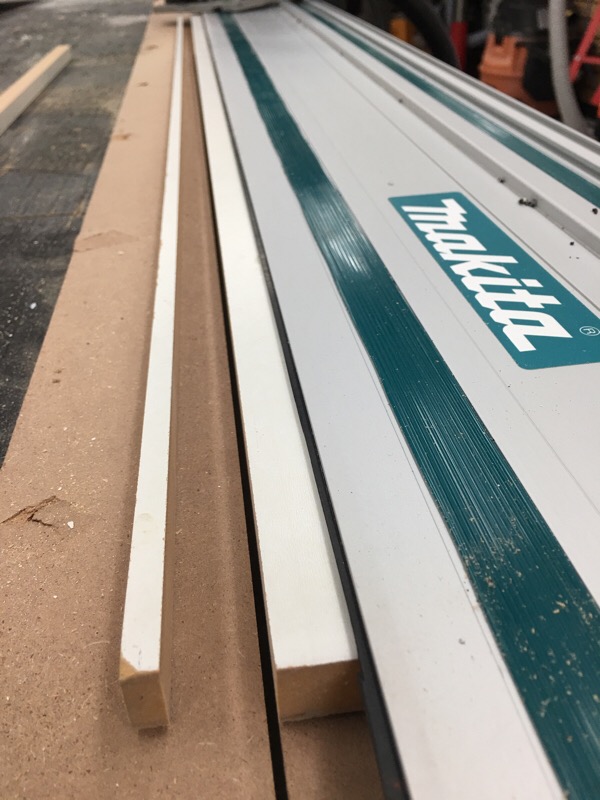
The two tracks arrived in perfect shape. The 118" long track will require an added rack to safely store it in the shop. I waxed both tracks and the saw base. Sliding effort is surprising low, you might find yourself wondering if there are bearings in play. The saw base has two tool-less adjustments fore and aft to take any play out of the track. When swapping tracks, I found a small adjustment needed to made to get to zero play, likely amounting to a few thousandths of an inch.

Other reviewers have commented that unlike other tracks saws, the blade included with the Makita is excellent out of the box. I'd agree and have no plans to replace it.

track1.jpg


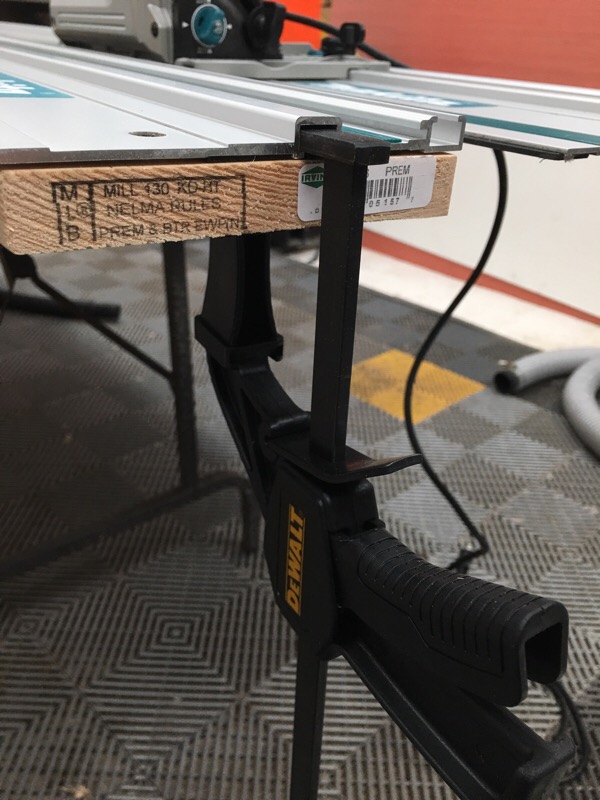
The Dewalt track clamps are very nice. I did not use the clamps at all making the cuts on the laundry room torsion box "test" panel at the end of this post. Gravity and the non-skid strips on the tracks held them in place nicely while cutting.

track2.jpg


track3.jpg


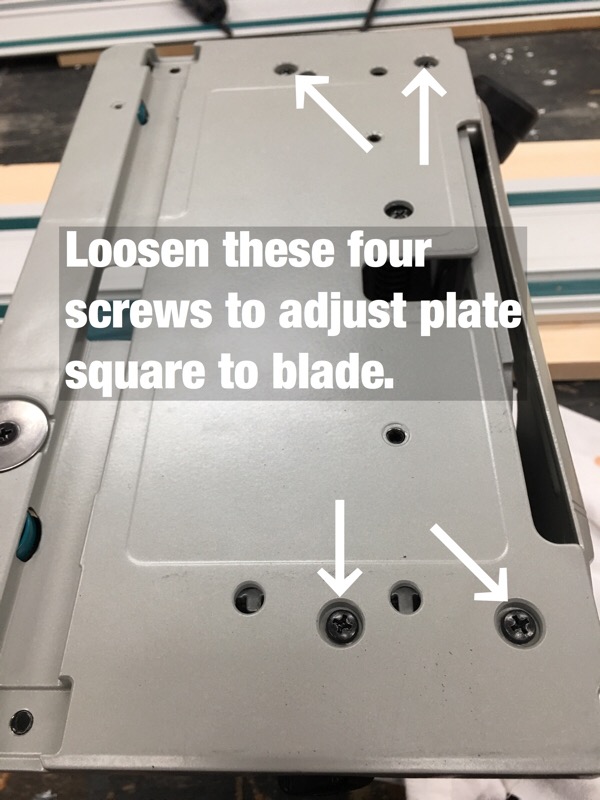
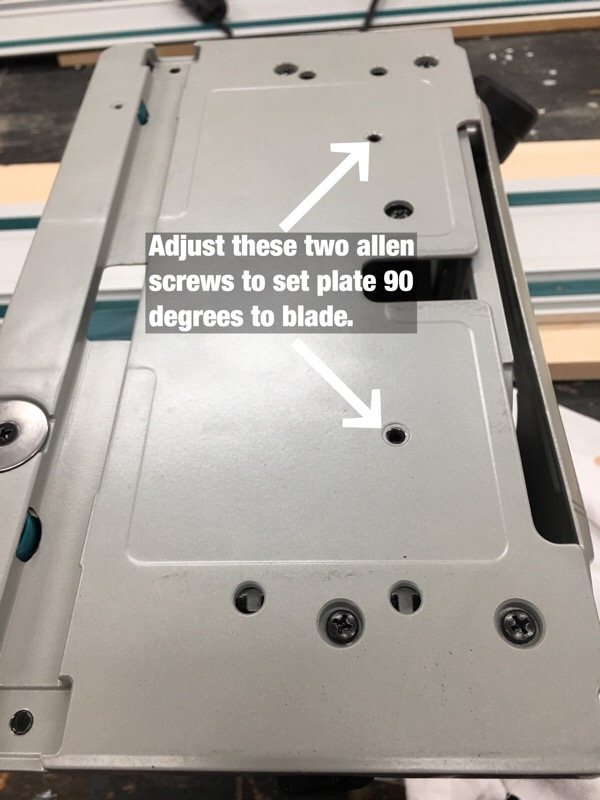
The instructions really don't explain how to square the base plate to the blade, or adjust the 90 degree setting for cuts. If you remove the base plate, you can figure this out..but these pics should help.

track4.jpg


track5.jpg


After some tweaking the base is pretty much perfectly flat.

track11.jpg


track6.jpg


track7.jpg


track8.jpg


track9.jpg


track10.jpg


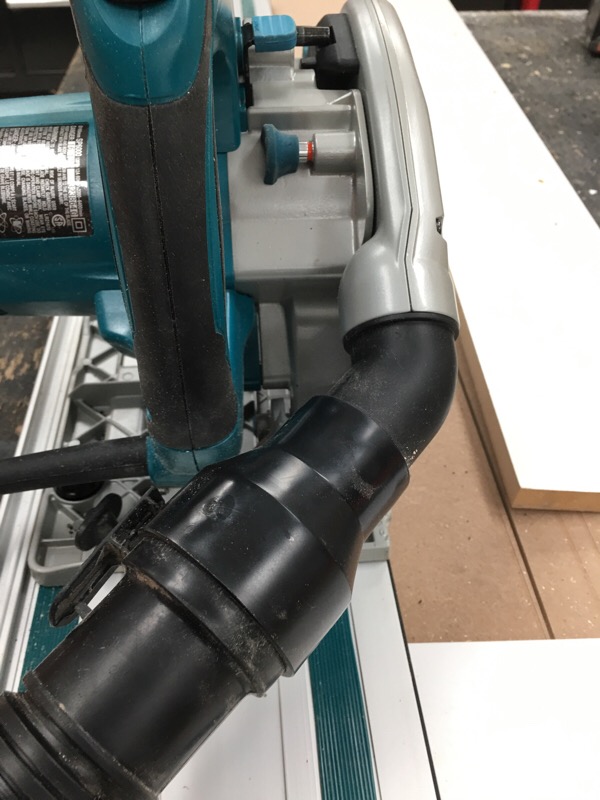
Dust collection is excellent. Trying a cut without a hose connected filled the area with a surprising amount of dust in a few seconds of use. With the hose connected, there is virtually zero dust :)

track12.jpg


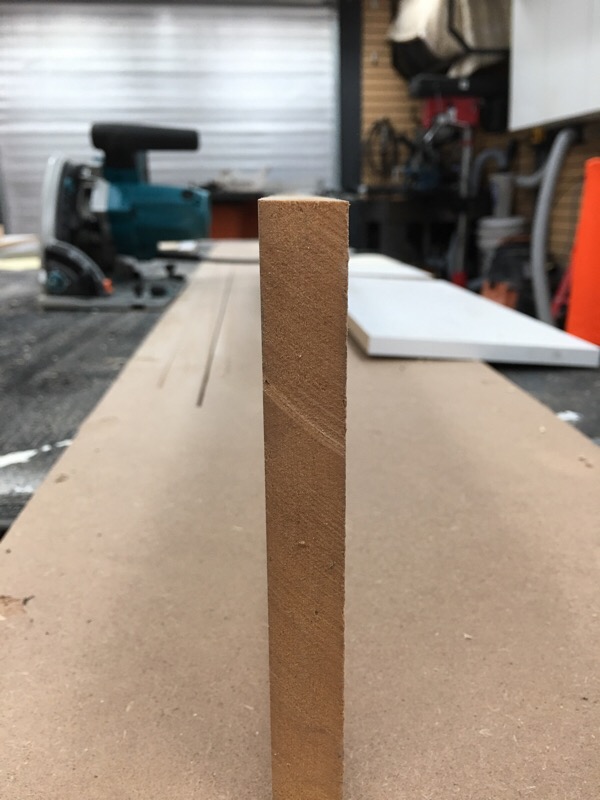
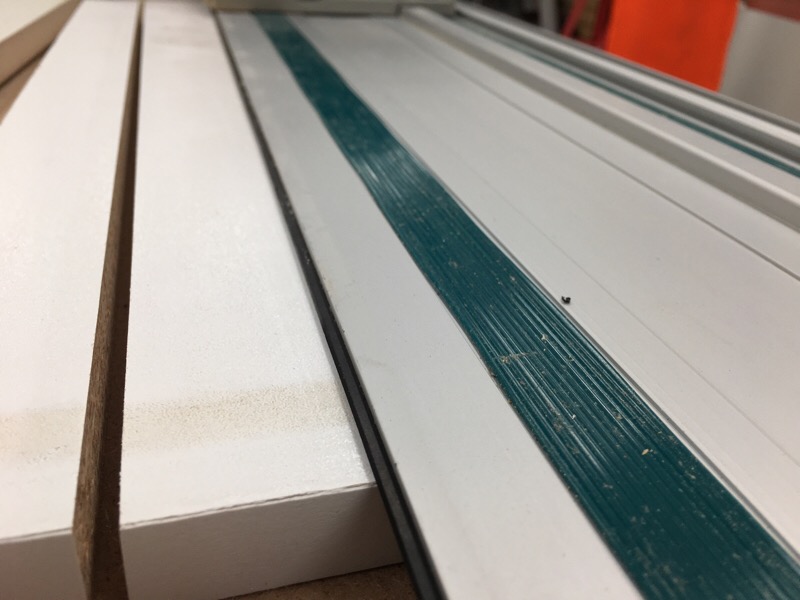
A few test cuts on some scrap melamine show that the stock blade, set up properly, provides pretty much perfect cuts. The edges are sharp (don't slide your finger down these!), clean and laser straight.

track13.jpg


track14.jpg


track15.jpg


This is the first panel cut with the track saw, and test fitted after using the "tick stick" method (a few posts back) to transfer the irregular shape to the material. It was ridiculously easy cutting with the Makita track saw! Dust is pretty much zero with my small Dust Deputy cyclone setup. Cutting the panel took only about 5 minutes once marked out using the tick stick template I made a few days ago. Fit was perfect..no adjustment required.

track16.jpg
 
Last edited:

drivesitfar

Well-known member
Joined
Oct 23, 2013
Messages
36,075
Location
Pacific Northwest
WOODY: very happy to see that not only your Makita finally arrived, but that your tick stick worked.

also not sure how you put words and arrows on your pictures (did you do that with MS PAINT or do tell?), but you seemed to figure out how to make a new good tool even better. WELL DONE!!

looking forward to all the progress cause i know you don't want 20+ sheets of plywood cluttering up your garage or your girl's dance floor.

cheers and good luck
 
OP
D

Denwood

Well-known member
Joined
Sep 22, 2014
Messages
4,219
Location
Thunder Bay, Ontario, Canada
1/2, from what I've read, the Dewalt, Makita or Festool are miles better than a circular saw when using a good blade and properly set up. Using one for one night, I just wish I'd grabbed one sooner. Accuracy, speed and dust management are three compelling reasons to own one.

Drives, for efficiency, all pics I take are generally done on iOS..captured with whatever flavour of the month iPhone I'm using. Those pics were taken on an iPhone 6s plus, an app called Phonto used to add the text and graphics (simple and powerful!), Resize Image to resize them, and FTPOnTheGo to upload. I've been using that workflow more or less since day one.

I was holding back a bit on anything involving sheet goods, so at this point we're back in business. There's two work surfaces to finish in the basement, and a torsion box worktable to build. Then of course trim in the laundry/computer/kitchen basement area..and the theatre demo to tackle.
 
Last edited:

starckie

Well-known member
Joined
Apr 15, 2013
Messages
53
Location
Central PA
Dennis, would you say that the 118" track is worth the nearly $200 premium over buying a second 55" track and a connector kit?
 

JohnnieMo

Well-known member
Joined
Nov 25, 2014
Messages
1,175
Location
Calgary, Alberta
Woody,

Thanks for the quality review on the track saw. Up until now I'd never even heard of a track saw. Now it is on my backlog of things to buy. Sigh.... this thread should require some sort of Credit Card activation :)

Also thanks for the Phonto recommendation. I always appreciate your diligence in how you explain your process with photos. You must have written a user manual or two in your day. I've been struggling to find a good iPhone based photo editor and image hosting. I will start using Phonto for sure. In fact I've already got it installed!

For hosting, I just email to photobucket and my iPhone will prompt me to resize when it sends the email. Or otherwise I use Tapatalk directly and it will resize also.

Hey, it works!
54bdd656aa83023a7dbd194325a6de1a.jpg
 

Attachments

  • 54bdd656aa83023a7dbd194325a6de1a.jpg
    54bdd656aa83023a7dbd194325a6de1a.jpg
    352.7 KB · Views: 0
Last edited:
OP
D

Denwood

Well-known member
Joined
Sep 22, 2014
Messages
4,219
Location
Thunder Bay, Ontario, Canada
Starckie, I was considering the two shorter tracks and connectors, but my experience with a joined straight edge deterred me from doing this. When working in a small shop with sheet goods, anything 9 ft long is a pain. So having both is just convenience and speed as I don't need to constantly join and separate the pieces. If portability is an issue..definitely choose the two shorter tracks as 118" is nearly 10 ft long!

Johnnie, you'll like Phonto. The hot tip with Phonto is to insert symbols separately from text ( you can rotate, move and resize arrows) and the other is to select a text block, choose "Style" and "Background". When using white letters I choose a black background, than adjust the "Alpha" slider to adjust opacity. You can play with this so your text is always readable. I'll have to play with your image flow as the FTP thing is a bit tedious..mostly as I rename images to make the thread composition easier.

Somehow I knew I'd be hearing from you on this tool :) Every time I have to wrestle a 4x8 down to size I've been muttering under my breath about getting a track saw. With all the work I have to do, I'm honestly a lot more motivated knowing sheet management just got a lot easier. The dust issue with a conventional circular saw and straight edge in a small shop in winter (and you know my pain!) is enough to warrant a track saw. It seems that a single 4' cut is enough to fill the entire shop with airborne dust using the circular saw with no dust management. Lately, if a tool does not have integrated dust management, I don't buy it.

Oh, and tell "Goose" I dig his shades :)
 

JohnnieMo

Well-known member
Joined
Nov 25, 2014
Messages
1,175
Location
Calgary, Alberta
If you post from Tapatalk on an iPhone or iPad, then the Tapatalk method is hands down the best.

Photobucket is only good when posting from a PC. However the resizing can be done through the Mail app on your iPhone. You just email them to your photobucket account and you are prompted for a resize. Only downside is it maxes out at about 6 images per email. (it makes me miss my Blackberry which did this far better)

I'll pass on your regards to Goose.
 
OP
D

Denwood

Well-known member
Joined
Sep 22, 2014
Messages
4,219
Location
Thunder Bay, Ontario, Canada
Johnnie, I'll have to try out the Tapa method. One of the nice things about hosting my own images is that anyone can see them, even if not logged in on the forum...and they are always full size. Does Tapatalk let you do this?

Sub, the cuts literally are sharp. Handling the freshly cut stock warrants caution in letting panels slide through one's hands.

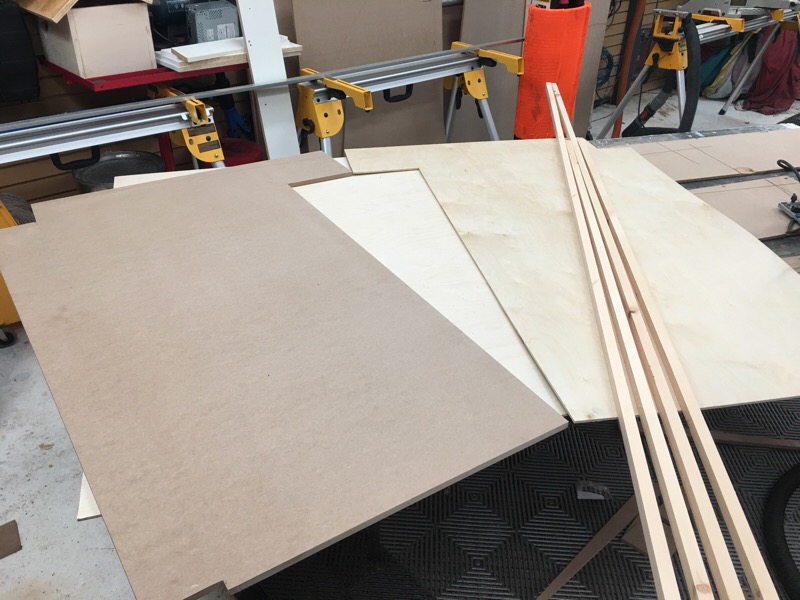
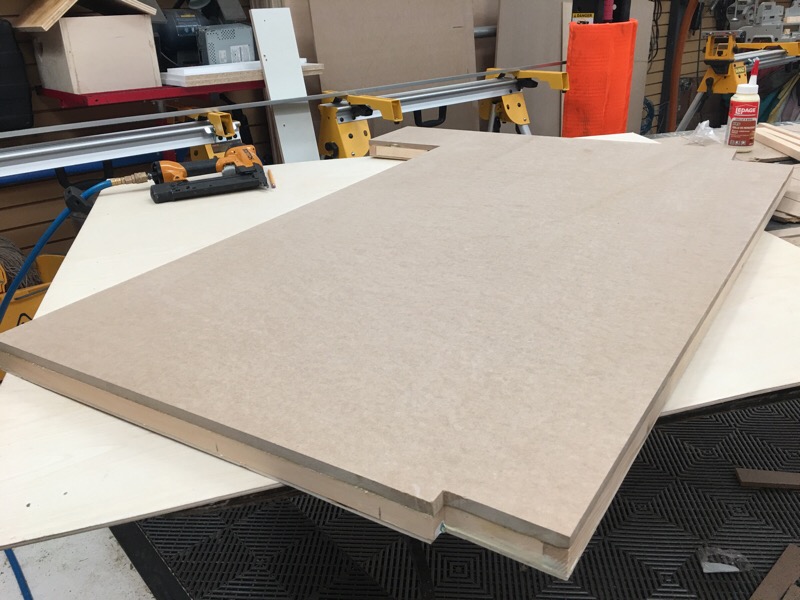
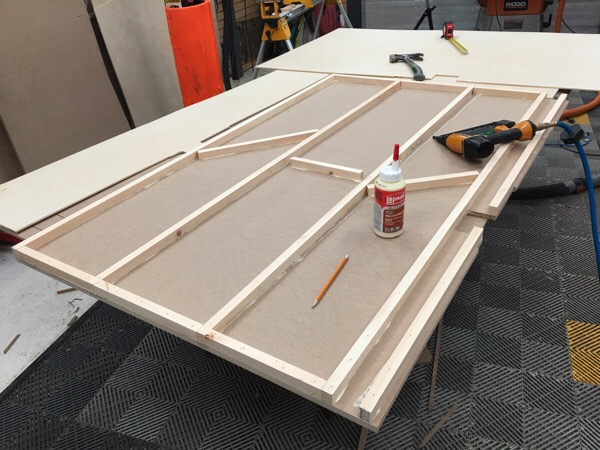
I started the torsion box experiments with the laundry work area. It needs to be in two sections as there is a support post in the middle of the 10ft span. This is section one to match up with the piece I last posted. I decided to try 1/2" MDF for the top, 1/4" Birch ply for the bottom and clear pine ripped to 1" for the interior ribs. Standard wood glue, and the air nailer made quick work of this unit. The cuts on the table using the track saw were very quick and easy. This weighs about 30lbs and seems crazy stiff. We'll load test it tomorrow.

martorsion2.jpg


martorsion1.jpg


This will be finished with white laminate and birch trim.
 
Last edited:

JohnnieMo

Well-known member
Joined
Nov 25, 2014
Messages
1,175
Location
Calgary, Alberta
Johnnie, I'll have to try out the Tapa method. One of the nice things about hosting my own images is that anyone can see them, even if not logged in on the forum...and they are always full size. Does Tapatalk let you do this?


Tapatalk hosts the images for you, not the forum itself. I'm not sure what their limits are on hosting. I've never hit the limit. However for $5 / year or $15 / lifetime they will host an unlimited number. They show up for everyone, regardless of login. They also appear to work behind company firewalls, as that is a limitation of some of the cheap hosting sites.

To add a photo you just click on here and the image is loaded and resized to your preference wherever your cursor is.

732f5f79361081490f2df10d63cec843.jpg

I usually just use 640x480. That's usually enough. But you can pick a bunch of sizes. The viewer sees that size.

One of the best features is when you are just reading any forum they are presented in the same style. Further, images are scaled to fit the screen size of whatever device you are using. This is unlike a browser where the images can stretch off screen. So even if you (or anyone else) uploads massive images, they are scaled to your iPhone for easy viewing.

I think my love of Tapatalk is now effectively communicated. Back to garaging.
 

Attachments

  • 732f5f79361081490f2df10d63cec843.jpg
    732f5f79361081490f2df10d63cec843.jpg
    159.6 KB · Views: 2
Last edited:

txusa03

Well-known member
Joined
Sep 16, 2011
Messages
479
Nice saw and work. Do you know if the track is compatible with any of the Makita cordless saw?
 
OP
D

Denwood

Well-known member
Joined
Sep 22, 2014
Messages
4,219
Location
Thunder Bay, Ontario, Canada
Johnnie, thanks for that :)

Tx, as far as I know their cordless saws would not work on that track.

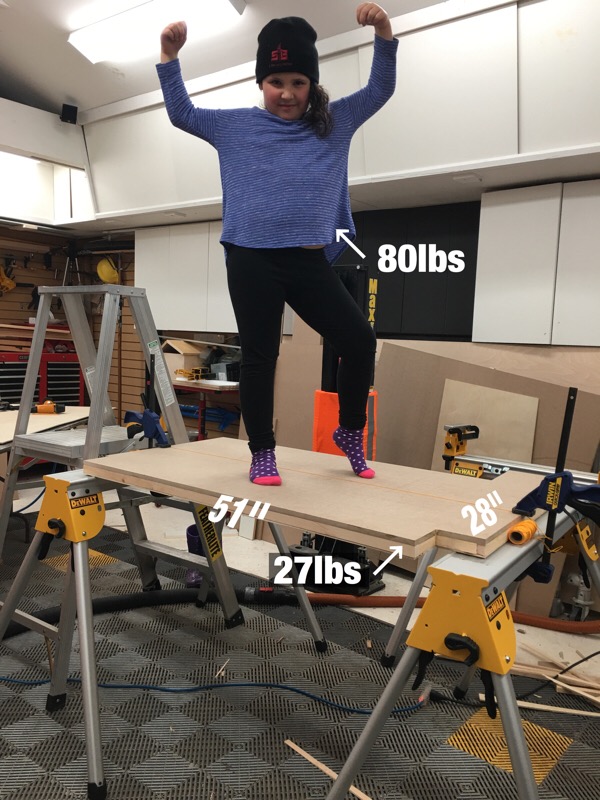
There's not a lot of information out there in terms of torsion boxes, how much they weigh, and how much they support. So as I build various iterations I'm going to report back on various build methods, thicknesses, sizes and weights. (Perhaps fire up a torsion box thread?) My trusty load tester will be helping out with standardised testing :)

This box is made with 1/2" MDF top, 1/4" birch ply bottom, and 3/4" thick pine ribs, ripped to 7/8" in height. The overall section is 1 1/2" thick. Including the edges, there are only 4 ribs running the length of the counter top. Actual span between the horses is 45".

martorsion3.jpg


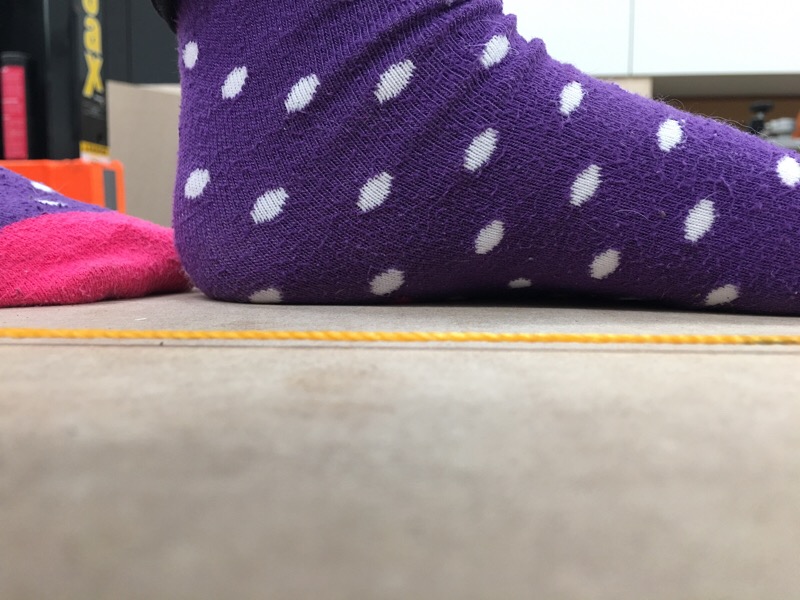
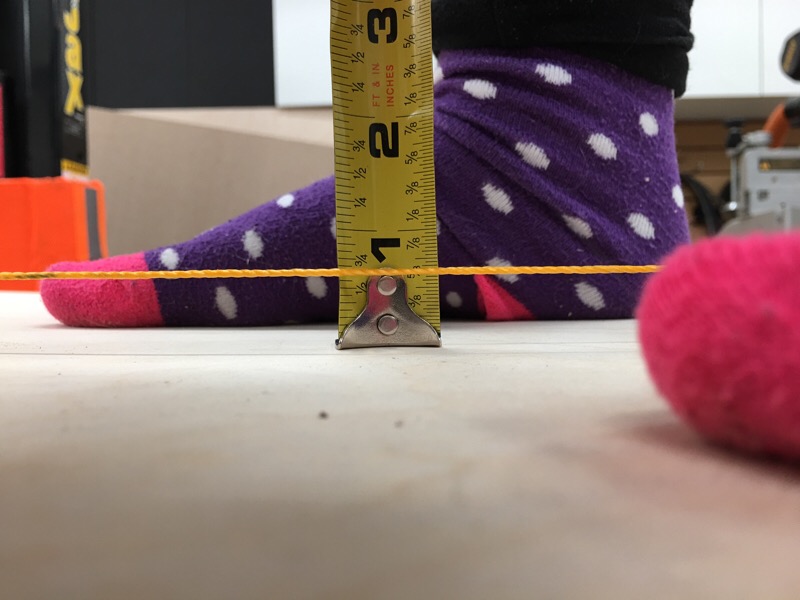
With my 80lb tester standing amidships, we're at about 1/32" deflection in the middle. I'd say that's a pretty decent strength to weight ratio!

martorsion4.jpg


This is the same test (80lbs in the middle) but with the 1/2" MDF and 1/4" ply just laying across the sawhorses..no ribs or separation between the skins. You can see there's over 5/8" deflection.

martorsion5.jpg


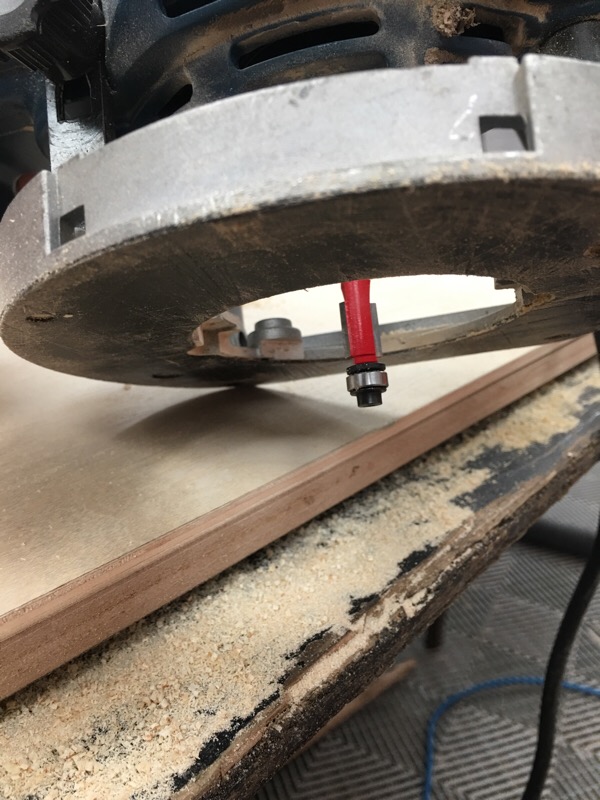
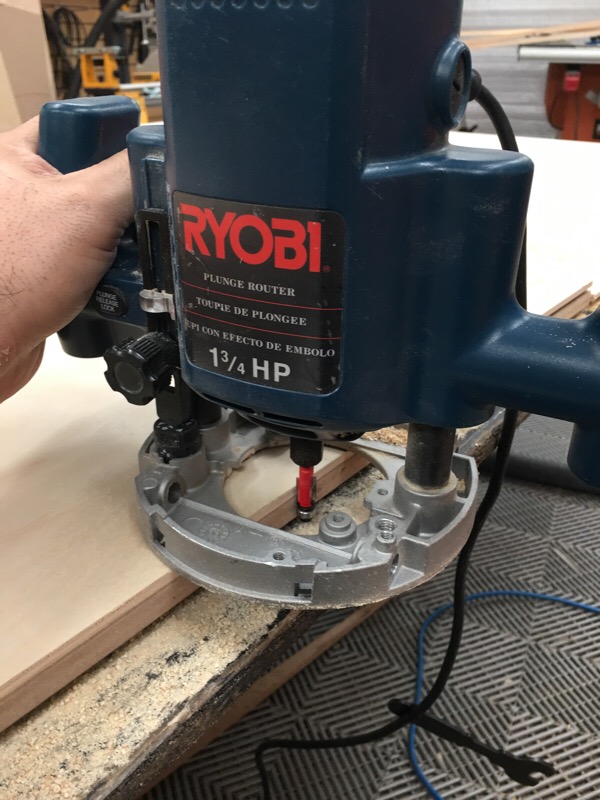
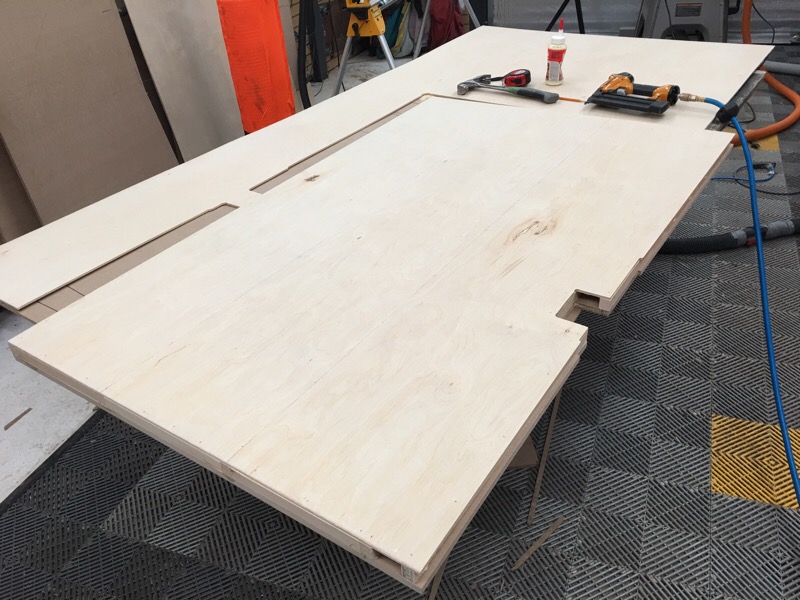
This is the second section of the 10ft counter. Rather than tracing out the bottom sheet and cutting it with the track saw, I found it a lot quicker to just use a trim bit in the router. Thus the MDF (cut using the tick stick template, then track saw) was the pattern for the bottom skin. This makes matching the bottom skin to top skin super quick...1-2 minutes, and dead accurate.

martorsion6.jpg


martorsion7.jpg


The 2nd counter section is constructed the same as the 1st, but it's larger. I used 1 1/4" brads to nail from the top of the ribs, making assembly simple and quick. Nothing fancy for adhesive, just the typical yellow wood glue. Once the ribs were air nailed into the MDF, I just ran glue, popped the 1/4" birch ply and tacked that in place. Simple and quick. We'll test this section tomorrow :)

martorsion8.jpg


martorsion9.jpg


These are so strong and light, I'm questioning even trying the 2" 100 psi foam I had ordered for a work table core as these will require epoxy, and 3 days of cure. Wood glue and pine is fast, simple and cheap.
 
Last edited:

bj383ss

Well-known member
Joined
Sep 29, 2011
Messages
3,166
Location
TX
Torsion boxes look great Dennis. Honestly that is very few ribs inside there most of the ones I have seen have almost double that amount of ribs in both directions.

And if you did that I bet you would have no deflection at all. The workbenches I have seen made with torsion tops make 6" square spacing between the ribs so you can imagine how strong that would be. I am curious to see what the foam core would be like as you said it would be nice and light.

Bret

And now I have a track saw on my wish list. My main purpose is just for the dust collection aspect. I really like the Grizzly one.
 
OP
D

Denwood

Well-known member
Joined
Sep 22, 2014
Messages
4,219
Location
Thunder Bay, Ontario, Canada
Bret, there is a YouTube vid covering a fellow who "hacked" the Grizzly saw to address any issues that have been raised in reviews:
It's worth a watch :)

I am looking to do a decent cross cut sled for the tablesaw like you had posted. It makes the odd crosscut doable accurately rather than hauling the chop saw out.

My theory on the torsion box is that adding more cross pieces, and tightening the grid will do less for total flex, and more for top skin rigidity. I will do the next iteration with more webs, and another that is simply thicker. Separation of the skins distance, and the ability of the bottom skin to resist tension, top skin to resist buckling, should factor in large here for the tests I'm doing. I read over some tech data, and also looked at failure modes for glass/foam sandwiches on hydraulic "bend to fail" tests. Either way, there will be decent data on home built torsion box assemblies that doesn't seem to exist right now :)

Because these counter sections are for laundry (light loads) I wanted to build the most conservative (light) torsion box sections first, to get an idea of strength to weight. Now as we dial things up, there will be a reference to see if all the extra effort is warranted in every case. I have a compter desk that I want to clear span six feet. This one will be 2" thick, but again fewer ribs, to see how extra width helps with rigidity.

It's worth noting that these boxes have turned out very flat..despite being built on a table with zero attempts at leveling. The table is a 4x8 piece of 3/4" pressure treated ply, stored outside, and support with two inexpensive folding table legs screwed to it. The crate material from the 118" track is sitting on that table as a sacrificial cut surface. Again, I'm starting simple and fast to see how things turn out.

A thickness planer to match plane all the ribs to exact height would be nice...
 
Last edited:

drivesitfar

Well-known member
Joined
Oct 23, 2013
Messages
36,075
Location
Pacific Northwest
Woody: i'm not exactly sure why you are building shelves or bench tops like this, but always fun to check in on you and see you and your kids having fun. so tell me is that your daughter's first table dance?

just kidding, but she and your other daughter do a lot of dancing in your garage so keep an eye on them. also i'll have to get you the application form i had somewhere for the boys to fill out if they wanted to date either of my daughters.

i think the first question was something like if you know the price of a hotel room's hourly rate you better stop filling in the paperwork and move on. or if you own a van you do know i own a shotgun and with ammo so expensive these days a warning shot will not be fired. those are just a few i recall. you've still got a ways to go and your girls seem pretty well grounded, but something happens to girls at 12-15 and boys at 15-18 that still as yet can not be explained and might not ever be.
all your work is over the top as usual. i'm not quite sure what the routering did so if you have a picture where the parts went together or an after picture that maybe i didn't see (yes i need glasses) that would be great. BTW does your router have a port to use with the dust collector?

cheers and have a great Friday and weekend.
 
OP
D

Denwood

Well-known member
Joined
Sep 22, 2014
Messages
4,219
Location
Thunder Bay, Ontario, Canada
Drives, that router is over 10 yrs old...and no dust collection :) Because you need a top skin, and matching bottom skin for a torsion box, you have a few choices. Remember my shapes are quite irregular. You can cut them together, but this means a mistake might toast two sheets of material. I laid out the MDF with my "tick stick" template, then cut with the track saw. Then I took the MDF and test fit it in the basement laundry. So back in the shop, the question was..how do I quickly reproduce the MDF sheet shape onto the 1/4" ply skin? Clamping the 1/4" stock onto the MDF "template", I just ran the perimeter with the router trim bit. The bearing on the trim bit tracks the MDF..and cuts the ply exactly to size.

You apply laminate in much the same way. Overhang edges, then trim exactly to size with the router trim bit.
 
Last edited:

drivesitfar

Well-known member
Joined
Oct 23, 2013
Messages
36,075
Location
Pacific Northwest
Woody: so you are cutting both edges in one cut and you inset the 1 or 2 inch board a bit so you'll have plenty or room to trim?

If that's not right don't worry about explaining it more to me cause it's been a few days since i've had a good night's sleep so i'll figure it out.

i'll also delete the table dance and fatherly advice if you want me to and just my kind of humor that some don't always get. i love your kids that always seem to be smiling and you can tell they love you. mine smile when i feed them as in this picture of last week after i hit some golf balls with my 26 year old.

also in case you want to see a cool garage 50x80 and help a member that has some issues trying to post pictures maybe you or one of the other members reading your thread can and here's Walt's link to his new pole barn.

http://www.garagejournal.com/forum/showthread.php?t=338496
 

Attachments

  • WP_20170306_010[24788].jpg
    WP_20170306_010[24788].jpg
    133.9 KB · Views: 36
Last edited:
To avoid these ads, REGISTER NOW!
Top Bottom