To avoid these ads, REGISTER NOW!

Between 265 & 485 SQ/FT Woody's Works Garage

Workspaces sized between 265 and 485 squarefeet.
OP
D

Denwood

Well-known member
Joined
Sep 22, 2014
Messages
4,305
Location
Thunder Bay, Ontario, Canada
Bob, yes, the kitchens I see on many of the design shows are quite excessive for sure. It seemed like we had no space in the old setup, due I think to the lack of pullouts. Now there are two larger drawers more or less empty and still plenty of room in the upper cabinets. We have zero need for anything larger as a family of four.

I’m a big fan of Sarah Suzanka’s books: https://susanka.com/not-so-big-house/ ... so much so that my wife brought me a 3 book set a few years back. It’s a basic concept of more efficient design combined with a higher quality, but smaller footprint.
 
To avoid these ads, REGISTER NOW!
OP
D

Denwood

Well-known member
Joined
Sep 22, 2014
Messages
4,305
Location
Thunder Bay, Ontario, Canada
Honda CRV 2003 Service - 188 000 km

My daughter's 03 CRV has been seeing some issues of late. Cold starting was not happening, and occasionally under part throttle it was bucking like an angry horse. It sounded like a MAP sensor issue so I figured I'd haul it out of the -25C cold into the shop and check on a few things.

1. Remove and clean the the MAP sensor with MAF sensor cleaning fluid.
2. Replace the air filter (old one was not so bad).
3. Replace the spark plugs
4. Check over the top end for vacuum leaks etc. (none found).
5. Load test and replace the battery if required. (it failed)

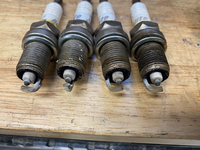
We've had this CRV since new in 03, and it's been relegated now as our third vehicle for my eldest, a new driver. It has been going through oil, particularly when hot, although power etc. is fine. I've suspected the valve seals (hard to believe it's a ring issue as we've had it since new, and I've always run synthetic with scheduled maintenance etc) and I believe the plugs tell that story. It looks like atomised oil has been combusting and leaving those white deposits. Thoughts boys?

IMG_7370.jpgIMG_7374.jpg

In any case, after replacing the battery (over the counter free replacement) and buttoning things back up, it looks like the bucking bronco has been tamed :) After a few test drives, it seems like good behaviour has been restored.

Back to the kitchen for some filling/sanding and touch up paint...

filling_tools_2022.jpg
 

drivesitfar

Well-known member
Joined
Oct 23, 2013
Messages
36,191
Location
Pacific Northwest
Since I’ve owned 5 Honda CRV’s and had a 2005 since new until last August with 195,000 miles I’ll give you my two cents.

At about 130,000 miles our 2005 starting burning about a quart of oil every couple thousand miles. Not one leak on garage floor or driveway. I just added oil as needed until a friend of mine that is a retired Honda dealer’s tech mentioned one solution might be to use heavier oil so instead of synthetic that I used since day one we changed to regular 30/10 I think or 30 weight instead of synthetic. It slowed the burning down quite a bit but not to zero. We had the timing chain slip so with 195,000 and new engines market at all time high we just bought a new RDX. I really wanted to install a new engine cause the CRV was still in great shape. I’m not sure why chain slipped so that’s in your court but maybe changing to regular oil might help.
 
OP
D

Denwood

Well-known member
Joined
Sep 22, 2014
Messages
4,305
Location
Thunder Bay, Ontario, Canada
Thanks Drives...I'm pretty sure we started burning oil right around that time too. I did replace the timing chain, and in retrospect, that would have been the time for oil seals. The old girl is about done anyway....20 years old now.
 

drivesitfar

Well-known member
Joined
Oct 23, 2013
Messages
36,191
Location
Pacific Northwest
I bet with it in your care that old CRV will last as long as your little girl wants to drive it and without a ton more time and money invested in it. Good to hear your timing chain was replaced.
 

Bob Heine

ALLIANCE MEMBER
Joined
Oct 24, 2009
Messages
10,716
Location
Boca Raton, Florida
I've suspected the valve seals
Dennis, if it's the valve seals the car will blow a good size puff of blue smoke upon startup but won't smoke while running at normal temperature. I had the problem with my Corvette and the job was pretty simple. Had to removve the valve covers, rocker arms and then the valve springs. Replaced the valve springs "while I was at it." With your CRV I suspect it's a lot more complicated. Without spending a fortune on special tools, you may want to just remove the head and take it to a shop. When I say "just remove the head" it's a non-trivial job for your engine. Your engine has a couple of chains, sprockets and cams that have to be moved out of the way before the head can come off (not to mention intake and exhaust manifolds).
Honda Valve Seals.jpg
 
OP
D

Denwood

Well-known member
Joined
Sep 22, 2014
Messages
4,305
Location
Thunder Bay, Ontario, Canada
Bob, I replaced the timing chain a year or two back and that was not a fun job :-(. I may just keep adding oil. There are a few tools out there to allow seal replacement in the car, but you're removing cams etc to do it. I've had the intake manifold off as well, to replace an alternator...It's not a fun engine to work on at all. Given its age etc, I'm not sure it's worth doing.
 
Last edited:

Bob Heine

ALLIANCE MEMBER
Joined
Oct 24, 2009
Messages
10,716
Location
Boca Raton, Florida
Dennis, adding oil sounds like a better approach. Just like the V8 in the Corvette, you've got to do 16 oil seals and hope nothing goes wrong (like a valve dropping).
 
OP
D

Denwood

Well-known member
Joined
Sep 22, 2014
Messages
4,305
Location
Thunder Bay, Ontario, Canada
Bob, I watched a technique lowering rope into each piston and raising each piston to keep the valves in place..ya, way too much work given 16 seals and a 20 year car that isn't so cool.

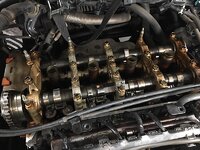
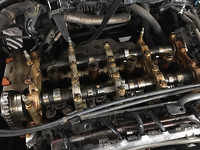
This was the head in 2018 when I did the chain...pretty clean in there for a 2003...

crvtimingchain1.jpg
 
Last edited:

Bob Heine

ALLIANCE MEMBER
Joined
Oct 24, 2009
Messages
10,716
Location
Boca Raton, Florida
Dennis, that's what I did. I have the air hose adapter to pressurize the cylinder but knew I'd knock a quick connect loose. The rope trick at top dead center is old school and works great. I do use braided rather than twisted rope.

Those valve springs look uncomfortably close together.
 
OP
D

Denwood

Well-known member
Joined
Sep 22, 2014
Messages
4,305
Location
Thunder Bay, Ontario, Canada
Bob, thanks for that :) It looks like there are a few companies making the valve spring compression tool for the K20 Honda engine so I just may take a look at doing the work.

The kitchen crown and trim is 100% done, filled and painted. The boss is also very happy :)

One detail I missed is around the the IKEA (Blum acutally) 110 degree hinges allowing cabinet doors to swing beyond 90 degress and hit adjacent side walls, and more importantly, the range hood. I took a bit of a gamble and ordered up a 10 pack of tiny hinge restrictors which I was hoping would work with the IKEA utrusta hinges (with built in dampers). These are made by BLUM for IKEA, and they call their version "blue motion". There was zero out there on there on the interwebs to confirm that the IKEA Utrusta 110 degree clip on (with dampeners integrated) hinges would work with the Blum 70T3553. They do :) You can order the hinges for $14 a pair from IKEA, so this might be a hot tip for someone wanting to save a few bucks on Blum Blumotion 110 degree hinges.

The part is BLUM 70T3553 and the 10 pack I ordererd via amazon, B07GLZMCQB.

These parts are super tiny, but they work extremely well to restrict door movement from 110 to 87 degrees. They tuck in behind the hinge (you have to remove the door first!) and snap in place.

blum_70T3553.jpg

Part slides in behind hinge as per these instructions:

70T%20install.jpg

Partly slid into place:

blum_70T3553_with_IKEA_Utrusta_hinge.jpg

And this is the door now restricted to 87 degress so the glass is not in further danger of collision with the vent hood!! Before the restrictor was added, the door glass would make contact with the metal range hood with breakage a real concern. I ordered 10 pairs so installed them on the doors adjacent to the hood and walls. Problem solved :)

restricted_IKEA_hinge.jpg

The Utrusta 110 degree clip on hinge with integrated soft close: https://www.ikea.com/us/en/p/utrusta-hinge-w-b-in-damper-for-kitchen-80524882/

10 pack of clips: https://www.amazon.ca/dp/B07GLZMCQB/?tag=atomicindus04-20
 
Last edited:

Matias

Well-known member
Joined
Feb 28, 2015
Messages
616
Location
Finland
Good that your done with the crown and the filling, I must admit at least I do not especially like those jobs.

It's always nice if the repairs are simple and not too expensive, related to taming the CRV bucking and startup. For the oil consumption, I suspect there are no easy repairs. My opel is going through a quart every 500 miles nearly, but I thought it could be the rings. I read that you could try pouring diesel from the spark plug holes, and leaving it there for some time. If it goes faster through one, then probably there's some issues with the rings. Add the diesel again, and it's just supposed to remove gunk. Ofcourse one would drain the oil at the beginning and let any diesel going through come out. Then remember to remove any possible diesel on top of the cylinders, and add fresh oil, maybe run a little / short distance and change oil again if worried. I think I might try that with the opel I don't manage to sell it first.

But, at that point I would probably just add oil. Currently I've been adding oil for two years 10k miles. Sure, the oil consumpion has increased, but it still works :D

PS. That hinge stopper must be a life-saver regarding the door glass. Such a small piece but difficult to make on your own, and such a help.
 
OP
D

Denwood

Well-known member
Joined
Sep 22, 2014
Messages
4,305
Location
Thunder Bay, Ontario, Canada
Good that your done with the crown and the filling, I must admit at least I do not especially like those jobs.

It's always nice if the repairs are simple and not too expensive, related to taming the CRV bucking and startup. For the oil consumption, I suspect there are no easy repairs. My opel is going through a quart every 500 miles nearly, but I thought it could be the rings. I read that you could try pouring diesel from the spark plug holes, and leaving it there for some time. If it goes faster through one, then probably there's some issues with the rings. Add the diesel again, and it's just supposed to remove gunk. Ofcourse one would drain the oil at the beginning and let any diesel going through come out. Then remember to remove any possible diesel on top of the cylinders, and add fresh oil, maybe run a little / short distance and change oil again if worried. I think I might try that with the opel I don't manage to sell it first.

But, at that point I would probably just add oil. Currently I've been adding oil for two years 10k miles. Sure, the oil consumpion has increased, but it still works :D

PS. That hinge stopper must be a life-saver regarding the door glass. Such a small piece but difficult to make on your own, and such a help.
Matias, I'd agree 100% on the trim comment. That said, the Milwaukee airless nailer, crown cutting jig and activated CA glue actually made the job pretty easy :) Filling/sanding/painting is my least favourite.

I had a few small filler strips to sort and I must admit that the CA glue/activator was super handy there too. It's now part of my "essential" kit.

The CRV goes through nearly zero oil in the cold weather, but when it gets to +30C, it's noticeably more. There has never been smoke while driving so after seeing the plugs (which clearly show powdery-white residue of atomised oil burning in the cylinder) I'm about 95% sure the issue is valve seals. There are no cooling issues (no gasses, no leaks) so the head gaskets are fine.

I tried making my own spacers for the hinges, but this is one task where the correct part (or a very accurate 3D printed part) is required. Forces are quite high at the back of the hinge, so the part needs to fit 100% accurately or it will just crush. To be honest, the first set I ordered (just two) were destroyed in 1 second because I didn't look at the install directions first. It's about impossible to figure out how they go in unless you look at their installation diagram, as 90% of the tiny part is hidden when installed correctly.

After filling/sanding and touch up paint...the trim looks about perfect :) The paint is a custom colour match in semi gloss Benjamin Moore "Regal Select" which is nearly perfect when compared to IKEA's BOBDYN off-white factory finish. For any white trim, I use PPG Breakthrough which is not cheap, but is an outstanding product for both spray and brush applications.

IMG_7384.jpg

IMG_7383.jpg
 
Last edited:
OP
D

Denwood

Well-known member
Joined
Sep 22, 2014
Messages
4,305
Location
Thunder Bay, Ontario, Canada
Some shop time again, but this time with a snowblower needing some attention. I bought a Toro 1128 Power Drive snow blower back in 2013 which has been used quite a lot as I do our driveway, back lane, and a few other driveways for some retired neighbours.

If you have a snowblower, stop reading now...remove your snowblower wheels and slather some anti-seize on the axles...ha. More in this post on that topic. Every spring I spray on anti corrosion spray, (Rust Check usually), change the oil etc. but I haven't done much "under the hood" aside from drive/shift mechanism lubrication, and minor adjustments as the blower has been fine mechanically. We've had a ton of snow this year and I noticed that the auger drive was slipping a bit. Figuring it just needed a belt, the small project turned into a much larger one.

1. The main pulley/auger drive bearing had noticeable play, as did the auger bearings at left and right of the auger itself. To my surprise, these are not bearings...they're bushings. I guess bushings hold up better at these lower speeds in snow/salt, however none of them have grease zerks which I figure would make them lifetime parts if lubed regularly. I'll be adding these.

2. One wheel came right off, the other was stuck solid to the axle. After removing the offending wheel/axle, there was no budging it after a few days of heat/penetrating oil and pounding. A local machine shop pressed it off with their 50 ton press...it took 20 tons to budge it!

So now to wait for the belts, and bearings to arrive so I can install zerks and get things running. I'm also going to install some LED lights to replace the rather tired/dim 12V 18W old school light on there.

The motor and auger sections needed to be separated:

IMG_7415.jpg

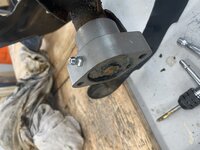
The main auger pulley was a pain to remove. Gentle pressure with this puller, repeated heat cycles, penetrating fluid, and gentle hammering on the puller bolt eventually did the trick. This is the pulley that drives the auger...and behind it is the offending bearing.

IMG_7414.jpg


This is the main auger bushing (that you can remove after the pulley is off) after about 9 years of use. Not terrible, but certainly clunky in operation with that extra 1/16" or so of play. The steel shaft is in perfect shape.

IMG_7418.jpg

With that bearing off, I was able to remove the auger assembly in a few minutes. I'll touch up paint etc. while everything is apart. The regular Spring spray with Rust Check etc. has helped keep rust at bay, but there is still some bare metal/rust to deal with. Our roads see a lot of salt/sand in the winter so the large snowbanks at the end of our driveway and back lane are full of salt/sand.
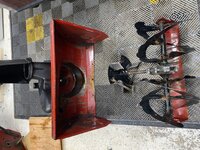
IMG_7416.jpg

At the right and left sides of the auger, there is another set of bushings, again with no grease zerk. These are not as worn as the main drive bearing, but I'm going to replace them and add zerks as well so I can pack grease in the end gap area. The factory put grease here, but there is no way to add any unless zerks are installed. These would be "lifetime" parts with a few squirts of fresh grease every year.
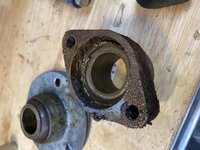
IMG_7419.jpg

Finally, I tried with heat/pounding/penetrating fluid for a few nights to remove this wheel from its axle, but it was not budging. I removed the axle/gears from the machine to make things easier, but it was not moving an iota. A local machine shop pressed it out for me today in a few minutes, requiring 20 tons of pressure on a 50 ton press to remove it! This is one of those jobs that can **** a lot of time if you try and DIY it, even with a press at home.
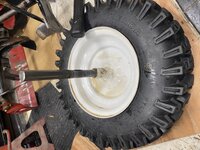
IMG_7420.jpg

I should have been removing the wheels and applying anti-seize at least yearly, so will need to start doing this as part of the spring maintenance.

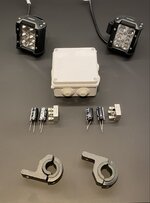
Now to wait for parts. I'm adding two 1260 Lumen LED lights so have ordered up some rectifiers and capacitors to convert the 12V AC 18 watt OEM light to DC for the LEDs. Our back lane is not lit, and the OEM light is quite dim...so this setup should be a lot better. The OEM light is maybe 200 lumens new. The new LED setup will be about 2520 lumens, so about 10x brighter.

-af95-65048da0bd0f.__CR0,0,300,400_PT0_SX300_V1___.jpg
 
Last edited:

jonshonda

Well-known member
Joined
Jul 17, 2017
Messages
4,755
Location
Wisconsin
I criticized the use of bushing instead of bearings as well, but the Ditch Witch mini skid steer (sk650) that I use to build trails uses bushings everywhere, and doesn't have a single grease zerk. The place that services it is a rental company, and they said there are very few issues with them. Like, close to zero on their rental fleet.
 
OP
D

Denwood

Well-known member
Joined
Sep 22, 2014
Messages
4,305
Location
Thunder Bay, Ontario, Canada
Jon, bushings don't seize like bearings can, so I understand why they use them. That said, adding grease zerks will make them lifetime parts I suspect. The main auger bearing sees the highest rotational shaft speed of any on the mower, so it makes sense it would wear the most.
 

jbfsr

Well-known member
Joined
Mar 17, 2017
Messages
455
Location
Hampstead, Md
Some shop time again, but this time with a snowblower needing some attention. I bought a Toro 1128 Power Drive snow blower back in 2013 which has been used quite a lot as I do our driveway, back lane, and a few other driveways for some retired neighbours.

If you have a snowblower, stop reading now...remove your snowblower wheels and slather some anti-seize on the axles...ha. More in this post on that topic. Every spring I spray on anti corrosion spray, (Rust Check usually), change the oil etc. but I haven't done much "under the hood" aside from drive/shift mechanism lubrication, and minor adjustments as the blower has been fine mechanically. We've had a ton of snow this year and I noticed that the auger drive was slipping a bit. Figuring it just needed a belt, the small project turned into a much larger one.

1. The main pulley/auger drive bearing had noticeable play, as did the auger bearings at left and right of the auger itself. To my surprise, these are not bearings...they're bushings. I guess bushings hold up better at these lower speeds in snow/salt, however none of them have grease zerks which I figure would make them lifetime parts if lubed regularly. I'll be adding these.

2. One wheel came right off, the other was stuck solid to the axle. After removing the offending wheel/axle, there was no budging it after a few days of heat/penetrating oil and pounding. A local machine shop pressed it off with their 50 ton press...it took 20 tons to budge it!

So now to wait for the belts, and bearings to arrive so I can install zerks and get things running. I'm also going to install some LED lights to replace the rather tired/dim 12V 18W old school light on there.

The motor and auger sections needed to be separated:

IMG_7415.jpg

The main auger pulley was a pain to remove. Gentle pressure with this puller, repeated heat cycles, penetrating fluid, and gentle hammering on the puller bolt eventually did the trick. This is the pulley that drives the auger...and behind it is the offending bearing.

IMG_7414.jpg


This is the main auger bushing (that you can remove after the pulley is off) after about 9 years of use. Not terrible, but certainly clunky in operation with that extra 1/16" or so of play. The steel shaft is in perfect shape.

IMG_7418.jpg

With that bearing off, I was able to remove the auger assembly in a few minutes. I'll touch up paint etc. while everything is apart. The regular Spring spray with Rust Check etc. has helped keep rust at bay, but there is still some bare metal/rust to deal with. Our roads see a lot of salt/sand in the winter so the large snowbanks at the end of our driveway and back lane are full of salt/sand.

IMG_7416.jpg

At the right and left sides of the auger, there is another set of bushings, again with no grease zerk. These are not as worn as the main drive bearing, but I'm going to replace them and add zerks as well so I can pack grease in the end gap area. The factory put grease here, but there is no way to add any unless zerks are installed. These would be "lifetime" parts with a few squirts of fresh grease every year.

IMG_7419.jpg

Finally, I tried with heat/pounding/penetrating fluid for a few nights to remove this wheel from its axle, but it was not budging. I removed the axle/gears from the machine to make things easier, but it was not moving an iota. A local machine shop pressed it out for me today in a few minutes, requiring 20 tons of pressure on a 50 ton press to remove it! This is one of those jobs that can **** a lot of time if you try and DIY it, even with a press at home.

IMG_7420.jpg

I should have been removing the wheels and applying anti-seize at least yearly, so will need to start doing this as part of the spring maintenance.

Now to wait for parts. I'm adding two 1260 Lumen LED lights so have ordered up some rectifiers and capacitors to convert the 12V AC 18 watt OEM light to DC for the LEDs. Our back lane is not lit, and the OEM light is quite dim...so this setup should be a lot better. The OEM light is maybe 200 lumens new. The new LED setup will be about 2520 lumens, so about 10x brighter.

-af95-65048da0bd0f.__CR0,0,300,400_PT0_SX300_V1___.jpg
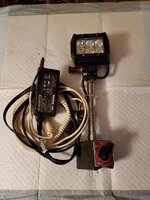
Those lights are really BRIGHT. I have a couple of the same mounted to magnetic bases hooked to a power supply. Use them under the lift and for welding.
 

Attachments

  • 20220302_181535.jpg
    20220302_181535.jpg
    348.1 KB · Views: 15
  • 20220302_181629.jpg
    20220302_181629.jpg
    325.8 KB · Views: 15
OP
D

Denwood

Well-known member
Joined
Sep 22, 2014
Messages
4,305
Location
Thunder Bay, Ontario, Canada
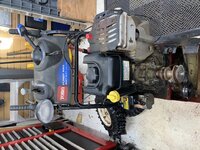
This snowblower "rebuild" project is turning out to be a massive pain. After wrestling with the stuck right axle/wheel issue, and the auger flange pulley, the left axle is solidly stuck in the center axle tube (that both axles slide into internally). You can see I've had to rig a makeshift "pusher" tool using six threaded couplers, and 3 x 3/4" bolts. I'm not sure I've ever killed so much time dealing with just a few parts so my frustration level is high. I'm using a few ball joint removal kit bits along with the DIY pusher tool to try and extract the axle shaft from the tube shown in the 2nd pic below. This part is stuck with parts inside and outside the machine so I can't just remove it and take it to the same shop I took the wheel to (which has a 50 ton press).

IMG_7425.jpg

The tube in the pic below is hollow..and both wheel axles normally slide into it. One side just slid out, but this side..not. I've been alternating heat and penetrating fluid and have moved the axle 1-2 inches with hours invested. I'm sure a shop much just cut these off and source new parts as this is a crazy time kill.

IMG_7426.jpg


The pieces I need to convert the old light to dual LED lights have all arrived so at least that is good to go. I'm still waiting for snowblower parts though. I guess I'll stare at that stuck axle for a few more days...

IMG_7429.jpg
 
To avoid these ads, REGISTER NOW!

jon72vega

Well-known member
Joined
Apr 17, 2013
Messages
3,526
Location
Niles Michigan
This snowblower "rebuild" project is turning out to be a massive pain. After wrestling with the stuck right axle/wheel issue, and the auger flange pulley, the left axle is solidly stuck in the center axle tube (that both axles slide into internally). You can see I've had to rig a makeshift "pusher" tool using six threaded couplers, and 3 x 3/4" bolts. I'm not sure I've ever killed so much time dealing with just a few parts so my frustration level is high. I'm using a few ball joint removal kit bits along with the DIY pusher tool to try and extract the axle shaft from the tube shown in the 2nd pic below. This part is stuck with parts inside and outside the machine so I can't just remove it and take it to the same shop I took the wheel to (which has a 50 ton press).

IMG_7425.jpg

The tube in the pic below is hollow..and both wheel axles normally slide into it. One side just slid out, but this side..not. I've been alternating heat and penetrating fluid and have moved the axle 1-2 inches with hours invested. I'm sure a shop much just cut these off and source new parts as this is a crazy time kill.

IMG_7426.jpg


The pieces I need to convert the old light to dual LED lights have all arrived so at least that is good to go. I'm still waiting for snowblower parts though. I guess I'll stare at that stuck axle for a few more days...

IMG_7429.jpg
Dennis,
You have alot more patience than me!
Good on you for sticking with the repair attempt.
 

Bob Heine

ALLIANCE MEMBER
Joined
Oct 24, 2009
Messages
10,716
Location
Boca Raton, Florida
The tube in the pic below is hollow..and both wheel axles normally slide into it. One side just slid out, but this side..not. I've been alternating heat and penetrating fluid and have moved the axle 1-2 inches with hours invested. I'm sure a shop much just cut these off and source new parts as this is a crazy time kill.
Dennis, if all else fails, those two parts (axle tube and axle) are about $150 US.
1646585571792.png
The two axles are the same part number (107-8898) and are $50.45 but the axle tube (106-7259), which is simpler looking, is $85.16. Of course, because you are in Canada the price will be double that and because of the supply line issues it will be quadruple. I believe your patience will pay off.

On the bright side, the valve seals on the Honda will now seem like a relaxing and rewarding job.
 
OP
D

Denwood

Well-known member
Joined
Sep 22, 2014
Messages
4,305
Location
Thunder Bay, Ontario, Canada
Jon, I have time on my side as I'm waiting for the other parts anyway :)

Bob, you're a champ for taking the time to source the part diagram and parts. You constantly reaffirm my faith in human kind...something we all need to remind ourselves of these days. You're also 100% correct on the parts costs here in Canada. Even the belt for the auger seems to be a 2-3 week wait. The positive side of owning a "name" brand product like Toro or Ariens, JD etc. is that you can actually find the service manual and parts listings for these products, 10 years later, in a few minutes online.

I'm going to take another stab at this and if unsuccessful I will for sure just order the parts and cut the axle off. My neighbour has extended a "borrow it anytime" on his blower, so I already took advantage (snowed a bunch yesterday) and filled up his tank after. Fuel here is up to $1.90 a litre....so about $5.50 US per gallon...so any fuel donations I suspect will bode well :)

Bob, the same machine shop that helped me out last week also mentioned they do a pile of Honda heads. This shop is the go to for cylinder head work in town. I spoke to them on the seals and they were pretty sure it would buy some time, but that the end outcome would likely be a burnt exhaust valve if the guides were also not done. If we were keeping the car (and pretty sure, we're not) I'd likely need to just pull the head and get it over with.
 
OP
D

Denwood

Well-known member
Joined
Sep 22, 2014
Messages
4,305
Location
Thunder Bay, Ontario, Canada
We're still waiting for parts so I figured it was time to sort the light upgrade out. The Toro light output is somewhere around 13V, but it is AC. That works fine for the old bulbs, but the LED lights want DC. In the pic a few posts back you can see the AC-DC rectifier and capacitors (to clean up the DC output) These bits are pretty much right from Youtube posts on snowblower LED light conversions (for older machines) so I won't post details. It's more or less here:


Here is the old light which when new was maybe 200 lumens. It's not adequate if you using the blower at night IMHO.

IMG_7434.jpg

The new lights mounted x 2 (approx 2500 lumens). The clamps were sourced from Amazon.ca : https://www.amazon.ca/gp/product/B07TNH72SG/?tag=atomicindus04-20

IMG_7435.jpg

I fired up the disassembled snowblower for a few seconds to test. The lights pretty much lit up the garage, so for sure will be a vast improvement outside. Start up (cold engine) exhaust made for an interesting visual effect..ha. For about $60 for the lights, mounts and rectifier/capacitors, this is a pretty cost effective upgrade for pretty much any 12V application.

IMG_7436.jpg

I can see why JB (a few posts back) uses these lights for work lights under the hoist, welding etc. They are bright!
 
OP
D

Denwood

Well-known member
Joined
Sep 22, 2014
Messages
4,305
Location
Thunder Bay, Ontario, Canada
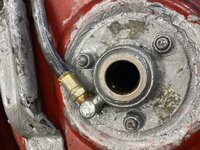
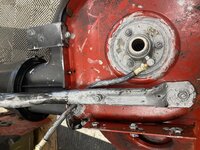
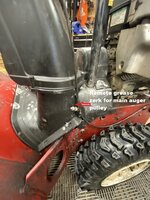
All parts in hand now, so reassembly is the next order of business. I sourced up some grease zerks, a new 1/4" 28 tap, and a solution for a "remote" zerk compliments of a local hydraulics shop. For about $15, they fixed me up with the high pressure hose, right angle adaptor and ends (used commonly on heavy equipment, trucks etc) so that I can grease the main auger bearing without splitting the case. It's hard to get at once installed, so the remote zerk will make it a snap to add a few pumps of grease to the bushing. The OEM setup is just a bushing..no way to grease it.

This is a self aligning bushing, which from the factory has a small bolt to keep it from spinning in the housing. I removed the bolt from the (brand new) bushing, drilled right through the housing and bushing, and tapped it 1/4" 28 for the right angled zerk adapter. This bushing takes the most abuse of any on a snowblower, so it makes sense to make it greasable. The

IMG_7451.jpg

The end of this hose (just out of frame) has the grease zerk fitted. Routing the hose behind the chute support tube ensures it will never contact the spinning main auger pulley :)

IMG_7450.jpg

The main auger pully now back in place with a ton of anti-seize on everything :) By adding grease zerks to the main bearing and auger bearings, this PITA pulley will likely never need to be removed again.

IMG_7453.jpg


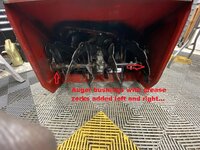
I added zerks to the right and left auger bearings...again, there was no provision to add grease from the factory. These should be lifetime parts now. These bearings support the auger shaft left and right and cannot be removed unless you remove the entire auger assembly. The factory 100% should have these zerks installed during manufacturing but I guess it saves a few bucks and ensures you'll need to replace them every 8-10 years. If I bought a new snowblower, I'd 100% add these when the unit was new, and nothing was rusted/seized/stuck !!!

IMG_7449.jpg
 
Last edited:
OP
D

Denwood

Well-known member
Joined
Sep 22, 2014
Messages
4,305
Location
Thunder Bay, Ontario, Canada
This is the external zerk for the main auger bearing. A squirt or two per season will make this a lifetime part.

IMG_7457.jpg

The auger now sports greasable bushings (close up in the previous post) I changed up the gear case oil (80w90 Castrol) while I was in there.

IMG_7458.jpg

Part 2 in this diagram (Part# 106-4570, BEARING-AUGER) corresponds to the auger bushings which I mod'd with the zerks.

toro_part.jpg

Back together and running very nicely. The auger assembly is running so quiet and vibration-free, the only way I knew it was running is by hearing the motor load up a bit when engaged. The new LED lights are crazy bright too, even in daylight :)

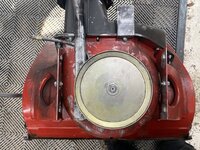
The 342 CC engine (4 stroke) got a fresh fill of synthetic 5w30 oil too. I'll be sure and pull the wheels every year now (so they don't seize again), along with the yearly oil change, and grease work. I've found that the octagonal drive shaft (the friction drive wheel slides on this) does need a yearly coat of low temp grease as it will quickly rust if left alone for even a year. You basically tilt the blower up on the auger housing which makes it super easy to pull the bottom access plate and give the moving bits some grease every year.

On to the next project.

IMG_7460.jpg
 
Last edited:
OP
D

Denwood

Well-known member
Joined
Sep 22, 2014
Messages
4,305
Location
Thunder Bay, Ontario, Canada
Made, thanks for your kind words :)

A replacement (new) TORO with similar specs blower here is in the $2600 range, so for a few parts (and too much time unfortunately) this one is running as good (perhaps better!) than new. We commonly get 8-12 inches of snow and a resulting early morning 2-3 foot snowbank at the head of our 50ft double driveway so I've begun to rely on having a reliable clearing mechanism. The folks in our back lane (a few of them seniors with small cars) have stopped by to thank me for keeping about 300 feet of lane clear too. At 28" (fits through the garage man door) and 11hp, this one is the exact sweet spot for this application so I'm pretty happy to give it another decade or two of life (assuming I'll still be able to buy gas in 10 years, ha). In the midst of winter it's also pretty dark at 7am, so the 10X increase in light levels will be awesome too.
 
OP
D

Denwood

Well-known member
Joined
Sep 22, 2014
Messages
4,305
Location
Thunder Bay, Ontario, Canada
Suddenly I realise that the impeller bushing is installed backwards...:cry: I'll need to pull it apart and reverse it as the thrust part of the bushing (protruding oillite/brass flange) should be against the impeller itself, not the impeller pulley! Jeeps creeps...
 

drivesitfar

Well-known member
Joined
Oct 23, 2013
Messages
36,191
Location
Pacific Northwest
I always love checking in on you cause you seem to take on these sort of challenges head on whether you've done one before or not. another job well done (as soon as you reverse the slight issue you just mentioned). I agree that if we can fix something old it sure has a lot more quality than about 80-90% of the stuff we can buy new. I hope youre wrong about small engines being obsolete with ZERO GAS to buy, but i do like the idea of electric cars just not the computer driven ones.

stay warm and SPRING is just around the corner.

speaking of Spring and Summer do you have any projects planned like maybe building a cabin at the lake or ....?
 
OP
D

Denwood

Well-known member
Joined
Sep 22, 2014
Messages
4,305
Location
Thunder Bay, Ontario, Canada
Drives, it's always nice to hear from you...and now even more so given the challenges you are facing. Thanks for taking the time to post :)

The temps are rising rapidly to a predicted torrid 9 C tomorrow, with sun..yay. Spirits always rise here as the Spring renewal launches into high gear. I'm working now on the main floor of our house to get the trim updated to the style we used in the kitchen, paint and redo the hardwood floor. The missus also wants a redone staircase, so there is no shortage of work.

We'll be out to camp starting in May, pretty much every weekend, so now is the time to get the house stuff sorted. Not much planned out there as we did the shed, deck and gazebo stuff last year. I hope to actually enjoy some summer fun and get into some better shape for windsurfing.

That snowblower came apart for the fix in less than 30 minutes...a lot faster this time around! All is well in the mechanical universe for us...at least for a day :)
 

crashmtb

Well-known member
Joined
Aug 2, 2006
Messages
93
Location
Winnipeg
Bob, I replaced the timing chain a year or two back and that was not a fun job :-(. I may just keep adding oil. There are a few tools out there to allow seal replacement in the car, but you're removing cams etc to do it. I've had the intake manifold off as well, to replace an alternator...It's not a fun engine to work on at all. Given its age etc, I'm not sure it's worth doing.
@Metallitubby may have some insight
 
OP
D

Denwood

Well-known member
Joined
Sep 22, 2014
Messages
4,305
Location
Thunder Bay, Ontario, Canada
Short of going back through the entire thread, what are we trying to achieve here?
Crash, thanks for the referral!

Metal, thanks for ringing in :)

I think you're referring to the questions I had on our older 2003 CRV (keeping it alive for my daughter) that is seeing some oil consumption on the K34 engine. We purchased it new in 2003, and have done regular oil changes with synthetic etc. from the get go. It uses some oil in hot weather, almost nothing in winter. I posted up a pic of the spark plugs on a recent change out:

1647701362174.png

1647701371531.png

This sure looks like atomised oil burn in the cylinders from valve seal leaks. I should mention that the car runs great, has good power, and does not blow out blue smoke noticeably ever, even on a cold start.

A local machine shop that does a lot of Honda heads is telling me seals are done, but also suggests that if the guides are not dealt with, a burnt valve will likely be the end result. I'd like to avoid pulling the heads (car is 18 years old) and not worth a lot so the choices are:

1. Just keep adding oil
2. Do the seals only with heads in place.
3. Pull the heads and have them redone at the machine shop.

I did the timing chain to resolve a P0341 code (and the usual stuff along with that job) in 2020...the engine looked pretty good:

1647701753064.png


crvtimingchain2.jpg
 
Last edited:
OP
D

Denwood

Well-known member
Joined
Sep 22, 2014
Messages
4,305
Location
Thunder Bay, Ontario, Canada
Bob, that's what I thought as well. The machinist who helped me with the snowblower issue mentioned that not doing the guides would almost certainly lead to a burnt valve, hence my hesitation now on doing anything. I figure some oil on the guides may be a good thing...ha.
 

Metallitubby

Well-known member
Joined
Aug 12, 2019
Messages
26,750
Location
ATL OTP North
I think you're referring to the questions I had on our older 2003 CRV (keeping it alive for my daughter) that is seeing some oil consumption on the K34 engine.

Alright, where to begin:

You've had the usual chain stretch concern already, but I am afraid that the valve seals won't be the end of it. These engines DO have a PCV valve, so if you haven't replaced that, I'd start there (even if it rattles on inspection). With the mileage, I suspect one of the oil control rings has stuck "closed". This is not to be confused with the later VCM oil rings aligning, but the end result is similar.

I have replaced quite a few engines for oil consumption of this CRV/Accord/Civic Si vintage, and there really is no easy way around it. If it were my car, I'd do exactly as you are doing and just keep an eye on the oil level and continue on. If the car is relatively rust-free, and you like the car, then in the interim price out used/junkyard engines (this is what I normally do).

I have access to 100% of Honda/Acura's engineering documents since 1976 and on, so I can answer pretty much any question, about any Honda product from cars, to mowers, to marine engines, and so on. You are more than welcome to reach out if you need specific questions answered.

- Andy
 
Last edited:
OP
D

Denwood

Well-known member
Joined
Sep 22, 2014
Messages
4,305
Location
Thunder Bay, Ontario, Canada
Andy, yes did the PCV valve. I figure you're 100% on that stuck oil control comment on one or more of the cylinders. It's likely that, and seals too.

I very much appreciate your input here and the offer of information :) Experience is everything in this business! I figure we'll nurse this CRV along with just safety items addressed. What I do like about it is that when my 18 year old daughter drives it in the winter, there are zero concerns with getting stuck anywhere. It's a tank in the snow with winter boots on.

With about 40 years wrenching on internal combustion stuff, I find myself gravitating more and more to the simplicity (mechanically) of our EV. After taking a deep dive into internals on the various EV offerings out there, I'm not sure we'll ever buy an ICE car again. Yes the packs degrade, but they are a six-eight bolt drop-in.
 

Metallitubby

Well-known member
Joined
Aug 12, 2019
Messages
26,750
Location
ATL OTP North
I very much appreciate your input here and the offer of information :)

One comment I should make is that I would swap over to a set of Denso or NGK plugs. You'd be surprised how much better the engine will run with those plugs. It won't cure your oil issue, but it maybe fix an oddball driveability concern.

I am an engineer for Honda, so I have access to most every (if not all) documents and engineering drawings on your car. Plus, the Honda Marine engines still use the K24 for the BF115, BF140, and BF150, which is essentially the CRV engine "on a stick".
 
To avoid these ads, REGISTER NOW!
Top Bottom