To avoid these ads, REGISTER NOW!

Between 265 & 485 SQ/FT Woody's Works Garage

Workspaces sized between 265 and 485 squarefeet.
OP
D

Denwood

Well-known member
Joined
Sep 22, 2014
Messages
4,224
Location
Thunder Bay, Ontario, Canada
Nick, ( @nicholam77 )there are a few omissions (apparently by design) as it would be nice to open the garage door a block away by voice. Locks/Doors in Hubitat do not have access to the integration so far. I'll likely just set up a few basic things for the boss (like control of the water valve). If she can't remember how to say "turn on water" then all is lost..ha :)

I typically don't want to touch a phone/app to do anything in the house, so the automation rules are important. Webcore and Rule Machine 5.1 both work excellently in Hubitat. The Hubitat lighting app is a cluster to look at, but it actually does everything I need when managing tricky stuff like the theatre lighting. That's where you only want motion activation when the theatre bits are not in play. Same thing with main floor "scenes" which dim certain lights and turn off others and we don't want motion in play. Again, the HE lighting app makes it pretty easy to do this with a virtual switch or two and activation restrictions. You won't like the GUI, but you will like HE once you get it set up. Migration is no fun.

On the Zooz, all I wanted them for was the heater control, and for that...they are excellent. It's nice that you can disable physical control and swap LED function. I wanted the LED's on when the switch is on, so they match the Leviton's. Green lights means everything is on once you tweak them.
 
To avoid these ads, REGISTER NOW!
OP
D

Denwood

Well-known member
Joined
Sep 22, 2014
Messages
4,224
Location
Thunder Bay, Ontario, Canada
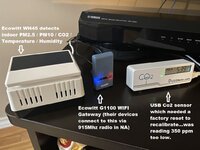
Final piece of the puzzle with respect to the ventilation system is Co2 sensing so I can drive the HRV at the 55, 65, 75 or 90 CFM configurations (or off completely) depending on real time air quality in the home. To that end, I ordered up these two items, the Ecowitt G1100 gateway and Ecowitt WH45 air quality sensor. These are powered by USB (they don't include the wall wart, just the USB cable. They are not super expensive about $150 for the pair. Turns out our air quality in our home is quite good with PM 2.5 and PM 10 levels at 0.1...which is very low. Those two are measurements of particles in the air, where PM 2.5 are of particular concern as they can reach your blood stream via inhalation. These particles are small enough to travel all the way through your lungs to the alveoli where gas transfer is taking place.

The G1100 WIFI gateway connects to your home WIFI and then their sensor devices (many can be added including outdoor weather stations, soil moisture sensors, etc) connect to the same gateway via 915 Mhz radio. The gateway has a built in web server to display data so the system does not require an app, cloud account etc. to operate. More importantly, it can send data to the Hubitat automation hub. Specifically Co2 levels are sent every minute or so, which in term now drive the HRV system depending on levels of Co2 detected.

There is a very nice integration written for Hubitat which is 100% local code, no cloud accounts required. The G1100 gateway sends data to the Hubitat hub every 60 seconds. It was a bit of a process to get everything set up but has been rock solid since installation.

I was tipped off on an issue with my older Co2 sensor which had automatically calibrated itself to inside air and was reading nearly 350 PPM low. I had to factory reset it, and it now reads very close to the Ecowitt WH45.

This is what the live data feed looks like from the G1100 gateway's built in internal web server:

IMG_8566.PNG

The gateway is very compact and like the WH45 is powered by USB. The WH45 can also run off two AA batteries installed in the base, but reports less frequently when run this way. You can view the live data via an app (free cloud account required) or via the internal web server on the gateway. There are quite a few positive reviews by the Hubitat crowd with respect to accuracy and reliability for these products.

IMG_8561.JPG
 
OP
D

Denwood

Well-known member
Joined
Sep 22, 2014
Messages
4,224
Location
Thunder Bay, Ontario, Canada
Had a very productive evening cleaning up the HRV project. I'm not a fan of drywall boarding and mud, but am getting slowly more proficient. Paint is also not on my list of favourite tasks. I have to admit that using the Milwaukee cordless 18 gauge nail gun for the trim work was a treat. Loving this tool.

1670902250215.png

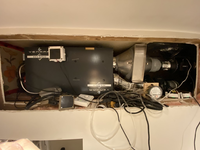
Hard to believe a few weeks ago that this mess:

1670901375295.png


Is now this:

IMG_8570.JPG

The switches on the wall are pretty much there for a visual on what the automation system is up to. Once the missus hangs up coats etc, they will magically disappear :) I used my favourite method to hold this door in place...namely four rare earth cup magnets attached at each corner. They do an excellent job of keeping the look nice and clean, while securing the door as well.

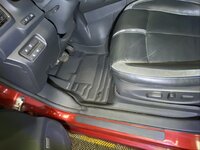
One of Nick's ( @nicholam77 ) posts on floor mats reminded me that I've been looking to replace mine. The replacement front Tuxmats showed up for the LEAF EV today. The car came with a full set but after 3 years of student driving/teaching (previous life) they were getting a bit tired, particularly the driver side. I was impressed that the new ones have improved on the design for the 2018 LEAF in a few ways, specifically now using the factory anchor system on the drivers side. Always nice to see a company integrating improvements in their products. The new mats have a cleaner, sleek look too. I had a set of Weathertecs in my A3 Audi, and I've have to say these are nicer. They have some cushion to them, but don't leak. You can see that they wrap around the mat area, and have a side leaf as well that extends down between the seat and door on on both sides. It's a nice touch. They fit perfectly, and the multi-layered design gives the sides quite a bit of rigidity so they hug the floor well very nicely without using any additional clips (which they did include...)

They really do "fit like a glove" :)


IMG_8571.JPG

IMG_8572.JPEG
 

Attachments

  • 1670902222458.png
    1670902222458.png
    126.3 KB · Views: 1
Last edited:

nicholam77

Well-known member
Joined
Dec 18, 2016
Messages
2,678
Location
Minneapolis, MN
Wow, those tuxmats really do look nice!

Nick, ( @nicholam77 )there are a few omissions (apparently by design) as it would be nice to open the garage door a block away by voice. Locks/Doors in Hubitat do not have access to the integration so far. I'll likely just set up a few basic things for the boss (like control of the water valve). If she can't remember how to say "turn on water" then all is lost..ha :)

Yep, HomeKit only allows native locks and garage doors (not linked through a hub). If you really want this, you could use HomeBridge with Hubitat and just pass through those few devices to HomeKit.

I typically don't want to touch a phone/app to do anything in the house, so the automation rules are important. Webcore and Rule Machine 5.1 both work excellently in Hubitat. The Hubitat lighting app is a cluster to look at, but it actually does everything I need when managing tricky stuff like the theatre lighting. That's where you only want motion activation when the theatre bits are not in play. Same thing with main floor "scenes" which dim certain lights and turn off others and we don't want motion in play. Again, the HE lighting app makes it pretty easy to do this with a virtual switch or two and activation restrictions. You won't like the GUI, but you will like HE once you get it set up. Migration is no fun.

I'm not worried about an ugly GUI as long as it's not the front end user experience, which the new HomeKit support solves. Sounds like there's tons of options for automation in Hubitat, and I have no doubt I could achieve anything I'd want to do. Even webCoRE alone would do it.

I used to solve for your home theater conditions with Global Variables in webCoRE, which is one of the reasons I loved it and it's so awesome that it can be used on Hubitat. Virtual switches totally work, but webCoRE variables eliminates extra devices (although then the automations have to be confined to webCoRE).

One other thing I thought I'd mention in case you're not aware — since you said your an iOS user and set up the Hubitat HomeKit integration — you can set up automations in the iOS shortcuts app that have some very useful inputs. In the Automations tab of the Shortcuts app, if you choose "Create Personal Automation" you can use a bunch of device-based triggers like connecting to a certain WiFi network or bluetooth, battery level, charging status, Focus mode, connection to CarPlay, scanning NFC tags, etc. I can see a ton of uses for these triggers.

As an example my plan would be to create a virtual switch in Hubitat called "phone charging" and expose it to HomeKit to use as a boolean. Then set up personal automations in the Shortcuts app that turn that virtual switch on when my phone connects to the charger and off when it disconnects. Then (via the virtual switch), my phone's charging status can be automated within Hubitat. A simple use case would be if it connects to the charger between 9-11pm, run a Goodnight routine, shutting off all the lights and music. Instead of running an automation like that at a specific time every day, or having to push some smart home button somewhere, it would automatically run when my phone goes on the charger for the night, which is both natural and not intrusive.

On the Zooz, all I wanted them for was the heater control, and for that...they are excellent. It's nice that you can disable physical control and swap LED function.

I've been looking at their products and they have some really neat stuff. I especially like the Remote Switch that's Decora style but runs on batteries with no need for hard wiring.
 
OP
D

Denwood

Well-known member
Joined
Sep 22, 2014
Messages
4,224
Location
Thunder Bay, Ontario, Canada
Nick, ( @nicholam77 ) yes..you'll like Webcore in Hubitat (it was pretty easy to port all my Smarthings stuff over), but Rule Machine may do everything you want...albeit in a clunky interface.

I've got the HRV now running at 50, 60 ,75 or 90 CFM depending on Co2 levels in the house. The Ecowitt WH45 air quality sensor has been 100% solid so far with a nicely written integration to Hubitat. Everything related to the ventilation system is running in Rule Machine on the Hubitat box.

Thanks for the tips on the Homekit. I'm hesitant to dip too far into that world as debugging an automation with multiple systems controlling it will get complicated. That said, the obvious stuff (like turn the water on via SIRI)a is 100% happening. I like your charging/trigger idea. The other strong point I suspect for Homekit will be presence sensing via iOS which I'm guessing will work a lot better than other options in Hubitat.

The Tuxmats are definitely my preference over Weathertec just based on the side wall rigidity and the extra padding in ice/snow. They are a lot less slippery when getting into a cold car with ice/snow on the mat. I figure they know that as they are priced pretty similarly...
 

drivesitfar

Well-known member
Joined
Oct 23, 2013
Messages
36,077
Location
Pacific Northwest
I know you’re not a huge fan of the leaf quality but yours seems to get you around nicely. New Mats look awesome.

I’m happy you’ve figured out how to not only get that used air quality machine working like you want it but you also tidied it up nicely and coat rack is a nice trick.
 
OP
D

Denwood

Well-known member
Joined
Sep 22, 2014
Messages
4,224
Location
Thunder Bay, Ontario, Canada
Drives, the LEAF EV's quality is just fine..on par with our Toyota Highlander. It's the aesthetic I'm not crazy about :) We're in the midst of a winter storm, so the EV will be in bed for a day or two. It's more like AWD territory out there right now!

It seems the re-tasked HRV was just a small part of the whole ventilation puzzle in retrospect, but yep, it's humming along nicely. I'm looking around for a larger cross flow heat exchanger (ERV core this time) to make it even more efficient.

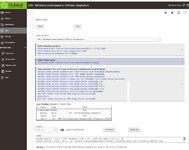
This was the final bit of code that gets everything working based on Co2 (call it stale air) levels. The rule set I've created ramps up the air exchanger (or turns it completely off) based on real time measurements of air quality in our main living area. The defrost cycle is run depending on how cold it is outside, and wattage is modulated to the inline electric heaters if fresh air to the house is entering at less than 63F. It's an interesting little science project :)


code.jpg
 

nicholam77

Well-known member
Joined
Dec 18, 2016
Messages
2,678
Location
Minneapolis, MN
Thanks for the tips on the Homekit. I'm hesitant to dip too far into that world as debugging an automation with multiple systems controlling it will get complicated. That said, the obvious stuff (like turn the water on via SIRI)a is 100% happening. I like your charging/trigger idea. The other strong point I suspect for Homekit will be presence sensing via iOS which I'm guessing will work a lot better than other options in Hubitat.

That's fair, I sort of hated that as well — having automations split between various native SmartThings apps like Smart Lighting, and webCoRE, as well as my devices ported into HomeKit through Homebridge for awhile. It can get confusing.

100% agree on using the iOS presence sensing. Maybe you can do this in Hubitat already, but I can see the usefulness of the iOS Shortcuts/Personal automations, like iPhone disconnects from office WiFi after 5 pm... trigger thermostat at home if no one is home so it's warm when you get back. That sort of thing.

We have plants in our bedroom and I have a grow light on our baby lemon tree, that suffers in the winter months, that's currently automated to turn on at 7am with SmartThings. I'm usually up by then, but on the off chance the kids sleep in, it's annoying when it comes on and the room is dark and I'm still in bed. By leveraging my phone on the charger, I could have it come on when I take my phone off the charger in the morning (meaning I'm committed to being awake at that point). I really like the idea of that sort of flexible scheduling.

This was the final bit of code that gets everything working based on Co2 (call it stale air) levels.

I assume this is a Rule Machine screenshot? I can sort of follow along, but it's definitely a lot less clean than webCoRE.
 
OP
D

Denwood

Well-known member
Joined
Sep 22, 2014
Messages
4,224
Location
Thunder Bay, Ontario, Canada
That's fair, I sort of hated that as well — having automations split between various native SmartThings apps like Smart Lighting, and webCoRE, as well as my devices ported into HomeKit through Homebridge for awhile. It can get confusing.

100% agree on using the iOS presence sensing. Maybe you can do this in Hubitat already, but I can see the usefulness of the iOS Shortcuts/Personal automations, like iPhone disconnects from office WiFi after 5 pm... trigger thermostat at home if no one is home so it's warm when you get back. That sort of thing.

We have plants in our bedroom and I have a grow light on our baby lemon tree, that suffers in the winter months, that's currently automated to turn on at 7am with SmartThings. I'm usually up by then, but on the off chance the kids sleep in, it's annoying when it comes on and the room is dark and I'm still in bed. By leveraging my phone on the charger, I could have it come on when I take my phone off the charger in the morning (meaning I'm committed to being awake at that point). I really like the idea of that sort of flexible scheduling.


I assume this is a Rule Machine screenshot? I can sort of follow along, but it's definitely a lot less clean than webCoRE.
Yes, Rule Machine. You will not like the GUI as it takes some figuring … it’s all about function. Webcore can be installed and runs just fine as local code.
 
OP
D

Denwood

Well-known member
Joined
Sep 22, 2014
Messages
4,224
Location
Thunder Bay, Ontario, Canada
I managed to refine a few items related to control:

Heating of the air into the living space is now actively modulated based on a combination of the HRV CFM air flow setting, and the difference between incoming air temp vs target air temp. This is pretty cool...the wattage output to the inline heaters is recalculated and adjusted every time the incoming fresh air temperature changes, or CFM changes.

If the HRV is running at 50 CFM, and air is coming in at 58 F (cuz it's 8 F outside!) then we can figure out how many btu/watts are required to heat that air. The formula for BTUs required is 50 CFM x 1.08 x Temp delta. So if we want 50 CFM of air to be 68 F hitting the room, we need to add 50 x 1.08 x (68-58) or 540 BTU. Divide that by 3.14 and we get 171 watts of heat.

Turns out that outputting 171 watts of heat to my inline PTC heaters does indeed raise the temp from 58 to 68 F. Increase the CFM, or lower the input temp and more watts are needed. I scratched my head a bit on how to turn this information into a few automation rules that would set the Zooz dimmers connected to the heaters based on live data.

The dimmers use a setting from 0-100 so I needed to figure out how many watts the heaters used at each dimmer setting. I took about 10 measurements using a kilawatt type meter. Then I plotted those points to find that the dimmer/vs watts relationship was pretty linear.


DIMMER SETTING = 0.122 * WATTS + 16

So combining the formula for watts and the dimmer, now I had a formula that would tell me what dimmer setting to use for a given wattage. The /2 in there is because I have two heaters so each will get half of the total wattage requirement fed to them.

DIMMER SETTING = .122 * (((CFM x 1.08 x (Temp Delta))/3.41)/2) + 16

Hubitat is super clunky on calculations (in Webcore this would all be one line of code!!), but here is what it looks like as you step through the calculation above using Hubitat's build in Rule Machine:

heater_code.jpg

I may not even understand all this in a month, but I do think it's kind of cool that the heating system is continuously varying the heat output based on live measured conditions and the desired end result. It's a simple predictive system.

To my surprise, it actually works and the output temperature stays within a pretty small window of 1-2 F. In cold temps the system needs to stop every 30 minutes and recirculate air to warm the core up. When it goes back into ventilation mode (starts pulling cold air in again), the incoming air steadily drops as the heat exchange core cools. This heating setup compensates for that quite precisely and sets the heater wattage at exactly what it needs to be set at to get 67 F fresh air dumping into the main living area.
 

MadeByMiller

Well-known member
Joined
Dec 29, 2018
Messages
1,230
Location
Rapid City, SD
I may not even understand all this in a month, but I do think it's kind of cool...
I always like seeing your thread bumped up because I know no matter what you do, you do it well. Your HRV project including automation is way way beyond me, but I wanted to say that I respect the level to which you've gone to implement and perfect this system.

That quote hit me, I do the same often - furiously research the nitty gritty details of a subject, complete the project, and the knowledge is then gone with the wind ha!
 
OP
D

Denwood

Well-known member
Joined
Sep 22, 2014
Messages
4,224
Location
Thunder Bay, Ontario, Canada
Austin ( @MadeByMiller ), I believe it's called "rabbit hole syndrome" :) I tend to use the Garagejournal as just that...a journal so I can look back and review project later if needed. In some cases, the pictures include details of structure etc. that I am looking for.

Drives, ( @drivesitfar ), best to you and the rest of the crew :) It's defintely going to be a very white (and cold) Christmas here. Meanwhile Bob is out in his board shorts...

I have the Ecowitt air quality system web portal set up so the air quality sensor data is now logged and graphed. You can see here that the system is working quite well to keep Co2 levels between 750 and 850 ppm. It also looks like the MERV13 filtration on the inbound fresh air is very effective as the air quality tends to improve (from already very low levels) when the ventilation system is lowering Co2 levels by bringing in fresh air. You can also see indoor relative humidity cycles between 40 and 43 %, which is about right for these temps. This graph covers from about 12 midnight to 8 am so you also see the thermostat set back in play.


air_quality.jpg
 
Last edited:

nicholam77

Well-known member
Joined
Dec 18, 2016
Messages
2,678
Location
Minneapolis, MN
Amazing work Dennis. All that math is making my brain hurt, but it's pretty impressive how you have it all working.

I don't have any automations that complicated, but I think I'll be sticking with webCoRE until I can wrap my head around Rule Machine.
 
OP
D

Denwood

Well-known member
Joined
Sep 22, 2014
Messages
4,224
Location
Thunder Bay, Ontario, Canada
Amazing work Dennis. All that math is making my brain hurt, but it's pretty impressive how you have it all working.

I don't have any automations that complicated, but I think I'll be sticking with webCoRE until I can wrap my head around Rule Machine.

Thanks Nick. My only concern with Webcore, is if the web portal disappears, how do you edit a piston? They run locally, but you need the web bits to edit AFAIK. It's a lot more efficient to code there though..and my pool solar all runs off it.

I've learned quite a bit going along, particularly with managing Rule Machine. I had about 10-12 rules previously which managed everything (clunky), now down to 4. The system will be a lot more efficient now with the current setup:

1. The HRV defrost cycle fires up twice an hour if temps are below freezing, but the time it spends recirculating (defrosting) is dynamic. In a defrost cycle, the code just checks every 30 seconds to see if the core has warmed up to 59 F, then resumes normal ventilation. Getting a simple conditional loop (just one line of code) with a repeat was key here..super simple once I figured it out. The OEM printed circuit board is programmed for for three defrost cycle time, given a temperature window determined by one thermistor. By tightening this up based on actual temp measurements, the system will spend more time in ventilation mode if required.

2. The CFM rate (amount of air flowing through the system) is controlled by live Co2 sensing. Again, pretty simple with the Ecowitt WH45 air quality sensor attached to the system.

3. Wattage to the post HRV heaters is continually changed based on current air flow, current air temp, and target temp so that the air entering the main living area is 65 F or so.
 

nicholam77

Well-known member
Joined
Dec 18, 2016
Messages
2,678
Location
Minneapolis, MN
Thanks Nick. My only concern with Webcore, is if the web portal disappears, how do you edit a piston? They run locally, but you need the web bits to edit AFAIK. It's a lot more efficient to code there though..and my pool solar all runs off it.

There is a way to self host the web portion of WebCoRE, but I don’t want to mess with that, so you make a valid point. Although to be fair the SmartThings version had a pretty good run and I feel like longevity is an issue with many smart home platforms.

That being said… I’ll just leave this here:

https://www.reddit.com/r/Hubitat/comments/zs62uh
Hubitat seems to be on fire lately! Making all the right moves!
 
OP
D

Denwood

Well-known member
Joined
Sep 22, 2014
Messages
4,224
Location
Thunder Bay, Ontario, Canada
There is a way to self host the web portion of WebCoRE, but I don’t want to mess with that, so you make a valid point. Although to be fair the SmartThings version had a pretty good run and I feel like longevity is an issue with many smart home platforms.

That being said… I’ll just leave this here:

https://www.reddit.com/r/Hubitat/comments/zs62uh
Hubitat seems to be on fire lately! Making all the right moves!
Now that is good news. Not sure I'm a big fan of Rule Machine as I've seen some weirdness particularly when using IF THEN conditional loops.

WebCore on Smarthings and Hubitat has run my pool solar with zero issues for at least 3 years now, so hopefully this integration will not break anything :)
 
OP
D

Denwood

Well-known member
Joined
Sep 22, 2014
Messages
4,224
Location
Thunder Bay, Ontario, Canada
Likewise John and crew :) Hope you guys stay warm out there...

The "beast" has been working hard this year:

img_7460-jpg.1627675
 
Last edited:
To avoid these ads, REGISTER NOW!

nicholam77

Well-known member
Joined
Dec 18, 2016
Messages
2,678
Location
Minneapolis, MN
Hey Dennis, hope you had a great holiday. Santa brought me a Hubitat and I've been working on setting it up 😁 .

I was wondering if you could share with me which integration you're using for your Logitech Harmony hub? I see there are a few community apps. Thanks!
 
OP
D

Denwood

Well-known member
Joined
Sep 22, 2014
Messages
4,224
Location
Thunder Bay, Ontario, Canada
Nick ( nicholam77 ) , so far so good :) The Logitech Harmony integration has been pretty much set and forget. I used this one: https://community.hubitat.com/t/release-logitech-harmony-hub-driver-v0-1-20210725/7618

The home control buttons are an issue if you're using an Elite remote, however all of my lights are HUE, so I just added HUE to Logitech's built in harmony integration and programmed them that way, outside of Hubitat.

You'll also want to update the Zwave firmware which is done from Settings - Zwave Details - Update zWave Firmware
There will only be an update button there if a firmware update is available.

Lots of developers are using the Hubitat Package Manager which you can install from here: https://community.hubitat.com/t/release-hubitat-package-manager-hubitatcommunity/94471
 
Last edited:

nicholam77

Well-known member
Joined
Dec 18, 2016
Messages
2,678
Location
Minneapolis, MN
Thanks! I installed that one and it works great.

I don't have the Elite remote so no worries about the home control buttons. My lights in that room are also HUE, so I'm doing the same as you and having the Logitech hub manage them.

I'll check on the Z-Wave firmware and package manager.
 

nicholam77

Well-known member
Joined
Dec 18, 2016
Messages
2,678
Location
Minneapolis, MN
Sorry to be a pest, but one more question if you don't mind since you know this stuff so well 😁

Are you using a community-written integration like this one for your Philips HUE stuff, or the built-in one? I noticed the built-in one doesn't support the motion sensors, and is set to poll devices every 60sec, which is not great in my opinion. Sometimes I use the state of a HUE bulb to trigger other things. Thanks!
 
OP
D

Denwood

Well-known member
Joined
Sep 22, 2014
Messages
4,224
Location
Thunder Bay, Ontario, Canada
No worries..pester away. Glad to help anytime :) I'm still learning pretty much daily with respect to Rule Machine as I refine the ventilation controls.

I'm just using the built in integration for HUE as I have lights only in Hubitat. I have a few HUE motion sensors but manage them and the lights attached to them 100% from the HUE app which works great for our needs. The HUE motion sensors in the HUE app have been flawlessly reliable...and batteries last forever.
 
OP
D

Denwood

Well-known member
Joined
Sep 22, 2014
Messages
4,224
Location
Thunder Bay, Ontario, Canada
Sorry to be a pest, but one more question if you don't mind since you know this stuff so well 😁

Are you using a community-written integration like this one for your Philips HUE stuff, or the built-in one? I noticed the built-in one doesn't support the motion sensors, and is set to poll devices every 60sec, which is not great in my opinion. Sometimes I use the state of a HUE bulb to trigger other things. Thanks!
It looks like the built in Webcore is released just in time for you Nick :) I'll need to figure out how to migrate myself now...

Just update the hub firmware: https://community.hubitat.com/t/release-2-3-4-available/105667/11

and then install/migrate :)

 
Last edited:

nicholam77

Well-known member
Joined
Dec 18, 2016
Messages
2,678
Location
Minneapolis, MN
Awesome! Just updated and got the webCoRE app installed. I had made 10+ automations with Rule Machine so far, some are working great and some have some unexpected issues. So I think I’ll migrate most things to webCoRE and see how that goes.
 
OP
D

Denwood

Well-known member
Joined
Sep 22, 2014
Messages
4,224
Location
Thunder Bay, Ontario, Canada
Awesome! Just updated and got the webCoRE app installed. I had made 10+ automations with Rule Machine so far, some are working great and some have some unexpected issues. So I think I’ll migrate most things to webCoRE and see how that goes.
Nick, I've seen some weirdness with Rule Machine as well, particularly with nested IF, WAIT, loops to the point I stopped using them. On the other hand, everything I've ever done in WebCore just works.

Don’t mean to interrupt all this cool TECH TALK, but want to wish you and your family a great 2023.

Cheers Woody!!
Drives, you have had to deal with some very difficult situations over the last few years, and I hope this one brings more on the joy side of things for you :) You very much deserve all the good stuff to come.
 
OP
D

Denwood

Well-known member
Joined
Sep 22, 2014
Messages
4,224
Location
Thunder Bay, Ontario, Canada
Figured I'd tackle a project that has been on my mind for some time now.

We are using a Whirlpool Heat Pump clothes dryer (Model YWED7990FW0 ) that has been used almost daily for the last six years. These dryers do not heat air and vent it outside your house, but rather have a heat pump setup that heats up air, passes it through the clothes, then cools that air to condense moisture from it. It's not so different from a dehumidifier. Condensate is collected under the evaporator and pumped out as required.

maxresdefault.jpg

A conventional dryer uses around 3000 watts, but a heat pump dryer will use about 800. Savings also arise from the fact that you're not heating up air and firing it outside your home at 200 CFM, which in turn means incoming air from outside has to be conditioned to replace it.

The downside is that it takes longer to dry (a zero issue for us), but also that some cleaning is required. There are two lint filters in the system. The first is the one with a larger mesh screen (conventional) but the second has a very fine screen and is cleaned out every 3-5 loads. Behind that screen is the evaporator and condenser and for whatever reason, over time, fine lint gets past the secondary filter and is impossible to clean without disassembly :-( Some newer units use the condensate water to clean the condenser (hidden behind the evaporator which is a pretty smart idea.

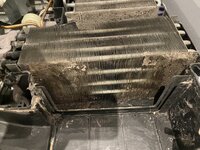
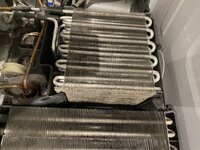
This is what the evaporator (foreground) and condenser look like after 6 years of use. You can see that my attempts to clean with a foaming AC condenser cleaner (unit fully assembled) were pretty much a waste of time. There is a non-removable protective mesh screen in front of the evaporator, which I had to cut to get access to clean the evaporator. It's not a great design with respect to cleaning.

I figure about 40-50 % of the airflow was restricted. Fortunately I was able to find this interactive manual with videos etc. that makes disassembly pretty straight forward. Doing it again, I figure about 30-45 minutes to pull the unit apart.

IMG_8632.JPG


A closer look at the condenser (heats the air returning to the clothes drum after it cools over the evaporator) face with the fine lint particles covering the face.

IMG_8631.JPG

All cleaned up with AC foaming cleaner spray, hot water and a wet vac. I also pulled the condensate pump cover off and cleaned that out while I was doing the job.

IMG_8633.JPG

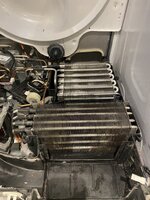
You can see the extent of disassembly required! It's actually pretty easy to take apart, although you do need to keep track of screws and mounting locations along the way. I fixed up some sloppy air sealing from the factory around the blower motor which will take care of some air leakage into the dryer housing. Turns out the drum is a pretty simple assembly to remove too.


IMG_8634.JPG

The boss ran a test load through the unit and it's working quite nicely again :)
 
OP
D

Denwood

Well-known member
Joined
Sep 22, 2014
Messages
4,224
Location
Thunder Bay, Ontario, Canada
I've been wanting to sort a lighting issue with the LEAF EV that ranks in the very low priority department, but was also quick and inexpensive to address.

Using these LED H11 lights: https://www.amazon.ca/gp/product/B07G5VLVNM/?tag=atomicindus04-20

"Alla Lighting 2800lm H8 H11 LED Fog Lights Bulbs Xtreme Super Bright High Power COB-72 Cars Trucks H16 H11 LED Foglights DRL Replacement, 6500K Cool Xenon White"

LED_FOG.jpg

The LED bulbs are 8.5 watt, 6500K color temp, to replace the 35 watt halogen fogs. The colour temp mismatch between the fogs and LED headlights on the 2018 SL always bothered me.

These lights are definitely brighter, but not to the extent that other drivers are flashing brights at me. The reflector in the fog light creates a very diffuse pattern. These particular bulbs have a 360 COB array, but also have a COB facing forward under a small projector lens so will provide better forward low level illumination in poor conditions. They are almost exactly the same dimensions as the OEM bulb.

The 2018 LEAF SL headlights are already LED from the factory.

OEM
IMG_8638.jpg

LED fogs installed
IMG_8639.jpg

The [email protected] watts vs OEM@35 watts won't make any measurable difference with respect to EV range, but the color temps match now :)
 

ebarker9

Well-known member
Joined
Oct 1, 2010
Messages
85
Figured I'd tackle a project that has been on my mind for some time now.

We are using a Whirlpool Heat Pump clothes dryer (Model YWED7990FW0 ) that has been used almost daily for the last six years. These dryers do not heat air and vent it outside your house, but rather have a heat pump setup that heats up air, passes it through the clothes, then cools that air to condense moisture from it. It's not so different from a dehumidifier. Condensate is collected under the evaporator and pumped out as required.

I have the smaller 4.0 ft^3 Samsung heat pump dryer and I've debated going with the larger Whirlpool, which I think is the only current "full sized" heat pump dryer option. The Samsung has a small access panel at the bottom for cleaning the condenser fins. It's not the most enjoyable process, so I'm curious how the Whirlpool compares. Reviews for both models are heavily skewed toward the negative by people who aren't expecting/willing to tolerate the longer dry times so it's hard to get a good sense of the overall performance and reliability. I'm interested in your overall impressions.
 
OP
D

Denwood

Well-known member
Joined
Sep 22, 2014
Messages
4,224
Location
Thunder Bay, Ontario, Canada
@ebarker9 , I honestly don't get the dryer time issue with respect to a typical family. Our unit is typically done with a full dryer load in about 80-90 minutes. Yes, it takes longer...but if you're doing the average 3-4 loads a week, is an extra 30 minutes/load an issue? What I do like a lot about the unit is that no vent is required, and therefore no heat is pumped out of the home. If a typical dryer is using 2500 watts for an hour, and expelling heated air at 200 CFM, then you need to pull in that air from outside to replace it. On a -10 F day, that's another 17K BTU (or 5 kWh) to heat that air to 70 F. In rough terms, our gas furnace would need to run non-stop for 15 minutes to replace that heat lost. Our unit is in the basement, and quite frankly the small heat gain we do see during a load (the dryer gives off some heat from the motor and compressor) is not an issue, even in summer. Total power consumption by the unit itself is about 1/3 of an electric dryer. That does not factor in that heat/cooling loss I calculated to replace the air pumped out of a vented unit so overall efficiency is actually higher depending on outside ambient temps.

Our dryer has been in service since February 2017 with zero issues so far, other than the cleaning I just did. Once or twice we've needed to power if off at the panel (easier than unplugging it) to reset the electronics.

What I would do though is clean the secondary filter after every load (they recommend after 3-5 loads), and vacuum out the screen behind it regularly. This particular Whirlpool "hybrid" dryer has electric heat elements as well which are energised based on the cycle and temperature choice...you can't force it to heat pump mode only. There is a video tear down of one of the units with built in condenser wash system, and quite frankly...it would still need taking apart to clean based on what I saw. Check video at 6:11


I've ordered up some stainless micro-mesh (.075mm holes) to do a secondary screen with, so hopefully will keep lint out of the evaporator and condenser. That said, taking the unit apart is not that bad actually...maybe 30 minutes to do it again. Two sizes of nut driver, a philips screwdriver and 9/16" wrench is all you need for tools. You can take some extra time to clean out the condensate pump, secondary condenser, give the bearings some oil, etc. The unit is constantly pulling in cooling air via the back panel louvers and 6" fan (fires out the back) so dust will be an issue at some point, regardless.
 
Last edited:

nicholam77

Well-known member
Joined
Dec 18, 2016
Messages
2,678
Location
Minneapolis, MN
Nice work on the dryer, I didn't know a heat pump dryer existed. Can't say I haven't wondered about venting with negative temps outside :ROFLMAO:

100% with you on the color temp mismatch, it's a huge pet peeve of mine, in any lighting scenario. So many houses have mismatched exterior lighting and it makes me cringe.

My GTI has the same issue of the headlamps and fog lights not matching (headlamps are Xenon, fogs are LED). I did throw some yellow Lamin-X on the fogs (is that still cool?! :ROFLMAO:) but then the yellow film over the fogs doesn't match the amber blinkers. Which came with incandescent bulbs and I swapped to LED.

Really, all car lights should be LED, period. Another huge peeve of mine is using incandescent blinkers in an otherwise LED running light setup. Happens all the time even with new cars and for the life of my I don't understand why it can't just all be LED.
 

ScottW

Well-known member
Joined
Mar 9, 2021
Messages
109
Location
WA State
Nice work on the dryer, I didn't know a heat pump dryer existed. Can't say I haven't wondered about venting with negative temps outside :ROFLMAO:

100% with you on the color temp mismatch, it's a huge pet peeve of mine, in any lighting scenario. So many houses have mismatched exterior lighting and it makes me cringe.

My GTI has the same issue of the headlamps and fog lights not matching (headlamps are Xenon, fogs are LED). I did throw some yellow Lamin-X on the fogs (is that still cool?! :ROFLMAO:) but then the yellow film over the fogs doesn't match the amber blinkers. Which came with incandescent bulbs and I swapped to LED.

Really, all car lights should be LED, period. Another huge peeve of mine is using incandescent blinkers in an otherwise LED running light setup. Happens all the time even with new cars and for the life of my I don't understand why it can't just all be LED.
I think they use incandescent blinker lights because they are relying on the current to make their older style blinker relay work. Change those bulbs out for LED and you sometimes end up with a solid, non-blinking turn signal because the current draw isn’t enough to activate the blinker relay. The solution is a modern electronic blinker relay replacement that will allow you to run LEDs and still blink. In this day and age, I agree with you that any OEM should be using electronic blinker relays already.
 
Last edited:
OP
D

Denwood

Well-known member
Joined
Sep 22, 2014
Messages
4,224
Location
Thunder Bay, Ontario, Canada
The Whirlpool heat pump dryer disassembly and cleaning got me thinking about prevention with respect to lint/dust entering the evaporator and condenser. I mentioned there is a primarly conventional filter, and a secondary filter at the bottom of the unit. Despite that, very fine lint/dust had made its way into the internals as pictured a few post back:

img_8632-jpg.1804237


It's all cleaned up now, but I figured some preventative work might further reduce the lint/dust reaching the evaporator and condenser.

I just received some stainless steel micro-mesh that I had ordered from Amazon (similar to what you'd find on a reusable coffee filter) and came up with this screen setup which will sit just behind the secondary lint filter. I used two layers of fine mesh window screen (aluminum) for support, and then added the layer of stainless steel micro mesh (0.12 mm / .005" holes). I used a hot glue gun along the edges which worked great. A sandwich frame for this would be a great 3D print project if I had one @nicholam77 (Nick) !

Resistance to flow is very low with this setup, and I'll just vacuum it out periodically when the secondary lint filter is removed for cleaning.

IMG_8645.JPG


IMG_8646.JPG


IMG_8647.JPG

The stainless micro mesh filter in place..it's just sitting held by the soft rubber gasket that contacts the secondary filter so can be removed to clean it.

IMG_8649.JPG


This is the primary lint filter:

IMG_8654.JPG

And this is the secondary lint filter. The filter cassette is removed to access what amounts to a two layer plastic "micro mesh" filter.

IMG_8653.JPG


IMG_8650.JPG
IMG_8651.JPG

IMG_8652.JPG
 
Last edited:
To avoid these ads, REGISTER NOW!
Top Bottom