To avoid these ads, REGISTER NOW!

Work Bench Build Thread

IROC-Z28

Well-known member
Joined
Dec 22, 2013
Messages
84
Hey All,
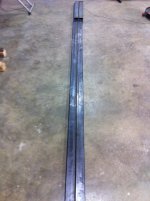
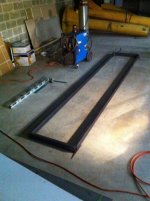
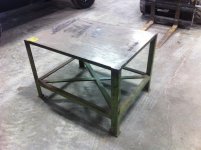
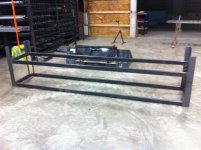
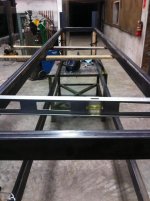
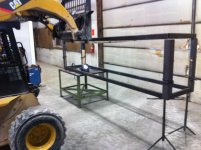
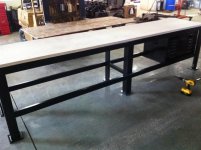
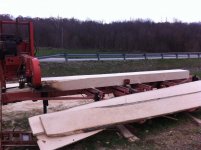
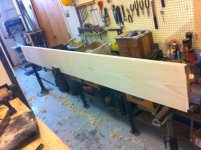
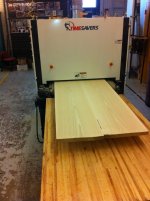
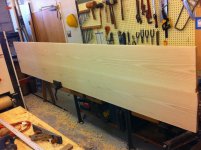
I figured I would start a thread regarding a work bench I am building, I know there's a "show me your work bench" thread but I didn't want to clog it up with my updates. So long story short I started with having 8 quarter white ash cut for me about 6 months ago or so. It was dried down to 6% mc and is now ready to be worked up. So yesterday I surfaced it and then jointed the edges with a hand plane. I glued the two pieces together this morning and will post pics of my progress tomorrow. The bench will consist of two 15 inch wide 13 foot long ash boards glued together and the base will be a welded steel frame I plan on fabricating over the next 6 months in my spare time. Thanks for looking!
P.S. (For any of you woodworkers out there I know it is not very smart to glue up boards this wide, but I have never had any issues doing so, therefore I will have to learn the hard way if this glue up is a complete failure and warps)
 

Attachments

  • IMG_0172.jpg
    IMG_0172.jpg
    145.7 KB · Views: 321
  • IMG_0175.jpg
    IMG_0175.jpg
    143.4 KB · Views: 314
  • IMG_0809.jpg
    IMG_0809.jpg
    137.8 KB · Views: 380
  • IMG_0810.jpg
    IMG_0810.jpg
    135.9 KB · Views: 309
  • IMG_0811.jpg
    IMG_0811.jpg
    137.2 KB · Views: 320
To avoid these ads, REGISTER NOW!
OP
I

IROC-Z28

Well-known member
Joined
Dec 22, 2013
Messages
84
Got some work done yesterday on the bench. Threw it through the time save and sanded down to 180, will have more pics of the sanded top later.

Thanks for looking
 

Attachments

  • sanding.jpg
    sanding.jpg
    141.1 KB · Views: 276
  • Glue up 2.jpg
    Glue up 2.jpg
    138.8 KB · Views: 214
  • Glue up.jpg
    Glue up.jpg
    138.4 KB · Views: 233
OP
I

IROC-Z28

Well-known member
Joined
Dec 22, 2013
Messages
84
Here we are today, sanded and ripped to about 28 inches.
 

Attachments

  • Sanded.jpg
    Sanded.jpg
    143.1 KB · Views: 254

MoonRise

Well-known member
Joined
Nov 5, 2010
Messages
4,030
Location
NJ
Nope, no good. You didn't bookmatch the flitches and the grain pattern between the two boards just doesn't 'work'.

Tell you what, you send them to me and I'll save you all sorts of internet embarassment from you showing those boards like that.

:D

:beer:

btw, a tip/trick when edge-jointing pieces that will be glued together is to clamp them good-face-to-good-face (or bad-face-to-bad-face) and then joint the 'stack'. Helps to self-cancel out any slight waves/wobbles in the jointed edges.

Did you do a "spring joint" when you jointed the edges, or just flat-n-straight?

Any biscuits/dowels/splines on the glued edge or just glued?

Personal pref, but as you acknowledged, boards that wide can 'move'. Sometimes you really want that wide-board look, so you do your best and cross your fingers and hope. For a workbench though, I probably would have ripped each board into at least two or three, then alternated the growth rings up-down-up-down-up-down and glued that up. Trade off possible major cupping on those wide flat-sawn boards into a bit of time and effort (and some sawdust from the kerfs) and into smaller 'waves' even if the wood 'moved' the same amount. Strip floor versus wide-board floor effect. YMMV, personal preference, etc, etc.

Keep up with the work and the updates. :D
 
OP
I

IROC-Z28

Well-known member
Joined
Dec 22, 2013
Messages
84
Nope, no good. You didn't bookmatch the flitches and the grain pattern between the two boards just doesn't 'work'.

Tell you what, you send them to me and I'll save you all sorts of internet embarassment from you showing those boards like that.

:D

:beer:

btw, a tip/trick when edge-jointing pieces that will be glued together is to clamp them good-face-to-good-face (or bad-face-to-bad-face) and then joint the 'stack'. Helps to self-cancel out any slight waves/wobbles in the jointed edges.

Did you do a "spring joint" when you jointed the edges, or just flat-n-straight?

Any biscuits/dowels/splines on the glued edge or just glued?

Personal pref, but as you acknowledged, boards that wide can 'move'. Sometimes you really want that wide-board look, so you do your best and cross your fingers and hope. For a workbench though, I probably would have ripped each board into at least two or three, then alternated the growth rings up-down-up-down-up-down and glued that up. Trade off possible major cupping on those wide flat-sawn boards into a bit of time and effort (and some sawdust from the kerfs) and into smaller 'waves' even if the wood 'moved' the same amount. Strip floor versus wide-board floor effect. YMMV, personal preference, etc, etc.

Keep up with the work and the updates. :D
Ha, I bet you would :beer: I used no biscuits/dowels/ or splines. I did use a slight spring joint. They definitely could cup, but I'm willing to take the chance, I haven't been at this forever and have been taught not to do exactly what I did in class, but I can't resist, I have done a few wide board projects and haven't had an issue yet. I also wanted a deeper bench and didn't want to loose anymore width than I had by cutting them down into smaller pieces, then jointing the edges, then ripping so on and so forth. Biggest trade off of going wide board for this project was the severe loss in thickness during the surfacing.

Thanks, IROC-Z28

Now a question for you... Do you work in the wood product industry? Perhaps a veneer mill (typically I think of the word flitch being associated with veneer, although I understand its definition lends itself elsewhere)
 

MoonRise

Well-known member
Joined
Nov 5, 2010
Messages
4,030
Location
NJ
Now a question for you... Do you work in the wood product industry? Perhaps a veneer mill (typically I think of the word flitch being associated with veneer, although I understand its definition lends itself elsewhere)

Nope, not in the 'wood product industry'.

Flitches can certainly refer to the veneer 'layers', but it can also refer to the board 'layers' as they are cut from the log.

Stack up the boards in the order and orientation of the original log, and you pretty much have the original log. Just now in layers (minus the kerf waste).

:beer:
 
OP
I

IROC-Z28

Well-known member
Joined
Dec 22, 2013
Messages
84
Well you clearly know quite a bit for someone not in the wood products industry :thumbup:
 
OP
I

IROC-Z28

Well-known member
Joined
Dec 22, 2013
Messages
84
Alright guys,
It looks like next week is the week I will be making the base. I plan on using 4 inch angle 1/4 thick, and 1/4 channel as the apron, 1/8 1 inch by 3 inch rectangular tubing for the bottom stretchers. My main issue now is how do I make all this square. We have three welding tables at the shop that were bought used, and non of them are truly square. One that could work nicely is way too small. Anyone have any ideas? All the space in the shop leads to a drain, so there is no such thing as a flat floor.
 

Fretters

Well-known member
Joined
Jan 25, 2014
Messages
4,217
Location
South Yorkshire, England
Do you mean square or flat/level? If square, measure your corners. If flat, get a piece of good 3/4" ply or similar down as a temporary surface. Once you have one piece of it sorted, the rest is fairly easy to gauge from that.
 
OP
I

IROC-Z28

Well-known member
Joined
Dec 22, 2013
Messages
84
Both! And great idea, the problem is plywood is 4x8 and my table is 12x 28inchs. Do you think hanging 4ft off one end will mess things up while I attempt to weld the other end?
 

Fretters

Well-known member
Joined
Jan 25, 2014
Messages
4,217
Location
South Yorkshire, England
Are you sure you couldn't find a smaller bench to work on? :D Prop up the overhanging part with lengths of wood, steel or whatever. Easy enough to shim pieces to get it level all round.
 
OP
I

IROC-Z28

Well-known member
Joined
Dec 22, 2013
Messages
84
Are you sure you couldn't find a smaller bench to work on? :D Prop up the overhanging part with lengths of wood, steel or whatever. Easy enough to shim pieces to get it level all round.

Hmmm I never thought of that :lol: And perfect advice, thank you!
 
To avoid these ads, REGISTER NOW!

mjozefow

Well-known member
Joined
Apr 9, 2009
Messages
2,111
Location
Lafayette, IN
Where are you located IROC?

Edit: And I'll be darned if that mill doesn't look mighty familiar!

Edit 2: And I was on here to start my bench build thread...must be something in the water here.
 
Last edited:
OP
I

IROC-Z28

Well-known member
Joined
Dec 22, 2013
Messages
84
Well I got what I am going to call the apron done today. The pictures are pretty self explanatory. The last one is of my Parker that will go on the bench when I finish.
 

Attachments

  • Bench 1.jpg
    Bench 1.jpg
    145.9 KB · Views: 130
  • Bench 2.jpg
    Bench 2.jpg
    142.6 KB · Views: 158
  • Bench 3.jpg
    Bench 3.jpg
    147.1 KB · Views: 156
  • Bench 4.jpg
    Bench 4.jpg
    140.1 KB · Views: 160
OP
I

IROC-Z28

Well-known member
Joined
Dec 22, 2013
Messages
84
Nice vice. :) Good to see you went with the floor and just packed things level. That small bench would have been screaming. :D

Yeah it would have been, as you can see I am in a back room in the shop. I found it was pretty close to level there as there is no drain. Not ideal though because there's practically no light... or room. And it absolutely would have, idk how I would have done it differently.
 

Mr. 360

Well-known member
Joined
Nov 23, 2012
Messages
662
Location
Bowmanville, Ontario
Portable sawmill, not enough guys own one of these. I have a Hud-Son Oscar 18, what brand is this baby? I'd love to mount mine on a trailer. There really is something about splitting a nice section of hardwood down and watching boards come off. I have some Sugar Maple I plan on milling up for my benches soon. Really nice work on this, should be serviceable for years to come, and there's always something nice about using wood you milled yourself.
 
OP
I

IROC-Z28

Well-known member
Joined
Dec 22, 2013
Messages
84
Hey guys,
Here's the update from last night. I decided to go to the big shop to weld on my legs. Again they're 4x4 1/4 thick angle. I leveled the apron on my favorite little work bench and two stands. Once I had four of the 6 legs tac'd on I cut four pieces of wood to 18 inches and strapped them loosely to each leg. I grabbed the bottom apron (or whatever you would call it) with the skid steer and slowly set it on the wood spacers, then checked for level and tac'd it on. I final welded everything after that, and that's when I quit for the night :)
 

Attachments

  • Bench 13.jpg
    Bench 13.jpg
    145.6 KB · Views: 132
  • Bench 12.jpg
    Bench 12.jpg
    141.1 KB · Views: 116
  • Bench 11.jpg
    Bench 11.jpg
    143.4 KB · Views: 121
  • Bench 10.jpg
    Bench 10.jpg
    143.6 KB · Views: 121
OP
I

IROC-Z28

Well-known member
Joined
Dec 22, 2013
Messages
84
The rest
 

Attachments

  • Bench 18.jpg
    Bench 18.jpg
    141.8 KB · Views: 115
  • Bench 17.jpg
    Bench 17.jpg
    140 KB · Views: 106
  • Bench 16.jpg
    Bench 16.jpg
    144.3 KB · Views: 110
  • Bench 15.jpg
    Bench 15.jpg
    142.5 KB · Views: 113
  • Bench 14.jpg
    Bench 14.jpg
    143.5 KB · Views: 120
OP
I

IROC-Z28

Well-known member
Joined
Dec 22, 2013
Messages
84
Started in on the feet a few days ago, they're 6"x6" half inch thick, I put a 7/8" bolt in the center to level the table if the floor is un-level. All six are done, I will attach the other two legs, and weld the feet on Monday.
 

Attachments

  • Bench.jpg
    Bench.jpg
    144.2 KB · Views: 63
  • Bench 1.jpg
    Bench 1.jpg
    146.4 KB · Views: 77
OP
I

IROC-Z28

Well-known member
Joined
Dec 22, 2013
Messages
84
Looks good!

Have you worked out how you will accommodate the wood movement in your fastening arrangement?

Thanks! I will be running angle "joists" and will have 1/4" lag screws with washers. I will slot the angle to accommodate the horizontal expansion and contraction. I have been trying to decide how I want to do it, it would be nice to just have the slots machined but I will probably go another route.
 
OP
I

IROC-Z28

Well-known member
Joined
Dec 22, 2013
Messages
84
Made a little progress, top isn't bolted down, or trimmed to fit. I mocked up a tool box that will go under the bench for safety glasses, tape measures, precision tools, flashlights, and the like.
 

Attachments

  • Work Bench 1.jpg
    Work Bench 1.jpg
    139 KB · Views: 131
  • Work Bench 2.jpg
    Work Bench 2.jpg
    145 KB · Views: 180
OP
I

IROC-Z28

Well-known member
Joined
Dec 22, 2013
Messages
84
Terrible pics but got the toolbox installed, just need to throw a couple more drawers in.
 

Attachments

  • PIC 2.jpg
    PIC 2.jpg
    138.8 KB · Views: 115
  • PIC 3.jpg
    PIC 3.jpg
    144.6 KB · Views: 90
To avoid these ads, REGISTER NOW!
Top Bottom