To avoid these ads, REGISTER NOW!

work benches... from scratch

To avoid these ads, REGISTER NOW!

wishihadatalon

Well-known member
Joined
May 6, 2010
Messages
141
Location
Grand Rapids, MI
I have been building this for ~13 weeks at school.
2011-02-28_15-21-27_319.jpg

IMG_0739.jpg
 

sams

Well-known member
Joined
Apr 7, 2010
Messages
266
Location
S.E Victoria, Australia!
wishihadatalon it looks like you have something specific for it's use, or am I wrong? Amazing work though, must of been quite time consuming to get it right.
 

cool50

Well-known member
Joined
Jan 22, 2009
Messages
275
Location
Il
Looks like I got me some good ideas. My bench is to deep and I can't reach the pegboard to good. Plus It came with the house and I never liked it anyway, need to build one myself.
 

Sr. WiNdTeCh

Well-known member
Joined
Apr 15, 2011
Messages
241


I got a wild hair in March and gutted my garage, insulated it and bought a bunch of OSB and 2X4's and started building with basically no plan. I got robbed 2 years ago so I knew I wanted some lockable storage for expensive tools. As you can see I just made a sliding door for my tools, I waxed where it slides and added some dish soap for good measure. It wooks pretty good, I have more in there then you think. Hobart 187 welder and plasma cutter and helmet, Chainsaw, Table saw, Air compressor, Portaband, tons of DeWalt cordless tools and my electricians belt, probably missing something. Anyways the main bench is 16' long 50" high and 32"deep. I'm 6'4" so the bench is just right. I have more pictures of my garage if interested. This is a work in progress and I see this as half done, I've came a long way in 45 days.

The pictures were taken on my galaxy tab and so was this post so sorry for poor quality or spelling errors. Also as my lights are CFL's I just turned them on and its 40degrees in there so the pictures are a little dim yet.
 
Last edited:

BEAVO

Well-known member
Joined
Aug 9, 2010
Messages
239
Location
wash ch ohio
thats pretty neat never seen anything like that!! bet it has alot of good uses and has made life alot easier
 

Full Size 66

Well-known member
Joined
Jan 1, 2009
Messages
298
Location
Wa.
Those are some seriously expensive vises. The cool thing is the collapsable lift/mount. This will be in my new shop... All I can say is wow! I have never seen one like it before.
 

Berserker

Banned
Joined
Oct 17, 2010
Messages
222
Location
WI
That bracket for the vice, who makes that or what is it called? I have seen the part that bolts to the vice at Northern Tool, but not the receiver.


I read on Family Handyman's website you can use a router to make cuts for biscuits. I think I am going to try this. Though not really sure why.
 

Berserker

Banned
Joined
Oct 17, 2010
Messages
222
Location
WI
Windtech, I have been thinking of something to lock my tools up in the garage. I keep some in the basement, but thats a PIA. I was thinking similar but sliding horizinally, and making it hidden. On my bench, one side will be open to sit at and put a shop vac.

I like what you got, but people can tell its there. My idea was hopefully to have it appear just as a front. Not sure if that would fool anyone.

I have also though about the above the ceiling for the stuff I don't use alot. Though it is a PIA to get it. But alot of the stuff sits for long periods.


I hate to sound like a *****, but how did you attach the 45s to the wall. Its easy with no sheeting Did you just drill through them into a stud?
 
Last edited:

Sr. WiNdTeCh

Well-known member
Joined
Apr 15, 2011
Messages
241
My intension isnt to fool or stop anyone, but slow them down. I have an infered sensor for our NEW house alarm system that is pointed at the bench, so hopefully it will keep them occupied until the cops show up. I lost 15,000$ worth of tools, reloading supplies, couple guns (lucky the expensive ones were with me shooting prairie dogs), electronics. It ***** getting robbed.
 

Berserker

Banned
Joined
Oct 17, 2010
Messages
222
Location
WI
I have never been robbed, but ya it crosses my mind. I was thinking maybe a gangbox in the pole barn. I have a pole barn about 8' away.

I think above the garage ceiling would be a good place. Just need to work on access. Some said they knew someone who had a motor that would lower stuff down.

I like the idea of trying to hide it better.


Great looking bench.
 

rocklobster

Well-known member
Joined
Apr 1, 2011
Messages
184
This last winter I built this bench in my basement. I have a detached 26X28 shop that is currently unheated and I live in Canada so I needed a good work area for winter projects and servicing and drying chainsaws/guns/toys after use. The previous owner of the house had made a craft table with basically a low 4x8 sheet of ply and a shelf in the back that was a stretch to reach even for my ape index. I would never want such a wide bench again as it just seemed to collect junk, I have read that you cant build a bench too long or too strong but you can build too wide...

I lived with that craft table for 3 years and it felt so good to tear it apart! I reused as much of it as I could and here is what I have built so far:

It is 2x6 construction 24 inches wide and 8 ft long. The top is 2x6 boards under 2 sheets of 3/4 ply. I will admit I got a little carried away building "project Mega Bench" but I would like to carry on my fathers and grandfathers tradition of building a nice strong work bench in every house owned.

I still have some more work to do. I will be adding some nice cabinet drawers to the right side of the bench. I want to move my HW tank over into the corner to the right and place a sturdy file cabinet in its place for more storage. I will also build a storage shelf to the left of the bench to store camping gear and other domestic things...

IMG_3156.JPG


IMG_3157.JPG

I had a bunch of leftover 2x6 boards that my Grandfather gave me when I helped him clean out his shed, so I used them here and there and to make the top.
IMG_3166.JPG


IMG_3158.JPG


Homemade socket organizer made of reused materials:
IMG_3162.JPG

IMG_3160.JPG

IMG_3161.JPG

Cheap driver storage. I like how visible this is instead of the 4x deep driver rack that I have in the shop
IMG_3165.JPG

Robertson drive first of course! I hate phillips drive... I eliminate them in my house whenever I can. Once you go Robertson you never go back!
 
Last edited:
To avoid these ads, REGISTER NOW!

BEAVO

Well-known member
Joined
Aug 9, 2010
Messages
239
Location
wash ch ohio
what did you use to hold your sockets on im thinking of making my own thanks i was just thinking of using wooden dowls
 

rocklobster

Well-known member
Joined
Apr 1, 2011
Messages
184
I used some steel rod from metal rack salvaged from the dump and just glued them into a drilled hole in a piece of black ash with wood glue.
 

CrashTestDummy

Well-known member
Joined
Apr 20, 2009
Messages
232
Not sure if I have already posted my workbench that we built out of pallet rack parts and plywood, but here it is. We covered the tops with linoleum counter top sheet in a gray, 50's boomerang pattern. I love it. Still working out the lighting and other things. Not exactly where/how I'll mount the vise when I get it. Perhaps I'll use the receiver hitch idea.

Gene Beaird,
Pearland, Texas
 

Attachments

  • workbench 2.jpg
    workbench 2.jpg
    120 KB · Views: 414

wishihadatalon

Well-known member
Joined
May 6, 2010
Messages
141
Location
Grand Rapids, MI
Did you use a mag drill to drill/tap the holes?

The holes were pierced using a plasma table and then drilled using a mag drill.
2011-03-04_15-05-11_515.jpg


The threading in the holes is from weld nuts that were placed on the underside of the table top.

IMG_0576.jpg


I did that mainly to have them replaceable for when I mess up the threads.
 

Corsario

Well-known member
Joined
Apr 4, 2010
Messages
136
I have alredy put this images but yesterday I upgraded the cabinet so, here they are again

This old table

<script src='http://img122.imageshack.us/shareable/?i=garage0061600x1200.jpg' type='text/javascript'></script><noscript> </noscript>

Becames this rolling cart after some work. Sitting aside my xs 650

<script src='http://img29.imageshack.us/shareable/?i=img0021jz.jpg' type='text/javascript'></script><noscript> </noscript>
 

greenenvy1

Active member
Joined
Feb 18, 2011
Messages
26
Location
Nova Scotia, Canada
Mostly finished mine finally. 30" x 96" and 40 3/4" tall. Need to source a vice at some point. Need to deceide where I'm putting it and put some shelves in the bottom. Excuse the cell phone pics, can't find camera since the move a month ago.
CumberlandSubdC-20110415-00125.jpg

CumberlandSubdC-20110415-00124.jpg
 

srmofo

Well-known member
Joined
Oct 15, 2009
Messages
6,161
Location
SW ohio
That bracket for the vice, who makes that or what is it called? I have seen the part that bolts to the vice at Northern Tool, but not the receiver.


I read on Family Handyman's website you can use a router to make cuts for biscuits. I think I am going to try this. Though not really sure why.

Those are some seriously expensive vises. The cool thing is the collapsable lift/mount. This will be in my new shop... All I can say is wow! I have never seen one like it before.
thats pretty neat never seen anything like that!! bet it has alot of good uses and has made life alot easier


That collapsable vise lift is at the bottom of this link. Its $1280! :eek:
Just a collapsable jig is $650

http://www.samstagsales.com/brockhaus.htm

Try the above for english.

lg
no neat sig line
 

weatmaster

Member
Joined
Mar 17, 2010
Messages
23
Location
Germany
That collapsable vise lift is at the bottom of this link. Its $1280! :eek:
Just a collapsable jig is $650

Yeah,
the collapsible lift is like 1280$ and the vice another 700$.

If anyone is really interrested in it I can get them and ship them way cheaper.
 

Daniel Dudley

Well-known member
Joined
Sep 4, 2009
Messages
3,546
Mostly finished mine finally. 30" x 96" and 40 3/4" tall. Need to source a vice at some point. Need to deceide where I'm putting it and put some shelves in the bottom. Excuse the cell phone pics, can't find camera since the move a month ago.

Well, good luck with the camera. I would suggest that you set up that sofa next to a small fridge full of cold beverages. :drool:

A man has to have priorities. :beer:
 

jakeb

Well-known member
Joined
Feb 11, 2008
Messages
317
Location
Bay City, MI
I made this last week...still have a few things to do as well as clean things up. Eventually the walls will get insulated and finished and some wall cabinets will go above the bench. As well as painting the cabinets and raw metal of the bench.....but I have other car projects to get going on before that happens.

it is 13' long, 24" wide, and right around 41" tall. I like a tall bench. It is made of 1.25" angle for the top and then some beefy 3.5" leg angle for the legs. The leg angle was too cheap to pass up so I went a little thicker than needed.
The left side surface is an old stainless steel elevator door, and the right side is just covered particle board. The left will be for heavy work and the right is more for soldering, lighter work. If you notice I was able to fit my bench grinder in the top of a cabinet drawer. Also the space between the old metal kitchen cabinets works out for metal storage and then scrap wood storage on the other side.


IMG_2599.JPG

IMG_2600.JPG

IMG_2601.JPG

IMG_2602.JPG

IMG_2603.JPG
 

LeonardY

Well-known member
Joined
Apr 16, 2011
Messages
5,020
Location
Southern California
Hi everyone,

First time post here.
Those are some really nice benches.
Here's one of mine. I'm guessing it weighs about +300lbs. It's constructed of 3/4" plywood laminated together with West System epoxy. It has a 2'x7' 1-1/2 thick maple top. A quick release vise on the end and a pattern makers vise on the side. I had the brackets for the casters welded up at work by a certified welder. I was afraid the bench would sag in the middle but in ten years it's still flat.

Leonard
 

Attachments

  • Bench1.jpg
    Bench1.jpg
    25 KB · Views: 546
  • Bench2.jpg
    Bench2.jpg
    30.3 KB · Views: 614

Morrisman

Well-known member
Joined
Nov 7, 2006
Messages
424
Location
Angeles City, Philippines
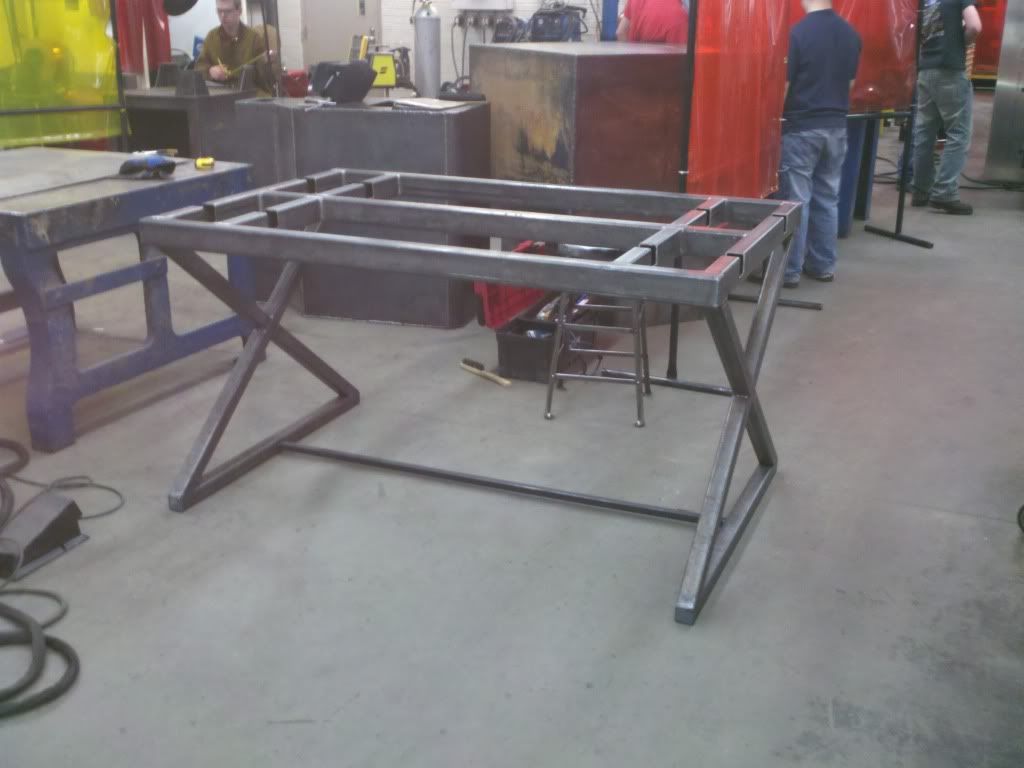
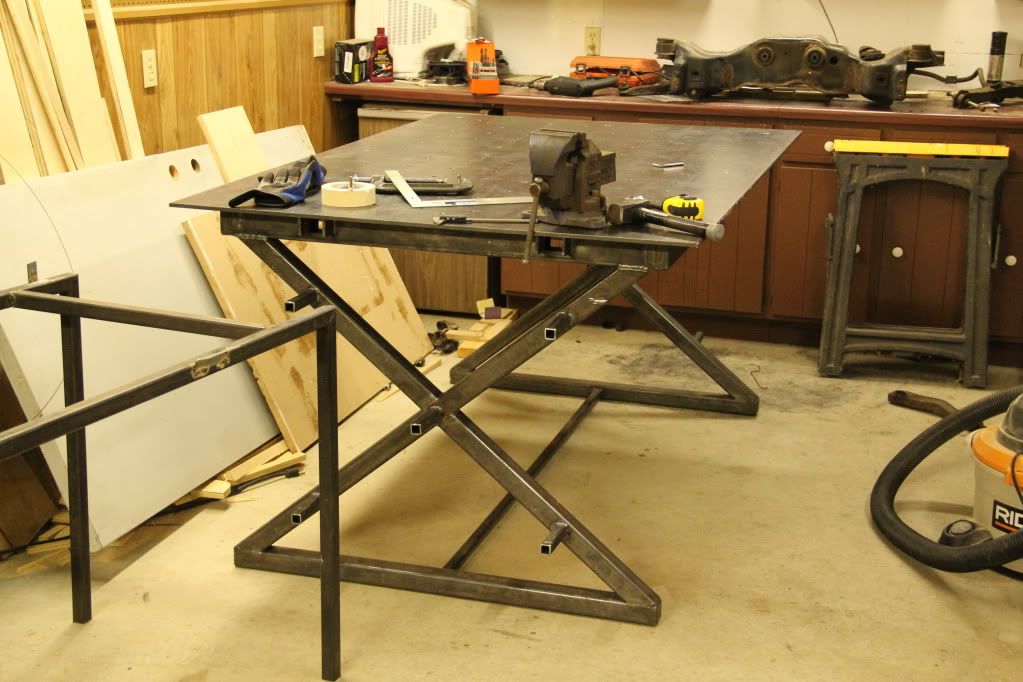
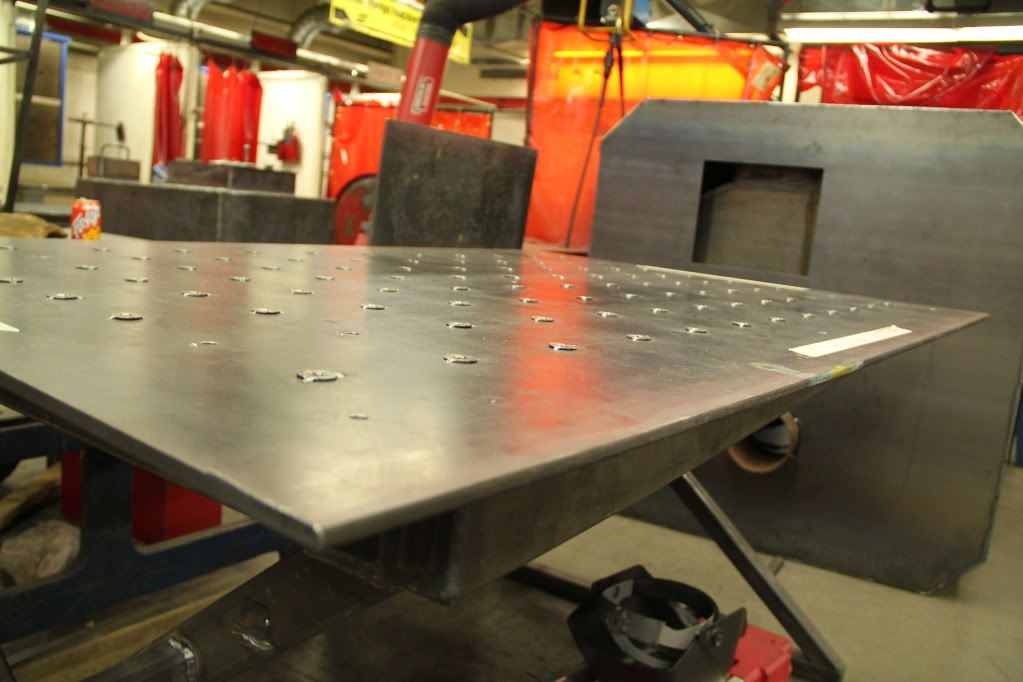
I built mine out of 2 x 4, coach bolted together, then the top was made of 2 layers of 3/4" decking chipboard, with a layer of 3/4" marine ply on top of that.

Benchprogress1.jpg


Benchprogress2.jpg


Benchprogress3.jpg


I never really thought it out much before I started, or I would have made it bigger inside, for storage. As it was I had barely 14" in between the uprights inside, though I did add a second shelf all the way along.

The sheet wood was bought in 24" widths, so that pretty much dictated the overall size. Next time I plan to go 30" width.

That old bench to the left I built in the Philippines some 15 years ago. It travelled to a couple of different garages with me over there, then we shipped it to the UK with our household stuff, it moved through three houses and four garages in England. It had a new top surface grafted on and ended up as a dedicated 'drill bench' for several years. Now we have moved again it is now it is back in the Philippines currently serving me well as a normal every day multi-purpose over-crowded bench in my latest tiny garage.

If benches could talk, the stories they would tell.....:beer:

821d3791.jpg


When my new garage is finished 'old faithful' will be turned back into a drill bench. I shall never get rid of it, as it has seen me through good times and bad, rich and poor. :)
 

Marty256

Well-known member
Joined
Aug 26, 2007
Messages
170
Location
Central NJ
Nothing fancy but I'm also limmited for space. 62" wide and 42" tall. Bad back and can't be bent over working too long. Also wanted to be able to store tool cart underneath.
 

Attachments

  • IMG_5513.jpg
    IMG_5513.jpg
    143.3 KB · Views: 591
  • IMG_5511.jpg
    IMG_5511.jpg
    140.2 KB · Views: 584
  • IMG_5517.jpg
    IMG_5517.jpg
    142.6 KB · Views: 605

Manicmech

Member
Joined
May 22, 2011
Messages
9
Location
Mid Coast, Maine
One thing I found real useful is a "dropped down" section towards the middle of the bench for my sliding chop saw to rest in. The drop allows the bench top surface to be even with the chop saw's cutting table surface, making working with long stock much easier, without having to break out the saw's table for quick cuts. I also made a "blank" to fit in the recess when the saw is not being used. :thumbup:
 
To avoid these ads, REGISTER NOW!
Top Bottom