To avoid these ads, REGISTER NOW!

work benches... from scratch

mypov

Well-known member
Joined
Aug 1, 2011
Messages
557
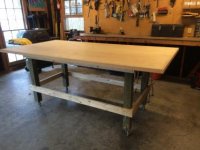
Finally done the workbench, it took about 6 weeks of "free time" work. This has been my first attempt at something so involved, in terms of having drawers and requiring so much effort to keep square. Though it's not perfect it accomplishes the required tasks for which it was built. I purchased a track saw and and orbital sander, and wanted a place to store the systainers. Also, wanted a functional place to work with the table saw (used to make all my cuts on the ground), will be mounting my sliding miter saw as well...
benchdone2.jpg
 
To avoid these ads, REGISTER NOW!

JettaGetUpandGo

Well-known member
Joined
Jun 3, 2015
Messages
685
Location
Pewaukee, WI
This is my take on a workbench, nothing fancy. My goal was to build something sturdy with minimal posts. It doesn't get used for anything specific or special, just general DIY type projects.

The frames are mounted to the concrete with anchor studs. The main workbench top is made up of 2x12's laid flat with a sheet of 1/4" hardboard on top. It makes for a smooth and easily replaceable surface if I were to damage it. The shelf under the workbench was reinforced a bit due to the depth. The shelves on the left are just a simple 2x4 frame. All shelves topped with 1/2" OSB. Once I had things laid out how I wanted I added a few drawers beneath.

I love the extra depth because I can have things I am working on spread out and still have enough space to work at the front of the bench. The downside to this is the rear wall is pretty much unusable for hanging space as it is difficult to reach. Storage space isn't an issue ...yet. Someday I'm sure it will be!

Early "completion":
1167243_896783962439_1080018420_o_zpsute0nqx9.jpg


The structure below the workbench. It's overkill, but rock solid:
1147620_896783732899_635332429_o_zpsqlldsyj6.jpg


Current:
255A058E-BF05-4D04-B02F-D98273583A91_zpseldrddbw.jpg


250C7B6F-C9CE-4212-BC04-C27C27FE184B_zpsl5nhp4qg.jpg
 
Joined
Mar 14, 2013
Messages
5
Location
Troy, Missouri
I want to thank everyone that's posted ideas and photos to this thread. I just finished my new workbench using many ideas I got from this forum. Here are a few pics of my new bench.

benchleft.jpg


benchright.jpg


benchlow.jpg
 

csp

Well-known member
Joined
Mar 23, 2010
Messages
5,719
Location
Franktown, CO
Understood, however that wasn't the question. The way those boxes work the lid has to be open in order for the drawers to be able to open. Close the lid and the drawers are locked shut via a mechanism in the back of the box.
 

fitz11

Well-known member
Joined
Jun 16, 2011
Messages
974
Location
Fox Valley, WI
Understood, however that wasn't the question. The way those boxes work the lid has to be open in order for the drawers to be able to open. Close the lid and the drawers are locked shut via a mechanism in the back of the box.

Just take the locking bars out and the drawers can always be opened.
 

csp

Well-known member
Joined
Mar 23, 2010
Messages
5,719
Location
Franktown, CO
Yes, I'm fully aware of that as well. Maybe let the person I asked answer the question how he handled it. There's more than one way, some more permanent than others.
 

BAGN1T

Well-known member
Joined
May 10, 2011
Messages
150
Well….after 6 years, I finally got to build my workbench. It isn’t 100% done…but it is darn close. Worked on it in the evenings this past week and Sunday. Started with this:

Where the work bench will go

IMG_20151110_181759_332.jpg


Piles of wood

IMG_20151110_181742_577.jpg


IMG_20151110_181750_592.jpg


My first step was to go through and cut all the wood. I’m in a duplex and didn’t want to be running a saw late into the night to disturb the neighbors (I can’t wait to get into my own house in the middle of nowhere). Here is all the wood cut

IMG_20151110_200931_460.jpg


Made some sawdust

IMG_20151110_200957_712.jpg


Did all of this with a partially torn tape (it ended up finally breaking all the way off on Sunday…it almost made it the whole project)

IMG_20151110_183501_814.jpg


Dogs in the way…as usual

IMG_20151110_210939_662.jpg


IMG_20151110_211053_035.jpg


IMG_20151110_211102_066.jpg


Built half of it first…on the ground…piece by piece

IMG_20151110_215029_916.jpg


Drawbacks of cheap lumber and cheap tools to make cuts…had to use some highly specialized tools

IMG_20151110_220030_704.jpg


After the end of evening 1

IMG_20151110_222711_437.jpg


Then I did the two other bench tops and shelf frames on top of the first frame and added the legs at the end. Then screwed it all together

IMG_20151111_230324_700.jpg


IMG_20151111_230324_700.jpg


Had to wait a few days to borrow a circular saw to cut the plywood as mine is packed away…somewhere. I got all of the plywood cut and installed on Sunday. I also built a fold down workbench for the shed. Unfortunately, it got dark before I was able to snag a photo of it. I was able to get all of the hardware on the doors and the eyes for the handles.

Turns out the floor isn’t perfectly flat, so when I opened the doors, they hit the floor…so I made an adjustment so it wouldn’t hit the floor and it was hitting the other door…so I need to do some trimming there but it is done enough now to go ahead and post this. I also picked up some Wall Control pegboard kits and put them up. Going to place an order for 8 more panels sometime in the next month or so and run it all the way along that block wall. PS-I hate drilling into concrete...just have my regular drill. Got it done anyway.

IMG_20151115_213843_362.jpg


IMG_20151115_214203_270.jpg


There aren't any outlets on that wall yet so I got one of those adapters where you can put an outlet between your light socket and the bulb and screwed a power strip to the ceiling because the cord for the shop lights isn't long enough to make it to the light that is already there. So I have a few light duty outlets in the ceiling for now. Will run some regular outlets at some point in the future just above the bench.

IMG_20151112_210643_726.jpg
 
Last edited:

tac

Well-known member
Joined
Sep 2, 2015
Messages
69
Location
Colleyville Texas
I built this for my garage:
1003877x.jpg


Simpson Strong-Tie corner connectors from HD and 2x4s. Fast and bomb-proof.

parts and cut lists here

Hmm, id something like this for temporary shelving, but I didn't use any strong ties. I just ripped sheets in half made 2x4 frame for 2' wide by 8' shelf and just screwed it all together to some studs for legs. I only had to cut the short 2x4s and rip the sheets. Not much waste, no notching or strong ties.
 

Yourfired

Well-known member
Joined
Aug 24, 2015
Messages
121
Just skimmed through this thread, and it's unbelievable the work you guys do. I hope to learn a lot from all of you.
 
To avoid these ads, REGISTER NOW!

markvfr

Well-known member
Joined
Jun 1, 2010
Messages
79
After four years of working on my rolling cabinets woodtops, I finally had some time to build a proper l bench. I wanted something with low profile so I can easily clamp stuff to it. Also, out of the way legs for easy floor cleaning and tall enough for the rolling cabinets to sit underneath and be able to roll them out for more working space if needed. Ended up going with 1/4"x1.5" angle iron and some flatbar for the skeleton, and then two 3/4" plywood sheets glued and screwed together for a top. Just finishing the top with some leftover epoxy I had from my floor and I'm happy how it turned out. Was gonna cap it with a steel sheet right away, but I'll see how the epoxy holds up.

The bench is solid sturdy, considering I don't have supports where the cabinets sit underneath. It deflects maybe 1/8" when I stand on top of it (190lbs) in the middle of the span, so if I need it for something superheavy, I made up spacers that I put in between the bench and the rolling cabinet top below. Then it becomes rock solid.

The dimensions are:
39.5" tall, 30" deep, 13ft wide. Total cost was $120 for the iron, $100 for the plywood and lag bolts etc.

Sorry about the big pics... I don't know how to put them in a neat little gallery like some of you have it.

image1.jpeg

image2.jpeg

image4.jpeg

IMG_4487.JPG

image7.jpeg

image9.jpeg

IMG_4519.JPG

IMG_4520.JPG
 
Last edited:

aka Larry

Well-known member
Joined
May 2, 2012
Messages
8,011
Location
Eastern, NC
The bench is solid sturdy, considering I don't have supports where the cabinets sit underneath.

So it's cantilevered off the wall with just the lags for support? I would have never considered doing that, but it sounds like it will work for you.
 

markvfr

Well-known member
Joined
Jun 1, 2010
Messages
79
So it's cantilevered off the wall with just the lags for support? I would have never considered doing that, but it sounds like it will work for you.

No, its if you look on the ends of the bench, and also in the sitting space in the middle, I have legs at 45deg bolted to the wall. Legs are also made of 1/4" 1.5" angle. I know, its tough to see, maybe I'll snap a few pics closer up.

As for the fisheye effect... :) I know, I just shot it on my iphone with the panorama setting, so looks like ****.
 
Last edited:

David the welder

Well-known member
Joined
Nov 2, 2015
Messages
45
Location
Centerburg, Oh
Here's a nice little layout/welding table I recently made. The legs are 4" round with a1/4" wall, the shelf is 1/8" with under bracing, and the top is from an old griddle from a restaurant, which is 3/4" thick. The griddle is cast iron and true flat, so it works perfectly for squaring things up with precision layout tool.
 

Attachments

  • image.jpg
    image.jpg
    127.1 KB · Views: 392

zoomzoomjeff

Well-known member
Joined
Sep 21, 2009
Messages
1,471
Location
Des Moines, IA area
Here's a nice little layout/welding table I recently made. The legs are 4" round with a1/4" wall, the shelf is 1/8" with under bracing, and the top is from an old griddle from a restaurant, which is 3/4" thick. The griddle is cast iron and true flat, so it works perfectly for squaring things up with precision layout tool.
Salivating! I'd love to hammer the s*&$ out of stuff on that table with a 2 lb sledge.
 

NemHoward

New member
Joined
Jan 28, 2016
Messages
1
I'm new here. Found the forum looking for ideas to assist me in designing a rolling workbench for my detached garage (25' x 20').

I used 4x4 posts for the legs and 2x4's for the frames. The top frame that supports two 3/4 (MDF and cabinet quality maple plywood) has 3 2x4 slats while the bottom frame is open. 3" locking casters make moving this around the space easy. Total height is 40" to match existing bench top. Surface is 4 x 8 plus .75" trim so its big! I borrowed a miter saw but it is too small to cut 2x4 unless they lay flat. I cut the mitered corners on the 1 1/2" oak trim by hand. I suspect I will stain and apply a few coats poly to protect the top. Anyway, this is my bench from scratch.
 

Attachments

  • image.jpg
    image.jpg
    18.1 KB · Views: 305
Last edited:

Ainsley

Well-known member
Joined
Jun 12, 2014
Messages
557
Location
Ontario, Canada
Woodworking bench and out feed table in the centre of the shop:
NUnafDbl.jpg

Frame is 2x4s with a truss rod construction. Top is three layers of 5/8 MDF

This one is still in progress:
YWTYm36l.jpg
 

Big Daddy Chop Shop

Well-known member
Joined
Jan 13, 2016
Messages
233
Location
Hope, Indiana
Been looking thru these, and there are so many nice benches. Woodworking benches, fab benches, all purpose, etc. One thing struck me page after page after page:

So many of these benches have tool boxes in them or "back walls" of peg board, or shelves, racks/ bins attached, and it brings me to a thought or 2.

First off, are these your primary tool boxes? If so what happens if you need to expand?

As for the shelves, pegboard, rack and bin attachments, how on earth do you all keep this stuff in place when grinding, beating, sawing, etc, and how does it stay nice/ clean, and if you are doing hot work, do you move it all?

Its no criticism, I guess I am just a work bench minimalist, nothing on it except what i am working on. Our last place had a nice bench, built-ins below, had to empty them because stuff fell over/ spilled etc all the time. Maybe Im just a bull when I work too...
 

thomfr

Well-known member
Joined
Sep 16, 2010
Messages
408
Location
The Netherlands
As for the shelves, pegboard, rack and bin attachments, how on earth do you all keep this stuff in place when grinding, beating, sawing, etc, and how does it stay nice/ clean, and if you are doing hot work, do you move it all?

Thinking about this also.
I want to built a new bench where my tool carts can stand under and can be rolled out easy if needed elsewhere. However for keeping them clean and for keeping them out of sight while the overhead doors are open (my family tends to forget them sometimes and the doors auto close only after 4 minutes). I would like to ad a sort of "doors" in front of them under the bench.
However I do not want them to be standing in the room while open like conventional doors do or have a rail on the ground for sliding ones.
I was thinking about pull downs from office drawers but I'm not yet convinced with that solution. Any Ideas?
Thom
 

srvctec

Well-known member
Joined
Aug 23, 2014
Messages
83
Location
Central Kansas
Thinking about this also.
I want to built a new bench where my tool carts can stand under and can be rolled out easy if needed elsewhere. However for keeping them clean and for keeping them out of sight while the overhead doors are open (my family tends to forget them sometimes and the doors auto close only after 4 minutes). I would like to ad a sort of "doors" in front of them under the bench.
However I do not want them to be standing in the room while open like conventional doors do or have a rail on the ground for sliding ones.
I was thinking about pull downs from office drawers but I'm not yet convinced with that solution. Any Ideas?
Thom
Rolltop desk type of contraption, sort of like a mini garage door might work. Wouldn't take up much space, but would be out of the way when open.
 

Theo911

Well-known member
Joined
Feb 22, 2009
Messages
75
I built this 4x8' bench because I needed more working space for my 911 engine rebuild project. The top is galvanized sheet metal with 1" aluminum angle on the corners.
 

Attachments

  • workbench.jpg
    workbench.jpg
    143.2 KB · Views: 237

Phixer

Well-known member
Joined
Dec 27, 2010
Messages
126
Location
Sacramento, CA
This is my woodworking bench built over the course of about 9 months using mostly free/scrap wood and zero electric tools. Oh, and using a rickety B&D Workmate as a workbench.
It started with a piece of glue-lam beam "cut-off" that someone gave me, then some old doug fir rough-cut 2x4's salvaged from a house remodel, 4x6 posts picked from a trash pile, and other various bits that I've accumulated. (people know I do wood projects, so stuff just comes to me) Money was spent on a stick of maple to become the vice screw, oak dowels to pin some of the joints together, and the Craftsman tail vise was from a garage sale.
No power tools? Well, just because.
IMG_7670_zps6b0af7db.jpg

IMG_7672_zps7a02149f.jpg
 

mdbeck1

Well-known member
Joined
Mar 7, 2010
Messages
2,297
Location
Norman, OK
Been looking thru these, and there are so many nice benches. Woodworking benches, fab benches, all purpose, etc. One thing struck me page after page after page:

So many of these benches have tool boxes in them or "back walls" of peg board, or shelves, racks/ bins attached, and it brings me to a thought or 2.

First off, are these your primary tool boxes? If so what happens if you need to expand?

As for the shelves, pegboard, rack and bin attachments, how on earth do you all keep this stuff in place when grinding, beating, sawing, etc, and how does it stay nice/ clean, and if you are doing hot work, do you move it all?

Its no criticism, I guess I am just a work bench minimalist, nothing on it except what i am working on. Our last place had a nice bench, built-ins below, had to empty them because stuff fell over/ spilled etc all the time. Maybe Im just a bull when I work too...

None of these are mine but when I installed my metal cabinets I used 3.5" wood screws to attach them to the wall. That way they don't move. ...at least not without some pretty severe "persuasion".

When I added the tops I made sure that they went all the way to the wall. That way nothing rolls off of the back. However stuff still rolls UNDER them.
 

MarkG

Well-known member
Joined
May 23, 2012
Messages
1,219
Location
Elgin, IL
I'm new here. Found the forum looking for ideas to assist me in designing a rolling workbench for my detached garage (25' x 20').

I used 4x4 posts for the legs and 2x4's for the frames. The top frame that supports two 3/4 (MDF and cabinet quality maple plywood) has 3 2x4 slats while the bottom frame is open. 3" locking casters make moving this around the space easy. Total height is 40" to match existing bench top. Surface is 4 x 8 plus .75" trim so its big! I borrowed a miter saw but it is too small to cut 2x4 unless they lay flat. I cut the mitered corners on the 1 1/2" oak trim by hand. I suspect I will stain and apply a few coats poly to protect the top. Anyway, this is my bench from scratch.

That's basically the construction I used in my rolling 4 x 8 table. I just recently added a 1/4" Masonite top 'captured' by 4 hardwood pieces of edgebanding and soaked it with several coats of thinned poly varnish, letting it soak in and wiping off the excess. This is how I finished my benchtop and it's very durable, but won't hurt 'edged tools'. The other nice thing about my current set up is that if one side of the Masonite gets banged up eventually, I can flip it over and have a fresh side----no fasteners required.
 

MarkG

Well-known member
Joined
May 23, 2012
Messages
1,219
Location
Elgin, IL
This is my woodworking bench built over the course of about 9 months using mostly free/scrap wood and zero electric tools. Oh, and using a rickety B&D Workmate as a workbench.
It started with a piece of glue-lam beam "cut-off" that someone gave me, then some old doug fir rough-cut 2x4's salvaged from a house remodel, 4x6 posts picked from a trash pile, and other various bits that I've accumulated. (people know I do wood projects, so stuff just comes to me) Money was spent on a stick of maple to become the vice screw, oak dowels to pin some of the joints together, and the Craftsman tail vise was from a garage sale.
No power tools? Well, just because.
IMG_7670_zps6b0af7db.jpg

IMG_7672_zps7a02149f.jpg

Nice job! This is awesome----I love this stuff. If we didn't, we wouldn't read books like 'The Workbench Book' would we?? :D (BTW, if you haven't, you should)
 
To avoid these ads, REGISTER NOW!
Top Bottom