To avoid these ads, REGISTER NOW!

work benches... from scratch

Big Daddy Chop Shop

Well-known member
Joined
Jan 13, 2016
Messages
233
Location
Hope, Indiana
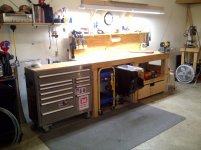
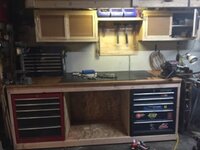
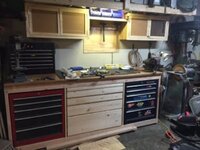
None of these are mine but when I installed my metal cabinets I used 3.5" wood screws to attach them to the wall. That way they don't move. ...at least not without some pretty severe "persuasion".

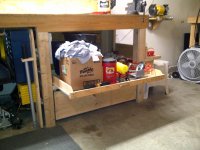
When I added the tops I made sure that they went all the way to the wall. That way nothing rolls off of the back. However stuff still rolls UNDER them.


Maybe I just get too rowdy. IDK, I always seen to get that sawzall blade that makes every thing jump of the bench like a depressed wino at Christmas, or need to beat something into submission. Maybe I just need counseling. LOL.

I anchor mine and also always run it back as well. I can still make it jump.
 
To avoid these ads, REGISTER NOW!

62blue

Active member
Joined
Feb 13, 2016
Messages
30
I have noticed a lot of wall plugs put in but not one ground fault plug. Don't you guys believe in them. Just curious here guys
May I add a lot of nice stuff here.
 

dittle fart around

Well-known member
Joined
Jan 9, 2011
Messages
2,455
Location
Vancouver, Washington, USA
A ground fault outlet is meant to be used in a moisture rich environment. Around a sink, outside stuff like that. Any outlet downstream of the ground fault is protected. After 35 years as an electrician--------
Well that's all I've got.

:beer::beer::beer:
 

Fly320s

Well-known member
Joined
May 8, 2015
Messages
121
Location
NH
What about the arc fault receptacles?

My basement has those and it plays havoc with trying to use power tools. Just starting the miter saw trips the breaker.
 

crooklyn

Well-known member
Joined
Apr 26, 2011
Messages
96
Location
Prince George, BC
Great posts.
Just started building mine. I used 2x4 for the frame, 1/2 plywood for base, 3/8 plywood to sheet the back and gables. For the top 2x4x16ft, then 3/4 plywood and topped it off with 1/4 hardboard.
Just need to mount the doors which are made from 3/4 plywood.
C56ED4FC-9493-4281-AB1C-3D07B62CAC0F_zpsy1vauzcq.jpg

6F46F40A-F714-450A-91DE-812062C7D7A8_zps3c2kxmcm.jpg
 

67CarGuy

Well-known member
Joined
Feb 6, 2008
Messages
763
Location
Outside Boston, MA
Wow! I just finished reading through all 55(!) pages (okay, it did take me a few days...) and I am also impressed. I've already started my own bench project, which I'll add on here one of these days. The sistered 2x4s for legs worked like a charm for me. All I've got left to do is add the plywood top and I'll be set! Oh, and a vice. And more clamps. Well, it's off to the hardware store I guess.... :lol_hitti

Thanks to everyone who's posted their own bench(es) so far - you never know who you're going to be helping or inspiring.:beer:
 

4 FN 27

ALLIANCE MEMBER
Joined
Oct 19, 2015
Messages
4,635
Location
Minnesnowta
New shop means I need a new Work Bench...

2 x 3, 2 x 2 and 1 1/2 x 1/12 .120 wall tubing, .120 thk Stainless Top, .125 6061 Aluminum Perf Panels, added outlets, lights and a light switch. 96 x 27 work surface. Made the Shelves out of 3/4 AC Plywood.

Had to cut the Tubing at work since I didn't have my new Saw set-up.

IMG_3908.jpg


Starting the Bench Top.

IMG_3913.jpg


Put leveling feet on the legs.

IMG_3916.jpg


More Welding.

IMG_3918.jpg


IMG_3920.jpg


Finished Frame.

IMG_3926.jpg


Making the Perf Panels at work. Cut them on a Mitsubishi NXF 4000 Fiber Laser.

IMG_4163.jpg


Installing the Perf Panels.

IMG_4181.jpg


Installed.

IMG_4220.jpg


IMG_4224.jpg


On to the next Bench. This time a 180 x 36 Work Surface and everything but the frame will be Stainless. Painting plywood is a pain in the ****!!!
 
Last edited:

mv213

Well-known member
Joined
Sep 29, 2014
Messages
660
Location
Dallas, OR (the OTHER "Big D")
New shop means I need a new Work Bench...

2 x 3, 2 x 2 and 1 1/2 x 1/12 .120 wall tubing, .120 thk Stainless Top, .125 6061 Aluminum Perf Panels, added outlets, lights and a light switch. 96 x 27 work surface. Made the Shelves out of 3/4 AC Plywood.

Had to cut the Tubing at work since I didn't have my new Saw set-up.

On to the next Bench. This time a 180 x 36 Work Surface and everything but the frame will be Stainless. Painting plywood is a pain in the ****!!!

Wow, that is one great looking bench!
 

EarlyBroncoGuy

King Of The World
Joined
Aug 15, 2013
Messages
917
4x4 legs notched for beams and 2x6 lower frame beams notched to nestle together at bottom of legs

DSCF1391_zpse238ead8.jpg


2x6 center crossbeam and 2x4 outer braces

DSCF1395_zpscab22f1c.jpg


How strong is it? Strong enough, and rolls easy even with that much weight on it.

Elgin-20150617-00091_zpsnx1twjhw.jpg
 

greasyfingers01

Well-known member
Joined
Apr 6, 2015
Messages
143
Nice EB! I've got one just like it. In a million pieces lol24ea41cc36cf1cb5fb703a35eaea99ef.jpg

Excuse the mess. I just moved into the place

Sent from my SM-N910V using Tapatalk
 

yossarian19

Well-known member
Joined
Jan 2, 2015
Messages
193
Location
People's Republik of Kalifornia
4x4 legs & short horizontals with 2x4 stringers, all joints half-lapped 3/4" deep. Laminated 2x4 top. My first time using half-laps or laminations, first time trying to build anything that didn't come in a box actually.
The one joinery "whoops" was that the 1/2" lag bolts go into the end grain of the horizontal 4x4 sections. Still, it weighs ~200 lbs or so without the cabinets and feels pretty solid. Might add shear panels of plywood on the ends.
IMG_20151213_214522060_zpszbustn4t.jpg
 

KraftwerkMk1Jetta

Well-known member
Joined
Sep 26, 2006
Messages
812
Location
Long Valley, NJ
I made this little mobile workbench last weekend so I can roll it up to whatever i'm working on and have a solid work surface. Will also come in handy when I want to cut something with the miter saw. I like to be able to wheel it out of the garage to cut stuff. I hate sawdust in my garage. I still need to do something with that middle shelf though.

Untitled by Joe, on Flickr
 

Vette10R

Well-known member
Joined
Feb 12, 2016
Messages
722
Location
MN
New shop means I need a new Work Bench...

2 x 3, 2 x 2 and 1 1/2 x 1/12 .120 wall tubing, .120 thk Stainless Top, .125 6061 Aluminum Perf Panels, added outlets, lights and a light switch. 96 x 27 work surface. Made the Shelves out of 3/4 AC Plywood.

Had to cut the Tubing at work since I didn't have my new Saw set-up.

IMG_3908.jpg


Starting the Bench Top.

IMG_3913.jpg


Put leveling feet on the legs.

IMG_3916.jpg


More Welding.

IMG_3918.jpg


IMG_3920.jpg


Finished Frame.

IMG_3926.jpg


Making the Perf Panels at work. Cut them on a Mitsubishi NXF 4000 Fiber Laser.

IMG_4163.jpg


Installing the Perf Panels.

IMG_4181.jpg


Installed.

IMG_4220.jpg


IMG_4224.jpg


On to the next Bench. This time a 180 x 36 Work Surface and everything but the frame will be Stainless. Painting plywood is a pain in the ****!!!


Wow nice work!!
 
To avoid these ads, REGISTER NOW!

kv501

Well-known member
Joined
Jul 14, 2010
Messages
613
No, its if you look on the ends of the bench, and also in the sitting space in the middle, I have legs at 45deg bolted to the wall. Legs are also made of 1/4" 1.5" angle. I know, its tough to see, maybe I'll snap a few pics closer up.

That's what "cantilevered to the wall" means.
 

rharman

Well-known member
Joined
Apr 22, 2012
Messages
8,730
Location
SoCal
4x4 legs notched for beams and 2x6 lower frame beams notched to nestle together at bottom of legs

DSCF1391_zpse238ead8.jpg

I really like that. The mitered corners and beveled cross beams are a nice touch. Elegant and clean - Well done!

BTW.... I am definitely keeping this design in mind for a bench I'm planning.
 

peelman

Well-known member
Joined
Jan 13, 2011
Messages
198
Location
Seymour, Indiana
I made this little mobile workbench last weekend so I can roll it up to whatever i'm working on and have a solid work surface. Will also come in handy when I want to cut something with the miter saw. I like to be able to wheel it out of the garage to cut stuff. I hate sawdust in my garage. I still need to do something with that middle shelf though.

I am soooo building one of these; once i find a place to put it...would love to get the heights to match up so i could use it as an outfeed table for my table saw when needed...

I really like that. The mitered corners and beveled cross beams are a nice touch. Elegant and clean - Well done!

BTW.... I am definitely keeping this design in mind for a bench I'm planning.

Agreed. Filing this away as well for future use...
 

Always_Thinkin

Well-known member
Joined
Aug 14, 2012
Messages
300
Location
Illinois
Here is my bench. I have had it for the past 5 years or so. I really like it and it works well for what I like to do. It is 8 ft long, 42 inch work surface height and 30 inches deep. The shelf 18 inches above the work surface is really handy. It also has magnetic tool strips.

Always_Thinkin
 

Attachments

  • 13_Pull-out_Drawer_Closeup.jpg
    13_Pull-out_Drawer_Closeup.jpg
    142.7 KB · Views: 373
  • 1_Workbench.jpg
    1_Workbench.jpg
    139.7 KB · Views: 478
  • 7_Tool_Cart.jpg
    7_Tool_Cart.jpg
    143.5 KB · Views: 423
  • 8_Pull-out_Drawer_Panel.jpg
    8_Pull-out_Drawer_Panel.jpg
    142.2 KB · Views: 412
  • 10_Pull-out_Trashcan.jpg
    10_Pull-out_Trashcan.jpg
    141.7 KB · Views: 385
  • 14_Roll-out_drawer.jpg
    14_Roll-out_drawer.jpg
    141.4 KB · Views: 369

ALWX65

Well-known member
Joined
Jan 13, 2010
Messages
104
Great Ideas Here !!!


4x4 legs notched for beams and 2x6 lower frame beams notched to nestle together at bottom of legs

DSCF1391_zpse238ead8.jpg


2x6 center crossbeam and 2x4 outer braces

DSCF1395_zpscab22f1c.jpg


How strong is it? Strong enough, and rolls easy even with that much weight on it.

Elgin-20150617-00091_zpsnx1twjhw.jpg
 

Vette10R

Well-known member
Joined
Feb 12, 2016
Messages
722
Location
MN
20160226_235136_zpsa7lglkjf.jpg


Here's mine I just built a few weeks ago, nothing special but its rock solid and part of the house now Haha! The shelf bracing is 16 on center then mounted to the house the same way (does that make sense?) Lol Then 4x4s on the corners, I told my wife if she pulls in to fast it will total her car out haha :lol_hitti
 

highangle501

Member
Joined
Feb 16, 2016
Messages
13
Well I guess it's my turn 2x4 frame with 2x12 top that I ran through the plainer and jointer and built all the center drawers 69d3524af28fdaf283ff07b6bd59c89d.jpg9b8ecc33babe335996b6f1fa8cdf808f.jpgac71131cd32f7137c702367815ef6e28.jpg42e46bd999930c2590acc1755c95c4a2.jpg
Still need to build the drawer fronts but otherwise
I'm going to do pegboard all behind it


Sent from my iPhone using Tapatalk
 

stikman56

Well-known member
Joined
Jun 12, 2014
Messages
3,127
I built mine out of the left over stuff from the home build. I used engineered floor joists for the legs, some 2x6's and some 16 penny nails. It turned out heavy and sturdy. Looks kind of funny with those legs, but it is functional and plenty strong.
 

Mr_B

Well-known member
Joined
Nov 21, 2016
Messages
5,373
Location
Reading
Well I guess it's my turn 2x4 frame with 2x12 top that I ran through the plainer and jointer and built all the center drawers 69d3524af28fdaf283ff07b6bd59c89d.jpg9b8ecc33babe335996b6f1fa8cdf808f.jpgac71131cd32f7137c702367815ef6e28.jpg42e46bd999930c2590acc1755c95c4a2.jpg
Still need to build the drawer fronts but otherwise
I'm going to do pegboard all behind it

Sent from my iPhone using Tapatalk


I was thinking about doing one with wood for 2 52" husky 22" deep" boxes and 36" centre space, Having seen yours I think I will go wood as have framing timbers free if I collect and result could be quite pleasing .
 

Attachments

  • 69d3524af28fdaf283ff07b6bd59c89d.jpg
    69d3524af28fdaf283ff07b6bd59c89d.jpg
    13 KB · Views: 8
  • 9b8ecc33babe335996b6f1fa8cdf808f.jpg
    9b8ecc33babe335996b6f1fa8cdf808f.jpg
    9.7 KB · Views: 7
  • ac71131cd32f7137c702367815ef6e28.jpg
    ac71131cd32f7137c702367815ef6e28.jpg
    14.7 KB · Views: 7
  • 42e46bd999930c2590acc1755c95c4a2.jpg
    42e46bd999930c2590acc1755c95c4a2.jpg
    16.8 KB · Views: 5

Ijhursh

Well-known member
Joined
Dec 23, 2016
Messages
125
Location
FL
New shop means I need a new Work Bench...


2 x 3, 2 x 2 and 1 1/2 x 1/12 .120 wall tubing, .120 thk Stainless Top, .125 6061 Aluminum Perf Panels, added outlets, lights and a light switch. 96 x 27 work surface. Made the Shelves out of 3/4 AC Plywood.


Had to cut the Tubing at work since I didn't have my new Saw set-up.


IMG_3908.jpg


Starting the Bench Top.


IMG_3913.jpg


Put leveling feet on the legs.


IMG_3916.jpg


More Welding.


IMG_3918.jpg


IMG_3920.jpg


Finished Frame.


IMG_3926.jpg


Making the Perf Panels at work. Cut them on a Mitsubishi NXF 4000 Fiber Laser.


IMG_4163.jpg


Installing the Perf Panels.


IMG_4181.jpg


Installed.


IMG_4220.jpg


IMG_4224.jpg


On to the next Bench. This time a 180 x 36 Work Surface and everything but the frame will be Stainless. Painting plywood is a pain in the ****!!!


Wow that is one impressive bench!!


Sent from my iPad using Tapatalk
 
To avoid these ads, REGISTER NOW!
Top Bottom