To avoid these ads, REGISTER NOW!

Workbench Critique.......going to start building this weekend

Fastbird

Well-known member
Joined
Jan 28, 2007
Messages
694
Location
Fort Wayne, IN
I need a workbench in my garage, way better than the makeshift cobbled together pieces of wood that's in it now.

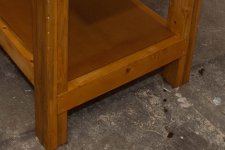
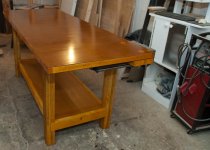
I did it up in Sketchup, you can see dimensions in the first pic. The vice is shown where I plan to put it, you can see the reinforcement 4x4's underneath where the vice will be mounted in the second pic. Actual depth is 24", actual height is 35 3/4".

Essentially, my critique point arises at the top. I plan to fasten the 2'x8' 3/4 plywood directly on the top of the 2x6 frame that's even with the 4x4 legs. I'm PONDERING actually raising the 2x6 frame 3/4" above the 4x4 legs, and undercutting the 2'x8' top to sit framed in the 2x6's. Not sure if I want to bother though.

The lower shelf has a 2x4 frame around the legs, and the other half of the 3/4" ply sheet is down there. I set it ground level to give me room to put all my stuff.

Any thoughts or critiques?


To avoid these ads, REGISTER NOW!

nolimits76

Well-known member
Joined
Jul 11, 2013
Messages
959
Location
Oklahoma
In one of my old houses, I built one very similar. I used 4x4 for my legs and 2x4 framing everywhere else (top & bottom). Instead of bracing in the middle like you did, I had bracing on 2' centers. The thing was a TANK!!!

In regards to raising the framing up 3/4", yes, you could and it would probably be fine, but I like having part of the load transferred to the 4x4's which point load to your concrete.

One thing to consider is where you are placing this work bench....up front on a level location, or on the side that has (or should have) some slope towards the overhead garage door. The reason I mention this is because the bottom shelf may not sit flush on the concrete if on a slope. One end would, but the other would have a small gap. If that is the case I would raise it up a few inches, making sure to give yourself enough room to get a broom underneath it. If you are sitting on a level surface, I would be inclined to take to the concrete and then finish out with some quarter round or similar.

Another thought...you may be better off stopping the 2x4 framing on BOTTOM so it sits flush with the 4x4's. That way you can just cut an "L" out of each corner of the plywood. Otherwise you have to nail in little filler pieces and they provide no functional value.

Lastly, verify that 36" is a good working height for YOU. If you have a bench now, take and shim as needed to get to that height. I'm a bit taller and like a taller bench. Shorter guys tend to cuss them.
 
Last edited:

Woody610nb

Banned
Joined
Jun 14, 2013
Messages
645
Location
Concord, NC
Don't set the top inside the 2x6s, because the only support you will really have is the legs. Also that bottom shelf needs to get off the floor so you can stand closer to the bench. It will be very uncomfortable as it is. Think about your kitchen base cabinets, there is a toe kick under them so your toes have room.
 

KEH

Well-known member
Joined
Jan 31, 2010
Messages
5,142
Looks good. Like Whitefeather said, I would prefer the cross pieces under the top to be 2 feet apart, instead of having just one.

I like the idea of having something to protect the edges. Doing it your way will require something around the inside to support the top, like a 1 x 4 fastened to the 2 x 6. You could also make it like the pic shows, and then fasten a 1 by or 2 by board around the outside, raised 3/4 inch to protect the top. I would prefer oak or other hardwood for this.

I would use screws for fasteners except where you use bolts.

KEH
 

Davefr

Well-known member
Joined
Jan 7, 2010
Messages
11,836
Location
OR
Use lap joints where possible vs nails/screws - much stronger!!!

Add more support members under the top and bottom surface. (at least every 16-24")

x001.jpg
 

shoot summ

Well-known member
Joined
Jun 8, 2010
Messages
2,959
Don't bring the bottom shelf to the outside of the 4x4's, you will kick it all of the time.
 
OP
F

Fastbird

Well-known member
Joined
Jan 28, 2007
Messages
694
Location
Fort Wayne, IN
DaveFR, hate to say it but I'm not a wood worker. I'll have to look up lap joints. Am going to make some revisions based on the suggestions, will post another rendering tomorrow.
 

benjamintmiller

Well-known member
Joined
Feb 8, 2011
Messages
284
Location
IA
I've found with all my workbenches that they work much better if the top hangs over the edges about two inches in all directions. That gives me a place for clamps to attach.
 

Always_Thinkin

Well-known member
Joined
Aug 14, 2012
Messages
300
Location
Illinois
I would consider raising the bottom shelf up 4"-6" so when you stand against the bench your toes won't hit that shelf.
 
OP
F

Fastbird

Well-known member
Joined
Jan 28, 2007
Messages
694
Location
Fort Wayne, IN
Quick changes. Added bracing and revised the lower shelf. No surfaces but you get the idea. Will be adding bracing to the lower shelf too.

I'm contemplating levelers under the legs just to be able to square things up. The 3.5" recess for the lower shelf will be plenty for me. I'm used to working with no bench.

CONCERN: Tucking in the lower shelf gives me a working front to back leg spacing of about 21". I'm slightly concerned over stability with it being that narrow.


crazytrain

Well-known member
Joined
Mar 4, 2011
Messages
1,550
Location
Amish Country, Pa
I agree on the lap joints for strength. They will be much stronger then just screws or nails. They can be made pretty easy with basic tools.

<a href="http://www.flickr.com/photos/93748745@N03/10062891356/" title="lap-joint by RyanLee1978, on Flickr"><img src="http://farm6.staticflickr.com/5468/10062891356_f0a5d24de8_m.jpg" width="240" height="77" alt="lap-joint"></a>

<a href="http://www.flickr.com/photos/93748745@N03/10062946143/" title="half-lap-joints-01 by RyanLee1978, on Flickr"><img src="http://farm6.staticflickr.com/5531/10062946143_836e988161_m.jpg" width="240" height="240" alt="half-lap-joints-01"></a>

<a href="http://www.flickr.com/photos/93748745@N03/10062826044/" title="half-lap-joints-02 by RyanLee1978, on Flickr"><img src="http://farm6.staticflickr.com/5475/10062826044_fe9d4518cf_m.jpg" width="240" height="240" alt="half-lap-joints-02"></a>
 

larry_g

Well-known member
Joined
Apr 28, 2007
Messages
16,889
Location
oregon
One thing that I would suggest is that you think about how your going to mount your vise. Design in structure for the mounting bolts and that the structure is in the correct place and there are not framing members in the way of mounting the vise.


lg
no neat sig line
 

DIC

Well-known member
Joined
Aug 2, 2009
Messages
698
The changes look good but I would raise the bottom shelf up 6 or 8 inches
 

nolimits76

Well-known member
Joined
Jul 11, 2013
Messages
959
Location
Oklahoma
Nice pics. Quickly shows the DIY method.

Alternatively, instead of using 4x4's, the OP could use 2x4's glued & screwed together and just cut the inside 2x4 short 3.5" to hold the 2x4 frame (or 5.5", if he sticks with 2x6 framing). This would probably even save a few bucks over 4x4's.

I agree on the lap joints for strength. They will be much stronger then just screws or nails. They can be made pretty easy with basic tools.

<a href="http://www.flickr.com/photos/93748745@N03/10062891356/" title="lap-joint by RyanLee1978, on Flickr"><img src="http://farm6.staticflickr.com/5468/10062891356_f0a5d24de8_m.jpg" width="240" height="77" alt="lap-joint"></a>

<a href="http://www.flickr.com/photos/93748745@N03/10062946143/" title="half-lap-joints-01 by RyanLee1978, on Flickr"><img src="http://farm6.staticflickr.com/5531/10062946143_836e988161_m.jpg" width="240" height="240" alt="half-lap-joints-01"></a>

<a href="http://www.flickr.com/photos/93748745@N03/10062826044/" title="half-lap-joints-02 by RyanLee1978, on Flickr"><img src="http://farm6.staticflickr.com/5475/10062826044_fe9d4518cf_m.jpg" width="240" height="240" alt="half-lap-joints-02"></a>
 

Specs

Well-known member
Joined
Sep 30, 2013
Messages
248
Location
The other side
For what it's worth, those designs look great!

I had no kind of workshop to make a bench for myself and for lack of a better word.... I'M A NOOB. I tripped on this setup and made my life easier cause now I have a starting point.

The masters on here gave great advice, it's just a meat and potatoes workstation that works.


I threw on a 4 1/2" table vice and now i can tackle projects.
 

lilscorpion

Well-known member
Joined
Mar 15, 2010
Messages
3,600
Location
Colorado
I like the design, should be strong. The only thing I'd add is some drawers, maybe a row at the top. Shelves are good for big stuff but in my years in the garage, big stuff isn't the problem. Adding a row would increase the complexity of the bench but could also be done at a later time given you design.

I agree with the comment about moving the shelf up a little off the floor. You will kick it and what fun is a bench that can't let things roll under it right?
 

Davefr

Well-known member
Joined
Jan 7, 2010
Messages
11,836
Location
OR
Quick changes. Added bracing and revised the lower shelf. No surfaces but you get the idea. Will be adding bracing to the lower shelf too.

Bracing looks good! However I'd guess that the bench will be very succeptable to racking in the lengthwise direction. Add a diagonal member to the back frame or add a panel.


I'm contemplating levelers under the legs just to be able to square things up.

I don't think you need levelers. The wood frame will flex slighlty and self adjust to subtle differences in the floor. Beside that I don't think they'd be strong enough.

The 3.5" recess for the lower shelf will be plenty for me. I'm used to working with no bench.

CONCERN: Tucking in the lower shelf gives me a working front to back leg spacing of about 21". I'm slightly concerned over stability with it being that narrow.

That is narrow. Can you go with 32-36" and keep just the bottom shelf recessed about 8". Whatever you do keep that bottom runner. There's nothing worse then hunting for a small part that's rolled under a workbench!! And Murphy's Law states that any part you drop will immediately roll right under the workbench in the hardest to reach location!! It's also nice to have a little backdrop on the top/back for the same reason.

Someone mentioned the vise mount. It's very important to beef up the mount for a vise. You don't want it simply screwed into plywood.

I'd also urge you to throw on some pegboard panels to both ends like I did with mine. It adds a lot of extra storage and also can beef up the end framing from racking.

x002.jpg
 
Last edited:
OP
F

Fastbird

Well-known member
Joined
Jan 28, 2007
Messages
694
Location
Fort Wayne, IN
To address some things. The walls of the entire garage are pegboard, so no need there.

The vice mount will be on the 3x4 plywood, but go through that into the extra 4x4 braces I will be mounting under the vice specifically for securing it.

Given I'm going to be recessing the lower shelf, I could probably afford the add some width overall and up top for stability. What I'm aiming to do is get out of it using a single 4'x8' sheet of 3/4 plywood. Trying to do this as budget minded as possible (hence I'm reclaiming some gnarly 4x4's from the current monstrosity in the garage.

Thirty inches deep might be doable, given the contraption in the garage currently is about 29" from the wall. But doing that cuts me down to a 18" lower shelf. Thinking I might be able to make do with that......have to look at some stuff.
 

taumac

Well-known member
Joined
Aug 30, 2011
Messages
8,104
Location
Brooksville, Fl
From org design I would only add more cross bracing. I would use 5 instead of 3 on shelves and extra where you plan mounting stuff. Look good.
 
To avoid these ads, REGISTER NOW!
OP
F

Fastbird

Well-known member
Joined
Jan 28, 2007
Messages
694
Location
Fort Wayne, IN
Is this how you guys would recommend doing the lap joints at the top end of the legs?


*Edit* Just noticed I set the pic above for 2x4's instead of 2x6's on the top. But you get the idea. Just don't know if that's the right way to do a lap joint on a 3 way corner or not.

Please take note, I'm NOT a person who's ever worked well with wood. I don't need professional quality, just strong and stable.
 
Last edited:

EJM02

Well-known member
Joined
Oct 23, 2011
Messages
149
When designing my bench build, a friend of mine gave me a suggestion that I'm really glad I incorporated.

He suggested having about a 2 or 3" lip of the bench top extend past the frame. It provides a perfect place to clamp to for various projects.

Overall, I think your design and the suggestions made above will provide a great bench.
 

ChevyEFI

Well-known member
Joined
Sep 2, 2012
Messages
8,760
Location
Phoenix, AZ
I would make the 2x6 around the sides of the top 2' x 8' at their outside so the 3/4" top sits on them as well as the 4x4s. That maintains a smoother work surface around the edges. Maybe a couple centered 4x4s to sturdy things up, depending on how you'll use the access to the lower shelf area.
 

wintermute

Well-known member
Joined
Sep 4, 2011
Messages
450
Location
Mount Vernon, WA
Nice design, pretty similar to mine I agree with keeping the shelf just far enough off the ground for a broom. If you wanted to get tricky, you could nail up some plastic garden edging on the inside face of the shelf support to act as a skirt to the floor
 

Always_Thinkin

Well-known member
Joined
Aug 14, 2012
Messages
300
Location
Illinois
In my opinion, you would only lap the legs for the front and rear headers. The sides act as joists to transfer the load to the front and rear header boards which is what they are screwed/nailed to..
 

Zengineer

Well-known member
Joined
Apr 10, 2010
Messages
781
Location
British Columbia, Canada
Easier than notching 4x4's, use the 2x4 glued and screwed method of making lap joints. The beauty of this table is it is all 2x4 constuction (cheap) and it's self supporting. (ie: none of the joints align with each other, the joints align over top of support)

attachment.php


attachment.php
 

Attachments

  • RGL_7585.jpg
    RGL_7585.jpg
    106.4 KB · Views: 252
  • RGL_7584.jpg
    RGL_7584.jpg
    119.1 KB · Views: 260

nolimits76

Well-known member
Joined
Jul 11, 2013
Messages
959
Location
Oklahoma
Nice bench!

The 2x4 glue & screw method is what I mentioned earlier as well. I like it and it will cut your costs down. And as the picture proves, it can look awesome. :)

In regards to your measurements and using the 48" wide sheet....depending on placement of your framing a 27" top and 21" bottom shelf would work well.

I've went back & forth on the perfect depth over the years. In my office, I have (and insist on keeping) a 36" wide desk; however, I don't like this width in the garage. I think 27-30" is about right for me, but it largely depends on what is COMFORTABLE for you!

I'm just saying there is a way to make a 48" wide plywood sheet work, and have a toe kick and sufficient top width. If you give yourself a 6" lip as someone else suggested, that puts your frame at 21" outside dimensions and works well with what I was saying. But there are other ways as well.

Easier than notching 4x4's, use the 2x4 glued and screwed method of making lap joints. The beauty of this table is it is all 2x4 constuction (cheap) and it's self supporting. (ie: none of the joints align with each other, the joints align over top of support)

attachment.php


attachment.php
 

SD396

Well-known member
Joined
Dec 7, 2012
Messages
48
Location
Kelowna, B.C.
I'm slightly concerned over stability with it being that narrow.


I would suggest fastening it to the wall studs with lag bolts. Last thing you want is your bench moving around when you're tugging on something in the vise.
 

kenfath

Well-known member
Joined
Oct 17, 2006
Messages
358
Location
Upland, CA
Not sure what you decided for the bottom shelf. My suggestion is to NOT have it on the floor. Instead, the bottom of your frame should be in the 4 to 6-inch range above the floor, OR high enough to let you get your floor jack under the end frame pieces. WHY? It would allow you to lift the loaded bench and place it on dollies for movement in, and maybe out of, the garage.
 
OP
F

Fastbird

Well-known member
Joined
Jan 28, 2007
Messages
694
Location
Fort Wayne, IN
Not sure what you decided for the bottom shelf. My suggestion is to NOT have it on the floor. Instead, the bottom of your frame should be in the 4 to 6-inch range above the floor, OR high enough to let you get your floor jack under the end frame pieces. WHY? It would allow you to lift the loaded bench and place it on dollies for movement in, and maybe out of, the garage.


Now THIS is thought provoking.

I'm going to redesign it ground up. Family is gone for 2 weeks so I've got LOTS of time to kill. Will probably have something later tonight to show for approval.
 

aka Larry

Well-known member
Joined
May 2, 2012
Messages
8,066
Location
Eastern, NC
I've built two as pictured below and wouldn't change a thing as far a simple sturdy workbench goes. The top frame is 2x6's and everything is is 2x4's, all held together with 3-1/2" long wood screws. The top is made from 3/4" thick melamine and has an overhang of 2" on three sides which is good for clamping. The lower shelf was raised to allow for a toe-kick along with storage for drain bins.


P1010866.jpg


P1010877.jpg
 

taumac

Well-known member
Joined
Aug 30, 2011
Messages
8,104
Location
Brooksville, Fl
Just a thought.... I always prefer to nest things under my benches. Igot a 8ft x2ft bench with vises mounted and under 2 craftsman bottoms, a service cart and a heavy duty metal table. I do this cause each one can be pulled out use and wheeled back doubleing my work space cause each one I do use to work on.


View media item 33641
 
Last edited:
OP
F

Fastbird

Well-known member
Joined
Jan 28, 2007
Messages
694
Location
Fort Wayne, IN
I've built two as pictured below and wouldn't change a thing as far a simple sturdy workbench goes. The top frame is 2x6's and everything is is 2x4's, all held together with 3-1/2" long wood screws. The top is made from 3/4" thick melamine and has an overhang of 2" on three sides which is good for clamping. The lower shelf was raised to allow for a toe-kick along with storage for drain bins.


P1010866.jpg


P1010877.jpg

That's pretty much what I"m trying to end up with. How'd you recess the lower shelf like that, because in the top pic all the supports look flush.
 

aka Larry

Well-known member
Joined
May 2, 2012
Messages
8,066
Location
Eastern, NC
That's pretty much what I"m trying to end up with. How'd you recess the lower shelf like that, because in the top pic all the supports look flush.

I'm not sure what you mean. The pics show the framing and the lower shelf is like the top except it's flush with the supports vs with an overhang.
 

spotco2

Well-known member
Joined
May 18, 2012
Messages
1,050
Location
NW Georgia
I'm not sure what you mean. The pics show the framing and the lower shelf is like the top except it's flush with the supports vs with an overhang.

It looks like the white board is recessed and flush with the tops of the 2x4's on the bottom shelf. I thought it was too until I zoomed in a little and noticed it was sitting on top of the 2x4'x and just cut out around the legs.
 

er3456df

Well-known member
Joined
Dec 1, 2009
Messages
230

It's an illusion-- the edge of the melamine blends in with the top of the 2x4, making it look as though the melamine is inset, flush with the top of the 2x4.

Zoom in on the pic, and you can see that it isn't.
 
To avoid these ads, REGISTER NOW!
Top Bottom