To avoid these ads, REGISTER NOW!

Workbench Design Ideas?

DIY_Guy79

Well-known member
Joined
Apr 30, 2019
Messages
424
Location
Tulsa, Ok
Gonna be fabbing a new workbench in the near future. Have some 3x3 square tube I'm gonna be using for the legs, some 2x2 square tube for the frame, and lots of angle iron from old bed frames as well as some 2"x1/2" rectangle tube for whatever else. Anyways I believe I have way more than enough steel setting around to build pretty much any kind of bench I want. Just looking for some cool ideas you guys may have had to make your workbench area awesome.

As far as what I'll be doing.. Everything. From basic tinkering with anything and everything, soldering, hobby stuff like models, some woodworking, all the way up to welding and fabricating/metal forming and hammering the ever loving hell out of anything that needs to be. I'm thinking the top will be between 6 and 8 ft in length and about 33" wide, going to over set the top all way around by maybe 3" for easy clamp gripping. with 6 3x6" planks for the top. I'm trying to locate a small length of 3x6x?" channel iron. Going to make it a pounding surface that will be nice and smooth/flush with the wood near the bench vise. I'm looking for a nice set of drawers to incorporate into it as well. Would really like to find the bottom half of a tool box. Also been looking at old file cabinets with lateral drawers, drafters cabinets, etc.


Outside of that I'm open to suggestions/ideas for things to add/not to add and look out for. Maybe cool storage ideas for different things, lights/outlet ideas, cubby's, and any tips.Also wondering what type of wood I should use for the top? Not looking to break the bank on incredibly expensive hardwood. I am going to sand and poly coat the top and and make it look as nice as possible and will do my best to take care of it, but it's still a workbench and its going to take abuse. Also what should I use to seal and gloss the top with? It will likely be subjected to pretty much every type of lubricant under the sun along with gasoline, diesel, paint thinner, mineral spirits, rubbing alcohol, etc.

Thanks.
 
Last edited:
To avoid these ads, REGISTER NOW!

seattletom

New member
Joined
Oct 30, 2010
Messages
1
Make the top out of a thick steel sheet and you can weld and pound on it all you want. 1/2" thick or more would be best. If you go thinner, reinforce it with angle iron on the bottom.
 

Short Round

Well-known member
Joined
Sep 13, 2014
Messages
92
Location
Upstate NY.
+1 on the bench outlets.

Leaflessshadetree, my dad did his that way. Also he had a couple under the bench cabinet in smaller handiboxes. Mine are in the wall about a foot over the bench surface. 12’ x 24” bench. Doubled 3/4” plywood surface.

Fully consider the lighting of it.

I am just getting close. I have 18 dual 4’ led lights on the ceiling in my 32x50’ garage but over the bench is only fair lighting for detail work.

My intent was and is to stick under cabinet lighting over the bench. Getting closer, I am painting those cabinets a second coat today.

At the moment my current lighting can be blocked by my fat head and shoulders.


ETA. I painted my workbench surface with gloss enamel rustoleum. The garage one is cobalt blue and is still unblemished. My basement bench I use for gun cleaning and reloading has some discoloration spots from one of the solvents. I used the rustoleum grey.

It’s hard to find oil based enamels anymore.
 
Last edited:

Marctrees

Well-known member
Joined
Mar 5, 2015
Messages
6,265
Location
TX/LA border - Toledo Bend
I find 2" of overhang to be more than plenty for clamping.

3" is not needed, and is less solid, more bounceback if beating on something on edge.

I go w 1 1/2", but not less.

Also consider vise mounting holes when planning frame to avoid conflict like angle web in the way of nuts underneath.

Marc
 
Last edited:

MFolks

Well-known member
Joined
Feb 3, 2013
Messages
1,045
Location
Springfield Mo.
I used a grizzly butcher block 6ft X 30" as a guide to make my rolling workbench over hang just enough for a long powerstrip. 2" X 4" legs bolted together. 6 swiveling 3" wheels with brakes for stability.
 

isb cornbinder

Well-known member
Joined
Nov 3, 2010
Messages
7,073
Location
Pacific South West, BC, Canada
Google pneumatic motorcycle lift. https://www.google.ca/search?hl=en&...ws-wiz.....0..0i131j0i67j0i131i67.t2RNpLluTHw
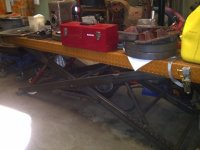
I built my own lift table. It is easily converted to a motorcycle lift table for servicing. The height is as low as low as 4 inches and as high as 48 inches.
I have used this hydraulic lift table to unload heavier item from my truck. I can load heavy machines at 4 inches and raise them up to a comfortable seated working height.
The cost to build was $1365.00 in 2002. That can be doubled in 2019.
Some of the imported pneumatic lifts can be purchased for less than the cost of the material to build your own.
A low output compressor is good enough if it can make 100 psi.
 

Attachments

  • Honda on lift table.jpg
    Honda on lift table.jpg
    60.1 KB · Views: 118
  • lift table2.jpg
    lift table2.jpg
    40.6 KB · Views: 112
  • LIFT TABLE MC WHEEL CLAMP.jpg
    LIFT TABLE MC WHEEL CLAMP.jpg
    70.6 KB · Views: 114
  • LB SOME ASSEMBLY REQUIRED.jpg
    LB SOME ASSEMBLY REQUIRED.jpg
    64.5 KB · Views: 101

isb cornbinder

Well-known member
Joined
Nov 3, 2010
Messages
7,073
Location
Pacific South West, BC, Canada
I think you might have scared a few persons away when you mentioned CASKETS. You may be out of business with no one dropping dead. If persons keep passing away they may not think they need a casket. If "they" go up there where they can look down on us, packaging may not be so important. I am going for cremation.
What do you have for a bunch of ashes?
 

sberry

Banned
Joined
Jun 18, 2005
Messages
35,747
Location
Brethren, Michigan
42 inches wide, 5 or 6 ft long, 1/2 steel top. Don't use bed frame angle. It really only needs stinkers the long way, I tack legs to the top, put the bracing in, doesn't need a gob of weld especially with shelf used as bracing underneath. I like shelf up high enough it's easy to sweep under.
 

Marctrees

Well-known member
Joined
Mar 5, 2015
Messages
6,265
Location
TX/LA border - Toledo Bend
isb - You may wish to consider our most modestly priced receptacle shown below -

Marc

Arrives in a Deep Burgundy Velvet with Gold Lame drawstring pouch.

Receptacle includes Nameplate to Memorialize with the Loved Ones Name, (Not included - Sharpie Pen $24 additional plus $8 additional shipping fee))

$139.95 shipped within CONUS. (add $49 shipping plus $29 packing charge please)

"Family Multi Pak" - Add $139.95 per additional Family Member Receptacles.

Out of Respect for your Loved ones we bear any and all extra shipping/ handling charges.

Again, we have other options that may be more appropriate to Honor the stature of your Loved One, but this is our most modestly priced receptacle.

ziploc_bags_x.jpg
 
Last edited:
To avoid these ads, REGISTER NOW!

matt_i

Well-known member
Joined
Mar 14, 2008
Messages
10,741
Location
SE Michigan
Best pounding is always directly over the legs. Even a 2" thick top there's a ring at midspan.

I suggest the swiveling leveling feet to get the bench rock-free no matter where it goes in life.

I also recommend ditching bedframe angle and save it for outdoor projects and instead get some HR 2" x 2" x 1/4" angle.
 

isb cornbinder

Well-known member
Joined
Nov 3, 2010
Messages
7,073
Location
Pacific South West, BC, Canada
I was thinking I may have my scrotum removed, stretched and tanned. While the old bag may not hold all of the ash, a smaller amount of ash may be enough to gross out my relatives. They think I am nuts. My uncle was an abbitoir . He saved and tanned bull bags and gave them to overly sensitive relatives. I nice bag of Scotch Mints for the late December celebration of overspending had the some of the next of kin looking for the barf bag. Nothing is a nice as a Scotch mint to get rid of that bad taste in one's mouth.
 
Last edited:

Justind97

Well-known member
Joined
Oct 6, 2014
Messages
691
Location
Ottawa, Canada
One thing that I’ve done that has created a lot of storage for me was adding a backsplash and then a 4” shelf on top of the backsplash made as a single piece of the metal bench top. Slightly difficult to explain. Essentially like below is how my bench top was bent for me. Ignore the periods
__
....|_______
 
Last edited:

btdobie

Well-known member
Joined
Mar 21, 2016
Messages
611
Location
Southern Minnesota
On my bench I did 12ga steel folded over some 3/4 "MDF with help from a local metal shop's hydraulic brake. Its cheaper and lighter than a thick steel top, but is just as durable. I can pound it with a sledge and not leave a dent.

Edit: Just to clarify it only folds around the edges not the bottom. To install it I smeared a coat of construction adhesive over the MDF and "rocked" the steel onto the MDF to force out any air bubbles.
 
Last edited:

JRC3

Well-known member
Joined
Jun 30, 2014
Messages
12,481
Location
Southwestern OH
Google pneumatic motorcycle lift. https://www.google.ca/search?hl=en&...ws-wiz.....0..0i131j0i67j0i131i67.t2RNpLluTHw
I built my own lift table. It is easily converted to a motorcycle lift table for servicing. The height is as low as low as 4 inches and as high as 48 inches.
I have used this hydraulic lift table to unload heavier item from my truck. I can load heavy machines at 4 inches and raise them up to a comfortable seated working height.
The cost to build was $1365.00 in 2002. That can be doubled in 2019.
Some of the imported pneumatic lifts can be purchased for less than the cost of the material to build your own.
A low output compressor is good enough if it can make 100 psi.
Seems like a mid-rise car lift would be way easier. I put everything from push mowers to pickups on mine. :thumbup:
 
OP
D

DIY_Guy79

Well-known member
Joined
Apr 30, 2019
Messages
424
Location
Tulsa, Ok
Thanks for the suggestions guys. I'm not using bed frame angle for any of the main structure. I have 3" square tube as well as some 2" square tube that will make up the bones of it. The bed frame angle is just available to use as well as some 1" light gauge square tube for anything that I may find to use it for, like shelving, drawers, additional support, etc.

Funny though, all my 3" is coming from an extremely well made canopy bed that we recently retired. Was a king bed with a really hefty canopy frame of all 3" square. With 2"x2"x3/16" angle iron to screw into where the bed rails attached. The rails were 2"x6"x1/4" angle. The light guage 1" square tube were the lateral supports between the bed rails. Think there were 8 of those. Bed was made in Canada. We got it second hand years ago. Would love to know the maker of it to see their other products as it was insanely well made. Although the 3" square tube isnt the heaviest tube on the planet its way more than strong enough. I weigh almost 300lbs and could swing from the center of any of those bars like a monkey and they wouldn't bend at all. With some good welding and some support in the corners I could probably set a big block on the bench(I wont, of course) and not have any trouble.


As far as outlets and lighting, I had planned on both, forgot to mention. Hadnt decided if i want to get a nice power strip and bolt onto it/encase somewhere or if I actually want to wire up outlets on it. I'm leaning towards the power strip for simplicity and its just one long strip that would be easy to mount out of the way. But I'd kind of like to be able to have the light wired up on the same circuit as the outlets that way my bench is fully powered by a single power cord. Would be a little cleaner.

A heavy steel top, eh... Well, I'm not really made of money and dont want to drop a couple hundred or more on a sheet of steel that big. All the metal I have now is stuff that I just happened to have. And I dont want to make the thing so heavy I need a fork lift to move it. Still havent decided if I want to put some hefty casters on it or if I just want to do leveling feet. Either way, if I ever move, I'm gonna be taking the bench with me and need to be able to get it into a truck and even with a wood top with what I have planned its going to be a tough item to move. I do like the idea of folding some light guage sheet over the wood though. I'll have to look around and see what price range I can find some sheet in.

I'm trying to locate some drawers before I get too far into drawing up any plans. Wanting to find a nice tool chest or a nice desk/cabinet with lots of drawers to incorporate and design the mid section of the bench around it. Will be much simpler and nicer than trying to come up with my own drawers. I'm shopping on a tight budget for the bench and I'm being really picky about it so it's taking a bit.

I'm really looking for cool storage ideas. Ways to really utilize the space to cram as much creative and convenient storage into it as possible as well as clamps and vises. While keeping it a clean attractive build with a really effective work space.
 

btdobie

Well-known member
Joined
Mar 21, 2016
Messages
611
Location
Southern Minnesota
I do like the idea of folding some light guage sheet over the wood though. I'll have to look around and see what price range I can find some sheet in.

Mine cost me $100 about 4 years ago. If you are really concerned about cost and weight, I think you could go as thin as 16ga over 3/4 MDF and still be quite durable. The key is to be sure there are no air bubbles between the metal and wood so the metal is fully supported.

Edit: $100 was just for the steel and machine work it didn't include the MDF. OSB would probably work well too.
 
Last edited:

astroracer

Well-known member
Joined
Jun 22, 2005
Messages
3,001
Location
Mid_Michigan
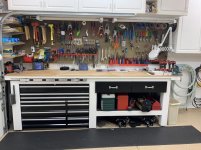
One thing I've been doing for a long time. Build a "shelf" under the top to store clear shoe boxes, drill motors and tools. The shoe boxes can hold anything you may need during a job and putting the drill motor and tools down, out of the way has been an excellent clutter eliminator.
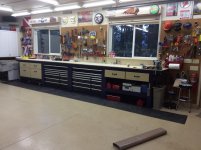
This is a top I built for new roll-a-round cabinet. The dividers are 2 x 6's. The top came with the unit.
2v291cbELx9EDKg.jpg

After some black paint, the mod disappears. I added an outlet after this pic was taken.
2v29ptzPLx9EDKg.jpg


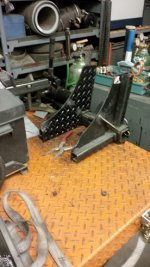
Another one. This is my go to fab bench for welding and grinding. With the 3/8th's inch top it is plenty stout. This one has a power strip on the RH end.
2v2UCoVb8x9EDKg.jpg

These both roll a round easily and have been to all corners of the shop, as needed.
Mark
 
Last edited:
To avoid these ads, REGISTER NOW!
Top Bottom