To avoid these ads, REGISTER NOW!

Workbench top attach ideas

To avoid these ads, REGISTER NOW!

rayra

Well-known member
Joined
Dec 1, 2014
Messages
4,724
Location
Escaped from Los Angeles
How permanent? Do you want hidden fasterners, or do you care if they're visible?
The easiest is to just use wood screws from below and make sure to use a length that makes it impossible to poke them all the way thru.
Personally, for a workbench, I'd just countersink some screws and make the depth of their heads just below the surface of the bench so they can't damage the surface of anything I'm working on


The real question is what are you going to do for an edge trim? a raw plywood edge is going to be prone to damage and tearing up anything you drag across it. And not be comfortable to lean against.
 

Beerhippie

Well-known member
Joined
Oct 13, 2023
Messages
10,024
Location
Far NE Oregon
I'd run a 2 X 4 or 2 X2 along the top of the long rails, flat to the top. Screw and glue--you'll have long-grain to long-grain which is ideal for glue--to the rails with a good, yellow wood glue. Then you can either use screws short enough they won't come through the top from below--that would be my preference--or countersink and screw from above. If you want to be able to easily remove the top in the future, don't glue it to the rails. I wouldn't fasten it at all on the short edges, and keep my fasteners back about 1/4 the length of the top from the ends to allow for expansion and contraction of the wood.

Iron-on edging will work much better than nothing and it's easy. If you have a router, you can trim it flush with both sides, if not, put any excess on the bottom of the edge.
 

Jlanciani

Well-known member
Joined
Jun 7, 2020
Messages
165
Location
Home
Pocket screws installed from the inside of the rails. Invisible and no extra holes or metal in the top surface. A basic Kreg jig kit is only about $30 if you don't have one already.
 

Wreckster23

Well-known member
Joined
Aug 15, 2014
Messages
369
Location
Newburgh, NY
Another option, one that I used in my old garage that turned out fantastic, screw both sheets of ply down, screw strips of wood along the edges raised up just a bit, enough to set a sheet of hardboard flush. Easy to change out the top should it get worn.
I’d grab photos, but I’m afraid those are long gone.
 

rayra

Well-known member
Joined
Dec 1, 2014
Messages
4,724
Location
Escaped from Los Angeles
I'm fine with using countersunk screws. I haven't really given the plywood edge much thought. Suggestions? Thanks.
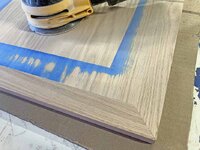
I'm kind of a carpenter, so I don't have any easy answer. Just yesterday I was finish-sanding this solid oak edging on a piece of oak-veneer plywood for some furniture I'm building.

If you are sandwiching a 2nd layer of ply on that pictured table, you could probably trim the edge with some 1x2's and either glue or screw them into the centerline of the thickest sheet. A little pre-drilling to prevent splitting would be useful. A little bit of care to make the top edges flush and maybe sand or router off the top outer edge of the trim board and it would be pretty comfortable.
 

Attachments

  • buffet build 042 countertop best corner.jpg
    buffet build 042 countertop best corner.jpg
    102.3 KB · Views: 108
To avoid these ads, REGISTER NOW!

RMERR

Well-known member
Joined
Mar 22, 2017
Messages
429
Location
Northern CA
For edge trim I used some Birch strips. Just glued and pin nailed. A little sanding and a few coats of wipe-on polyurethane. I used MDF for the top, but would work for plywood just the same.
 

Attachments

  • IMG_1356.JPG
    IMG_1356.JPG
    615.6 KB · Views: 83
  • IMG_1357.JPG
    IMG_1357.JPG
    644 KB · Views: 54

ItsNemo

Well-known member
Joined
Mar 5, 2016
Messages
4,806
Location
Canada
I have a doubled up 3/4" top...just screwed with something like 1 or 1 1/4" screws (can't remember which but enough not to poke through) from the bottom layer into the top, has been perfect.
 

Firebrick43

Well-known member
Joined
May 12, 2015
Messages
14,222
Location
West central Indiana
Maybe learn a woodworking skill?

Get a doweling jig and use dowels and glue to join the sheets together while temporary clamped together? Plus is there will be no metal in the top to damage tools.
 

tarmy

Well-known member
Joined
May 28, 2014
Messages
4,713
Location
Nor Cal
Screw one sheet down with drywall screws…then the next one. Sink them and putty them up and sand. Plywood tops are good disposable material that can be replaced every couple years.IMG_0595.jpeg
 

gilbo

Well-known member
Joined
Feb 1, 2010
Messages
717
Screw one sheet down with drywall screws…then the next one. Sink them and putty them up and sand. Plywood tops are good disposable material that can be replaced every couple years.IMG_0595.jpeg
How long did it take you to clean off the messy workbench, before posting this picture????? JK looks great, plus plus on the toolboxes builtin!!!
 

NUTTSGT

Super Moderator
Staff member
Joined
Sep 14, 2009
Messages
51,148
Location
Northern Central Ohio
I simply screwed down the workbench top, plywood, to the frame. I sunk the screws below the surface.

The edge is a 1x4 ripped down and finish nailed to the plywood. I can't remember if I used any glue or not.
 

jmarkwolf

Well-known member
Joined
Jan 15, 2013
Messages
1,824
Location
Southeast Michigan
My bench top is two sheets of 3/4in ply glued and screwed together with flat head screws, then screwed down to the wood frame, not too dis-similar to yours.

Then I glued trim around the perimeter, such that a sheet of masonite drops in flush with the top of the trim.

The weight of the masonite keeps it flat mostly. When the masonite gets grungy I pull it out and a new sheet goes in. I'm still on the 1st sheet of masonite after nearly 10 years.
 

Attachments

  • Bench with parts cabinets.jpg
    Bench with parts cabinets.jpg
    155.6 KB · Views: 55
OP
4

4 Ever-Fish N

Well-known member
Joined
Jul 20, 2011
Messages
350
Location
Deep East Texas
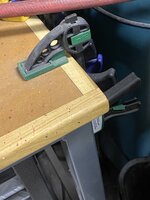
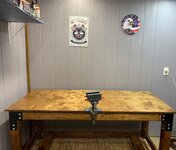
Almost done. Still have to find something for the edges and put a shelf on the lower section. I used screws to attach both parts of the top, using a countersink so the screws don't show. Thanks to all who made suggestions
 

Attachments

  • IMG_7172.jpg
    IMG_7172.jpg
    765.3 KB · Views: 51

Fixr

Well-known member
Joined
Dec 23, 2012
Messages
9,709
Location
SW VA
Plywood is really wonderful for a utility workbench top because you can just attach it to wood framing pretty much however you want. There won't be much differential in the movement as moisture content changes with humidity. You could just use your choice of sanding technology to smooth and round over the edges, and then just put a few coats of some kind of finish on them. Won't get you many GJ awesomeness points, but it will probably work just fine for decades.
 
To avoid these ads, REGISTER NOW!
Top Bottom