To avoid these ads, REGISTER NOW!

working copper

edl

Well-known member
Joined
Jan 29, 2006
Messages
809
Location
Southeast, US
Well, the time has come to plumb the compressor - this will be my first attempt ever working with copper and I could use a lot of help - i have done may searches that talk about plumbing air lines, but most are around the material and certain specs - i haven't found much on the actual a, b, c's of how to do things - so here follows a lot of newbie questions - thanks for your patience:

Heat:
- have seen that most people "sweat" the connections - I take this to mean solder - one or two others talk about brazing, which I believe involves a lot more heat - as solder seems to work for most, I guess this is what i'll do - any strong objections?

- if solder, i take it we are not talking about a soldering iron and a roll of lead free solder, but more one of those mini-torches - which one? what kind of gas? suggested size or brand?

- as to solder, looking at the shelves of HD, it looks like there is "flux" which is a gel form of solder - is that what i should use? if so, how is it applied? with what? how much? do i put it on both pipe ends being connected? any magic other than an even coating? - or should i use the roll of solder wire? or both? or something else entirely?

- any merit to the joints that have hardened soldered already lining it? - is this a good way to go?

- in either case, how to i heat the joint? how far away should the flame be? should i keep the flame moving? should i roll the pipe around to get all sides of the of the joint? while i will try to do most things in a vise, how do you get at the back side of the joint if it is against the wall? how long do i heat it? how will i know it is "done"?


2. Layout

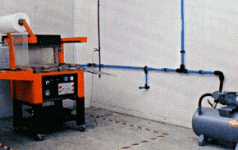
- this is the layout i am planning: first a ball valve at the 3/4" outlet at the side of the compressor - the thought here is that i have a shut off right there if i need it, without having to use electric shut off should a line burst - the tank can then stay full - what should i put on the joint threads - just the white tape? something else? how tight should that connection be?

- next a have 12" section of steel braided hose with swivel joints on each end -fellow at pipe store said not too much pressure putting the male in the swivel female, and no compound or tape needed - then tape (4"??) on the male ends - this hose is 3/4 each end, both ends male - how tight should the male be screwed into the ball joint at the compressor side?

next I believe i need a "union" that connects the 3/4" steel braid to the 1" copper - what exactly is this called? what does it look like - assume one end is a female threaded and the other is copper to copper and is a "sweated joint

- from there I go through the garage wall, straight up the wall to ceiling - on this run, i will but a tee (assume this has 3 oppenings - 2 have to be 1" - the one going to the compressor and running air up to the ceiling - how about the one going down as a drip leg - 3/4"? 1/2"? - will have a ball joint on teh drip leg and a 45 deg joint at the end so it drips away from the wall...

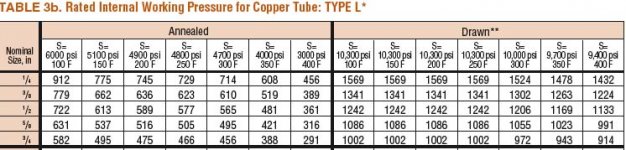
- i will turn 90 degrees toward the back of the wall, stopping 6 inches or so short of the ceiling so i can build slope as i go along toward the back - will have a run accross the garage to a station on the side wall opposite the one it came in on, and 2 stations on either side of the work bench at the back of the garage - 1 fiinal one on the ceiling for a reel/hose - the high runs will be 1" all the way around (schedule L) - should the drops toward the work stations be 3/4" or 1/2"? and same question for the portion below the station to the drip leg 3/4" or 1/2"?

- at each station I plan to have a T - the section going into the reg/filter is 1/2" flexible rubber line (300 psi for air) with swivel ends on each side (got all of these flexible sections made at a local hose place - the 1/2" are 16"long and with 2 swivel connections cost $9 - the steel braid at 3/4 x 12" with 2 swivels, $39) - do i use a union and connect the rubber hose directly to the T via the union? or should i have a short section of copper then a union?

- for emergency shut off, i will start the entire line with a ball valve at the compressor, once in the garage, I will put a ball valve so i can shut off there and purge the lines - don't want loaded lines when i am not working with the kids etc. - there would be a ball valve for each drip leg - and each regulator/filter will have a shut off valve - anything else needed??

I think that is pretty much it - will use 2x4 as blocking as there is already conduit will have to over - will ensure sloping back toward the start on all lines (or is there a preferred way?) - WHAT HAVE I MISSED? WHAT ARE THE TIPS AND TRICKS THAT WILL MAKE THIS EASIER? WHERE SHOULD I START?

By the way, what is the best way to cut the pipe?
 
To avoid these ads, REGISTER NOW!

wrench409

Well-known member
Joined
Oct 14, 2006
Messages
2,559
Location
Over here....
edl said:
Well, the time has come to plumb the compressor - this will be my first attempt ever working with copper and I could use a lot of help

I would NOT use copper lines for compressed air!
 

VvvJRvvV

Well-known member
Joined
Oct 25, 2006
Messages
66
Location
Sharptown
lefty said:
I would NOT use copper lines for compressed air!

Why not? It is the next best thing to black iron. Some would even argue it is better than black iron because it does not rust.
 

Charles (in GA)

Well-known member
Joined
Jan 11, 2006
Messages
12,489
Location
50 mi south of Atlanta
May I suggest the Copper Tube Handbook as a reference. WARNING: 6.38 MB download, do not try this on a phone modem!

http://www.copper.org/resources/pub_list/pdf/copper_tube_handbook.pdf

Use a Mapp gas torch, its hotter than Propane and easy to use and get gas cylinders.

Solder everything you can on the floor, even going to the point of using screw together union couplings to assembly major subassemblies so you don't have to solder up on the wall. Keep a fire extinguisher and hose at hand, use something such as a galvanized sheet to slide behind where you are working. When done, stay in the area for 30 minutes or more to assure that nothing is smoldering that you missed. Be very alert for fire hazard.

Charles
 

wrench409

Well-known member
Joined
Oct 14, 2006
Messages
2,559
Location
Over here....
VvvJRvvV said:
Why not? It is the next best thing to black iron. Some would even argue it is better than black iron because it does not rust.

I've seen too many split lines. Black iron will last a long time as long as you keep the system dry.

JMHO
 

lilpeenoiracer

Well-known member
Joined
Oct 8, 2006
Messages
133
Location
La Puente,
sweat b4 putting it up but there are those joints that will need to be sweated on the walls, get those blankets that they sell in the copper section of yhour local hardware store, will save u from blck ugly burns on walls, and prevent at worse a fire. i used ez sweat joints, it wasnt too much more, doesnt look as clean as the regualre sweated joints, but it halped me out alot since i was a firest time sweater :-D. so far its worked perfect, non of my sweated joints leaked from the start, and are still holding strong, all my leak problems were due to threaded joints, for the flex lines for the regulator i just boght a 1/2x50ft air hose goodyear, and cut it up and used 1/2"barb x 1/2"fpt, works great for me.

the solder i used was 100% free of lead, i forgot the brand, i started off with a propane tank that i had for a few months now, and still have that same propane tank not yet finished, during the middle i switched over to a butane torch, MAPP gass. i had to fix a leaking faucet and main like regulator for our house, there was lots of watter around the pipe i was fixing and it was a 1" pipe which the propane did not do it so i oppped out for the mapp. the mapp gas worked great on the 1/2 copper lines i used for my compressor. if i were u i would not use a lighter to keep lighting the torch it gets anoying, keep a candle lit or get an autolight torch. let the copper cool naturally what i did was set teh copper peices on an aluminum peice of metal i had to help disipate heat much faster, just dont dump in water or ne thing like that solder could crack so ive herd. id idnt care how most of my joints looked as far as drippign solder and all that cause i was goign to cover with dry wall ne ways but the ones thare are exposed, i used flux right after i sweated them to clean it up, also a rag to wipe it up, keep ball valves open when sweating helps the heat travel, i left it closed once and when i opened it it bunch of pressure had built up and some solder had built up on the ball and made it a little hard to open. for the ball valves i used the full port threaded valves which i hated, it caused lots of problems and wasted time and money. well. atmy local home depot i found these esy sweat ball valves, not llike your regular sweat type brass ball vales but it has a copper sleeve that you sweat on the the copper line then screw it all togther and its done i found it usefull when disconnecting the steel braded flex line from the coppper lines, just take the valve appart and u can easily take the fleex line of for servicing, i have pictures of everyting on my post on my garage.

learned most of everyting from this forum lots of information on here.

http://www.garagejournal.com/forum/showthread.php?t=5893&&showall=1

hope i helped u out and didnt confuse u lol.
 

JohnHenrys48

Well-known member
Joined
Jan 27, 2005
Messages
199
Location
Arizona
edl said:
- as to solder, looking at the shelves of HD, it looks like there is "flux" which is a gel form of solder - is that what i should use? if so, how is it applied? with what? how much? do i put it on both pipe ends being connected? any magic other than an even coating? - or should i use the roll of solder wire? or both? or something else entirely?


By the way, what is the best way to cut the pipe?

Check out that link that Charles posted. It's a wealth of information.

As far as the flux goes...it's not solder. It helps the solder "flow". Lightly coat both pieces to be joined, then connect, then heat and apply the solder.

Too much flux is a bad thing though, it is corrosive.

The best way to cut the pipe is with a tubing cutter. Buy a larger one that you need for your job. In the future, you may need to cut larger diameter pipe and you will not need to purchase two of them (like me doh!).

Everyone else has given good information, so I won't elaborate...
 

Randall Edge

Active member
Joined
Nov 1, 2006
Messages
39
Location
Savannah, Ga.
VvvJRvvV said:
Why not? It is the next best thing to black iron.
I've looked at the black iron locally and I've seen pressure ratings of 150 psi for 3/4". What's up with that, seems like the black iron should be way higher. Am I reading something wrong? That is way less than the thinnest copper.
 

VvvJRvvV

Well-known member
Joined
Oct 25, 2006
Messages
66
Location
Sharptown
The black iron vs. copper pipe fight could go on forever. Personally, I prefer copper because I don't have to worry about rust in my lines. Black iron does have its benefits though. Honestly, there is nothing wrong with either of them. If you do a search on this site, you will find many different people using both of these.

My comment to lefty was just that, a comment. I wanted to know his reasoning for not liking copper.

To post back to lefty. If copper is abused, there is a chance of a split pipe. I could see this happening if you used the lighter copper, not L or M though.
 

Randall Edge

Active member
Joined
Nov 1, 2006
Messages
39
Location
Savannah, Ga.
VvvJRvvV said:
To post back to lefty. If copper is abused, there is a chance of a split pipe. I could see this happening if you used the lighter copper, not L or M though.
I thought M was the thin stuff. L and K are the thick stuff. K being the thickest.
 
To avoid these ads, REGISTER NOW!

bmwpower

Super Moderator
Staff member
Joined
Apr 24, 2005
Messages
12,578
Location
NJ
lefty said:
I've seen too many split lines. Black iron will last a long time as long as you keep the system dry.

JMHO

How many?

I've never heard of a copper pipe splitting. Unless you have inferior copper and a compressor that runs up over 300 psi, I don't see it bursting.
 

ersatzs2

Well-known member
Joined
Aug 9, 2006
Messages
630
Location
Mercer County, New Jersey
Legris Transair

Anyone used this stuff? Stainless, aluminum and polymer, with mechanical connections. The local Rotary dealer sells it, says it is what they are installing at all their higher end dealership garage clients. It doesn't look cheap but it does look quick to install.

http://transair.legris.com/en/index.htm
 

Attachments

  • Transair pipe.gif
    Transair pipe.gif
    23.5 KB · Views: 95

byrdman

Well-known member
Joined
Jan 15, 2005
Messages
308
Location
NC
edl said:
Heat:
- have seen that most people "sweat" the connections - I take this to mean solder - one or two others talk about brazing, which I believe involves a lot more heat - as solder seems to work for most, I guess this is what i'll do - any strong objections?
Yes, that means solder. And not electrical solder!

edl said:
- if solder, i take it we are not talking about a soldering iron and a roll of lead free solder, but more one of those mini-torches - which one? what kind of gas? suggested size or brand?
UL100_tn.jpg

Classic BernzOmatic torch is fine. MAPP is not required. Sweating ball valves (thick heavy material) will just take a minute or two longer. Leadfree solder is fine.
edl said:
- as to solder, looking at the shelves of HD, it looks like there is "flux" which is a gel form of solder - is that what i should use? if so, how is it applied? with what? how much? do i put it on both pipe ends being connected? any magic other than an even coating? - or should i use the roll of solder wire? or both? or something else entirely?
flux is brushed onto a clean deburred pipe end before fitting the pieces together. I put it on both pieces and try to apply a thin, even coat on the area where both pieces will touch. Then you sweat. Flux prevents oxidation, so the solder can work better.

edl said:
- in either case, how to i heat the joint? how far away should the flame be? should i keep the flame moving? should i roll the pipe around to get all sides of the of the joint? while i will try to do most things in a vise, how do you get at the back side of the joint if it is against the wall? how long do i heat it? how will i know it is "done"?
Hey, don't sweat it! (ha ha ha, bad humor) Seriously though, it's not that critical. You'll figure it out easily when you start in. Heat the fitting, not the pipe going into the joint. Leave the flame on the joint. The flame should be in full contact with the fitting. If it's taking you more than a minute or two to get it hot enough to sweat, you need more heat. (again, thick ball valves will take longer than this with propane) When it's hot enough, solder placed against the area where the pipe joins the fitting should flow into the fitting, towards the heat. You want it to flow into the joint 360°, all the way around the pipe. Assemble as much as possible before mounting to the wall.

edl said:
By the way, what is the best way to cut the pipe?
Get your self a regular pipe cutter, and a little brush-looking tool to clean the pipe. Some solder, emory cloth, a Benzomatic torch and ignitor, extra fittings, fire-proof fabric, welder's gloves, etc.

Keep everything clean. Deburr and clean each end of every joint. It should be shiny copper. If you screw up a fitting (doesn't flow well), cut that fitting off and try again, don't reheat it and try to flow solder into it again. Assemble as much as possible before hanging sections of pipe.

I assume you saw the post about my project, but in case you didn't, it's HERE. It covers most of the tips I'd be inclined to give out.

Good luck! Post pictures!
 

tsbrewers

Well-known member
Joined
Dec 7, 2006
Messages
71
Re: Legris Transair

ersatzs2 said:
Anyone used this stuff? Stainless, aluminum and polymer, with mechanical connections. The local Rotary dealer sells it, says it is what they are installing at all their higher end dealership garage clients. It doesn't look cheap but it does look quick to install.

http://transair.legris.com/en/index.htm

It is good stuff. The pipe itself is not too expensive, it is the fittings that are spendy. I have a buddy that sells it (jhfoster.com) and will probably go with it, once i figure out where the compressor will live in the garage for good. Hoping copper prices drop so I can run another 240 line in where I want the compressor to sit.

Brew
 

PAToyota

Well-known member
Joined
Jan 20, 2006
Messages
4,366
Location
South Central Pennsylvania, USA
bluepipeguys.com said:
Copper is not designed for air pressures!

I'd be curious as to where you came up with that?

Straight from the Copper Tube Handbook:

Compressed Air—Use copper tube of Types K, L or M determined by the rated internal working pressures as shown in Table 3. Brazed joints are recommended.
 

wrench409

Well-known member
Joined
Oct 14, 2006
Messages
2,559
Location
Over here....
bmwpower said:
How many? I've never heard of a copper pipe splitting. Unless you have inferior copper and a compressor that runs up over 300 psi, I don't see it bursting.

My uncle's shop was plumbed with copper. He was always dealing with leaks, splits, etc. I worked in a few gas stations when younger. The copper never had soldered seam problems but constantly had burst lines close to the compressor. My current job - we replaced ALL of it with iron pipe. Too many hisses.

Now, remember these are old buildings, uncle's garage and the gas stations are long since torn down. I still work at the refitted shop. Now the onlt hissing is the abused hoses and fittings. These kind of experiences tend to influence opinions of the material. No way to know the original contractors installation methods or quality of materials he used.
 

blue77

Member
Joined
Dec 4, 2006
Messages
21
What metal WAS designed for compessed air? Metal is metal, as long as it is airtight and of the right thickness any can work. That said, all have advantages and disadvantages. Dry air is pretty safe with black iron, copper is safe as long as jointed properly, the new fangled stuff is also safe when plumbed properly.
 

blue77

Member
Joined
Dec 4, 2006
Messages
21
lefty said:
My uncle's shop was plumbed with copper. He was always dealing with leaks, splits, etc. I worked in a few gas stations when younger. The copper never had soldered seam problems but constantly had burst lines close to the compressor. My current job - we replaced ALL of it with iron pipe. Too many hisses.

Now, remember these are old buildings, uncle's garage and the gas stations are long since torn down. I still work at the refitted shop. Now the onlt hissing is the abused hoses and fittings. These kind of experiences tend to influence opinions of the material. No way to know the original contractors installation methods or quality of materials he used.

Older materials are always suspect, modern drawing processes are 1000x better than they were, more importantly they are consistant. I would be surprised if you had those issues with modern copper.
 

byrdman

Well-known member
Joined
Jan 15, 2005
Messages
308
Location
NC
That's a bunch of whooey!(did I spell that right?) It may be that bluepipeguy is just pitching his website there. Schedule L copper is just fine for pressures typically found in the shop. Check the article that Charles posted again.
 

Mike F

Well-known member
Joined
Jan 28, 2006
Messages
197
Location
Long Island, NY
Though I do not have years of shop experience around compressors, I did quite a bit of research before configuring my compressor setup (which is a work in progress). One of the references is The Copper Handbook, from which I found the following info. Of course, if joints are not sweated properly there can be leaks in the system, but otherwise the numbers are quite favorable for anything most of our shops will be seeing. What seems to be key here is to use the proper solder- 95-5 tin antimony. Of course if you have some mammoth compressor for factory use, that's another story.
 

Attachments

  • actual burst pressure.jpg
    actual burst pressure.jpg
    66.4 KB · Views: 17
  • working pressure.jpg
    working pressure.jpg
    70.1 KB · Views: 22
  • soldered joints.jpg
    soldered joints.jpg
    72.5 KB · Views: 34
Last edited:
To avoid these ads, REGISTER NOW!
Top Bottom