To avoid these ads, REGISTER NOW!

Workshop 88

OP
M

Mr. 360

Well-known member
Joined
Nov 23, 2012
Messages
662
Location
Bowmanville, Ontario
To avoid these ads, REGISTER NOW!

longlivepunk

Well-known member
Joined
Feb 22, 2013
Messages
377
Location
Edmonton, AB, Canada
I know they wont have quite the same character as the pegboard idea but hear me out.

Haha I like that you have to justify things now ever since the Paint Vs. Stain controversy! :p Good score on that maple, man. That'll look great! Gotta love getting to go through your work place's old stuff.
 
OP
M

Mr. 360

Well-known member
Joined
Nov 23, 2012
Messages
662
Location
Bowmanville, Ontario
Haha I like that you have to justify things now ever since the Paint Vs. Stain controversy! :p Good score on that maple, man. That'll look great! Gotta love getting to go through your work place's old stuff.

I suppose I could have said something more along the lines of "I'm going with flat panel maple doors, get over it." Actually I was pretty on the fence about using them for a while, as I liked the pegboard idea. They've grown on me though. They're really well made, and made locally too. I like that about them.
 

FlyOverStateFarmboy

Well-known member
Joined
Jul 25, 2013
Messages
125
Location
Flyover State of Kansas
I've been a long time lurker on your thread, and I must say, I really like your garage and sketches. When I was younger, I'd draw cars all the time and wanted to be a car designer. Well I became a mechanical engineer instead and haven't looked back. I also really like your Willys truck. I almost bought a '47 Willys CJ2A last weekend for a project, but ended up getting another Harley. :lol:
 
OP
M

Mr. 360

Well-known member
Joined
Nov 23, 2012
Messages
662
Location
Bowmanville, Ontario
I've been a long time lurker on your thread, and I must say, I really like your garage and sketches. When I was younger, I'd draw cars all the time and wanted to be a car designer. Well I became a mechanical engineer instead and haven't looked back. I also really like your Willys truck. I almost bought a '47 Willys CJ2A last weekend for a project, but ended up getting another Harley. :lol:

Thanks for stopping by. I wanted to design cars as a kid too, realized in university that the job market is super competitive for car designers so I went the industrial design route instead. I took a look at your thread, wish I was living on a farm and had a bunch of out buildings like you do, sometimes the space can feel a little small. The Willys pickup is a fun, albeit very slow project. It's patiently waiting it's turn till I'm more or less finished in here with the big stuff. Cupboard doors, lighting, and a workbench are more or less my last big things in here. I've started slicing up the wood I picked up for doors and I think it'll look great when its done.
 

HSpencer

ALLIANCE MEMBER
Joined
Nov 28, 2010
Messages
2,854
Location
South Central US
Lots going on in there as usual. Just a super place to work and the shop is looking good with the new wall work. You place is one of my favorites to be sure.

Best Regards
Herb
 
OP
M

Mr. 360

Well-known member
Joined
Nov 23, 2012
Messages
662
Location
Bowmanville, Ontario
Lots going on in there as usual. Just a super place to work and the shop is looking good with the new wall work. You place is one of my favorites to be sure.

Best Regards
Herb

Thanks very much Herb! I've been getting a bit done here and there as I get the time, winter kinda has a way of stealing your drive. That being said, when the woodstove is going it's about 90 in there. Honestly it gets so warm and dry I open a window, and that's with a small fire with maybe 3 pieces of wood.

View media item 48008
A few little things lately, I started sawing up the cupboard doors into smaller cupboard doors, and used my leftover wainscoting wood to cover up the area above the roll-up door, so now it has a bit of flow. I hope to soon get that sheet of beadboard down and slice it up for the bathroom in the house, then maybe gut the rafters of old **** I don't need.

View media item 48005View media item 48007View media item 48006
I had to build it flush with the framing, so that's why you see the studs with the boards. If they sat on top they blocked the doors' path. Also, to anyone who really doesn't like the pink batton stuffed in the door, I'm right with you. I'd like to get a foil backed foam type of insulation that's light and doesn't trap dust, not to mention that the pink stuff is ugly.

Side story, I was driving to work last week in a snowstorm, so I took the backroads figuring they'd be safer with less traffic. I was driving through a whiteout with blowing snow and hit a 3' deep drift that went across the road, followed by about 4 successive smaller drifts. Broke the lower part of the bumper and the plastic grille, stuffed snow into the condenser fins, and filled so much snow into the engine bay the serpentine snapped.

16265363449_c7bd68587b_c.jpg
16263925908_b685d864d1_c.jpg

I had to dig the snow out of the engine bay with a snowbrush scraper before taking that pic, there's still a compressor down in that snow. I let the car cool and hobbled it back to the main roads with no water pump or alternator. only drove a little bit between cool-down sessions. Once I hit main roads I popped the hood, jammed a piece of stiff cardboard from a shipping container, propped the hood open and bungeed it tight to make a large ram air scoop of sorts.

16264224230_dca8a46434_c.jpg

(I added the bungee location in paint, since it wasnt on when i took the pic). Took me a while to nurse it home, but my dad and I threw a new belt on it in the driveway that night. I made a special 'fishing' tool that helped me loop the belt through the tight areas, and had it on in about 5 mins. The compressor clutch was so full of ice the car wouldnt turn over so I had to warm it with a heat gun for 10 minutes or so. Anyways, car runs like a champ now, 400,000km here I come.
 

FlyOverStateFarmboy

Well-known member
Joined
Jul 25, 2013
Messages
125
Location
Flyover State of Kansas
Thanks for stopping by. I wanted to design cars as a kid too, realized in university that the job market is super competitive for car designers so I went the industrial design route instead. I took a look at your thread, wish I was living on a farm and had a bunch of out buildings like you do, sometimes the space can feel a little small. The Willys pickup is a fun, albeit very slow project. It's patiently waiting it's turn till I'm more or less finished in here with the big stuff. Cupboard doors, lighting, and a workbench are more or less my last big things in here. I've started slicing up the wood I picked up for doors and I think it'll look great when its done.

Yeah I gave up on it cuz I didn't want to have to go to art school and get a job a long ways away from home. That and my drawings are not the best. :lol:

I really enjoy all the space I have, but sometimes I think a smaller garage would be neat with everything packed away in its place like in your garage or Jack's 12 gauge garage. I think that is just my ocd talking though. Lol

Your Willys is going to be a great project. It's nice to have one that runs and drives and you can slowly fix small things here and there. I'm excited to see you getting things more or less finished. I still have a ways to go figuring out how I want things arranged.
 
OP
M

Mr. 360

Well-known member
Joined
Nov 23, 2012
Messages
662
Location
Bowmanville, Ontario
Picking up a bit more freebie wood tomorrow from the overstock. I'd have bought this but they gave it to me, which was nice of them.


View media item 48051
View media item 48052
View media item 48053
Remember how I mentioned that the garage plans can be a fluid thing? Well this stuff is my new workbench. I had been planning on making butcher block tops, but this is so, so much faster.

The goods:
It's 4 sheets of 1 1/2"x4x8 quarter sawn Maple on a maple veneer core, AA face and B grade backer. That's right, a 4x8 sheet of 1 1/2" Maple. I know it isn't technically solid wood, but the top veneer is maple, the bottom veneer is maple, and the 24 or so layer core is also Maple (D-grade, but hey). This stuff is monumentally overkill, and that's whats so cool about it. Oh ya, and the fact that it's free isn't bad either.

The plan is to slice each sheet into a 30" strip, and an 18" strip. The whole back wall will be 30" deep and an 18" deep 'L' will run down the long wall about 6' or so. The grey cardfile will come off its feet and be slid underneath, setting the height to 39" for the bench. My 30x60 tanker table will get a lift and casters, and I'll weld in supports so my 3 rolling cabinets will get mounted underneath it. It will then roll in under the 30" deep part of the bench on one end. It's a work in progress so I'll try to get some sketches up soon. Best part is it's getting delivered tomorrow in the big company truck as we run some errands.

The rest of the material will be built under the bench for the cupboard shelving etc. Nothing going to waste here, gonna use every part of the whale.
 

rmalkow2

Well-known member
Joined
Jun 26, 2009
Messages
4,087
Location
Brighton, MI
Nice score on the wood and sounds like lots of progress being made in the garage. Got any more progress pics?
 
OP
M

Mr. 360

Well-known member
Joined
Nov 23, 2012
Messages
662
Location
Bowmanville, Ontario
Very innovative temporary road side repairs Eric, well done..

Thanks, got me home in one piece and lived to fight another day.

I like your style man! :thumbup:

Thanks very much! Hoping with paint and cupboard doors it'll look more finished.

Nice score! I didn't realize you could get plywood in 1 1/2" thickness, let alone maple. Sweet!

I'm not sure who this skid was intended for years ago, but when I unearthed it, I said "that's coming home with me." each sheet weighs probably 150+ pounds, I'll have to be creative moving, cutting, and installing it. One thing for sure is it's murderous overkill.

Nice score on the wood and sounds like lots of progress being made in the garage. Got any more progress pics?

Got a few more pics on my phone. The place is in one of its regular 'worse before better' states so it ain't pretty.

That plywood is going to make a great workbench. How are you planning on finishing the top of it?

Thanks. I'm open to suggestions actually. I had figured give it a sand and then a clear poly of some kind. I may look into staining it to make it a little richer and deeper before the clear though. I have some maple Strips which I will use for edge banding so it looks solid. Might throw a logo under the poly a la suggested by forty-four. Will have to see how it plays out I guess. Anybody know a good clear coat that isn't ridiculously expensive? I likely can't do it till nicer weather in the spring... like May perhaps. I can build the bench and lay a sheet of hardboard on it until sealing.
 
Last edited:

Jim_No_Garage

Well-known member
Joined
Jan 15, 2011
Messages
3,299
Location
Millington NJ
Side story, I was driving to work last week in a snowstorm, so I took the backroads figuring they'd be safer with less traffic.

I feel your pain. Last winter I hit a mound of snow that was left in the main road while some jackwagon plowed a driveway into and across the road to the far side.

The snow mound snagged/rattled the refrigerant line for the rear a/c condenser on the 2006 T&C van. My daughter smelled the refrigerant immediately - I couldn't smell it and the local mechanic didn't catch it either.

Long story short it's a $1,000 repair on a $4,000 vehicle.

That's some nice plywood - I need to check back and see what you do with it.

Cheers

Jim
 

SD396

Well-known member
Joined
Dec 7, 2012
Messages
48
Location
Kelowna, B.C.
I just finished going through the entire thread and all I can say is WOW. It always amazes me what some people can do with a small space. I see lots of ideas I might have to incorporate in my shop.
I started out with a 12x24 attached carport and eventually enclosed and added on to make it a 12x32 garage. Like you I always keep my eyes open for useable freebees and used a lot of recycled or free wood, light fixtures and cabinets from our kitchen remodel. I even loaded about 20 or so 8' 2x6"s I salvaged into our Toyota Corolla when my truck was down. Unfortunately I got impatient and ended up buying more material than I would have liked in order to get things finished up quicker.
I like the maple cabinet door idea. I did the same only with birch ply, but partly due to wanting things to somewhat match my old birch workbench I made years ago.
Keep up the inspiration, I'll be checking back often.

Bob.
 
To avoid these ads, REGISTER NOW!
OP
M

Mr. 360

Well-known member
Joined
Nov 23, 2012
Messages
662
Location
Bowmanville, Ontario
Then it's almost enough. :lol_hitti

I'll have to frame it in steel then.

Wow, those must've been some expensive sheets! Any idea what they were intended for?

I have no idea what it was intended for, it's just ridiculously heavy and strong. I can't find a price for this thickness but 3/4" goes for about $100 a sheet, but with a standard softwood core. This thickness, with a full maple core has got to be $200 or more each sheet.

I feel your pain. Last winter I hit a mound of snow that was left in the main road while some jackwagon plowed a driveway into and across the road to the far side.

The snow mound snagged/rattled the refrigerant line for the rear a/c condenser on the 2006 T&C van. My daughter smelled the refrigerant immediately - I couldn't smell it and the local mechanic didn't catch it either.

Long story short it's a $1,000 repair on a $4,000 vehicle.

That's some nice plywood - I need to check back and see what you do with it.

Cheers

Jim

Man, tough blow on that one. I think I was lucky that the drift was pretty soft. Still, it did manage to kill the compressor... The clutch doesn't engage anymore. The new belt was $15 so I'm not out much.

I just finished going through the entire thread and all I can say is WOW. It always amazes me what some people can do with a small space. I see lots of ideas I might have to incorporate in my shop.
I started out with a 12x24 attached carport and eventually enclosed and added on to make it a 12x32 garage. Like you I always keep my eyes open for useable freebees and used a lot of recycled or free wood, light fixtures and cabinets from our kitchen remodel. I even loaded about 20 or so 8' 2x6"s I salvaged into our Toyota Corolla when my truck was down. Unfortunately I got impatient and ended up buying more material than I would have liked in order to get things finished up quicker.
I like the maple cabinet door idea. I did the same only with birch ply, but partly due to wanting things to somewhat match my old birch workbench I made years ago.
Keep up the inspiration, I'll be checking back often.

Bob.

Thanks very much! Sounds like you're quite familiar with making do with what you've got in a small space. I know there's a trend in housing called the 'tiny house movement,' I guess this space is sort of the garage equivalent. I'm looking forward to getting everything unified in here and actually being able to do projects and make stuff.
 

FlyOverStateFarmboy

Well-known member
Joined
Jul 25, 2013
Messages
125
Location
Flyover State of Kansas
The logo under the poly would look awesome on your bench, but I'd be afraid of scratching it if working on anything metal. As long as you have a piece of hardboard to throw on top, it'd solve that problem.
 
OP
M

Mr. 360

Well-known member
Joined
Nov 23, 2012
Messages
662
Location
Bowmanville, Ontario
So last saturday I managed to get the 4 sheets of overkill Maple home. Myself and another guy used the company's big truck to run some errands, so I piggybacked the move of the wood at the same time. Moving this stuff into the shop nearly killed my arms, even with 2 people. I must be getting soft from my desk job, but I'm pretty sure these sheets are about 200lbs each. Regular 4x8 plywood is 15lbs per 1/4", so minimum 150lbs. This being hardwood I'm betting its up considerably.

View media item 48331View media item 48330View media item 48329
It's actually pretty clean all things considered. It was stamped on the tag as being manufactured in 2009, so it's been sitting in a warehouse for 6 years. The very edges are a little dirty but it seems to wipe/sand out, and the edge banding will cover a lot too (you can just see the edge banding all standing up on the right in the second pic, in the background).
 
OP
M

Mr. 360

Well-known member
Joined
Nov 23, 2012
Messages
662
Location
Bowmanville, Ontario
The logo under the poly would look awesome on your bench, but I'd be afraid of scratching it if working on anything metal. As long as you have a piece of hardboard to throw on top, it'd solve that problem.

Not a bad idea on the hardboard. I've seen people use rubber mats before too for some grip. I do have a steel bench that doesn't mind getting scratched if it's something particularly heavy and sharp.
 
OP
M

Mr. 360

Well-known member
Joined
Nov 23, 2012
Messages
662
Location
Bowmanville, Ontario
Having dreamt of a new, solid workbench for a while now, this weekend I started making it a reality. I used a bunch of nice, straight 2x4's I'd picked up a few years back, and threw together the frame which is screwed into the wall studs. The design idea here is that this is the heavy part of the bench, while out to the right is where my yet to be modified Tanker Table island will stow.

View media item 48564View media item 48565View media item 48566
You can see in the pic how I've screwed lengths of angle iron to the wall as support for the free-span part of the bench. This allows the island workbench to be as tall as possible, not having to deal with the frame of the bench.

View media item 48567
The plan is for the 30" deep bench to run the full back wall of the shop, while an 18" bench extends out over the gray cardfile unit to house my Myford ML7 metal lathe. The corner area will have cupboards built in underneath for heavy storage and bulky tools like my planer and metal chop saw.

View media item 48568
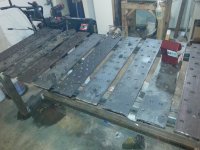
Nothing is 100% bolted down yet. I still have to add a support leg and glue the edges of the thick sheets together for a unified surface.

16004658833_6c833e5ff5_c.jpg

16623306941_0be5691f20_c.jpg

16598455336_e389c189a1_c.jpg


Cutting those big sheets was a bear of a task, so I had my dad over to help me move em onto the sawhorses. Since my makita saw still has a bunned cord, he brought his old cast aluminum Sears Craftsman unit, 1-3/4HP, probably late 50's/early 60's. With a nice blade this saw handled the wood no sweat and made beautiful cuts that were as nice as factory. I also managed to design it to use only 2 sheets so I might be inclined to sell the other 2 or slice them down for 2 very nice workbenches on my parents farm. I'm more inclined to hang onto them since this kind of plywood doesn't come around every day, and getting it for free is almost unheard of.

16417117527_d3b40cf6ba_c.jpg

16002235174_ae23204432_c.jpg

16623301301_a612796e57_c.jpg


lastly, while I'm not sure I need it, I picked up a bunch of raw steel from the scrap bin at work. 21 pcs of 3/8"x6"x12" plate with holes, 4pcs of 1/2"x22"x23" plate with slots, and about 160pcs of 1/4"x4"x6" plates with chamfered corners. It's mostly old inventory of stuff I designed a few years back, but I'm not exactly sure what to use it for.

The 1/2" plate seems ideal for welding table surfaces since it's thick with slots, not sure if I could tack all 4 together for 1 big surface. I've thought about routering out a 1/2" deep recess in the wooden workbench top and setting one in for heavy work.

the 6x12 plates and 4x6 plates must have a use too... If I had one of those little Torchmate tables I could use them for blanks, anybody have any ideas for uses on this stuff? If nothing else, I can maybe sell it or use it to trade for scrap angle iron or something from a scrap guy.
 
OP
M

Mr. 360

Well-known member
Joined
Nov 23, 2012
Messages
662
Location
Bowmanville, Ontario
I should note that the blue rolling steel cart, once relieved of it's lathe duties, will get a 3" lift and dock over with the welding table, thus allowing me to get rid of the old crappy tire wooden side table. The cart will be the new home of my grinders and perhaps drill press, etc. That will mean that the front corner will be the heavy work area, with 2 steel topped units and my shop press. I believe i'll keep the casters on the cart so I can roll it around or take it outside as my mobile heavy bench. If I can find some sheet steel I may enclose it and add doors, but that's not for a while.
 

1/2 Cup

Member Emeritus
Joined
Apr 28, 2012
Messages
19,283
Location
Shepparton. Victoria. Australia
Great work on the benches Eric.:thumbup:

I think you will have many drooling over your scrap bin scores, well done.:thumbup:

That's one nice Craftsman saw, once again there are a few members that would walk over hot coal for that as well.

Regards
 

rmalkow2

Well-known member
Joined
Jun 26, 2009
Messages
4,087
Location
Brighton, MI
The bench is looking great so far. When I saw those larger steel plates I immediately thought welding table too. What a score on that steel. Lots of good future uses for those. I'll bet your car was sagging low with that weight.
 

tiggi

Well-known member
Joined
Sep 12, 2014
Messages
253
Location
USA
The 1/2" plate seems ideal for welding table surfaces since it's thick with slots, not sure if I could tack all 4 together for 1 big surface. I've thought about routering out a 1/2" deep recess in the wooden workbench top and setting one in for heavy work.

Those would make a great welding table. I made mine with 6" wide strips of 3/8" plate with 1.5" spacing in between them. This way I can use clamps anywhere on the table. I like this design much better then one solid surface.
 

Attachments

  • 20150202_192335.jpg
    20150202_192335.jpg
    93.3 KB · Views: 176

Peter Mc Mahon

Well-known member
Joined
Jul 20, 2014
Messages
62
check out the Miller welding table. It might give you some ideas. I am going to make something similar with removable sections on top. Might even paint the legs Miller Blue!
 
OP
M

Mr. 360

Well-known member
Joined
Nov 23, 2012
Messages
662
Location
Bowmanville, Ontario
Got the 18" bench cut to length last night, still haven't bolted anything down. Also started framing in the bottom shelf of the lower cupboards. Things are so tight in my garage now... I love my shop, but an extra 100sqft would be a big plus sometimes.

View media item 48573
View media item 48574
O/T, but my Dad came across some pics of his dad hidden away in his workbench. I knew about a lot of my Grandfathers cars but I never knew he had a 55 Chevy, which prettywell floored me. Apparently he used to race it in the Canadian Winter Rally (my Aunt has the medal from 58). It may be a 4 door, but it's still a clean looking rig. I have a small collection of old photographs of my dad and both grandfathers with their cars and have thought about framing a couple for the shop, I think one of these should join them. I'm not sure which one I like more, maybe I'll just do both. Both my Grandfathers are gone now, so this is a nice way of preserving the legacy, so to speak.

16447356128_664f80909b_c.jpg

16633450051_2c39e66e12_c.jpg


The actual photos are pretty crisp. However, once you take a cell phone pic and message it, it looks a lot grainier. Both photos are taken from a trip to Daytona Beach. Not surprisingly, the pics show him parked on the beach.
 
OP
M

Mr. 360

Well-known member
Joined
Nov 23, 2012
Messages
662
Location
Bowmanville, Ontario
Great work on the benches Eric.:thumbup:

I think you will have many drooling over your scrap bin scores, well done.:thumbup:

That's one nice Craftsman saw, once again there are a few members that would walk over hot coal for that as well.

Regards

Thanks! I drool over that saw as well. I do have my Grandfather's old P.E.T circ saw from the 50's, but the blade size is obscure and I've had trouble locating new blades for it.

The bench is looking great so far. When I saw those larger steel plates I immediately thought welding table too. What a score on that steel. Lots of good future uses for those. I'll bet your car was sagging low with that weight.

Haha, I had to take the stuff over 3 days so it wouldn't kill my car, there's a lot of weight there.

Those would make a great welding table. I made mine with 6" wide strips of 3/8" plate with 1.5" spacing in between them. This way I can use clamps anywhere on the table. I like this design much better then one solid surface.

check out the Miller welding table. It might give you some ideas. I am going to make something similar with removable sections on top. Might even paint the legs Miller Blue!

Thanks guys. Honestly a welding table is what I'd love to do. That being said, I already have a nice compact one so I'd have to figure out where to put another one. These plates are really nice though and beg to be more than scrap.
 

slidemx5

Well-known member
Joined
Jun 15, 2009
Messages
100
Location
Hillsborough, NC
Eric - excellent work and I enjoyed reading the updates. The benches look great and should really add a lot of usable space! I don't know what I'd do with those plates but I'm sure I wouldn't have been able to pass them up for free either.
 
OP
M

Mr. 360

Well-known member
Joined
Nov 23, 2012
Messages
662
Location
Bowmanville, Ontario
A couple Idea's I've been kicking around for those plates. One, I'd like to use as a base plate for making a small press brake in my shop press. The second, I might keep as 'extra' for now.

The third and fourth, I'm considering making 2 MINI welding tables, as sort of illustrated in my quick sketch below.

View media item 48575
All it would be is a length of angle iron welded to the bottom (not enough to warp the plate) so it can be clamped in a vise, with a gusset at each end to prevent flex. Also in each corner would be a 3" or so piece of angle, like mini legs, so it could be sat on a bench top. Perhaps some kind of rubber foot so it wouldn't slide or mar the surface too.

I had thought if I made 2 and sold them, it could help finance other garage stuff (or pay bills). Figuring maybe guys with limited space and hobby scale equipment (such as myself) might appreciate the portability of a tabletop unit, that could be secured in a vise for heavier work. The pre-lasered slots are handy too for clamping. Not sure what a fair price would be. Can't be so expensive a welder would just do it themselves, but not so little that it isn't worth my time.
 
OP
M

Mr. 360

Well-known member
Joined
Nov 23, 2012
Messages
662
Location
Bowmanville, Ontario
Eric - excellent work and I enjoyed reading the updates. The benches look great and should really add a lot of usable space! I don't know what I'd do with those plates but I'm sure I wouldn't have been able to pass them up for free either.

Thanks, I'm happy to get some solid, permanent bench space as well. The tanker table is good but I can't mount a vise or beat on it, and the old door/bench was just... it just wasn't happening with the door.

Free steel plates with no coatings are gold to guys like us. Good thing nobody else I work with thinks the same way.
 

HSpencer

ALLIANCE MEMBER
Joined
Nov 28, 2010
Messages
2,854
Location
South Central US
Now that is going to be one very classy shop!! Your work on it just gets it to looking better and better.
Great job!

Best Regards
Herb
 

taumac

Well-known member
Joined
Aug 30, 2011
Messages
8,104
Location
Brooksville, Fl
I prefer smaller welding tables myself and think those would be nice size. Free steel doesn't come around so I would stash it away cause I'm sure you'll find a use for it soon.


Have a good one, Gerard
 
OP
M

Mr. 360

Well-known member
Joined
Nov 23, 2012
Messages
662
Location
Bowmanville, Ontario
Now that is going to be one very classy shop!! Your work on it just gets it to looking better and better.
Great job!

Best Regards
Herb

Thanks Herb. Kinda hoping once the workbench and cupboard doors are done I can paint and start using this place for more actual projects, not that working on it hasn't been fun.

I prefer smaller welding tables myself and think those would be nice size. Free steel doesn't come around so I would stash it away cause I'm sure you'll find a use for it soon.


Have a good one, Gerard

I hear ya on the stashing part. Smaller, thinner steel is one thing. 1/2" steel that's nearly 2'x2' is another. I'm sure as soon as I sold it I'd think of a use for it.
 

taumac

Well-known member
Joined
Aug 30, 2011
Messages
8,104
Location
Brooksville, Fl
Thanks Herb. Kinda hoping once the workbench and cupboard doors are done I can paint and start using this place for more actual projects, not that working on it hasn't been fun.


I hear ya on the stashing part. Smaller, thinner steel is one thing. 1/2" steel that's nearly 2'x2' is another. I'm sure as soon as I sold it I'd think of a use for it.


Isn't that Murphy's Law? You can have something in your garage for five years you haven't touched it, you give in away and within a week you need it. LOL. I will just make yourself one or two small tables from it and then get rid of the rest of it.


Have a good one, Gerard
 
OP
M

Mr. 360

Well-known member
Joined
Nov 23, 2012
Messages
662
Location
Bowmanville, Ontario
Got the lower shelf framed in and cut the material. It's actually just the remaining wood from the tops, so I thought I could use it here so as not to waste it. It's very, very thick for a shelf, but why not.

View media item 48590
I pulled some stuff out of the way for a full shot to get a sense of scale. Still haven't bolted the top down, but it's feeling pretty good so far. Even not bolted down the top is super sturdy. At some point I will add a mid-shelf to make better use of the space, but that's a lot more storage space now. I think this pretty well concludes the cabinet/cupboard part of the build in the shop.

View media item 48592
 
To avoid these ads, REGISTER NOW!
Top Bottom