To avoid these ads, REGISTER NOW!

Wow, welding gasses aint cheap, what pressure do I need

LoneGunman

Well-known member
Joined
Mar 27, 2007
Messages
2,081
Location
The Gunshine state
Okay, so I got this little 120v lincoln 135. I swapped the tank out today for a filled one being Praxair don't fill only swap. I'm not sure of the tank size but it's a little thing, maybe 16" tall by 6" diameter or so. He said I needed Stargon, which is Argon,CO2 and O2, I have never heard of O2 being used only Argon and CO2 mixes. That little tank ran me $28, am I getting screwed or is that just what it goes for?

Whats a good ballpark pressure I should be using?
 
To avoid these ads, REGISTER NOW!

rickairmedic

Well-known member
Joined
May 31, 2005
Messages
4,165
Location
louisville ,Ky
Gunman if you are welding mild steel the guy duped you good old c-25 75% argon/25% co2 would work fine . Honestly alot of guys run straaight co2 for mild steel as the only ral bennefit of the argon in the c25 mix is less spatter you want around 25-35 PSI on the guage when you pull the trigger on your gun.


Rick
 
OP
L

LoneGunman

Well-known member
Joined
Mar 27, 2007
Messages
2,081
Location
The Gunshine state
Gunman if you are welding mild steel the guy duped you good old c-25 75% argon/25% co2 would work fine . Honestly alot of guys run straaight co2 for mild steel as the only ral bennefit of the argon in the c25 mix is less spatter you want around 25-35 PSI on the guage when you pull the trigger on your gun.


Rick

Thank you, I figured I got taken, he asked what I was welding and I did tell him only mild steel. What's the average cost of the small bottle in straight co2 or the c25 mix?

$25 sound about right to test out of date tanks? While I was there I asked because I have two OA torch sets that are old and running low, he didnt seem bothered that they "may" be some other companies tanks.
 

rickairmedic

Well-known member
Joined
May 31, 2005
Messages
4,165
Location
louisville ,Ky
Gunman it costs me around $28.00 to get my 40 CF tank filled at TSC with C-25 . Your tank sounds more like a 20 CF tank but it wont be much cheaper to fill it than mine . I am not sure on the Tank testing prices but $25 doesnt sound to bad to Hydro a tank to me .
 

rickairmedic

Well-known member
Joined
May 31, 2005
Messages
4,165
Location
louisville ,Ky
TSC sells the 40 CF tanks for $179.00 and the main reason I went with TC was their prices were in line with my local welding supplies and they are open on weekends :D.


Rick
 

Vicegrip

Well-known member
Joined
Mar 9, 2007
Messages
1,187
Location
NoVA.
Small amounts of O2 are added in to stabiles the arc for certain metals/ processes. For a Mig and for steel no O2 is needed. Best bang for the buck is straight CO2. A little more splatter but nothing like flux core and more heat into the work amp for amp.
 

Red Green

Well-known member
Joined
Dec 5, 2007
Messages
1,905
Location
South Central Michigan
I think I am running about 15psi at the tank indoors with no fans on. I use a 75%-25% mix with out any O2 you can try some scrap to practice turing down the pressure that you use. You will notice when their isn't enough gas.
 
OP
L

LoneGunman

Well-known member
Joined
Mar 27, 2007
Messages
2,081
Location
The Gunshine state
Another stupid question, when you get a fresh tank from the welding supply house what pressure should it be? I think I got double screwed, when I hooked my gauge up it showed only 100psi, I don't know **** about welding gas but I know a little about o2 cylinders from being an EMT, 100PSI sounds very low, I'm down to 50psi already.

Of course my gauge could be wrong, we'll see.
 

Red Green

Well-known member
Joined
Dec 5, 2007
Messages
1,905
Location
South Central Michigan
The tanks I am using are the 5ft tall ones. Mine tank on the welder is just about empty right now so I couldn't tell, but my O2 cyl on the torch has about 15,000 psi in it and I havent used it much.

Edit reading the other posts It might have been 1,500 psi and I looked at the wrong markings?
 
Last edited:

rickairmedic

Well-known member
Joined
May 31, 2005
Messages
4,165
Location
louisville ,Ky
Gunman I am sitting at 1400 PSI on my 40CF tank right now and I have been using it . I am pretty sure it was around 2000 PSI when I got it filled last.


Rick
 

nissan_crawler

Well-known member
Joined
Jan 12, 2008
Messages
9,638
Location
Wichita, KS
Not to insult, but I'm going to ask another question...are you sure your small gauge is in p.s.i., or is it reading cu. ft.?
 

Britt

Member
Joined
Aug 14, 2006
Messages
12
Location
Ball Ground Ga.
Big tanks are 2250psi max...avg I get them on occasion to 2400psi.
I haven't run a small one in years...but I think they were 1800-2000 psi also...
Inside with no breeze you can run 15-20 cfh. that is about as low as you would want to go.
 

rickairmedic

Well-known member
Joined
May 31, 2005
Messages
4,165
Location
louisville ,Ky
Nevermind, I'm a dumbazz, read the wrong part of the gauge , I still used half of my gas though.:wtf:


Gunman I think as you get used to having the gas you should also tuck some money away for a tank upgrade 20CF in C-25 isnt gonna last long as you have noticed . I would also recomend you learn to remember to turn the tank off when your done although that means you have to remember to turn it back on :D.


Rick
 
To avoid these ads, REGISTER NOW!

Bevis

Well-known member
Joined
Jan 10, 2006
Messages
808
Location
Moore Haven, Florida
Go to weld on thursday and no gas...of course everybody is closed. So I went to TSC and changed out my 40 CF tank. It was $28, then I looked at the ticket on my way out and noted a $19 Fee Recycle Cylinder, WTF TSC.
 

nissan_crawler

Well-known member
Joined
Jan 12, 2008
Messages
9,638
Location
Wichita, KS
Go to weld on thursday and no gas...of course everybody is closed. So I went to TSC and changed out my 40 CF tank. It was $28, then I looked at the ticket on my way out and noted a $19 Fee Recycle Cylinder, WTF TSC.

That's part of their exchange program. You have to pay that fee the first time when it's not one of their bottles. From now on you won't have to pay it (assuming you stick to their bottles).
 

dwilliams35

Well-known member
Joined
Sep 27, 2008
Messages
271
Location
Pattison, TX
That "assuming you stick to their bottles" part is what kept me from buying the things from them: I've got about five different sources right now: TSC's program allows me to GIVE them my owner bottle and pay them to "recycle" it, then use their bottles exclusively, which THEY own. I looked into that a few years ago and said "no thanks" pretty dang quick.
 

tdkkart

Well-known member
Joined
Jun 17, 2006
Messages
6,887
Location
Eastern Iowa
Gunman I think as you get used to having the gas you should also tuck some money away for a tank upgrade 20CF in C-25 isnt gonna last long as you have noticed


Everyone should do some price checking, you may well find that filling the next size up tank is much cheaper per/CF.
Way back when I bought my Mig it came with a 40CF tank. The first time I refilled I found that I could get 125CF for $1 more per fill, for 3 times as much gas. They made me a decent trade on my 40CF for the 125.
Handily enough, the 125cf tank seesm to last me about as long as a 10lb spool of wire.

If you think mig gas is expensive, wait till you got to Tig using straight Argon, which uses about 3x as much gas. Don't even hope to use a 125cf bottle for that, you'll spend more time running back and forth to the weld shop than welding.
The 330cf tanks is gonna run $350+ to buy the bottle, and they're a pain in the *** to move around, heavy as hell.
 

Vicegrip

Well-known member
Joined
Mar 9, 2007
Messages
1,187
Location
NoVA.
In many areas (such as the one I live in) the largest tank you can purchase is an 80CF. Larger tanks need to be rented. I Mig indoors with a Miller 135 on tap one or two at 12 CFH. bump it up to 15 or 16 CFH on tap three or four. Keep the stick out right and you don't need as much gas. I also made a pre and post flow timer that lets me make a gas pocket before the wire moves and arc starts as well as covers the puddle at the end of the bead.
 

e-tek

Well-known member
Joined
Dec 19, 2007
Messages
10,690
Location
Saskatoon, SK
I also made a pre and post flow timer that lets me make a gas pocket before the wire moves and arc starts as well as covers the puddle at the end of the bead.
esplain please lucy!!
 
OP
L

LoneGunman

Well-known member
Joined
Mar 27, 2007
Messages
2,081
Location
The Gunshine state
esplain please lucy!!

I'm obviously clueless when it comes to MIG welding but control wiring is my thing, it would be pretty simple to delay the wire feed for a second to make the gas pocket before the arc starts and delay the gas shutting off when the trigger is released. I'm assuming this creats a better start and stop to the bead you just welded.
I'm suprised the machine don't have this built into it, does it make that much of a difference? I guess it really depends on what you are welding and what you need in terms of weld quality.
 

bugdust

Well-known member
Joined
Dec 2, 2008
Messages
580
Location
Middleburg, FL
I just swapped out my 125cf bottle of 75/25 today at Airgas...cost me $42 out the door ($35 + hazmat + argon surcharge + tax). I own my bottle. It is the largest size they will sell here; I asked today to move up a size and was told I'd have to rent the bottle if I go larger. I can buy another 125 for about $220.

I have my o/a from TSC. I turned in my owned tanks a few years ago just because I usually run out on weekends and it is convenient to go to TSC (about 10 miles, open on weekends) rather than go to the weld supply (about 35 miles, closed on weekends) I have small tanks but don't remember what they cost. I have to swap my oxygen this week.
 

KenS

Well-known member
Joined
Oct 21, 2007
Messages
726
Are TSC exchange tanks all painted blue when they are returned, or do they come in the normal nasty variety of colors from rusty green to rusty red to rusty yellow to plain rusty steel? There's something annoying about exchanging a shiny new tank for a WWII leftover.

At least the exchange barbecue propane tanks here are nicely painted white with fresh warning labels.
 

Nealcrenshaw

Well-known member
Joined
Mar 20, 2008
Messages
3,401
Location
Cleveland,OH
Good question!!!
just to be sure i'm on the same page, TSC is tractor supply right?
I've got a couple tanks i think i'll trade in for the leased ones as well,doesnt bother me to trade in my tanks if i know the tanks i'll be renting passes testing.
 

Stanger

Well-known member
Joined
Oct 25, 2006
Messages
1,298
Location
Alton, IL
I paid $175 to purchase my 60cf tank of C25. I think it is about $35 to refill. Like others have said, larger bottles don't cost much more to fill up. The 60cf tank is the largest I'm allowed to buy in Illinois. 80cf and up is renting.
 

W-Cummins

Well-known member
Joined
Jan 9, 2006
Messages
1,642
Location
Iowa
Man you guys are getting the deal on the gas:) Here a 335 cf fill (argon or 75/25 mix) is $20-$60 at the airgas place depending on who you are. My last one was about $30.00
The better machines do come with post and pre flow built in. I own all my tanks ( 10 of them, none are smaller then 125cf) and wound NEVER trade an owner tank for a leased or co tank.

William...
 

bugdust

Well-known member
Joined
Dec 2, 2008
Messages
580
Location
Middleburg, FL
Good question!!!
just to be sure i'm on the same page, TSC is tractor supply right?
I've got a couple tanks i think i'll trade in for the leased ones as well,doesnt bother me to trade in my tanks if i know the tanks i'll be renting passes testing.

Yes, TSC = Tractor Supply Co.

I don't actually get my owned tank filled at AirGas. They swap it out with a different tank. I'm not sure how they know I own it but they seem to. Oh, they do ask if I have an account with them and I tell them no. Maybe one day they'll give me a hassle about it? I do have my receipts though.

If you trade in your acetylene and you have the valve handle (bar-type, not knob) on it, keep it because the new ones don't have it.
 

Todd.Brock

Well-known member
Joined
Jul 15, 2008
Messages
4,250
Location
Cincinnati
Ijust switched to gas from running flux core. I am learning as I go. I stuck to flux b/c of initial cost of gas and the fact I weld infrequently. I bought a tank that was out of date from craigslist for $40 bucks. He told me it was an 80 cf. I went to have it swapped at the welding supply place and he said he wouldnt exchange because it is an owned tank and the companies name and phone number was on the top. I called the company and he said he said they would exchange it with no probs. They are about 50 miles away. I go to TSC the other day and pay the 19 bucks, which I would have to do anywhere else as a retest fee, and get the tank home. I paid 38 for the fill. The tank was rust as **** when I got it. It was blue and did look like WWII I asked if it would be a problem b/c they said exchange tanks cant be rusty...

Keep in mind Ive never used gas, not entirely sure what to expect... The gauge reads empty... They gave me an empty tank!! Make sure that you have the little orange thing on the vavle if you go there. They had to give me all my money back b/c they were out of the size 4 tanks which I see is the 125 cu ft size. My tank is 7inches in diameter and 48 inches to the top of the cap. I guess I scored an even better deal...
 

Vicegrip

Well-known member
Joined
Mar 9, 2007
Messages
1,187
Location
NoVA.
esplain please lucy!!
Carefull what you ask for.

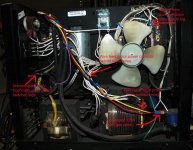
This is a long winded build and install description of a post flow controller for a Miller 135XP Mig welder. As built it could be adapted to many machines with a little thinking. I found that with some gas flow control you can make Tig like stack-O-dimes welds on very thin metals with a Mig. It also seemed to reduce the heat affected zone and warping.
As built you can weld in normal mode, with preflow only, post flow only or full control using pre and post flow. After a quick look at the wiring diagrams of some of the other standard Miller Mig machines it appears that this device can be used on them with little or no change other than how it is hooked up.
Please take note. There are many ways to do what this device does and this is only one way. I used the solid state cube timers rather than true single box process controllers as the timers are simple, easy to find, robust and inexpensive. The only thing I can guarantee is it works for me on my machine. What you do with/to your machine is up to you. Let the smoke out of your welder don’t come crying to me, you were the guy that made something you found on the internet.

PARTS
1 One Single pole single throw toggle switch
2 Two single pole double throw toggle switches
3 One On Delay timer. Granger Part# 2A561*
4 One Off Delay timer. Granger part# 6A857*
5 Two double pole double throw 120V relays
Granger part # 5CJ04* and two bases part# 5KN18*
6. Something to mount everything on including the switches.
7. Wire, male and female 1/4 spade crimp connectors.
8. Zip ties to keep the added wires out of the cooling fan.

* There are less expensive timers than the Granger sourced components that are the same in function available from HVAC supply houses. I used Granger items to ease others finding similar components (and I had them in hand) All told this is about $50 from Granger.


Notes on function.
Preflow works by delaying the start of the wire feed motor. The welding control contactor will close and the filler wire will be energized but the wire feed motor will not run until the On Delay timer cycles and the preflow relay closes. The wire motor will then run at the panel set speed and will stop as soon as you release the trigger as it normally would.
Post flow works by giving timed 120V power to the gas valve after normal control power has shut off. The relay marked isolation or post flow works as an isolation relay to prevent the post flow system from bootstrapping the preflow side back through the gas valve control.
One down side to the cheap cube timers is that the little plastic time adjuster knob/slots are small and easy to mess up. I recommend that you find a small flat head screwdriver that fits the little adjuster just right and leave it with the timers. Be careful when turning the timers up and down. I found that once set to average delay and postflow times I rarely need to adjust them. Unlike Tig, where a function like post flow is cooling the tungsten based on amps, in Mig all you are doing is keeping the weld pool covered until it solidifies. 1 or 2 seconds of post flow is more than enough for most applications if you hold the gun close and still during the post flow. Big welds on smaller parts that load up with heat might need a bit more. Half a second of preflow seems to be enough to produce a shield gas envelope in most cases. If you are running only pre flow set the post flow timer to .5 seconds or it will interfere with timing via the isolation relay being energized until the Off Delay timer clears.

Notes on building and mounting the device.
I apologize for only posting a picture of a hand drawn wiring schematic. I do not have elec. design planning software. If it is hard to read and I will post a better copy if anyone is interested in building one.
Be sure to keep an eye on the switch toggle functions and on the relay connections. All wiring connections can be made via the relay base connectors as they are double lug. As an example you can connect main power to the isolation relay then to the common of the isolation switch and on to the preflow timer by using the lugs only.
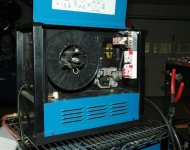
No holes need to be drilled and no wires need to be cut to install. You can remove the device and leave no trace that it was there. I used a high bond double stick tape to mount the timer inside the wire feed compartment. I have a plastic cover (not shown) that protects the timer from getting shorted out if the filler wire bird nests.


Notes on hookup.
Splice into 120v power at the on/off switch for the Uninterrupted power. Add a 3 amp fuse if you like.
Neutral is easy to get at the contactor on the 120V machines as there are extra 1/4 spade taps already there.
The easy place for the trigger controlled 120V is at the gas valve. Remove the 120V wire from the valve and use a male 1/4 spade connector to connect the Interrupted power wire.
Connect the gas valve wire from the isolation/post flow relay to the now open spade on the gas valve.
The wire motor is controlled by interrupting the power to it only. The wire speed control system is not changed and the wire motor does not get power from the preflow system. Remove one wire connector from the wire motor and connect it to one of the 2 wires from the preflow control using a 1/4 male spade connector. Connect the other wire from the preflow control to the now open male spade connector on the wire feed motor.

Notes on bench testing.
Main power switch should pass trigger power to the preflow timer and isolation relay coil in On position and to the gas valve in the Off position.
Preflow switch should short across the wire feed motor control wires on the Off position.
Post flow switch should interrupt the trigger from the preflow relay.
Gas valve control should go hot with main switch in Off position.
Gas valve control wire should go hot as soon as trigger is hit and hold on after trigger is released and wire motor stops for Off Delay timer setting.

Remember you saw this on the internet and it was designed by a holder of a GED not an EE.
 

Attachments

  • aa-pc135deviceL.jpg
    aa-pc135deviceL.jpg
    74.8 KB · Views: 33
  • aa-pc135hookups-global.jpg
    aa-pc135hookups-global.jpg
    74.4 KB · Views: 29
  • aa-pc135wiring-diagram.jpg
    aa-pc135wiring-diagram.jpg
    73.6 KB · Views: 34
  • mounted-in-mig1.jpg
    mounted-in-mig1.jpg
    74.5 KB · Views: 28
Last edited:
OP
L

LoneGunman

Well-known member
Joined
Mar 27, 2007
Messages
2,081
Location
The Gunshine state
"Remember you saw this on the internet and it was designed by a holder of a GED not an EE."

I put much more faith in something someone like yourself has come up with than someone with an EE who has never been outside of an office and only deals in theory. That being said, I do a lot of control wiring, your design is easy to understand, you provided a schematic, a material list and explained how to build it and test it. My 14 year old could probably build this. Thank you very much for taking the time to do this.
 

terabyte

Well-known member
Joined
Apr 7, 2006
Messages
690
Location
Southwest Ranches, Florida
Carefull what you ask for.

This is a long winded build and install description of a post flow controller for a Miller 135XP Mig welder. As built it could be adapted to many machines with a little thinking. I found that with some gas flow control you can make Tig like stack-O-dimes welds on very thin metals with a Mig. It also seemed to reduce the heat affected zone and warping.
As built you can weld in normal mode, with preflow only, post flow only or full control using pre and post flow. After a quick look at the wiring diagrams of some of the other standard Miller Mig machines it appears that this device can be used on them with little or no change other than how it is hooked up.
Please take note. There are many ways to do what this device does and this is only one way. I used the solid state cube timers rather than true single box process controllers as the timers are simple, easy to find, robust and inexpensive. The only thing I can guarantee is it works for me on my machine. What you do with/to your machine is up to you. Let the smoke out of your welder don’t come crying to me, you were the guy that made something you found on the internet.

PARTS
1 One Single pole single throw toggle switch
2 Two single pole double throw toggle switches
3 One On Delay timer. Granger Part# 2A561*
4 One Off Delay timer. Granger part# 6A857*
5 Two double pole double throw 120V relays
Granger part # 5CJ04* and two bases part# 5KN18*
6. Something to mount everything on including the switches.
7. Wire, male and female 1/4 spade crimp connectors.
8. Zip ties to keep the added wires out of the cooling fan.

* There are less expensive timers than the Granger sourced components that are the same in function available from HVAC supply houses. I used Granger items to ease others finding similar components (and I had them in hand) All told this is about $50 from Granger.


Notes on function.
Preflow works by delaying the start of the wire feed motor. The welding control contactor will close and the filler wire will be energized but the wire feed motor will not run until the On Delay timer cycles and the preflow relay closes. The wire motor will then run at the panel set speed and will stop as soon as you release the trigger as it normally would.
Post flow works by giving timed 120V power to the gas valve after normal control power has shut off. The relay marked isolation or post flow works as an isolation relay to prevent the post flow system from bootstrapping the preflow side back through the gas valve control.
One down side to the cheap cube timers is that the little plastic time adjuster knob/slots are small and easy to mess up. I recommend that you find a small flat head screwdriver that fits the little adjuster just right and leave it with the timers. Be careful when turning the timers up and down. I found that once set to average delay and postflow times I rarely need to adjust them. Unlike Tig, where a function like post flow is cooling the tungsten based on amps, in Mig all you are doing is keeping the weld pool covered until it solidifies. 1 or 2 seconds of post flow is more than enough for most applications if you hold the gun close and still during the post flow. Big welds on smaller parts that load up with heat might need a bit more. Half a second of preflow seems to be enough to produce a shield gas envelope in most cases. If you are running only pre flow set the post flow timer to .5 seconds or it will interfere with timing via the isolation relay being energized until the Off Delay timer clears.

Notes on building and mounting the device.
I apologize for only posting a picture of a hand drawn wiring schematic. I do not have elec. design planning software. If it is hard to read and I will post a better copy if anyone is interested in building one.
Be sure to keep an eye on the switch toggle functions and on the relay connections. All wiring connections can be made via the relay base connectors as they are double lug. As an example you can connect main power to the isolation relay then to the common of the isolation switch and on to the preflow timer by using the lugs only.
No holes need to be drilled and no wires need to be cut to install. You can remove the device and leave no trace that it was there. I used a high bond double stick tape to mount the timer inside the wire feed compartment. I have a plastic cover (not shown) that protects the timer from getting shorted out if the filler wire bird nests.


Notes on hookup.
Splice into 120v power at the on/off switch for the Uninterrupted power. Add a 3 amp fuse if you like.
Neutral is easy to get at the contactor on the 120V machines as there are extra 1/4 spade taps already there.
The easy place for the trigger controlled 120V is at the gas valve. Remove the 120V wire from the valve and use a male 1/4 spade connector to connect the Interrupted power wire.
Connect the gas valve wire from the isolation/post flow relay to the now open spade on the gas valve.
The wire motor is controlled by interrupting the power to it only. The wire speed control system is not changed and the wire motor does not get power from the preflow system. Remove one wire connector from the wire motor and connect it to one of the 2 wires from the preflow control using a 1/4 male spade connector. Connect the other wire from the preflow control to the now open male spade connector on the wire feed motor.

Notes on bench testing.
Main power switch should pass trigger power to the preflow timer and isolation relay coil in On position and to the gas valve in the Off position.
Preflow switch should short across the wire feed motor control wires on the Off position.
Post flow switch should interrupt the trigger from the preflow relay.
Gas valve control should go hot with main switch in Off position.
Gas valve control wire should go hot as soon as trigger is hit and hold on after trigger is released and wire motor stops for Off Delay timer setting.

Remember you saw this on the internet and it was designed by a holder of a GED not an EE.

dude not only were you an inspiration for me redoing my shop into what is now a usable space... you are truly an asset to this website.

thank you
 

franksinatra

Well-known member
Joined
Nov 26, 2006
Messages
169
Location
Minnesota
Im not yet a welder (working on it) but I agree 100%. Thank you for taking the time to post the great information. G :thumbup:
 

thewelder

Member
Joined
Nov 14, 2008
Messages
21
i don't know if anyone covered this but the O2 in the mix is for true spray transfer it nuns hotter with more penetration at anything over about 22 volts
 
To avoid these ads, REGISTER NOW!
Top Bottom