To avoid these ads, REGISTER NOW!

Yard cart patching ideas

stickshift

Well-known member
Joined
Nov 16, 2011
Messages
1,215
Location
northeastern US
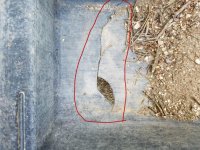
My yard cart has a hole and a crack running along the bottom. Any suggestions on how to repair?

Seems like a hard plastic, perhaps polypropylene? I have irrigation hose made of the same material and it gets soft with application of a heat gun, so possibly I could melt/fuse this with a similar plastic to patch the hole and crack? Or maybe JB weld some kind of patch material?
 

Attachments

  • 2020-05-07 17.17.14e.jpg
    2020-05-07 17.17.14e.jpg
    155 KB · Views: 144
To avoid these ads, REGISTER NOW!

rsanter

Well-known member
Joined
Dec 22, 2007
Messages
18,492
Location
visalia ca
Use plastic or sheet metal and make a patch (boat patch) that covers the damaged area.
Use an epoxy to apply a patch to both sides and then use bolts or rivets through the patches on either side of the patch
 

Shiftless

Well-known member
Joined
Mar 9, 2014
Messages
14,474
Location
East Bay SFO
The aluminum patch with pop rivets is a great idea.

Another approach would be to clean and rough up the affected area and apply some JB Weld, then some fiberglass mesh, and top it off with some more JB Weld.
 

juddspaintballs

Well-known member
Joined
Sep 1, 2011
Messages
324
Location
Hedgesville, WV
Rivet or screw a metal patch on the underside, clean up the whole area, and fill in the void with JB weld. Sand it down smooth once cured. You won't notice the patch that way and it won't catch on a shovel or get crud stuck in it.
 

CJM8515

Well-known member
Joined
Mar 8, 2014
Messages
9,291
Location
NJ
I would fiberglass it. Reinforce the bottom with metal of some kind and fiberglass over it with either bondo kitty hair or straight up fiberglass
 
OP
S

stickshift

Well-known member
Joined
Nov 16, 2011
Messages
1,215
Location
northeastern US
Thanks for the ideas. I like the riveting solution, and picked up the cheapest HF riveter. I have some scrap aluminum sheet, so I'm thinking I'll rivet an aluminum patch to both sides (so the rivet doesn't pull through the plastic of the cart if only patch one side).

Then maybe JB weld along the edge of the patch on the top side, allow to cure, then sand smooth as @juddspaintballs suggested. Might skip this step though, as I probably wouldn't be trying to shovel out of the cart once it gets nearly empty - just easier to dump out contents and shovel the dumped pile.
 

NUTTSGT

Super Moderator
Staff member
Joined
Sep 14, 2009
Messages
50,863
Location
Northern Central Ohio
Perfect candidate for this.


C'mon, it turns a screen door into a boat. :lol_hitti
 

Attachments

  • flex_seal_liquid_rubber_pint_black.jpg
    flex_seal_liquid_rubber_pint_black.jpg
    83.7 KB · Views: 20
To avoid these ads, REGISTER NOW!
OP
S

stickshift

Well-known member
Joined
Nov 16, 2011
Messages
1,215
Location
northeastern US
I ended up using scrap aluminum and riveting it in. Only could get aluminum on one side; just too hard to press rivet through alu-plastic-alu sandwich and hold it there while operating the riveter (need more than 2 hands). But rivets are firmly pulled up against plastic and didn't pull through plastic, so one sheet of alu is good enough.

Worked out well and was able to use the cart yesterday for some gardening. Thanks for the suggestions.

The $5 HF riveter was OK; several of the rivets (Arrow rivets) broke off well above where they should have. Not a big deal and easy to trim those flush using Dremel cutting wheel.
 

Shiftless

Well-known member
Joined
Mar 9, 2014
Messages
14,474
Location
East Bay SFO
Glad you were successful.
In the future, realize that you can use a tiny washer along with the pop rivets to reinforce and minimize the possibility of pull through with plastic.
 

Monza Harry

Well-known member
Joined
Dec 29, 2018
Messages
1,433
Location
Windsor ON
Glad you were successful.
In the future, realize that you can use a tiny washer along with the pop rivets to reinforce and minimize the possibility of pull through with plastic.

They actually sell those back up washers w the exact correct ID next to the rivets.

Marc

They would have likely helped with your projecting breakaway stud situation, I suspect the nail head [for lack of a better term] pulled right up to the flanged part of your rivet [instead of at or near the bulged part inside your cart] actually causing a Radial push against the bed material that will cause more damage down the road, those sort of items will deal with compressive loads better than the radial load trying to spread the part away. I think [I know you didn't really ask for that, so I'll give this for free :wtf::)] you should drill them out and go from the inside of the bed down with the metal where it is currently, [outside/bottom of cart] that will eliminate the need for the washers mentioned above and leave you with a smoother finish inside, you could even spot face a hair [Brad point Drill bit?] and end up with a nearly flush repair on the business side. Harry
https://arrowfastener.com/fastener-category/rivet/18/
https://www.rona.ca/en/back-up-plate
 
OP
S

stickshift

Well-known member
Joined
Nov 16, 2011
Messages
1,215
Location
northeastern US
Glad you were successful.
In the future, realize that you can use a tiny washer along with the pop rivets to reinforce and minimize the possibility of pull through with plastic.

They actually sell those back up washers w the exact correct ID next to the rivets.

Marc
Good idea on using washers. Good to know they make matching washers in case I need to rivet other items where I'm concerned about the rivet puling through the material.
 
OP
S

stickshift

Well-known member
Joined
Nov 16, 2011
Messages
1,215
Location
northeastern US
They would have likely helped with your projecting breakaway stud situation, I suspect the nail head [for lack of a better term] pulled right up to the flanged part of your rivet [instead of at or near the bulged part inside your cart] actually causing a Radial push against the bed material that will cause more damage down the road, those sort of items will deal with compressive loads better than the radial load trying to spread the part away. I think [I know you didn't really ask for that, so I'll give this for free :wtf::)] you should drill them out and go from the inside of the bed down with the metal where it is currently, [outside/bottom of cart] that will eliminate the need for the washers mentioned above and leave you with a smoother finish inside, you could even spot face a hair [Brad point Drill bit?] and end up with a nearly flush repair on the business side. Harry
https://arrowfastener.com/fastener-category/rivet/18/
https://www.rona.ca/en/back-up-plate
This went so far over my head, it may as well have been written in Mandalorian. :headscrat
 
To avoid these ads, REGISTER NOW!
Top Bottom