
After paying professionals to install two mini splits before, results were not completely satisfactory and I decided to buy the tools and install the next units myself. I am sure good techs are out there and not leave me with the issues that I have to deal with (that’s a story for another day).
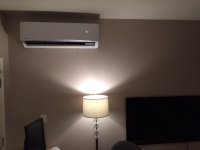
The unit I installed is called DuctlessAire (18K, 20.8 SEER) I think it’s the same as the pioneer inverter++ series, specs is the same with a slightly different look indoor. The brand seems to be well represented and backed.
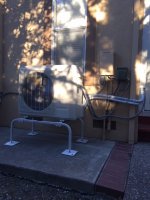
The 1/2” copper suction line is not forgiving to bend. If you bend it against something round with the insulation on, you pull the insulation off you may see the tubing flattening. I ended up getting a ratcheting bender with reverse bending attachments. My indoor unit hangs on an interior wall and from there it goes to the room behind then out to a sunroom, then finally to the outside, a total of 5 90 degree turns. It took a few hours to make the bends measuring carefully.
I mostly just read different installation manuals and text information online so I had a good idea on what to do. I used a combination of instructions taken from various brands.
I found it to be most important completely debur without scratching the tubing and then cleaning up the shavings. I used a small brush and attached a cocktail straw to a vacuum to make sure I got all the shavings.
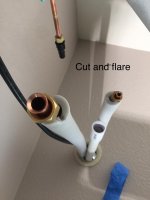
The flare tool I used is a eccentric motion and it rolls the flare outwards instead of using heavy pressure of a burnishing cone. A mirror shine on flares is nice to look at, but are created under heavy pressure and (in theory) they would have less “give” for crushing. The eccentric flare tool gives a duller finish.
I did use nylog to on my flare connection and the threads (not going too crazy with it), I think that did make things more forgiving.
Before pressure testing, I noticed most people pressurized as the first thing. I choose to first pull a vacuum before pressurizing with nitrogen, so the nitrogen is not compressing the atmospheric air.
I used 300 PSI because I read if using too much pressure there is a chance of nitrogen going past the stop valves and contaminate the refrigerant. 300 was just what I compromised with, I figure if the vacuum test fails I can go back and get more aggressive with it.
After letting it hold and check with Oatey leak detecting solution (it's like a bubble soap) for 30 minutes, I did a triple evacuation, it’s probably not that helpful with all new tubing and evaporator, but I don’t have anything to lose by doing so.
Then I started the final pull down, it took about 40 minutes without removing cores to get down to sub 150 microns, when I blanked it off I saw it quickly stabilized to 233 and after 10 minutes it was at 247, I think that’s pretty good for having 1.5 micron rise per minute, according to a graph in the pioneer manual, if wet or leaking it will raise to over 500 microns within a couple minutes.
I used a bunch of tees and valves but I know the micron gauge itself seems to contribute to the rise slightly, if I blank the micron gauge by itself it rises to a few thousand microns, being a device to read vacuum and they sure tend to be notorious for not holding it! So after after the tightness test I pull some more until it starts to have take longer at 130 microns, blanked off it is at 200 microns, that is when I closed the manifold and cracked the liquid line very slowly until I have 50 PSI, then disconnected my rig under positive pressure. I am still learning about my own setup and had to make a judgement call, overall I am happy with the numbers.
With that “here goes nothing” feeling I flipped the breaker and press the remote. After starting, it blows really cold air, (it sounds cliche I know). I used a probe and it is putting out 41 degree air with 67 intake with a moderately low compressor speed. It produced a lot of condensate, 1/2 gallon per hour even though there isn’t a lot of heat load here yet.
I do have a few “nit picks” about the machine, although it’s a good machine overall:
I measured perfectly to where they say drill the hole but the air handler hangs up on the piping and won’t sit down into the bracket. I had to file the hole 1/2” down, which made the hole almost with the bottom of the air handler
Fit and finish of the plastic parts had a cheaper feeling, things like a screw on the electrical cover is barely accessible after installing conduit fittings. The knock outs integrated into the electrical cover makes the cover dangle and get in the way while you install.
The wire terminals are NOT heavy duty I had a hard time getting a 12 AWG supply wire in, the screw is short that you have to back it out to it almost falling (it could fall into the machine). The mitsubishi has a more robust wire terminal setup and even 10AWG can be installed.
The louver is suppose to be able to manually adjust the airflow left to right, but I have not been able to actually move the tiny lever, they seem to be locked inside one of 4 detents and I am afraid of breaking it, where as other brands is very smooth and easy to adjust.
I wished it had a couple more fan speeds than just 3 so it can go slower than 300 CFM, it also doesn’t have a auto louver feature to point it down for heating for example, you seem to have to adjust the angle yourself. Overall functions are fairly basic.
Overall it seem to be a good machine for the money, the savings is definitely there. If it last 5 years I would be more than happy about it.
Sorry that was a bit long, just look at the self captioned pictures.
The unit I installed is called DuctlessAire (18K, 20.8 SEER) I think it’s the same as the pioneer inverter++ series, specs is the same with a slightly different look indoor. The brand seems to be well represented and backed.
The 1/2” copper suction line is not forgiving to bend. If you bend it against something round with the insulation on, you pull the insulation off you may see the tubing flattening. I ended up getting a ratcheting bender with reverse bending attachments. My indoor unit hangs on an interior wall and from there it goes to the room behind then out to a sunroom, then finally to the outside, a total of 5 90 degree turns. It took a few hours to make the bends measuring carefully.
I mostly just read different installation manuals and text information online so I had a good idea on what to do. I used a combination of instructions taken from various brands.
I found it to be most important completely debur without scratching the tubing and then cleaning up the shavings. I used a small brush and attached a cocktail straw to a vacuum to make sure I got all the shavings.
The flare tool I used is a eccentric motion and it rolls the flare outwards instead of using heavy pressure of a burnishing cone. A mirror shine on flares is nice to look at, but are created under heavy pressure and (in theory) they would have less “give” for crushing. The eccentric flare tool gives a duller finish.
I did use nylog to on my flare connection and the threads (not going too crazy with it), I think that did make things more forgiving.
Before pressure testing, I noticed most people pressurized as the first thing. I choose to first pull a vacuum before pressurizing with nitrogen, so the nitrogen is not compressing the atmospheric air.
I used 300 PSI because I read if using too much pressure there is a chance of nitrogen going past the stop valves and contaminate the refrigerant. 300 was just what I compromised with, I figure if the vacuum test fails I can go back and get more aggressive with it.
After letting it hold and check with Oatey leak detecting solution (it's like a bubble soap) for 30 minutes, I did a triple evacuation, it’s probably not that helpful with all new tubing and evaporator, but I don’t have anything to lose by doing so.
Then I started the final pull down, it took about 40 minutes without removing cores to get down to sub 150 microns, when I blanked it off I saw it quickly stabilized to 233 and after 10 minutes it was at 247, I think that’s pretty good for having 1.5 micron rise per minute, according to a graph in the pioneer manual, if wet or leaking it will raise to over 500 microns within a couple minutes.
I used a bunch of tees and valves but I know the micron gauge itself seems to contribute to the rise slightly, if I blank the micron gauge by itself it rises to a few thousand microns, being a device to read vacuum and they sure tend to be notorious for not holding it! So after after the tightness test I pull some more until it starts to have take longer at 130 microns, blanked off it is at 200 microns, that is when I closed the manifold and cracked the liquid line very slowly until I have 50 PSI, then disconnected my rig under positive pressure. I am still learning about my own setup and had to make a judgement call, overall I am happy with the numbers.
With that “here goes nothing” feeling I flipped the breaker and press the remote. After starting, it blows really cold air, (it sounds cliche I know). I used a probe and it is putting out 41 degree air with 67 intake with a moderately low compressor speed. It produced a lot of condensate, 1/2 gallon per hour even though there isn’t a lot of heat load here yet.
I do have a few “nit picks” about the machine, although it’s a good machine overall:
I measured perfectly to where they say drill the hole but the air handler hangs up on the piping and won’t sit down into the bracket. I had to file the hole 1/2” down, which made the hole almost with the bottom of the air handler
Fit and finish of the plastic parts had a cheaper feeling, things like a screw on the electrical cover is barely accessible after installing conduit fittings. The knock outs integrated into the electrical cover makes the cover dangle and get in the way while you install.
The wire terminals are NOT heavy duty I had a hard time getting a 12 AWG supply wire in, the screw is short that you have to back it out to it almost falling (it could fall into the machine). The mitsubishi has a more robust wire terminal setup and even 10AWG can be installed.
The louver is suppose to be able to manually adjust the airflow left to right, but I have not been able to actually move the tiny lever, they seem to be locked inside one of 4 detents and I am afraid of breaking it, where as other brands is very smooth and easy to adjust.
I wished it had a couple more fan speeds than just 3 so it can go slower than 300 CFM, it also doesn’t have a auto louver feature to point it down for heating for example, you seem to have to adjust the angle yourself. Overall functions are fairly basic.
Overall it seem to be a good machine for the money, the savings is definitely there. If it last 5 years I would be more than happy about it.
Sorry that was a bit long, just look at the self captioned pictures.
Attachments



Last edited: