To avoid these ads, REGISTER NOW!

Yet Another Snap-on Tool Chest Restoration

SeattleKent

Well-known member
Joined
Sep 30, 2011
Messages
236
Location
Redmond, Washington
After learning a lot by reading other threads on the great projects, it is time to do one of my own. I’m hoping someone else will learn something. I’m also hoping to get comments, suggestions, and tips to help me along. Also, I hope the thread provides motivation to get this done.

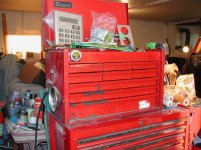
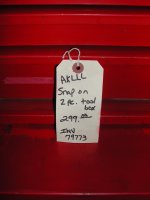
I needed a tool chest. After reading the restoration threads, I decided an old one would make a great project. I found these on Craigslist with a “make on offer” price. Given the age and condition we agreed on $300 for the two chests provided I also bought the tools inside for an additional $300. I didn’t need the tools but I figure there must be some value there so I went for it. I also got a nice Craftsman tool box for $100.

Here is the initial condition:

_DSC5965_zps22f14263.jpg


I filled about 8 cardboard boxes with tools then shoved the empty chests into the back of my Suburban. My teenage kids helped unload. They just rolled their eyes and said “oh no, not another strange dad project”.

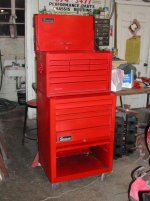
The top chest is a KRA-59A. The bottom chest is a KRA-377A. Both were built in 1965. I was just learning to walk when these were built.

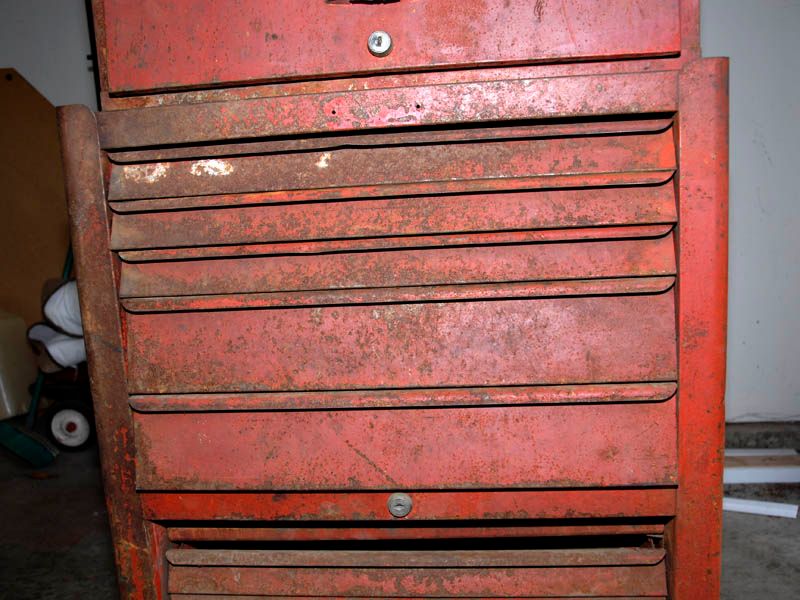
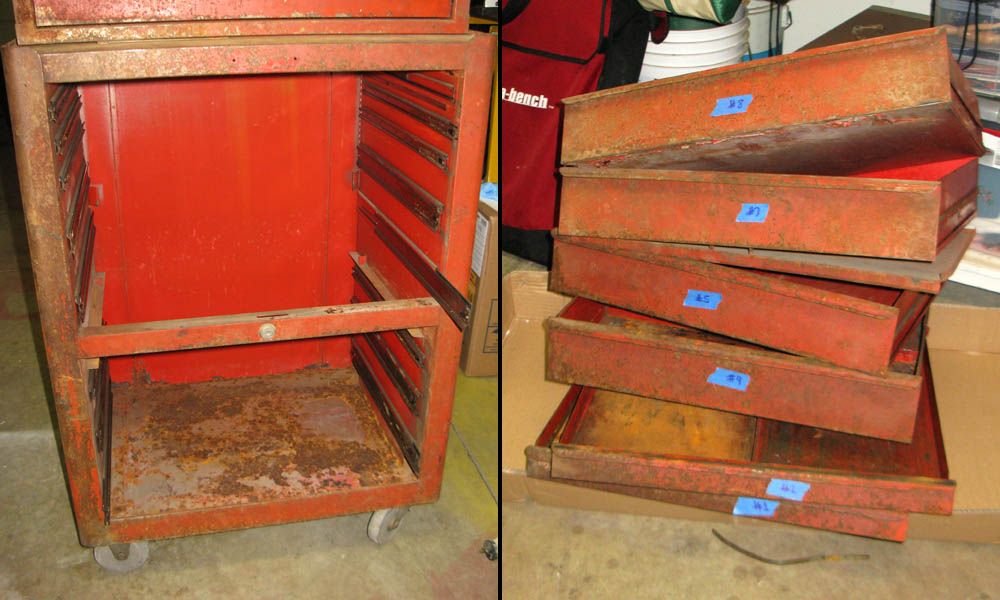
I decided to start with the bottom chest. There is a lot of rust but most of it is just surface rust. The chest looks to be structurally sound. A lot of the paint is missing. A number of the drawers a banged up. The top drawers do not slide cleanly.

_DSC5996_zps74b6f217.jpg


The insides are more of the same. At some point there was water sitting inside the drawers.

_DSC5987_zps3c24c8d6.jpg


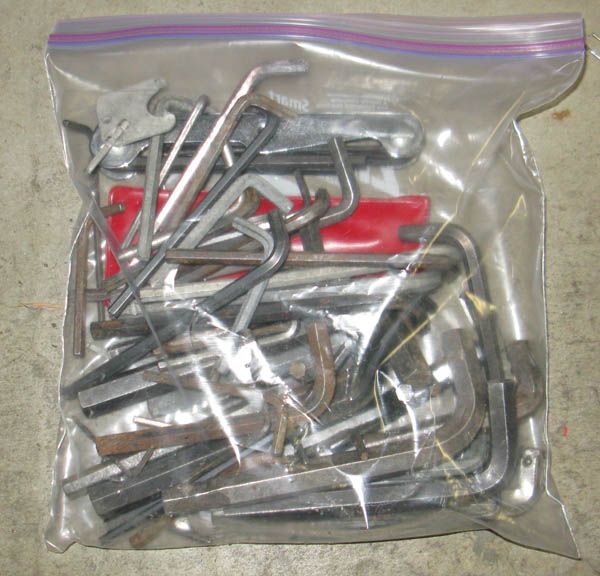
This drawer helped make the sale. When the seller saw this he figured out he was not going to get big bucks for the tool chest.

Enough for now.
 
To avoid these ads, REGISTER NOW!

stratman977

Well-known member
Joined
Jan 26, 2012
Messages
633
Location
Belle Vernon, PA
I got a bottom just like it is about the same shape. I see that you are missing the front cover for the bottom 3 drawers. It's kinda annoying anway but those drawers will never lock without it.
 

Packard V8

Well-known member
Joined
Mar 16, 2009
Messages
7,380
Location
Spokane, WA
I'm a patina guy, have a KRA-59C but those two are really ugly babies. It takes an optomistic eye to see $300 in that pair. They will be beautiful when you're done, but there will be a bunch of hours in those two. Reason I know is BTDTNA. Show us the progress.

1. Borrow time on a low pressure high volume blast cabinet with a gentle medium. Any other rust removal will take forever.

2. Once clean, carefully check the drawer runners inside the cabinet and on the drawers. There will probably be a few bent and a few worn through or pulled welds. Fix those while the metal is still clean.

3. Blow out the insides with high pressure air. Wear safety glasses and turn the cabinets over every which way about six times. The blasting medium gets in every crack and will keep paint from sticking.

4. Most slides can be saved with a little hammer and vise work, but eyeball each one for bends and twists.

5. The hinge on the top box cover usually is pulled loose in a couple of spot welds or the metal is bent at the outer ends. Attend to that before painting.

6. A good tin bender can make a new bottom box bottom cover and you can paint it at the same time.

The good thing is its relatively easy work, just a lot of it, but you'll have a pair of classic solid boxes when you're done.

jack vines
 
OP
S

SeattleKent

Well-known member
Joined
Sep 30, 2011
Messages
236
Location
Redmond, Washington
Thanks for the posts and information.

I see that you are missing the front cover for the bottom 3 drawers. It's kinda annoying anway but those drawers will never lock without it.

I actually have the front cover. It is sitting in the the little space just below the lock. That said, I still cannot lock it because I don't have a key for the lower chest.

It takes an optomistic eye to see $300 in that pair. They will be beautiful when you're done, but there will be a bunch of hours in those two. Reason I know is BTDTNA. Show us the progress.

You're probably right about over paying for the chests. I kept checking Craigslist for chests for a restoration project. I found these. I figured better to over pay a bit than have to wait a month or two for the right chests so come along.

I see what you mean about a ton of work. I'm a couple of weeks into the project, my posting is behind. It has been a lot of work.
 

str8axle55

Well-known member
Joined
Oct 23, 2010
Messages
379
Location
Ma
I think you did OK, they should respond well to a little love. How about some pics of the tools.
 
OP
S

SeattleKent

Well-known member
Joined
Sep 30, 2011
Messages
236
Location
Redmond, Washington
My first step in the restoration was cleaning out the drawers then removing the drawers. After a good vacuuming the drawers looked a little better, still rusty but nothing loose.

Following the instructions on numerous threads I ground down a hack saw blade to work as a drawer slide remover. It took a quite a few tries to get the first drawer out. After that it was no problem. I see what people mean by "once you see how it is done it is easy".

Here is the result:

DrawerRemoval_zpseeacb8b6.jpg


The bottom has more rust than I hoped. Fortunately it is not rusted all the way through. Leaving the box till later I started in on the drawers. My hacksaw blade drawer remover is at the bottom of the right picture.

Given I needed to do both rust and paint removal, I decided to use electrolysis. I worry when using abrasive methods like sanding, grinding and blasting that what I’m really doing is taking off a little rust and a lot of metal. Also, abrasive methods leave little pockets of rust here and there. Painted over rust comes back to bit you in the long run.

Using electrolysis I chemically get rid of all the rust. No small pockets to worry about later. Electrolysis also gets rid of the paint. As the metal bubbles the paint is lifted off in sheets or at least loosened to be easily removed by other methods.

Electrolysis is not perfect, there is still work to be done. But in the end the pieces are rust and paint free.

The drawers are big so my standard electrolysis plastic box would not work. I wandered around the house looking for something suitable. The best I found was a garbage can. Here is the set up:

IMG_0811_zps4dcd0c63.jpg


Electrolysis is pretty simple. Get an old battery charger (or a new dumb one). Hook up the positive to some metal plates. Hook up the negative to the item being cleaned. Fill the container with some warm water. Add Washing Soda. Put in the plates. Put in the drawer. Turn it on. You should see streams of small bubbles right away. After a couple of hours rusty looking crude starts to accumulate on the surface of the water:

IMG_0810_zpsaa931376.jpg


This picture shows it well. Most of the paint on the side of the drawer has come off. There are still a few spots here and there but nothing major. The brown rust has changed to black iron.

I let the electrolysis run over night. In the morning I took the drawer out and scrapped it clean with a plastic pudding knife. Then I scrubbed a bit with a ScotchBrite pad. The goal is to remove all the loose paint and black iron. The big flat surfaces are easy. The corners and curved parts are tougher. The scrubbing removes most of what is left. Then back into the garbage can for another 8 or 10 hours of electrolysis.

At this point all the rust is gone and the paint is either gone or loose. I removed the drawer and put it in big sink and scrubbed away with ScotchBright, steel wool or and SOS pad. In the corners I sometimes had to use little picks to get the paint out. Rinse with clean water. Dry with towel. Blow off with compressor. Success. One drawer done.

I don’t have a picture right now. I’ll post one tomorrow. (I’ll also get pictures of some of the tools.)

Enough for now. Thanks for reading.
 
OP
S

SeattleKent

Well-known member
Joined
Sep 30, 2011
Messages
236
Location
Redmond, Washington
Here is a picture of the first drawer after the electrolysis and scrubbing:

drawer1_zps864f0ea6.jpg


The drawer came out nice and clean. It is not perfect. The bottom part of the photo shows the front of the drawer. Under the lip there is just a bit of red paint remaining. Don't think it is enough to cause a problem, but shows that with electrolysis surfaces behind other surface often don't become clean.

Here is a close up of the left side of the drawer:

IMG_0929_zps335f559d.jpg


This was heavily rusted before the cleaning. The rust ate into the surface. Once the rust is gone there are holes or depressions left over. Some people think electrolysis changes the rust back into metal. Yes, but the metal is an iron oxide or pure iron, not the original steel. The remaining "black iron" is not as strong as the steel and can be scrubbed away. You can see a little remains in the depressions. Fortunately, painting over the black iron is not a problem.
 
OP
S

SeattleKent

Well-known member
Joined
Sep 30, 2011
Messages
236
Location
Redmond, Washington
How about some pics of the tools.

OK, here you go...

First off, a lot of the tools are in bad shape. When the box got filled with water the tools rusted. On top of that the previous owner did not seem that concerned about keeping the tools clean. The tools are covered in grease, dirt, paint, etc. What a mess. For example, here are some of the screw drivers and the like:

IMG_0961_zpsa44452e8.jpg


After cleaning these for a few days, I've started taking much better care of my tools. Now I carefully wipe them down before putting away.

There is a little of everything and a lot of nothing. That is lots of different types of tools but very few of one type or sets of one type. I asked the guy I bought them from what they were used for. He said they were is father or grandfather (I forget) and that he was more a collector than a user. For example here are the 3/8 inch sockets I found:

IMG_0935_zpsb686029b.jpg


I would think you could build a nice matching set. No such luck. There are 16 different brands of sockets. Need a 5/8" - no problem. Got 4 shorts and 6 longs. Need a 7/8" - good luck. None of those. The guy must have bought them piecemeal.

Anyway, here are most of the other tools.

1/2 drive sockets:

IMG_0938_zps565ca7c2.jpg


Some of these are nice Snap-on impact sockets.

Wrenches, pliers, screw drivers, files and punches:

IMG_0946_zps6fabcd7c.jpg


Good to know I'll never need to buy another channel lock pliers.

Wrenches:

IMG_0952_zps9bfcd8f7.jpg


I was able to build a nice set, of course none of them match.

Specialty wrenches and stuff I don’t know what to do with:

IMG_0943_zps20559ea9.jpg


Tons of Allen Wrenches:

IMG_0960_zps49942089.jpg


Cleaned tools set out to dry:

IMG_0937_zps57702832.jpg


Did not know what the funny square ended pliers thing in the middle of the photo was. Looked it up. Turns out it is a K-D 435 used for removing door trim on late 1950 Chrysler cars. Several have recently sold on Ebay for over $100! Not long after discovering that, I found a second set in another box. I’m thinking I could earn over $200. I tired listing one on Ebay but no one has bid on it (yet), so I should not count my chickens before they hatch.

Hammers:

IMG_0957_zps3348e3be.jpg


Found a rusty but salvageable Snap-on BF603!

Not sure what most of these are:

IMG_0954_zpsf54da765.jpg


Milton air fittings and some padlocks:

IMG_0955_zpsd3235ffd.jpg


More random stuff:

IMG_0956_zps73811d34.jpg


Tap and Die, extractors, etc:

IMG_0969_zps3574ebc8.jpg


Beneath the channel lock pliers is an electric impact gun:

IMG_0958_zpsdf0b13f5.jpg


More stuff I’m not sure of:

IMG_0959_zps70212499.jpg


Case full of tools. Looks like something a copier service guy would have:

IMG_0962_zpse795697e.jpg


Finally, here is the Craftsman tool box I paid an extra $100 for:

IMG_0964_zps267dfa8f.jpg


The best part is the contents are actually pretty good:

Craftsmandrawers_zps85637e6e.jpg


I’m most excited about the sockets set in the top. That is a restoration project for sometime in the future.

Anyway, that what I got for $300, $400 if you count the Craftsman. Lots of clean up, de-rusting and restoration to be done.

Thanks for reading.
 

Rico.

Well-known member
Joined
May 28, 2009
Messages
1,330
Location
England
Wow, looking at all those tools is like looking at the owners life. It's a pitty no one in the family
wanted them, but at least now they have been saved by a tool chap. That box will be
fantastic when you're done, and whoever that box belonged to I'm sure he would be
really chuffed to bits that you are restoring it. Well done, can't wait to see the result after
all the effort.
 

Man of Many Vices

Well-known member
Joined
Aug 23, 2012
Messages
366
What are those cast iron cones for? I got set of three marked "1," "2" and "3." My smartass brother said they are used in place of walnut shells for that "hide the pea" game.

By the way, you have an excellent collection of tools there!
 

AL`

Well-known member
Joined
Sep 2, 2011
Messages
318
Location
Texas
Neat stuff SeatleKent. Curious as to how many amps your battery charger supplies for your electrolysis setup. I couldn't make it out from the pics. I have an old Schumacher battery charger with 2 or 6 A output capability. I don't know if that is enough to work or work well.

SeattleKent said:
Using electrolysis I chemically get rid of all the rust. No small pockets to worry about later. Electrolysis also gets rid of the paint. As the metal bubbles the paint is lifted off in sheets or at least loosened to be easily removed by other methods.

I wonder if using a chemical stripper and rust remover is anymore or competitively convenient as an alternative to electrolysis for paint and rust removal. Just mulling the old, more than one way to skin a cat thing. I bought an old Mac Tools Box and I will probably try to strip and paint it at some point. The drawers are rather wide so an electrolysis tub would have to be fairly big for mine.

Neat thread. Thanks for sharing.
 
To avoid these ads, REGISTER NOW!

nine4gmc

Well-known member
Joined
Mar 24, 2012
Messages
14,357
Location
Dallas
You did score :beer:

BTW, I collect Craftsman and could possibly swap you some pieces to complete your sets. ;)
 
OP
S

SeattleKent

Well-known member
Joined
Sep 30, 2011
Messages
236
Location
Redmond, Washington
Al,

I use a Sear "DieHard 10 amp Manual Battery Charger". It is Sears model number 71221. Gives you a choice between 2 amps and 10 amps. When I'm doing a big piece the meter will show 6 or 8 amps. A 2 or 6 amp charger should work fine.

I found the amount of current flow depends on several factors. Adding enough washing soda is important. The first time I tried electrolysis I was only getting 2 or 3 amps. That was because I only used something like a half cup of soda for a big plastic storage box full of water. I added more soda, mixed it up a bit and the current jumped to 8 amps. My current method is to add about a cup or two of soda, start up the electrolysis, check the meter, then add a bit more soda (1/2 cup). If the current jumps up then add a bit more. Continue until adding washing soda does not affect the current flow.

Next is the size of the pieces. The donor plates should be big. I use several plates that are 15 inches long and 6 inches wide. The size of the rusted item also matter. I don't get much current flow when de-rusting a few screw drivers. That's fine. Still works. On something big like a draw expect lots of current flow.

Next is the proximity of the pieces. The closer the more current flow. If they get too close then the amps jumps off the scale. Not good. Separate a bit.

I really like "Evapo-Rust" for chemical rust removing. Works really well. Not as good for paint removal. I did not use Evapo-rust here because the pieces are so big. Would have cost hundreds of dollars for enough to fill suitable container.

I also use some chemical paint strippers. They are very caustic which makes me nervous. Even being careful with mask I still manage to breathe some in. My lungs feel it for a day or two. Chemical stripper are expensive. Finally, the current chemical strippers don’t seem to work as well. I use to use “Tal-Strip”. Worked great. I cannot find it anymore. I heard some rumor that it was banded for environmental reasons. The replacements are not as good, IMHO.

Sometime chemical is the only way to go. I tried stripping an old motorcycle gas tank. Electrolysis did next to nothing. Don’t know why (anyone else know?). I ended up using chemical strippers.

Give it a try and post what happens.
 

Thumper

Well-known member
Joined
Jun 5, 2005
Messages
2,209
Location
N.E.Ga
What are those cast iron cones for? I got set of three marked "1," "2" and "3." My smartass brother said they are used in place of walnut shells for that "hide the pea" game.

Those are control arm bushing knockers.....they come as a 4 piece set.
 

AL`

Well-known member
Joined
Sep 2, 2011
Messages
318
Location
Texas
Thanks SeattleKent. It will probably be some time before I try a restoration. Too many irons in the fire right now. I do have some Evapo-rust, and like you say, it's kind of pricey. I had been thinking more along the lines of naval jelly for the rust but using a wire brush to knock off the loose stuff first. I don't think that would be so abrasive as sandblasting or sanding. Anyways, I have some food for thought. Look forward to seeing your final results.
 
OP
S

SeattleKent

Well-known member
Joined
Sep 30, 2011
Messages
236
Location
Redmond, Washington
More electrolysis of the drawers.

The set up with the garbage can was OK but just OK. The donor metal plate were just sitting in the garbage can. I was worried about the slipping or falling over and coming into contact with the drawer being de-rusted causing a short. Happened once. The battery charger cuts out if there is too much current due to over heating. It would cool down a bit, the current would start again, it would short out, over heat and so it would go. Probably not good for the charger.

I took measurements of the drawer and headed off to Home Depot. The plastic storage bins were too narrow or too short. No good small garbage cans. Finally found a suitable container in the cement area. Picked up this cement mixing container:

IMG_0817_zpsb7874886.jpg


The drawer fits. I can use clamps to hold the donor plates in place.
I set it up with a plate on the bottom with the drawer on top sitting on some rocks. I then put another plate on top of more rocks sitting inside the drawer. That way I could re-rust/remove paint from both the top and bottom at the same time. Turned on the battery charger and the current shot up to the top of the dial. Too much surface area too close together.

I tried again with plate on either end and a plate under the drawer. This worked much better.

IMG_0818_zps1b49ffb7.jpg


Ten or fifteen hours would remove the rust and loosen most of the paint. I would then move the plate from under and set inside the drawer. It was slow and kind of a pain but at least it worked. It takes something like a day and a half to clean up a drawer.

Cleaning out the corners of the drawer was some work. It was hard to get a ScotchBrite pad all the way into the corner. I tired a little dental pick. Worked but slow. After doing a couple of drawer I realized a drawer would just barely fit in my small sand blaster. A second or two of blasting with glass beads (what I had in the blaster) would clean it right up. The paint was pretty loose after the electrolysis. A bit of bead blasting was all it needed. This sped up the process. I was no longer really concerned about getting the drawer completely clean. Just get it close then a couple of minutes of blasting would take care of the rest. I also went back and blasted the couple of drawer I had already finished.

Thanks for reading.
 

Modifieddriver

Well-known member
Joined
May 29, 2009
Messages
820
Location
Moonville, South Carolina
I can't wait to see the restored product.

I'm partial to these Snap-On top KRA 59A and KRA 377A bottom boxes.

I have two of the tops and one bottom. One top box was a swap meet find for $30, and the other top and bottom was a Pawn Shop score. Don't believe the tag in the pic. I had them bought for $200 but I didn't have the $dough$ on the hip. Went home, told my wife, went back two days later with the $dough$ and they were gone. Wife went behind me, bought them and then surprised me at XMAS. How cool is that. She said she got the pair for less than he quoted me :D .

You have the optional drawers in the bottom box. Wish I could find them for mine. Oh yeah, they didn't look like this right outa' the Pawn Shop. The PO had decals on it and spray bombed red on most everything. I removed the decals with a heat gun and wiped everything down with lacquer thinner to get rid of the cheap paint job. I spent a couple of days fluffing the paint job up. I still have to clean inside the drawers and install liners. I also had to get a new lock assembly for the bottom and a key made for the top.

I have some stuff that needs this electrolysis process. I'll be watching this closely. Your hard work is going to pay you back BIG time.

I have a newer ball bearing slide bottom box, and I don't like it as much as the friction slides. I'm always chasing drawers to close.
 

Attachments

  • 047.jpg
    047.jpg
    119.9 KB · Views: 525
  • 019.jpg
    019.jpg
    98.2 KB · Views: 595
  • 020.jpg
    020.jpg
    100.9 KB · Views: 514
  • 021.jpg
    021.jpg
    95.3 KB · Views: 459
  • 017.JPG
    017.JPG
    142.8 KB · Views: 548
Last edited:

spotco2

Well-known member
Joined
May 18, 2012
Messages
1,050
Location
NW Georgia
I love the way you are stripping the drawers. I would not have thought about doing that.

I see a lot of really good stuff in those boxes of dirty tools.
 

Engineer61

Well-known member
Joined
Oct 26, 2012
Messages
225
Location
Colorado
I think those two cones and the red tool with them are for exhaust tubing work. The red tool should have a big nut on each end, turn the nuts against each other and the tool expands - put it into the end of a piece of exhaust tubing and then turn the nut and the tubing gets straightened and dents removed so you can slide two pieces of tubing together. Cones are used in same kind of way to put a little flare on the end of the exhaust tubing if you put the point into the tubing, if you put the tubing into the cone from the back then it crushes the end slightly so you can put a flared end over it and have a little overlap for welding two pieces of tubing together. Two diameters on the red tool for two different sizes of exhaust pipe, probably 2" and 1 3/4"; same with the two cones.
 

pilotman81

Well-known member
Joined
Apr 24, 2012
Messages
181
Location
Somewhere on the road
Wow, looking at all those tools is like looking at the owners life. It's a pitty no one in the family
wanted them, but at least now they have been saved by a tool chap. That box will be
fantastic when you're done, and whoever that box belonged to I'm sure he would be
really chuffed to bits that you are restoring it. Well done, can't wait to see the result after
all the effort.

Translate "chuffed to bits" into actual english? Good buy and great project! Look forward to checking into the progress.
 

shephd

Well-known member
Joined
Jul 30, 2005
Messages
430
Location
va
I am another one that is trying to do something similar so am subscribed. I have been surprised by how difficult it is to get an old box really clean. My 15 yr old craftsman set is like new compared to the old boxes I have picked up, but I always clean tools before putting them away.

I picked up a bottom box like yours with the optional drawers. Mine was in a body shop and has been hard to clean. Not rusty, but sanding dust. I gave 80 for it empty. I don't know that you gave too much total,,but the breakout skews things.

I was going to get a trash can for electrolysis. Thanks for the tip on the cement pan!
 
To avoid these ads, REGISTER NOW!
Top Bottom