
You are using an out of date browser. It may not display this or other websites correctly.
You should upgrade or use an alternative browser.
You should upgrade or use an alternative browser.
Yet Another Snap-on Tool Chest Restoration
- Thread starter SeattleKent
- Start date
Smokeshow69
Well-known member
reviving an "old" thread. any updates? thanks!
Yeah! x2. Any new pictures.
Translate "chuffed to bits" into actual english? Good buy and great project! Look forward to checking into the progress.
You do know where the poster of that is from? And where English
originates from?
Or are you one of those people that think, if English was good enough for Jesus, it's good enough for you!?
Bigplum
Well-known member
Rothko , did you find any other names on that collapsable tool box?
Freeborn John
Well-known member
Chuffed to bits means '' I am very pleased'
"I'm chuffed to bits" as the train spotter said when he fell under a steam locomotive...
Leaky88
Well-known member
Hi,
I am a new member. Have read many posts throughout the years, but just
joined today. I was looking for information on restoring my Snap On
boxes and saw your project. Was hoping you might give me some pointers
on getting these refreshed?
I have a set of boxes "exactly" like you restored. Would appreciate any
lessons learned in doing yours. I love old stuff like this.
Immediate questions I have are:
I have hack saw blades, what modifications do I need to do to make them
tools for removing drawers?
I have tried in vain using the saw blade by itself. According to "How TO' posting, all one needs to do is spray lubricant on the end of saw blade, pull draw out to furthest travel, place blade between guides and cabinet, push until you hear a "click", and remove the drawer. Not happening for me. What is trick?
I read about using electrolysis process to remove rust/paint. I like
it!!! [Have done sandblasting and the clean-up is a life-long process
not to mention, friction surfaces do not like it.] I never did this
process before. I have a charger and vessel for dipping. How do I set
it up? You mention a washing solution. What kind?
What if any primer did you use for the clean metal?
Slides. Did you have to replace any drawer slides and if so can new
ones be purchased? Having not removed the drawers, I have a couple of
drawers with resistance. What kind of grease to you use when "final"
assembly is done?
Any additional information you can provide would be much appreciated.
Leaky
P.S.
These vintage tool boxes just represent one more reason Snap-on has the
good name it does. Gotta love them!!!
© 2014 Microsoft Terms Privacy & cookies Developers English (United States)
Lookin4'67Galaxieconv
Well-known member
So what happened here OP? 
You haven't posted in over a year and a half.
You haven't posted in over a year and a half.
OP
SeattleKent
Well-known member
Sorry for the long delay in posting. A few things came up and I had to put this project aside for a while. But, I recently made parole and I’m ready to get back to this (just kidding).
Leaky88’s timing is actually very good. I couple of days ago I took the first step in getting started again.
When I left the project I had a big stack of stripped and cleaned drawer. They were stored in a dry warm room so they have not rusted over again. The next step is painting. I built a nice spray booth in my garage from PVC and plastic. I purchased an HVLP gun. The question then becomes which paint.
I know there are wonderful epoxy primers and urethane paints that will do look great and last forever. The downsides are they are expensive and contain isocyanate. I spend a long time (obviously!) trying to figure out if I could safely use them. In the end I decided no. I could get a full body suit and a charcoal respirator and that might be good enough. But good enough does not cut it. Isocyanates are really nasty.
My current thinking is to just use rustoleum primer and paints. I have used them before. They take forever to cure (weeks). They are not that strong. But they are relatively safe. If anyone has better ideas I’m all ears. In the next couple of days I hope to do some test spraying to learn how to use an HVLP gun.
On to Leaky88’s questions.
Drawers
The only modification to the hack saw blade is grind it down to make it shorter. A new blade is something like a foot long, a half inch tall and really thin. I had to grind them down to 3/8 tall to fit in the slides. Post 10 in another thread has a good picture.
The trick you are probably missing is not having the drawers fully extended. You need to slip the blade in before the stop gets to the catch. Try opening the draw about half way then insert the blade. That will hold the catch down and let the stop slide over it. With the blade in pull the drawer all the way open. Putting a curve in the blade also helps.
Electrolysis
Post 7 of this current thread gives some information on my electrolysis setup. Post 22 talks about the charger I use. I use water mixed with “washing soda” for the liquid. I buy “Arm & Hammer Super Washing Soda” from the super market. If is found in the laundry aisle. Baking soda can also be used. The thread here at post 310 on page 16 has some discussions about which to use and why.
Here is a thread on another site which helped me get started.
Grab a bucket and a rusty tool and try it. Having done it once it gets much easier.
Primer
For primer I was going to use “Rust-oleum Clean Metal Primer”. It is number 7780 in Rustoleum land. On top I was going to put “Rust-oleum Protective Enamel” in Gloss Sunrise Red (number 7762). With spray cans I like the professional series better (does not run as much and dries fast). In the quart cans they don’t make Gloss Sunrise Red which is supposed to be very close to the snap-on red. The choice is subject to change based on any feedback I get.
Slides
A few of the slides were in bad shape. I ordered replacements from snap-on. See here. I think they had one type of the slides I needed but not the other. I suspect cleaning will solve most of your slide problems. I will use simple white lithium grease if needed.
One of the tracks on the cabinet is broken. Still need to figure how to fix that. First comes some painting.
Hope this helps.
OP
SeattleKent
Well-known member
Long ago, when I quit working on this, I was working on cleaning the drawers. I got that all done. Here is a before and after picture:

I was happy with the outcome. The discoloration in the after shot on the left side is just the texture from the rust. Part of the smooth surface rusted away. Removing the rust left little hills and valleys. Oh well.
A few of the drawer were banged up and bent. For example:

I tried a few things to straighten. First was just compressing between blocks of wood:

Did not work very well. Got most of the bend out but there was still a noticeable kink.
I moved up to steel:

In the end, what worked best was using these to bend and straighten the edges. It is one of my welding tools.

With that, the drawers were clean and ready for painting. I did not treat the drawers at all. I just piled them in a corner of a storage room in my house. It is heated space so I was not too worried about rusting. I thought it would be a few week and ended up being months and months.
I was happy with the outcome. The discoloration in the after shot on the left side is just the texture from the rust. Part of the smooth surface rusted away. Removing the rust left little hills and valleys. Oh well.
A few of the drawer were banged up and bent. For example:
I tried a few things to straighten. First was just compressing between blocks of wood:
Did not work very well. Got most of the bend out but there was still a noticeable kink.
I moved up to steel:
In the end, what worked best was using these to bend and straighten the edges. It is one of my welding tools.
With that, the drawers were clean and ready for painting. I did not treat the drawers at all. I just piled them in a corner of a storage room in my house. It is heated space so I was not too worried about rusting. I thought it would be a few week and ended up being months and months.
JAKE-THE-TOOL-MAN
Well-known member
Have you looked into waterborne automotive paints? Apparently they are much safer but require a different technique to spray. It's worth looking into.
OP
SeattleKent
Well-known member
Have you looked into waterborne automotive paints? Apparently they are much safer but require a different technique to spray. It's worth looking into.
Don't know anything about them. Do tell! Brands? Products? Experiences?
OP
SeattleKent
Well-known member
Painting the drawer is next. I have only used rattle cans before. This project offered a good opportunity to learn how to spray with an HVLP gun.
First step was getting a gun. I choose the DeVilbiss Finishline 4 FLG-670. Good reviews. Not super expensive. Purchased on Amazon.
I toyed with the idea of a Harbor Freight HVLP gun. I probably could have gotten it to work. But being new at this I figured if there were problems how would I know if it was me or the gun. Beside, how often do you buy a nice tool and wish you had bought the cheaper tool?
Next step was building a spray booth. It is a standard PVC pipes covered with painters plastic with furnace filter on the intake. I did buy a nice Jenny explosion proof fan for exhaust. Here is the result:

I don’t want to hijack my own thread with the construction details. I can post more if anyone is really interested.
The spray booth works great. The air stays clear rather than getting all foggy with paint spray. My wife is not too happy about losing a garage bay. I keep telling her it is a temporary spray booth and I will take it down someday.
Next step is paint selection. As discussed above, I went with Rustoleum. I have used their rattle cans with success. It is cheap. It is safe. The actual paints are:

I got them at Home Depot for $9 each.
Based on Rustoleum tech support, I thinned the primer 15% with mineral spirits. Worked great. I thinned the red paint a little more, maybe 20%. I’ll go maybe 25% next time. I sprayed with the 1.5 tip with 23 pounds pressure at the gun which according to the manual should be 10 pounds pressure at the cap.
The actual painting was a little difficult given the nature of the drawers. How do I paint the inside and outside in one go? Flipping them over would smear the paint. I could hang but that would require drilling a hole which did not seem like a good idea. How do I dry both sides at once? Never figured a good solution. Decided to paint one side at a time. Paint the bottom and outside with primer. Wait a couple of days for it to dry. Paint the inside with primer. Wait a couple of days for it to dry. Paint the outside with red paint, etc.
To help in the painting process I made a small turn table. Mounted a lazy susan turnable to a piece of plywood. Mounted a couple of 2x4s on the turnable. Tried it out and it was too short so I mounted a couple of 2x2 on top of the 2x4s.

Put the drawer on the turnable. Spray a side. Turn. Spray. Turn etc. I did two passes on each section. Did not have any runs. The Rustoleum is pretty easy to work with.
I was planning to doing two coats with the primer. Looked good enough after a single coat that I skipped the second. Took just about the full quart of primer to do all 8 drawers inside and out. Much, much cheaper than rattle cans.
I have done the first coat of the red on the outside and bottoms of the drawer. Tomorrow I will attempt to paint the inside. I will probably go two coats on the red just to be sure.
Thanks for reading.
First step was getting a gun. I choose the DeVilbiss Finishline 4 FLG-670. Good reviews. Not super expensive. Purchased on Amazon.
I toyed with the idea of a Harbor Freight HVLP gun. I probably could have gotten it to work. But being new at this I figured if there were problems how would I know if it was me or the gun. Beside, how often do you buy a nice tool and wish you had bought the cheaper tool?
Next step was building a spray booth. It is a standard PVC pipes covered with painters plastic with furnace filter on the intake. I did buy a nice Jenny explosion proof fan for exhaust. Here is the result:
I don’t want to hijack my own thread with the construction details. I can post more if anyone is really interested.
The spray booth works great. The air stays clear rather than getting all foggy with paint spray. My wife is not too happy about losing a garage bay. I keep telling her it is a temporary spray booth and I will take it down someday.
Next step is paint selection. As discussed above, I went with Rustoleum. I have used their rattle cans with success. It is cheap. It is safe. The actual paints are:
I got them at Home Depot for $9 each.
Based on Rustoleum tech support, I thinned the primer 15% with mineral spirits. Worked great. I thinned the red paint a little more, maybe 20%. I’ll go maybe 25% next time. I sprayed with the 1.5 tip with 23 pounds pressure at the gun which according to the manual should be 10 pounds pressure at the cap.
The actual painting was a little difficult given the nature of the drawers. How do I paint the inside and outside in one go? Flipping them over would smear the paint. I could hang but that would require drilling a hole which did not seem like a good idea. How do I dry both sides at once? Never figured a good solution. Decided to paint one side at a time. Paint the bottom and outside with primer. Wait a couple of days for it to dry. Paint the inside with primer. Wait a couple of days for it to dry. Paint the outside with red paint, etc.
To help in the painting process I made a small turn table. Mounted a lazy susan turnable to a piece of plywood. Mounted a couple of 2x4s on the turnable. Tried it out and it was too short so I mounted a couple of 2x2 on top of the 2x4s.
Put the drawer on the turnable. Spray a side. Turn. Spray. Turn etc. I did two passes on each section. Did not have any runs. The Rustoleum is pretty easy to work with.
I was planning to doing two coats with the primer. Looked good enough after a single coat that I skipped the second. Took just about the full quart of primer to do all 8 drawers inside and out. Much, much cheaper than rattle cans.
I have done the first coat of the red on the outside and bottoms of the drawer. Tomorrow I will attempt to paint the inside. I will probably go two coats on the red just to be sure.
Thanks for reading.
JAKE-THE-TOOL-MAN
Well-known member
Don't know anything about them. Do tell! Brands? Products? Experiences?
here's a few videos, a quick google search or poking around on youtube will teach you a lot

OP
SeattleKent
Well-known member
Finally I turn my attention to the main cabinet. The initial condition is bad but not terrible. The paint was in bad shape. Much of the cabinet had surface rust. The bottom was heavily rusted inside and out. Fortunately it still structurally sound, the walls are not rusted through.

The first step was to pressure wash it. I spray degreaser on the drawer tracks. Scrubbed a little then let it have it with the pressure washer. I was hoping the high pressure water would magically rip the old paint off. No such luck. Clean but very little of the paint came off and none of the rust.

I thought for a long time on how to clean this up. Paint stripper and sanding would work well on the outside but the drawer tracks would be a problem. Also, it would not really get rid of the rust. Electrolysis would be nice but I did not have container big enough. Buying a big container is expensive and storage becomes an issue.
The best I had was a little kiddie pool long ago used by my kids and now used by my black labrador retriever. I could do a side at a time. Six sides would not take that long.
Here is the initial set up.

Put a steel plate on the bottom. Put the cabinet up on bricks. Put another plate inside on little blocks.
The plan quickly fell apart.
There is some limit to the total surface area. With too much surface area the current on the battery charger goes really high. The electrolysis hardly works at all. The same thing can happen when the plate and piece are close together. Here I had both. Two big plates both close to the cabinet. It worked OK if I removed the plate inside. Suddenly my six steps became 12. Still I let it run for 24 hours and checked out the results. The rust was gone. Most of the paint was loose. Scrubbing SOS and scotchbrite pads got it pretty clean.

Back into the electrolysis to work on the bottom inside. 24 hours later and lots of scrubbing resulted in this.

Almost all the paint is gone. All the rust is gone, although some changed to black iron. Black iron is softer than steel. It does not really hurt. You can paint over it without worry.
At this point the process was becoming a pain. The cycle is:
* Electrolysis for 24 hours.
* Scrub the last little bits of paint off and some of the black iron.
* Hose it down.
* Move the box inside the house to dry off. In the cleaning the already stripped areas were getting wet. If just left that way surface rust would form. So after each cleaning I would dry the box and leave inside for a few hours by a fan to get completely dry.
* Repeat.
After the bottom, I worked on the inside where the drawer slides are. Slow going. 95% of the paint was gone with electrolysis. The last 5% took a lot of time. For one side I tried leaving it in the pool for 36 hours. Did not work so well. If left too long the old paint sort of dries out and resticks to the piece. It comes off with scrubbing but it is easier to take off after 24 hours.
Some of the corners still had paint in them. After a dry cycle I shot it with a soda blaster. Worked great at getting the last little bits off very quickly.
Here is a picture of the drying stage.

To complicate the process the kiddie pool sprung a leak. Overnight about half the pool would empty. I drained and cleaned the pool then fitted the inside with some 6-mil plastic I got in the Home Depot paint department. The plastic worked for a couple of cycles then that too started leaking, only much slower.
Conclusions
Cleaning a large piece by electrolysis is possible but not easy. Lack of a big pool required doing the part in little sections. The relatively low power of my battery charger further reduces the size of the sections. The already cleaned/stripped sections getting wet requires thoroughly drying the piece between cycles.
Fortunately the end results are good. All the rust is gone. The paint is cleaned off with some scrubbing.
So far I have done the top and bottom and the insides. Over the next few days I'll clean the outside. More pictures when it happens.
Thanks for reading.
The first step was to pressure wash it. I spray degreaser on the drawer tracks. Scrubbed a little then let it have it with the pressure washer. I was hoping the high pressure water would magically rip the old paint off. No such luck. Clean but very little of the paint came off and none of the rust.
I thought for a long time on how to clean this up. Paint stripper and sanding would work well on the outside but the drawer tracks would be a problem. Also, it would not really get rid of the rust. Electrolysis would be nice but I did not have container big enough. Buying a big container is expensive and storage becomes an issue.
The best I had was a little kiddie pool long ago used by my kids and now used by my black labrador retriever. I could do a side at a time. Six sides would not take that long.
Here is the initial set up.
Put a steel plate on the bottom. Put the cabinet up on bricks. Put another plate inside on little blocks.
The plan quickly fell apart.
There is some limit to the total surface area. With too much surface area the current on the battery charger goes really high. The electrolysis hardly works at all. The same thing can happen when the plate and piece are close together. Here I had both. Two big plates both close to the cabinet. It worked OK if I removed the plate inside. Suddenly my six steps became 12. Still I let it run for 24 hours and checked out the results. The rust was gone. Most of the paint was loose. Scrubbing SOS and scotchbrite pads got it pretty clean.
Back into the electrolysis to work on the bottom inside. 24 hours later and lots of scrubbing resulted in this.
Almost all the paint is gone. All the rust is gone, although some changed to black iron. Black iron is softer than steel. It does not really hurt. You can paint over it without worry.
At this point the process was becoming a pain. The cycle is:
* Electrolysis for 24 hours.
* Scrub the last little bits of paint off and some of the black iron.
* Hose it down.
* Move the box inside the house to dry off. In the cleaning the already stripped areas were getting wet. If just left that way surface rust would form. So after each cleaning I would dry the box and leave inside for a few hours by a fan to get completely dry.
* Repeat.
After the bottom, I worked on the inside where the drawer slides are. Slow going. 95% of the paint was gone with electrolysis. The last 5% took a lot of time. For one side I tried leaving it in the pool for 36 hours. Did not work so well. If left too long the old paint sort of dries out and resticks to the piece. It comes off with scrubbing but it is easier to take off after 24 hours.
Some of the corners still had paint in them. After a dry cycle I shot it with a soda blaster. Worked great at getting the last little bits off very quickly.
Here is a picture of the drying stage.
To complicate the process the kiddie pool sprung a leak. Overnight about half the pool would empty. I drained and cleaned the pool then fitted the inside with some 6-mil plastic I got in the Home Depot paint department. The plastic worked for a couple of cycles then that too started leaking, only much slower.
Conclusions
Cleaning a large piece by electrolysis is possible but not easy. Lack of a big pool required doing the part in little sections. The relatively low power of my battery charger further reduces the size of the sections. The already cleaned/stripped sections getting wet requires thoroughly drying the piece between cycles.
Fortunately the end results are good. All the rust is gone. The paint is cleaned off with some scrubbing.
So far I have done the top and bottom and the insides. Over the next few days I'll clean the outside. More pictures when it happens.
Thanks for reading.
Ace Sprocket
Member
- Joined
- Mar 11, 2012
- Messages
- 19
Sure looks good !! I'm looking forward to seeing the finished product.
Great work so far
Great work so far
Kent, this is a great thread. Thanks for sharing it. If you're worried about the pitted surface rust, may I suggest heading to the auto parts store and picking up some bondo glaze putty? That, plus some 220-400 grit sandpaper and a sanding block will fill those holes nicely and provide a smooth surface for primer.
Youtube is crawling with videos on how to apply and sand body filler, but look for Donnie Smith with Butler Collision on there if you want to zero in someone good.
Also, if you want to remove paint quickly I'd slap a paint stripping disc on a 4.5" angle grinder, amazing how fast you can strip to bare metal. Harbor Freight actually has some very good discs.
Electrolysis works great for irregular surfaces but a stripping wheel on an angle grinder is great for large flat surfaces.
OP
SeattleKent
Well-known member
Have you looked into waterborne automotive paints? Apparently they are much safer but require a different technique to spray. It's worth looking into.
I finally had some time to look into the waterborne automotive paints. They got good reviews for nice colors and easy to work with. Unfortunately, it seems they are a partial solution. The primers and clear coats are not water based and still have all the nasty chemicals. Since it is not good to mix products and lines the waterborne paints mean one of three steps is safe. Two out of three are not good.
Shoot. I was hoping for a break through. Probably still a few years off.
OP
SeattleKent
Well-known member
If you're worried about the pitted surface rust, may I suggest heading to the auto parts store and picking up some bondo glaze putty? That, plus some 220-400 grit sandpaper and a sanding block will fill those holes nicely and provide a smooth surface for primer.
Larry - Wow! Great tip. I had given some thought to using body filler for some of the dent. I never heard of glaze putty before.
Watched some of the videos. The end result was me going out and getting some putty to do this right. Thanks.
Also, if you want to remove paint quickly I'd slap a paint stripping disc on a 4.5" angle grinder, amazing how fast you can strip to bare metal. Harbor Freight actually has some very good discs.
Electrolysis works great for irregular surfaces but a stripping wheel on an angle grinder is great for large flat surfaces.
Putting the cabinet in the pool was a pain. Next time I'll look into some stripping discs. I worry about taking off lots of metal by mistake. I guess I'll find out.
RivennHewn
Well-known member
Aircraft stripper. No need to worry about removing any metal. Works fast.
http://www.wmbarr.com/product.aspx?catid=72&prodid=135
http://www.wmbarr.com/product.aspx?catid=72&prodid=135
OP
SeattleKent
Well-known member
I finished all the stripping and derusting. Did the last cycle in the pool. Washed it really well with the hose. Scrubbed with Scotchbrite pad and steel wool. Brought into the laundry room, put a fan on it and let it dry for a couple of days.

Tons of work but I am happy with the results.
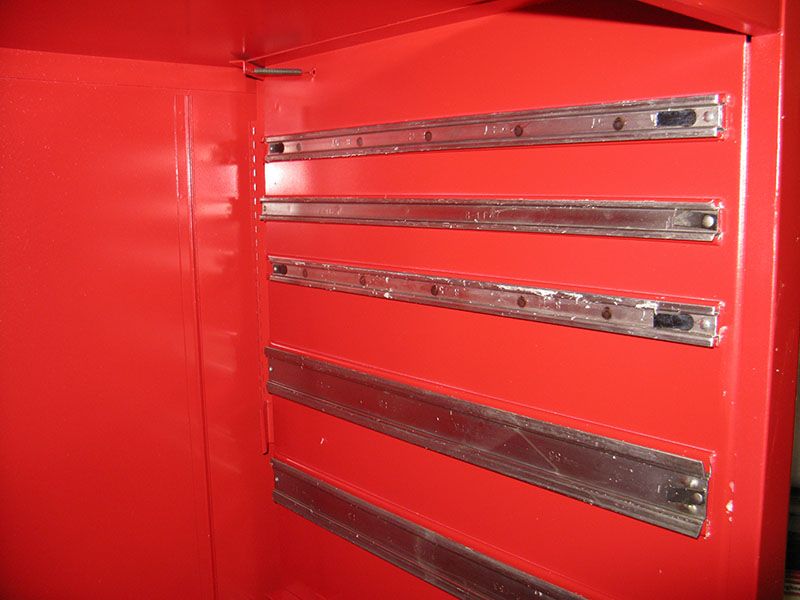
I’m anxious to move on to painting but one problem remains. The drawer slide holder on the left side for the top drawer got mangled at some point.

Here is the end view.

The first idea was just to buy a new slide holder. I looked high and low for a “8-1648”. Never found it. Snap-on had some other drawer parts but not this.
The next approach that came to mind was taking some bar stock and milling a groove to match the original and weld in place. Great except I don’t have a milling machine. It’s on my Christmas list but I don’t think Santa has room this year for something that big.
The next approach is to weld some sheet metal to some bar stock. The sheet metal would act like the lip that holes the slide in line. The bar stock would hold the weight. So how big should these be?
Measuring was difficult. Then I hit on an idea. Take a picture with a ruler and then use Photoshop to cut the ruler out and move around the picture:

Worked great. The bar stock should be 1/8 inch thick. The lip is between 20 and 22 gauge sheet metal. I had 22 so that is what I use.
I trimmed the crumpled ledge out with a Dremel. Cut the 1/8” x 1/2” bar stock to length. Cut the sheet metal and weld to the bar stock. Cleaned that up a bit and then welded into the cabinet. Here is the result:

The picture looks terrible (am I really that bad at welding?). It looks better in person. Either way, it seems to work.
Next step body filler for the big dents and glaze putty to make it really smooth.
Thanks for reading.
Tons of work but I am happy with the results.
I’m anxious to move on to painting but one problem remains. The drawer slide holder on the left side for the top drawer got mangled at some point.
Here is the end view.
The first idea was just to buy a new slide holder. I looked high and low for a “8-1648”. Never found it. Snap-on had some other drawer parts but not this.
The next approach that came to mind was taking some bar stock and milling a groove to match the original and weld in place. Great except I don’t have a milling machine. It’s on my Christmas list but I don’t think Santa has room this year for something that big.
The next approach is to weld some sheet metal to some bar stock. The sheet metal would act like the lip that holes the slide in line. The bar stock would hold the weight. So how big should these be?
Measuring was difficult. Then I hit on an idea. Take a picture with a ruler and then use Photoshop to cut the ruler out and move around the picture:
Worked great. The bar stock should be 1/8 inch thick. The lip is between 20 and 22 gauge sheet metal. I had 22 so that is what I use.
I trimmed the crumpled ledge out with a Dremel. Cut the 1/8” x 1/2” bar stock to length. Cut the sheet metal and weld to the bar stock. Cleaned that up a bit and then welded into the cabinet. Here is the result:
The picture looks terrible (am I really that bad at welding?). It looks better in person. Either way, it seems to work.
Next step body filler for the big dents and glaze putty to make it really smooth.
Thanks for reading.
OP
SeattleKent
Well-known member
Aircraft stripper. No need to worry about removing any metal. Works fast.
I tried Aircraft stripper once. It worked GREAT. I was super excited. Went through the can and went out and bought another. The second was terrible. Hardly took off anything. Went back to the shop and asked about. They said something about the formula changing to me more environmentally friendly or something. Not sure if it is true. All I know is it did not work.
Anyone else seen this?
Mohawk Dave
Well-known member
I tried Aircraft stripper once. It worked GREAT. I was super excited. Went through the can and went out and bought another. The second was terrible. Hardly took off anything. Went back to the shop and asked about. They said something about the formula changing to me more environmentally friendly or something. Not sure if it is true. All I know is it did not work.
Anyone else seen this?
YES! I used to use all that stripper years ago...tried again recently and realized I wasted my money and made a frikin half gooey mess. Nothin worse than wasting money by assholes who know they are selling you junk.

bulletpruf
Well-known member
Also, if you want to remove paint quickly I'd slap a paint stripping disc on a 4.5" angle grinder, amazing how fast you can strip to bare metal. Harbor Freight actually has some very good discs.
Electrolysis works great for irregular surfaces but a stripping wheel on an angle grinder is great for large flat surfaces.
^^^This.
You also don't need a ginormous sandblasting cabinet for the hard to reach areas -- just get one of the hoppers that you can use outside (the black plastic one from Sears; stay away from the metal one from Harbor Freight). Lay down a large tarp, blast on top of it. Reclaim your media and re-use.
Scott
Bigplum
Well-known member
In England it's the same, used to have good paint stripper called Nitromors , then some Health and safety types got involved and now it's about as powerful as rice pudding
Good fix on the runner , plug welds might have been prettier and easier to clean up
but it's not seen so no matter
Good fix on the runner , plug welds might have been prettier and easier to clean up
but it's not seen so no matter
OP
SeattleKent
Well-known member
This project is all about learning how to do stuff. The drawer painting was about learning how to use and HVLP spray gun. Larry’s comment (post #59) got me thinking. Maybe this is a chance to learn body filler. It would be fun to get the main cabinet looking a little nicer.
The cabinet had lots of dents and dings. The simple glaze putty would not be enough. I needed to start with body filler. A few months ago I purchased some body filler for another project (motorcycle restoration). It is Evercoat Rage Gold. Bought a gallon on Amazon. When the can showed up in was dented (probably from shipping) but seemed otherwise intact.
After watching a number of YouTube videos I got to work. I mixed up what seemed like a lot on a 6”x8” white plastic Bondo tray I got at the auto parts store. I spread it with a six inch plastic spread also from the auto parts store. It covered about half of one side. The biggest problem is it seemed to set up pretty quick. After a few minutes it was thick and very difficult to spread. Use less catalyst next time. I waited a couple of hours and had at it will 18” Dura-Block with 36 grit sand paper, sanding in an X pattern. I quickly filled my garage with dust.
It was clear one coat was not enough. I would sand with 36 grit, find the low spots, and then put on another coat of filler. Most sides took two or three coats of filler. I sanded with 36, then 80, and finally 180. Spraying a guide coat helped a lot.
The results:

and

The cabinet had lots of dents and dings. The simple glaze putty would not be enough. I needed to start with body filler. A few months ago I purchased some body filler for another project (motorcycle restoration). It is Evercoat Rage Gold. Bought a gallon on Amazon. When the can showed up in was dented (probably from shipping) but seemed otherwise intact.
After watching a number of YouTube videos I got to work. I mixed up what seemed like a lot on a 6”x8” white plastic Bondo tray I got at the auto parts store. I spread it with a six inch plastic spread also from the auto parts store. It covered about half of one side. The biggest problem is it seemed to set up pretty quick. After a few minutes it was thick and very difficult to spread. Use less catalyst next time. I waited a couple of hours and had at it will 18” Dura-Block with 36 grit sand paper, sanding in an X pattern. I quickly filled my garage with dust.
It was clear one coat was not enough. I would sand with 36 grit, find the low spots, and then put on another coat of filler. Most sides took two or three coats of filler. I sanded with 36, then 80, and finally 180. Spraying a guide coat helped a lot.
The results:
and
thor
Active member
Your box looks really good. I found when spraying rustoleum, that using a Valspar hardener in it will make it a harder more durable finish.
http://www.amazon.com/Valspar-4625-Enamel-Hardener-oz/dp/B000LNY1MY/ref=pd_ys_sf_s_rp_a1_3_p?ie=UTF8&refRID=1EAXZDRDR4B09J5W2TAK
http://www.amazon.com/Valspar-4625-Enamel-Hardener-oz/dp/B000LNY1MY/ref=pd_ys_sf_s_rp_a1_3_p?ie=UTF8&refRID=1EAXZDRDR4B09J5W2TAK
OP
SeattleKent
Well-known member
I found when spraying rustoleum, that using a Valspar hardener in it will make it a harder more durable finish.
The hardeners are great but unfortunately contain isocyanate. Use of these require full body suit, external air supply, etc. The chance of me getting all that right are slim to none. I just avoid the stuff. I have done enough bad things to my lungs and do not need to do any more damage.
OP
SeattleKent
Well-known member
The next step is a glaze coat. The body filler takes care of the major imperfections like dents and bent metal. The glaze coat gets rid of surface imperfections like deep scratches and pin holes. I used “Pro Putty Polyester Finishing and Blending Putty” I got from the local Wesco auto paint store. The decision process was as simple as “they had it and it was inexpensive”.
The application was similar to the body filler: mix with hardener, spread, level, let dry, and sand. I did a pass with 80 girt paper then 180 grit paper. Made a big difference and looked nice.

and

The lighter green is the glaze putty and the darker green the body filler. The bottom picture is the back of the unit like in the bottom picture of post #68.
Obviously this created lots of dust. I moved the cabinet outside and blew the dust off with the compressor. I moved the cabinet into my makeshift spray booth and went at it with the HVLP gun and the Rustoleum paint.
Painting was a little tricky given all six sides needed paint. I put the cabinet on two sawhorses with the front facing down and sprayed the back, sides, top and bottom with primer. I let it dry for a two days then flipped it over so the back was on the sawhorses and spraying primer on the inside, as well as the sides, top and bottom again. I waited a couple more days and put another coat of primer on the inside, sides, top and bottom. One time I got careless with the gun held it too close resulting in a paint run which I sanded off before the next coat.
A couple of days later it was time for the red paint. Once again I started with the front down and sprayed the back, sides, top and bottom. Waited two days and flipped it over and sprayed the inside, sides, top and bottom. I then repeated so I had two coats on the inside and back and four coats on the sides, top and bottom. All this took less than a quart each of primer and paint.
As mentioned above, one drawback of Rustoleum is that it takes forever to cure. Once the painting was done I left it to sit in the heated garage for three weeks.
Even with the long wait the paint was not perfect. When removing the cabinet from the saw horse I caught the back on the corner of the plastic saw horse which scratched off some paint. I am not sure if the paint was not fully cured, the metal was too smooth for the paint to grip, or if Rustoleum just does not adhere well.
The application was similar to the body filler: mix with hardener, spread, level, let dry, and sand. I did a pass with 80 girt paper then 180 grit paper. Made a big difference and looked nice.
and
The lighter green is the glaze putty and the darker green the body filler. The bottom picture is the back of the unit like in the bottom picture of post #68.
Obviously this created lots of dust. I moved the cabinet outside and blew the dust off with the compressor. I moved the cabinet into my makeshift spray booth and went at it with the HVLP gun and the Rustoleum paint.
Painting was a little tricky given all six sides needed paint. I put the cabinet on two sawhorses with the front facing down and sprayed the back, sides, top and bottom with primer. I let it dry for a two days then flipped it over so the back was on the sawhorses and spraying primer on the inside, as well as the sides, top and bottom again. I waited a couple more days and put another coat of primer on the inside, sides, top and bottom. One time I got careless with the gun held it too close resulting in a paint run which I sanded off before the next coat.
A couple of days later it was time for the red paint. Once again I started with the front down and sprayed the back, sides, top and bottom. Waited two days and flipped it over and sprayed the inside, sides, top and bottom. I then repeated so I had two coats on the inside and back and four coats on the sides, top and bottom. All this took less than a quart each of primer and paint.
As mentioned above, one drawback of Rustoleum is that it takes forever to cure. Once the painting was done I left it to sit in the heated garage for three weeks.
Even with the long wait the paint was not perfect. When removing the cabinet from the saw horse I caught the back on the corner of the plastic saw horse which scratched off some paint. I am not sure if the paint was not fully cured, the metal was too smooth for the paint to grip, or if Rustoleum just does not adhere well.
OP
SeattleKent
Well-known member
Reassembly was quick. The casters were easily bolted back on. I reinstalled the tracks. For lubrication I used paraffin wax. I rubbed it all over the side and in the grooves. Seem to help. Here you can see some of the wax on the sliders.
The lock was problematic in that I did not have a key. I order a pair on ebay for $10 using the number on the cylinder. Cheap but the key did not work. I took it to a locksmith who said the “spacing” was wrong on the key. He ground it down for about ten second and the key worked.
And the finished result….


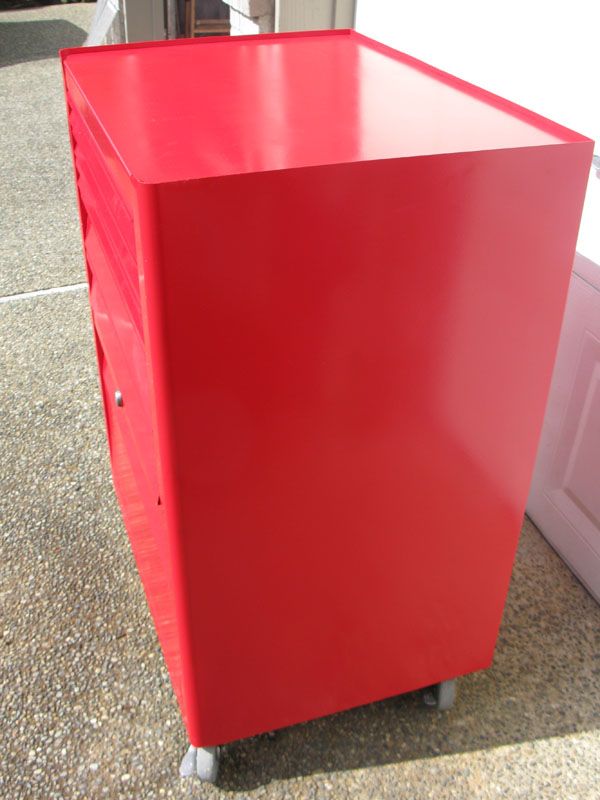
Here are a couple of before and after shots:


The pictures don't show it but the drawers looked banged up. Some body filler and glaze putty would have helped a lot. The sides, top and back look great. Nice and smooth.
So with that the project is just about done. I still need a Snap On badge for the front top. I also want to line the drawers with cork. These old boxes always seem to have cork in them so I thought I would continue the tradition. And, of course, I still have the top box to do.
The lock was problematic in that I did not have a key. I order a pair on ebay for $10 using the number on the cylinder. Cheap but the key did not work. I took it to a locksmith who said the “spacing” was wrong on the key. He ground it down for about ten second and the key worked.
And the finished result….
Here are a couple of before and after shots:
The pictures don't show it but the drawers looked banged up. Some body filler and glaze putty would have helped a lot. The sides, top and back look great. Nice and smooth.
So with that the project is just about done. I still need a Snap On badge for the front top. I also want to line the drawers with cork. These old boxes always seem to have cork in them so I thought I would continue the tradition. And, of course, I still have the top box to do.
Marc Benjamin
Well-known member
Well done. Hope you can find a true to the series badge.
Canadian Charlie
Banned
Great job, looks brand new
sponfit
Well-known member
Absolutely stunning!
MattVette89
Well-known member
Beautiful restoration!