
rattle_snake
Well-known member
Some details and lesson learned on my bench build...
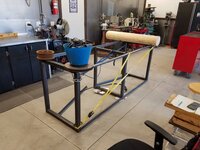
Built close to the original design due to blatant plagiarism. My existing bench was 36” high and comfortable to me so design goal was to minimize height. The legs are 34” which is about as short as possible given the overall height of the HF44 (34-5/8). The threaded feet and nylon insert adds a minimum of 1-3/4”, and the top is 1-1/2 MDF + 1/8” steel so minimum overall height is about 37-1/2”.
It is possible to reduce overall height by another ½” by routing relief grooves in the bottom of the MDF for the ridge on the tool box top. One could also underlap the leg bottoms for the threaded inserts. I chose to keep it simple. I’m just under 6’ tall.
All steel is 1/8” thick. Tubing is 2”, angle is 1-1/2”. Lower angle supports are 42-1/2”, which if welded on inside to make it look nice is too tight and may need some grinding to fit the 44-1/8” box. I also stole the bolt-on front upper rail idea from someone here as well, which allows the boxes to be loaded much easier. I welded ½-13 nuts in the tubing to support.
The HF44 is about 18” deep but I wanted a 32” deep work surface with a 2-1/2” front overhang I made the horizontal tubing 24” which yields a total frame depth of 31”. A flat bottom clamping surface can be achieved with a 1” flat bar on the lower front edge.
Simply cut and weld the pieces together. One can also agonize over getting everything square in every direction simultaneously. If you don’t have a flat surface to build on, shim and level as needed. Slap some paint on it.


The top is made from 2 layers of ¾” MDF. I cut them to 93”x32” and then glued-n-screwed. I used a foam roller to apply yellow glue to one side, should have done both. The screws are on the bottom. I painted the edges and bottom perimeter to protect the MDF from spilled liquids and resulting expansion. Went a little OCD and did the vice holes too like a via on a circuit board.


The steel is 11 ga (0.120”), aka 1/8” cold rolled. I found a local (PHX, AZ) place that could sheer and break into a counter top. The last bend on one short side slipped and was in the wrong spot. They stamped it back flat and re-bent. I inspected, accepted and saved some $$, BUT when I went to fit it on the wood I realized how jacked up it really was. Since this is a work bench that will get beat and abused I chose to go with it and test my metal working skills. I massage it back to flat with some therapeutic hammering, and welded up the corners.
I pondered a receiver style vice mount but chose to stay with mounting to the top surface. I countersunk the bottom for ½”-13 carriage bolts, and assembled the top. At this time only the vice bolts hold the steel down and it can be easily removed.
Note that these benched are not light weight:
HF44, 250# each
Frame 100#
MDF 150#
steel top #100
850# + vice Empty


I refrained from painting my HF 5" vice but I did disassemble, turd polish and lube it.
Built close to the original design due to blatant plagiarism. My existing bench was 36” high and comfortable to me so design goal was to minimize height. The legs are 34” which is about as short as possible given the overall height of the HF44 (34-5/8). The threaded feet and nylon insert adds a minimum of 1-3/4”, and the top is 1-1/2 MDF + 1/8” steel so minimum overall height is about 37-1/2”.
It is possible to reduce overall height by another ½” by routing relief grooves in the bottom of the MDF for the ridge on the tool box top. One could also underlap the leg bottoms for the threaded inserts. I chose to keep it simple. I’m just under 6’ tall.
All steel is 1/8” thick. Tubing is 2”, angle is 1-1/2”. Lower angle supports are 42-1/2”, which if welded on inside to make it look nice is too tight and may need some grinding to fit the 44-1/8” box. I also stole the bolt-on front upper rail idea from someone here as well, which allows the boxes to be loaded much easier. I welded ½-13 nuts in the tubing to support.
The HF44 is about 18” deep but I wanted a 32” deep work surface with a 2-1/2” front overhang I made the horizontal tubing 24” which yields a total frame depth of 31”. A flat bottom clamping surface can be achieved with a 1” flat bar on the lower front edge.
Simply cut and weld the pieces together. One can also agonize over getting everything square in every direction simultaneously. If you don’t have a flat surface to build on, shim and level as needed. Slap some paint on it.
The top is made from 2 layers of ¾” MDF. I cut them to 93”x32” and then glued-n-screwed. I used a foam roller to apply yellow glue to one side, should have done both. The screws are on the bottom. I painted the edges and bottom perimeter to protect the MDF from spilled liquids and resulting expansion. Went a little OCD and did the vice holes too like a via on a circuit board.
The steel is 11 ga (0.120”), aka 1/8” cold rolled. I found a local (PHX, AZ) place that could sheer and break into a counter top. The last bend on one short side slipped and was in the wrong spot. They stamped it back flat and re-bent. I inspected, accepted and saved some $$, BUT when I went to fit it on the wood I realized how jacked up it really was. Since this is a work bench that will get beat and abused I chose to go with it and test my metal working skills. I massage it back to flat with some therapeutic hammering, and welded up the corners.
I pondered a receiver style vice mount but chose to stay with mounting to the top surface. I countersunk the bottom for ½”-13 carriage bolts, and assembled the top. At this time only the vice bolts hold the steel down and it can be easily removed.
Note that these benched are not light weight:
HF44, 250# each
Frame 100#
MDF 150#
steel top #100
850# + vice Empty
I refrained from painting my HF 5" vice but I did disassemble, turd polish and lube it.
Attachments
-
 07dc94f878972e7bce6667614b24664b.jpg91.5 KB · Views: 44
 -
 7546b6b2404dec06b0f0f8c758727829.jpg92.1 KB · Views: 45
 -
 ea10a68cb7fa6db7a08f18fc756a1af6.jpg58.7 KB · Views: 37
 -
 02b2fdad9bf37eb7065c09b848d43c90.jpg44.8 KB · Views: 38
 -
 81933f7ce20b5f85c8dc8d264cbe5f59.jpg90.9 KB · Views: 45
 -
 602504438def5e4309ff494c943aecba.jpg82.8 KB · Views: 39
Last edited:
