

I’ve read so many posts on Garage Journal I’m sure I read about the errors I made but forgot – still in all we’re happy with the flooring!! For what it’s worth – here are some pics and notes from our installation which was finally finished (cars parking on it) 5/23/2016. The prep up through grinding took about 2 weeks off and on …
After 30 years of parking and projects there we’re areas where oils from repairs and tires had left there indelible marks as well as leftover painting projects
  … so removed oil with a mix of TSP and diatomaceous earth - scrubbed in and let dry completely - took a couple applications of this. I had originally thought this not to be necessary or I would have ordered the clean-up materials from Wolverine as well.

Paint was light overspray which I got with the grinder – really more of a sander from Home Depot – the floor polisher model (hopefully this will prove sufficient). A note on this tool – at first I was really struggling against the machine – finally learned that a little pressure up or down on the handle made the machine move left and right – too much pressure and you’re going through walls – quickly!
After grind, saw cuts v notched and backing rod …

Integra flex - really sticky and relatively fluid. Self leveling ... Not so much - hard to get it to fill completely - still a little valley... Took much longer than expected to set. I had some chipped out sections at the edge of the garage floor that I backed with cardboard wrapped with wax paper as a form and filled with Integra Flex – worked like a charm!

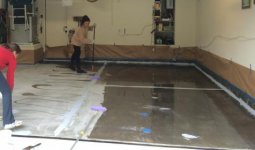
Bond tite took way longer to set than expected - stayed tacky/soft - needed 18 hrs to get hard @ 68 deg. My trusty crew spreading the bondtite …
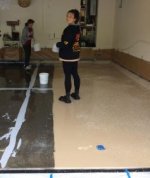
Endurashield shield - set faster than bond tite. Would cover two sections then start applying chips to first section - avoids getting chips in the new section. Spikes are a must! Did use a blower on the sides – probably should have laid the chips a little further away as the blower generally spread the chips about halfway up the edge – blowing them pretty straight across – thinking more distance = greater height?
Watch the edges - excess material flowed out carrying the chips with - result was areas with sparse chip distribution - I would walk it say 10-15 minutes after finish to check and throw more chips? Also not sure how you avoid the buildup of chips stuck on the floor at the edge – you can see them under the floor coating at the edge here in addition to the flow issue…

Used lots of buckets (one for cleaning the spiral mixer between mixes in addition to the others) and rubber gloves, paint brushes, heavy duty blue tarp, masking tape, plastic sheeting, MEK (1 gal), paper towels, and rollers.
We added the silica sand for extra traction in the finial clear coat – I don’t think it was necessary as the chips (still have half of these left and bought for a medium coverage) added plenty of texture against slipping …

Pretty happy with this so far – did add a vinyl wall/base board to it as a final touch – which immediately disappeared from sight as soon as I moved all the **** back in!
Kevin
After 30 years of parking and projects there we’re areas where oils from repairs and tires had left there indelible marks
as well as leftover painting projects … so removed oil with a mix of TSP and diatomaceous earth - scrubbed in and let dry completely - took a couple applications of this. I had originally thought this not to be necessary or I would have ordered the clean-up materials from Wolverine as well. Paint was light overspray which I got with the grinder – really more of a sander from Home Depot – the floor polisher model (hopefully this will prove sufficient). A note on this tool – at first I was really struggling against the machine – finally learned that a little pressure up or down on the handle made the machine move left and right – too much pressure and you’re going through walls – quickly!
After grind, saw cuts v notched and backing rod …
Integra flex - really sticky and relatively fluid. Self leveling ... Not so much - hard to get it to fill completely - still a little valley... Took much longer than expected to set. I had some chipped out sections at the edge of the garage floor that I backed with cardboard wrapped with wax paper as a form and filled with Integra Flex – worked like a charm!
Bond tite took way longer to set than expected - stayed tacky/soft - needed 18 hrs to get hard @ 68 deg.
My trusty crew spreading the bondtite …Endurashield shield - set faster than bond tite. Would cover two sections then start applying chips to first section - avoids getting chips in the new section. Spikes are a must! Did use a blower on the sides – probably should have laid the chips a little further away as the blower generally spread the chips about halfway up the edge – blowing them pretty straight across – thinking more distance = greater height?
Watch the edges - excess material flowed out carrying the chips with - result was areas with sparse chip distribution - I would walk it say 10-15 minutes after finish to check and throw more chips? Also not sure how you avoid the buildup of chips stuck on the floor at the edge – you can see them under the floor coating at the edge here in addition to the flow issue
…Used lots of buckets (one for cleaning the spiral mixer between mixes in addition to the others) and rubber gloves, paint brushes, heavy duty blue tarp, masking tape, plastic sheeting, MEK (1 gal), paper towels, and rollers.
We added the silica sand for extra traction in the finial clear coat – I don’t think it was necessary as the chips (still have half of these left and bought for a medium coverage) added plenty of texture against slipping …
Pretty happy with this so far – did add a vinyl wall/base board to it as a final touch – which immediately disappeared from sight as soon as I moved all the **** back in!
Kevin