To avoid these ads, REGISTER NOW!

Zane's Garage transformation

Zane

Well-known member
Joined
Feb 25, 2011
Messages
63
I have spent quite a bit of time reading through a ton of GREAT garages transformations that members have gone through. It’s been quite fun actually and it has given me all sorts of very good ideas.

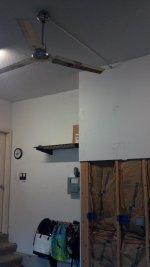
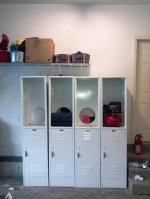
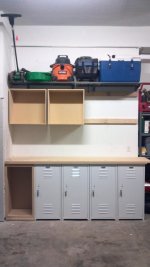
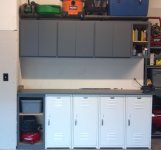
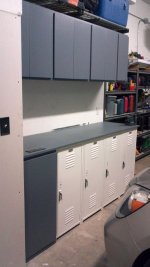
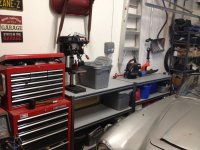
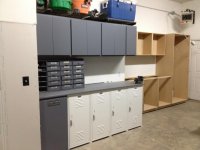
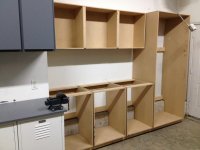
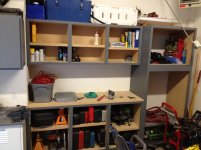
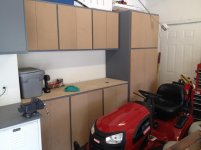
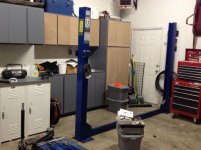
I figured I would start a thread on my own garage for those interested in following. My garage is a simple attached, residential 3 car garage in a 7 year old home. We purchased the home a little over a year ago and now that "most" of the honey do list is done I’m now able to make my garage my own once again. I'm excited about the journey, what I will learn and the fun I will have.
 
To avoid these ads, REGISTER NOW!
OP
Z

Zane

Well-known member
Joined
Feb 25, 2011
Messages
63
My first job was to install a 130 amp sub panel to feed my power needs in the garage. My plans are not as grand as most, but I was needing the panel to run some ceiling fans, florescent lights, 220v welder , 220v garage heater, additional 120v outlets around the whole garage and a enough room in the box to support other power needs down the road like garage lift, compressor, etc…
 

Attachments

  • subpanel mud.jpg
    subpanel mud.jpg
    57.4 KB · Views: 266
OP
Z

Zane

Well-known member
Joined
Feb 25, 2011
Messages
63
After finalizing the installation of the sub panel I needed to tackle putting in my Dayton G34 heater so that i could enjoy a comfortable space in the winter. I added a external Line Volt Thermostat during the wiring of the heater so that I could control the room temp without having to climb a ladder to do so. I will say that it also helps keep our master bathroom floor much nicer in colder weather. (wife is happy about that) You can find my thread on that installation and detailed instructions on wiring HERE.
 

Attachments

  • 2011-10-18_08-04-20_892.jpg
    2011-10-18_08-04-20_892.jpg
    131.7 KB · Views: 391
OP
Z

Zane

Well-known member
Joined
Feb 25, 2011
Messages
63
I then decided to run wire for some industrial ceiling fans. In the summer months it is HOT in the mid-west and the more air you can move the better for me. I have also noticed that using a fan in the winter helps circulate the hot air that gets trapped up high when I need it down low. I used to think my father was crazy when he had fans on in the winter, but I now get it. I know its overkill but for my ceiling fans I choose to go with some Westinghouse 7861400 Industrial 56-Inch Three-Blade Ceiling Fans. They are on the cheaper side, but move a ton of air. I will say that I tossed the wall mount controller they come with and ordered a Canarm Speed Control for 2 Ceiling Fans so that I can have one switch for both fans. I have only installed one of the fans, but wired it up for two.
 

Attachments

  • 2011-10-24_07-58-31_924.jpg
    2011-10-24_07-58-31_924.jpg
    146.8 KB · Views: 166
  • 2011-10-30_15-48-32_242.jpg
    2011-10-30_15-48-32_242.jpg
    137.4 KB · Views: 223
OP
Z

Zane

Well-known member
Joined
Feb 25, 2011
Messages
63
My next project and the one that I just started over the weekend was to build myself some storage. While getting my hair cut at Sports Clips a few weeks back, I had noticed that they had done some remodeling and they had replaced their lockers with new ones. I had asked what they had done with the old ones and they said they had been put out back and if I wanted them I could take them… Well…. I did just that. I wanted to use the lockers for storage under a work bench, so I had to chop up the top and bottom of the lockers to get them to be 3 foot in height (1st picture is before i chopped them up). I then welded them all together to make them a solid foundation. To the left of the lockers I have built a cabinet that will hold several drawers. I have also just started on my wall cabinets that will span all the way across the width of the work bench . In the picture below you can see the rough boxes that will make up the wall cabinets stacked on top of each other (only have two built).
 

Attachments

  • 2011-11-16_07-35-09_725.jpg
    2011-11-16_07-35-09_725.jpg
    123.5 KB · Views: 368
  • 2011-12-09_22-56-13_215.jpg
    2011-12-09_22-56-13_215.jpg
    140.1 KB · Views: 296
  • 2011-12-12_08-23-34_281.jpg
    2011-12-12_08-23-34_281.jpg
    128.6 KB · Views: 312
OP
Z

Zane

Well-known member
Joined
Feb 25, 2011
Messages
63
Looking good! What kind of lift are you planning on getting?

Not sure what kind of lift I'm going to go with. I really like the idea of the 4 post lift for storing my project car out of the way, but the ability to do a full range of automotive work with 2 post lifts are hard to beat. Plus I can take advantage of my high ceilings with a 2 post and get more head room under the car. A lift is a few lines down on my list of things I need to do, but fun to think about that's for sure.
 
OP
Z

Zane

Well-known member
Joined
Feb 25, 2011
Messages
63
Did a little work last night. Ran to the lumber yard to pick up the rest of the plywood needed to build the remaining wall mount cabinets that will be installed above the lockers. I had an hour to play in the garage so figured I would measure and install the two rough cabinets that i pulled together the other day. In the end i will have (3) 2'x2'x1' and (1) 1'x2'x1' wall mount cabinets above this work bench. Once the roughed in cabinets are all up i will rip the boards for the facing and use my handy pocket hole jig to put it all together, make up some hinged doors and a center adjustable shelf in each cabinet. In the end i think i will have about $150 in materials for this entire section of storage.

I'm still trying to figure out what color I should paint the cabinets. I'm willing to shot the lockers with a different color to match the direction I go, but i need to make a up my mind. Any suggestions? NOTE: My plan is to build another work bench with wall mount cabinets to the right of where my locker workbench is to get rid of the metal shelving to provide a cleaner look to my garage. I live in a nice neighborhood, but i think there is merit in hiding your shop tools behind a cabinet door so that curios eyes walking by don't know all the cool stuff you have to steal.
 

Attachments

  • 2011-12-14_07-32-49_667.jpg
    2011-12-14_07-32-49_667.jpg
    138.7 KB · Views: 158
  • 2011-12-14_07-32-31_636.jpg
    2011-12-14_07-32-31_636.jpg
    140 KB · Views: 155
OP
Z

Zane

Well-known member
Joined
Feb 25, 2011
Messages
63
Had some time during the holiday to knock out most of the cabinets above the "locker" workbench. I used hardwood for the facing to be strong enough to hold the MDF doors I made and drilled out the sides for adjustable shelving pins. I still need to make a door for the single cabinet on the far right as well as for the lower cabinet on the far left and finally paint them.

In the end I will have some aluminum tread plate cut to put on the face of each cabinet door. Not needed of course, but I think it will end up being a nice touch.

I will soon start the next set of cabinets and workbench that will sit on the back wall just to the right of this set up.
 

Attachments

  • cabinet facing 3.jpg
    cabinet facing 3.jpg
    89.3 KB · Views: 166
  • Cabinet facing 2.jpg
    Cabinet facing 2.jpg
    62.9 KB · Views: 134
  • cabinet facing 4.jpg
    cabinet facing 4.jpg
    50.1 KB · Views: 156

Rezarf

Well-known member
Joined
Jul 16, 2011
Messages
211
From one cruiser head to another, that is looking great Zane. The lockers were a great score! I love to see things look really nice without costing an arm and a leg. As far as paint and color, I am a big fan of bright white glossy in a workshop, it seems to "add" light and the glossy seems easier to keep clean when working with metal and other dirty materials. Mabye a light grey to compliment the white? Looks good as it is if you ask me though! :D
 
OP
Z

Zane

Well-known member
Joined
Feb 25, 2011
Messages
63
I went ahead and painted the cabinet doors that I hung to see if I would like the color. I used high gloss paint for easy clean up and applied several coats with a foam roller to minimize brush lines in the paint. I was very pleased with the outcome.
 

Attachments

  • Wall cabinets painted.jpg
    Wall cabinets painted.jpg
    94.1 KB · Views: 150

Pukeballs

Well-known member
Joined
Oct 6, 2008
Messages
289
Location
Rancho Mirage, CA
Wow. Great worksmanship and excellent score on the lockers. Looking forward to see whats next.

BTW, I have a 3 year old named Zane. Named after his great grampa. Love the Zane license plate too.
 
OP
Z

Zane

Well-known member
Joined
Feb 25, 2011
Messages
63
Wow. Great worksmanship and excellent score on the lockers. Looking forward to see whats next.

BTW, I have a 3 year old named Zane. Named after his great grampa. Love the Zane license plate too.


Thank you for the complement. Growing up I had never met another Zane before. Now quite a bit of kiddo's are sharing my name. My sons best friend is named Zane. Its quite an odd thing for me. I was named after "Zane Gray" a famous cowboy/western author my dad used to read during WWII days.
 

Pukeballs

Well-known member
Joined
Oct 6, 2008
Messages
289
Location
Rancho Mirage, CA
Too funny. My boys middle name is Grey. We didn't intentionally name him after the author, but we liked the name. I have read a few of his books and if you like cowboy stories, I'd recommend reading them.

Anyway, good luck with the garage transformation, and keep us posted.
 
OP
Z

Zane

Well-known member
Joined
Feb 25, 2011
Messages
63
officially done with this little project. I'm have decided to hold off on making more cabinets and spend my time researching 2 post lifts. I have exactly 11' 4" of height from floor to bottom of the ceiling sheetrock. I can cut out the sheetrock between two rafters to gain another another 10". Most 2 post top mount lifts say they require 12' to install but I'm nervous about setting the post upright with only 12' 2" total going between rafters. Thoughts???
 

Attachments

  • all cabinets finished.jpg
    all cabinets finished.jpg
    78.5 KB · Views: 116
OP
Z

Zane

Well-known member
Joined
Feb 25, 2011
Messages
63
I'm normally the type of person to get rid of things without much thought to reduce clutter. In doing some of that this weekend, I was getting ready to toss out an old wooden made bolt bin that my grandfather had made many years ago. It was handed down to me when he passed away and after thinking twice about it, I figured it would be nice to have a little mix of old with the new. So, i sanded it down, painted it the same color of the cabinets, labeled the drawers and placed it on the workbench for now.
 

Attachments

  • boltbin.jpg
    boltbin.jpg
    138.6 KB · Views: 172
OP
Z

Zane

Well-known member
Joined
Feb 25, 2011
Messages
63
Next little project I did over the weekend was to rip off the carpet that the previous owners had on the stairs going into the house. I then painted them with paint left over from my cabinets. It looked OK, then I remembered I had some extra aluminum tread plate laying around. So I cut them to fit and placed them on the kick plate of the stairs. I ran out of time and still need to cut the bottom one but i think you guys get the idea.
 

Attachments

  • stairsfinal.jpg
    stairsfinal.jpg
    136.8 KB · Views: 173
OP
Z

Zane

Well-known member
Joined
Feb 25, 2011
Messages
63
cleaned out some of the clutter and reorganized the third car bay side of the garage.
 

Attachments

  • east walll 2.jpg
    east walll 2.jpg
    140.5 KB · Views: 271
To avoid these ads, REGISTER NOW!
OP
Z

Zane

Well-known member
Joined
Feb 25, 2011
Messages
63
Spent some time over the weekend building the rough in of a few new cabinets. The large cabinet will have two small doors on the top 2 foot and two larger doors on the lower half. I still need to add supports to this larger cabinet reducing potential warping over time and will show you how I plan to do this once complete. A total of 3 floor cabinets will make up the base of the secondary work bench and there will be 3 wall mount cabinets exactly like the ones you see above the "locker workbench". I will have about a foot and a half of space between the far right base cabinet and the wall so i'm trying to come up with some way to utilize that space. I will have to angle it back as the "man door" going outside sits 15 inches from the back wall. My base cabinets are 24 inches deep.

I'm a bit bummed out that I made a mistake measuring the placement of my thermostat when I installed my heater and will need to lower it 4". In its current place it is in the way for mounting my wall mount cabinets. Not a big deal, just something I was not expecting to have to do.
 

Attachments

  • garage cabinet framing 1.jpg
    garage cabinet framing 1.jpg
    143.7 KB · Views: 83
  • Garage cabinet framing 2.jpg
    Garage cabinet framing 2.jpg
    138.3 KB · Views: 87
OP
Z

Zane

Well-known member
Joined
Feb 25, 2011
Messages
63
Wrapped up the framing of the individual base and wall cabinets last night. I have not anchored anything to the walls yet as I'm trying to decide if i should put the large cabinet to the far right or keep it in its current location. The door going outside is causing some heartburn for me with it being so close to the back wall. Any feedback on how you would you lay it out?
 

Attachments

  • garage cabinet frame complete 2.jpg
    garage cabinet frame complete 2.jpg
    143 KB · Views: 69
OP
Z

Zane

Well-known member
Joined
Feb 25, 2011
Messages
63
I decided to switch the cabinets around and hung my wall mounts last night. I'm very happy with the decision. As I had said earlier I ended up having to remove the thermostat controller box off the wall and pull it out of the way so a slight re wire will be needed, but not a big deal. Next up will be to level and shim the lower cabinets and screw them into place. The cabinets will really come to life once I get the facing on the fronts of them.
 

Attachments

  • cabinets hung 1.jpg
    cabinets hung 1.jpg
    65.2 KB · Views: 64
  • cabinets hung 2.jpg
    cabinets hung 2.jpg
    66.9 KB · Views: 96
OP
Z

Zane

Well-known member
Joined
Feb 25, 2011
Messages
63
After quite the delay in any updates due to an unexpected shoulder surgery, I have been given the all clear given by my surgeon to get back to it!

I spent the last few evenings building the adjustable shelving as well as adding the facing to the front of the additional set of cabinets. Also was able to add the first few coats of paint before tackling the doors.
 

Attachments

  • photo 2.jpg
    photo 2.jpg
    136.9 KB · Views: 78
  • photo 1.jpg
    photo 1.jpg
    137.3 KB · Views: 79
OP
Z

Zane

Well-known member
Joined
Feb 25, 2011
Messages
63
Really comes together after cutting and hanging all of the doors. Now i need to pull them off and paint them and the cabinets will for the most part be done.

Don't worry, my mower has a different home. It just happened to be in that spot to charge its battery when I took the pic.
 

Attachments

  • photo 3.jpg
    photo 3.jpg
    133.6 KB · Views: 63
  • photo 4.jpg
    photo 4.jpg
    125 KB · Views: 83
OP
Z

Zane

Well-known member
Joined
Feb 25, 2011
Messages
63
Well, after 4 months of searching craigslist I found a used HD-9 Bendpak 4 post lift. Purchased it from a young guy who sadly had to close his business after only being open for one year, but got a screaming deal on it. The lift is in perfect shape other than I will need to repaint the main runways due to him getting some brake fluid on them and it stripped some of the paint away, but that's not a big deal. Working on running my 220 line to the lift tonight and hope to get things set up over the next few days.

I plan on bolting this thing down. Any advice on lessons learned regarding shimming and setting the posts?
 

Attachments

  • lift on trailer.jpg
    lift on trailer.jpg
    151 KB · Views: 51
  • lift legs set.jpg
    lift legs set.jpg
    135.3 KB · Views: 74

ODIS

Well-known member
Joined
Apr 30, 2012
Messages
2,110
Location
Pacific Northwest
Nice transformation and great job on the cabinets. Have several 4 post lifts none of which are bolted down. They are not Bendpak, so do not know if this is a requirement on these lifts. None-the-less, you will love that lift! Looking forward to seeing more of what you do in your garage.

Ody.
 
OP
Z

Zane

Well-known member
Joined
Feb 25, 2011
Messages
63
I know that the Bendpak 4 post lifts do not need to be anchored down, I'm just worried that if I don't level it out and bolt it down that it might bind up on me. Is this not going to be an issue?
 

daveroy

Well-known member
Joined
Sep 4, 2009
Messages
735
Location
Omaha NE
Zane,
Question on your cabinets: Did you use a template or jig or anything to drill for your adjustable shelves? Just curious.

I have been contemplating cabinets for a very long time... but I have some money invested in shelving brackets etc... so I just keep thinking about it.


(You have a lift... I'm jealous!)

P.S. I might have left a 'hole' somewhere in the base cabinets (maybe a false base cabinet with door) to scoot the welding cart into... just an idea.
 
OP
Z

Zane

Well-known member
Joined
Feb 25, 2011
Messages
63
Zane,
Question on your cabinets: Did you use a template or jig or anything to drill for your adjustable shelves? Just curious.

Yes, I used a section of pegboard as my jig for drilling the holes for the adjustable shelves, made things real easy.
 
OP
Z

Zane

Well-known member
Joined
Feb 25, 2011
Messages
63
Is the silver car a Lancia? We need some pics of that as well.

Yes, it is a 1958 Lancia Aurelia B24 that has been in my family for a very long time. It's the car that got me into cars and it holds many memories of working in the garage with my father when I was young.
 
Last edited:

Oldbear

Well-known member
Joined
Aug 31, 2011
Messages
620
Location
Linden, Alberta, Canada
I will need to repaint the main runways due to him getting some brake fluid on them and it stripped some of the paint away, but that's not a big deal....

I plan on bolting this thing down. Any advice on lessons learned regarding shimming and setting the posts?

We use a roll on grip paint (same style as an aircraft carrier deck) to cover all our flat decks and deck on the oil rigs we build. I'm putting it on my drive on bike lift. Might work for you...

And as for bolt your lift down; I like them bolted down (no chance of it moving) - but some brands have wheel/caster kits to move an unloaded lift.
 
OP
Z

Zane

Well-known member
Joined
Feb 25, 2011
Messages
63
Oldbear

How can I get my hands on that paint you are talking about?
 
OP
Z

Zane

Well-known member
Joined
Feb 25, 2011
Messages
63
Completed bending conduit and pulling wire for my 220 run from my sub panel to drop down just above the placement of the hydrolic pump for my lift last night. I will run flexible conduit from the ceiling down to a 30 amp double pole switch as a safty cut off before wiring to the pump switch. I was able to complete the hook up to the breaker within the sub panel as well but not shown in the attached pictures. It has taken me a while, but i think i finally have figured out how to best use the tubing bender without jacking up a bunch of conduit during the process, not that it ever happened.. ha! :bounce:
 

Attachments

  • 220 lift wiring 2.jpg
    220 lift wiring 2.jpg
    138.5 KB · Views: 37
  • 220 lift wiring.jpg
    220 lift wiring.jpg
    138.9 KB · Views: 34
To avoid these ads, REGISTER NOW!
Top Bottom