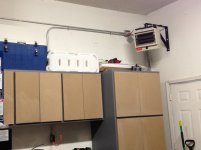
While I was on a role with my wiring marathon I finally pulled wire to reroute my thermostat for my garage heater. I had to move it due to the cabinets I built. I still need to install the thermostat in the box and hook everything up, but the hard part is now done. Not in the mood to think of heating when its been over 100 degrees every day the past two weeks, but at least I will be ready when winter hits.

You are using an out of date browser. It may not display this or other websites correctly.
You should upgrade or use an alternative browser.
You should upgrade or use an alternative browser.
Zane's Garage transformation
- Thread starter Zane
- Start date
Yes, it is a 1958 Lancia Aurelia B24 that has been in my family for a very long time. It's the car that got me into cars and it holds many memories of working in the garage with my father when I was young.
The Lancias from that era were incredibly engineered machines. Certainly rivaling those of any of the other "exotic" Italian manufacturers we normally think of today. You are lucky to be the caretaker of one of those. We do need some detailed photos!
The Lancias from that era were incredibly engineered machines. Certainly rivaling those of any of the other "exotic" Italian manufacturers we normally think of today. You are lucky to be the caretaker of one of those. We do need some detailed photos!
Skyline,
Yes I would agree that it is a fascinating car and over the past several years have done quite a bit of research on it to gather its history and have slowly started to bring it back to its glory. A car like this as you can imagine takes time and quite a bit of care with the simplest of projects. My father purchased the car in 1968 from the original owner who lived in California. It was last licensed in 1975 and has always been stored indoors. Twice a year we would start it up and drive it around the block. Quite a bit of fun as a young boy to do with his father.
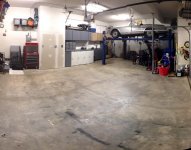
As i'm putting my lift together I have moved the Lancia to the other side of the garage and have stuff all around it so once I can get the garage all organized again I will shoot some pics of it and post them up for you.
Best,
Zane
tornadoalleycruiser
New member
- Joined
- Feb 23, 2010
- Messages
- 4
So when you coming over to get the Hoist to get that lift put together? NIce thread.. Don't think you'll need that fancy heater right now tho.
teamacacia
Member
We use a roll on grip paint (same style as an aircraft carrier deck) to cover all our flat decks and deck on the oil rigs we build. I'm putting it on my drive on bike lift. Might work for you...
One more request for where one might acquire some of this paint. Thanks
I was able to assemble my lift last night with the help of a engine hoist and a friend. It really is not that hard of a job at all. I was more concerned than I needed to be in the end.
Once I got everything leveled out as I wanted it I used my daily driver to test it out. I was very excited that I was able to lock the lift almost at full height without any issues at all. I was then able to drive the Lancia up onto its new home.
This is one of the coolest toys I have purchased in a long time. Cant wait to really get some use out of it.
Attachments


I figured I would share how I wired up my lift. As I was researching lifts I ran across some stories of switches on the motors sticking while raising the lift and the operator was not able to stop the lift and as you can imagine the damage that could occur if the top of the car met the garage ceiling..
I took the idea from a fellow Garage Journal contributor to add a 30 amp double pole switch in line to use as an emergency cutoff. It was a very simple addition for piece of mind. I am also able to add a lock to the switch if I want as an additional safety measure to prevent curios kids from raising the lift. I have set some very strong rules around touching the lift, but kids will be kids.
At some point I will be plumbing hard lines for the air locks, but for now I will simple just hook up my soft air hose from my tank when needing to use the lift.
Attachments

Not much to post, but I did however finish up painting the cabinet doors over the weekend.
Considering building some soffit storage around the back wall and sides of the entire garage to utilize all of that ceiling height I have. Measured it all out and with how I want to do it, it would provide me with an additional 65 linear foot of shelving. If I decide to do this, the soffit boxes will be 2 foot high x 2 foot deep x total length of wall space. Working on pricing out the materials now to see if its something I want to do or not.
Considering building some soffit storage around the back wall and sides of the entire garage to utilize all of that ceiling height I have. Measured it all out and with how I want to do it, it would provide me with an additional 65 linear foot of shelving. If I decide to do this, the soffit boxes will be 2 foot high x 2 foot deep x total length of wall space. Working on pricing out the materials now to see if its something I want to do or not.
Attachments


Spent the past few weeks prepping the walls for paint and actually got started on some painting. The garage had the original builders grade flat white paint that badly need attention. I went with a self-priming interior enamel paint in a satin finish. For the top half of the garage I have decided to go with pure white and for the lower half I'm going one shade lighter than the color of my cabinets. For the border I will use the same color I had used for the cabinets to tie it all together.
I have had to do two coats of paint to get a nice even finish but it has been worth the additional effort. I completed the back wall over the weekend, and hope to wrap up the sides over the next few evenings if time allows.
While repairing sheet rock, I noticed a large crack in my wall just under the main second story I-beam that spans the width of my garage. I decided to cut out the sheet rock and just replace that section, but in doing so I found a major framing issue that needed attention. It turns out that during the original framing and plumbing of the house (8 years ago) the idiot plumbers notched out the floor joists to get a large pipe into the basement. Quite a few problems with this approach!!! The problem was that the post that carries the load from the second story I-beam sat on the same sub floor and floor joists that this BIG cut out was made. As you can imagine, this created a major weak point in the structure. Rather than close up the sheet rock and pray nothing happens I choose to fix it and have peace of mind.
I had a company come out with jacks to release the pressure off of the original post allowing me to pull it out and replace it with a taller adjustable steal post that now rests on the foundation rather than the wood sub floor. I cant blame the framers for this issue, it was the plumbers who created the problem I now can rest knowing that the house is in solid shape.
I have had to do two coats of paint to get a nice even finish but it has been worth the additional effort. I completed the back wall over the weekend, and hope to wrap up the sides over the next few evenings if time allows.
While repairing sheet rock, I noticed a large crack in my wall just under the main second story I-beam that spans the width of my garage. I decided to cut out the sheet rock and just replace that section, but in doing so I found a major framing issue that needed attention. It turns out that during the original framing and plumbing of the house (8 years ago) the idiot plumbers notched out the floor joists to get a large pipe into the basement. Quite a few problems with this approach!!! The problem was that the post that carries the load from the second story I-beam sat on the same sub floor and floor joists that this BIG cut out was made. As you can imagine, this created a major weak point in the structure. Rather than close up the sheet rock and pray nothing happens I choose to fix it and have peace of mind.
I had a company come out with jacks to release the pressure off of the original post allowing me to pull it out and replace it with a taller adjustable steal post that now rests on the foundation rather than the wood sub floor. I cant blame the framers for this issue, it was the plumbers who created the problem
I now can rest knowing that the house is in solid shape.
