To avoid these ads, REGISTER NOW!

ZB's Garage

zbyler

Well-known member
Joined
Jun 3, 2014
Messages
129
Location
CT
Hey fellow GJ members! I purchased a new home with a small single car garage about a year and a half ago and this is my attempt to document it's transformation process.

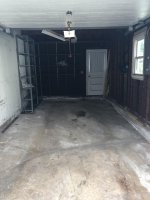
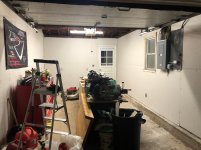
Overall garage shape at time of purchase:
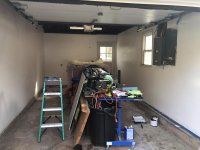
  • 21ft. long x 11ft. wide (8ft door opening)
  • Panel located on the RT side, only 1 existing outlet at time of purchase
  • All walls except for house side = unfinished, zero insulation present
  • Open rafters, no ceiling
  • Floor is unfinished
  • Lighting: 2 older fluorescent light fixtures
  • 1 window on side, full door in back RT corner
  • Neither of my current vehicles will fit ('11 silverado 1500, E60 535i)

Eventual goal:
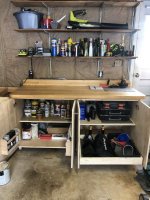
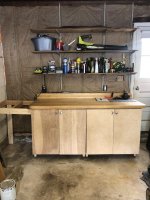
  • Add electrical outlets throughout
  • Insulate and sheetrock walls
  • Upgrade light fixtures to LED and add 2 more fixtures
  • Utilize walls for storage to keep items off floor
  • All large items to be stored against the back wall
  • Fill cracks and divots in floor, apply coating
 

Attachments

  • IMG_4217.jpg
    IMG_4217.jpg
    81 KB · Views: 62
To avoid these ads, REGISTER NOW!
OP
Z

zbyler

Well-known member
Joined
Jun 3, 2014
Messages
129
Location
CT
Shortly after moving in I started trying to try and organize things in a semi-efficient manner, given the layout.

I had a workbench that I built with my dad back in high school and it managed to fit snug alongside my HF 56" box against the back wall, albeit blocking the back door. At the time I didn't think I'd be using the back door so it didn't make a difference to me. Flash forward to when a big storm came through CT last month and we lost power for 4 days....... Not the best time to find out that your garage door doesn't have an emergency manual override or that you don't have a spare key for the back door! :willy_nil This is something I'd have to address moving forward......

The previous owner left some wall shelving units and some metal storage racks so I took advantage of them for a while. I also started hanging some garden tools, ladders, etc from nails I put into the exposed top plates of the walls, again only as a temporary solution.
 

Attachments

  • IMG_5854.jpg
    IMG_5854.jpg
    108.8 KB · Views: 82

quadrcr87

Well-known member
Joined
Jul 5, 2013
Messages
1,036
Location
Travelers Rest, SC
Good blank canvas to start with. Sometimes its better to start with bare framing then having to tear out poorly finished drywall and insulation to re do it. I had a very similar 1 car garage for a few years in North Dakota. I found that with a small space a little goes a long way. For example, race deck flooring for a 1 car garage is pretty affordable. If you move to a larger space in the future you can take it with you and easily add on.
 
OP
Z

zbyler

Well-known member
Joined
Jun 3, 2014
Messages
129
Location
CT
Good blank canvas to start with. Sometimes its better to start with bare framing then having to tear out poorly finished drywall and insulation to re do it. I had a very similar 1 car garage for a few years in North Dakota. I found that with a small space a little goes a long way. For example, race deck flooring for a 1 car garage is pretty affordable. If you move to a larger space in the future you can take it with you and easily add on.

I agree, being able to finish and lay everything out how I want it is definitely a plus! I checked into RaceDeck a while back and it was between $650 and $850 for the whole garage depending on which style I went with. Not bad, but I'm looking into what it would cost to fill/level the concrete and then coat it with something that's anti-slip. I have a feeling it will be much cheaper, but you never know!
 

CombatNinja

Well-known member
Joined
Aug 24, 2013
Messages
1,456
An e60 5-series is a shade over 16 feet long. How is it that you can't fit that into a 21' deep garage?
 

archerace

Well-known member
Joined
Jul 12, 2020
Messages
57
Location
michigan
Pull the rope that is circled to release the garage door opener carriage. Then open and close the door manually. e628fa4afc4b896a2ead6447450de59c.jpg

Sent from my SM-G965U using Tapatalk
 

Attachments

  • e628fa4afc4b896a2ead6447450de59c.jpg
    e628fa4afc4b896a2ead6447450de59c.jpg
    74.7 KB · Views: 1
OP
Z

zbyler

Well-known member
Joined
Jun 3, 2014
Messages
129
Location
CT
An e60 5-series is a shade over 16 feet long. How is it that you can't fit that into a 21' deep garage?

It's more of a width issue, not length. Getting the car in there is tight as is, and being able to get the doors open to get in/out is a nightmare. The car is going up for sale shortly so I'm not too worried about it!

Pull the rope that is circled to release the garage door opener carriage. Then open and close the door manually. e628fa4afc4b896a2ead6447450de59c.jpg

Sent from my SM-G965U using Tapatalk

^^This, but at the time of the power outage I had no way to get in the back door (no keys and full 56" toolbox in the way even if I could get the door open) and the window wasn't unlocked. I replaced the back door lock after the power came back and have since relocated the toolbox. :D
 

archerace

Well-known member
Joined
Jul 12, 2020
Messages
57
Location
michigan
^^This, but at the time of the power outage I had no way to get in the back door (no keys and full 56" toolbox in the way even if I could get the door open) and the window wasn't unlocked. I replaced the back door lock after the power came back and have since relocated the toolbox. :D

I was thinking it was an attached garage. My appoligizes for assuming you were a stupid *******. [emoji16]

Sent from my SM-G965U using Tapatalk
 
To avoid these ads, REGISTER NOW!
OP
Z

zbyler

Well-known member
Joined
Jun 3, 2014
Messages
129
Location
CT
I was thinking it was an attached garage. My appoligizes for assuming you were a stupid *******. [emoji16]

Sent from my SM-G965U using Tapatalk

Haha no worries! Technically you're correct. While it is ATTACHED to the house, there is no entrance to the house from the garage. That back door leads into my backyard and is mostly useless, unless you run out of power :eek:
 
OP
Z

zbyler

Well-known member
Joined
Jun 3, 2014
Messages
129
Location
CT
Slowly over the past few weeks I added 4 new outlets (there was only 1 before and it was right next to the front garage door) and installed R13 insulation in all of the wall cavities. The ceiling is open rafters and I haven't decided if I'm going to insulate them yet or not.....

In my quest for concentrating my storage on the back wall of the garage, I decided to forego buying metal cabinets and built my own wooden lower cabinets that would take the place of the old workbench frame.

I used the overall design from FixThisBuildThat on youtube and altered the dimensions to fit my application. They are both made out of 3/4" birch plywood and this was actually my first attempt at building cabinets. I learned a lot during this process including how to build and mount drawers, how to add adjustable shelving, how to add and adjust cabinet hinges, etc. The biggest thing I learned is that I need to invest in a table saw. Making all of these cuts with a circ saw and miter saw wasn't ideal, but it worked.

This allowed me to get rid of both giant metal shelves on the left hand side of the garage. I still have to store some items on the existing shelves over the new cabinets, but I plan to replace those with gladiator cabinets (white version) in the near future. This will give everything a nice clean look and allow it to remain unseen.
 

Attachments

  • IMG_8780.jpg
    IMG_8780.jpg
    119.7 KB · Views: 45
  • IMG_8779.jpg
    IMG_8779.jpg
    104.1 KB · Views: 42
  • IMG_8750.jpg
    IMG_8750.jpg
    94.4 KB · Views: 39
  • IMG_8729.jpg
    IMG_8729.jpg
    74 KB · Views: 40
  • IMG_8720.jpg
    IMG_8720.jpg
    91.3 KB · Views: 35
  • IMG_8718.jpg
    IMG_8718.jpg
    89 KB · Views: 34
  • IMG_8714.jpg
    IMG_8714.jpg
    127.8 KB · Views: 37
Last edited:
OP
Z

zbyler

Well-known member
Joined
Jun 3, 2014
Messages
129
Location
CT
In other news, my 56" HF tool box has taken up residence on the side wall where the metal shelves used to be. This is not an ideal setup, but it's the only spot I have to put it at the moment.

I've been looking into alternative toolbox setups and the HF 26" top and bottom cabinets would fit absolutely perfectly to the left of the new cabinets. This would put everything on the back wall and free up about 2ft. of space on the left side of the garage which is HUGE. I'd have to get creative with organizing all of my tools into the "smaller" box, but the increased height and 26" deep drawers should give me enough space. Selling the larger box could also help offset the cost of the 26" unit.

In other news, I'm having a buddy come by this weekend to give me a quote to install and finish the drywall. I don't mind hanging the stuff, but I can't stand taping and mudding and I don't have the time to deal with all of that at the moment.

I'm also looking into LED light fixtures and floor fillers/coatings so any recommendations would be greatly appreciated! I really need to figure out a better way to store scrap wood. I moved the old workbench frame to my basement and have some leftover 3/4" birch plywood that I'll be using for the top. Maybe I'll turn the basement into a wood shop and keep everything completely separate..... .
 

Attachments

  • IMG_8841.jpg
    IMG_8841.jpg
    121.9 KB · Views: 42
OP
Z

zbyler

Well-known member
Joined
Jun 3, 2014
Messages
129
Location
CT
Quick update!

Sheetrock guy is coming tomorrow to finish the back and side walls, as well as patch up the existing wall.

I removed the two ancient fluorescent light fixtures that were hanging crooked and didn’t work half the time. I chose 3 of the commercial electric 4ft LED strip lights. I hardwired the first light to the junction box where the old lights were wired in and then bought some 5ft linkable cords to attach the other 2 to the first. 1800 lumens of 4K at $30 each. Made a HUGE difference in light output overall and I’m very happy with them so far.

Also sold my BMW E60 over the weekend and I’m on the hunt for something that will actually fit comfortably in the garage. Maybe a Porsche 944? 🤔
 

Attachments

  • E9177BF6-AAA8-4FBB-BF35-9B74F78EBA27.jpg
    E9177BF6-AAA8-4FBB-BF35-9B74F78EBA27.jpg
    104.2 KB · Views: 30
OP
Z

zbyler

Well-known member
Joined
Jun 3, 2014
Messages
129
Location
CT
Drywall guys started working last night and got everything hung. They'll be back today to patch up the wall on the house-side and to put the first coat of tape/mud on.

The difference that the sheetrock and new LED lights made in regards to overall brightness in the garage is huge.
 

Attachments

  • drywall 1.jpg
    drywall 1.jpg
    147.8 KB · Views: 37
OP
Z

zbyler

Well-known member
Joined
Jun 3, 2014
Messages
129
Location
CT
Drywall was completed on Thursday and I finished priming and painting it yesterday. Went with Behr "Frost" for the color, which has a slightly off white/grey hue to it. Lightens up the garage even more and makes it feel significantly larger inside. I need to figure out what I want to do with the grey plywood that the electrical panel is mounted to. I may repaint it grey or try to match it with the white I just put up.....

Next up is to repaint the door/door trim and window trim. Then I'll start on fixing the foundation ledge and filling some cracks/divots in the floor.

In my quest to create more space I've decided to replace my 56" US general with the top and bottom 26" x 22" units. I'll keep one of the wooden cabinets I just built on the bottom of work bench and I'll put one of the US General 14.5" end cabinets on the other end for more storage. That leaves a nice 2ft space between the cabinets for a stool so I can actually sit down to work on projects.

I've been looking at the stainless Wall Control panels for above the workbench to keep my more frequently used tools and products on. I'd love to find some flip up, top hinged cabinets for above that to store things that I don't use often like brake bleeders, etc.
 

Attachments

  • Paint.jpg
    Paint.jpg
    132.9 KB · Views: 21
OP
Z

zbyler

Well-known member
Joined
Jun 3, 2014
Messages
129
Location
CT
Decided to go through with my toolbox "downsizing" plan..... scary, I know! :scared:

I've had a 56" U.S. General box for a few years now and I've been very happy with it. The issue is that it's too big for the space I have. "Downsizing" to the 26" box allows me utilize the vertical room that I have instead of the horizontal space the 56" box was taking up. I haven't relocated EVERYTHING yet, but it seems like the 26" boxes will give me plenty of space.

I also picked up a 14.5" end cabinet to use as one end of my workbench area. This will house the miscellaneous items that are now in my toolbox as well as items I don't use as often. The 56" box is for sale to recoup some of the money I spent on the new boxes. :lol_hitti

For storage above the workbench I was looking at the Wall Control metal pegboard panels. 3 panels arrange vertically will fit perfectly above the bench. I'm trying to decide between the galvanized, grey, and black panels, but I'm leaning toward grey with black accessories........:confused:

I'd also like to find some cabinets that I can put above the Wall Control panels, but I'm not having much luck locating a "flip-up" style cabinet. Think of an old office cubicle overhead cabinets that's hinged from the top.......
 

Attachments

  • Back wall.jpg
    Back wall.jpg
    82.6 KB · Views: 17
OP
Z

zbyler

Well-known member
Joined
Jun 3, 2014
Messages
129
Location
CT
Update for this week - A lot of progress!

I ordered the wall control panels and some accessories for above the workbench. After I got everything set up I decided that I would prefer to have covered storage over the workbench and returned the wall control (thank you Amazon!). I replaced it with one of the hanging tool cabinets from Harbor Freight and it worked out perfectly. Now I have a place to put my automotive fluids, detailing supplies, etc. and it's all within reach. I also picked up a magnetic glove holder and a paper towel holder to attach to the cabinet.

Part of my goal for this garage was to keep as much off the floors as possible, so I've been finding creative ways to store things on the walls. I reused some ajustable shelving and brackets from the previous owner and added some dark wood planks for shelving. These sit in some of the "unusable" space next to the garage door. I also grabbed a shoe mat and stuck it under the shelves and stored my lawn supplies there. On the other side of the garage door I set up some Rubbermaid FastTrack rails and hung my ladders and garden tools.

I had a ton of interest in the 56" HF toolbox I listed for sale and someone picked it up the other night. I didn't remember how heavy that thing was empty.....the site says almost 400# :wtf: 
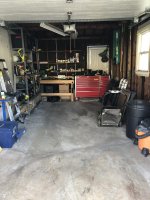
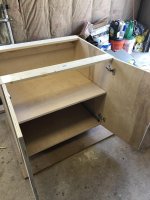
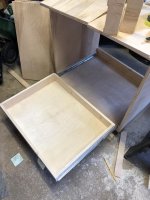
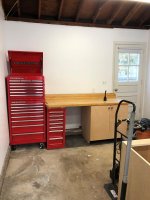
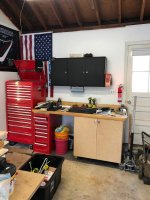
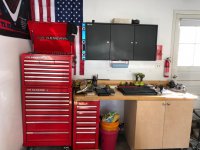
That freed up a ton of space and it forced me to start organizing my 26" box and 14.5" end cabinet. I picked up some Olsa Tools socket organizers to replace my Ernst twist socket rails. They fit perfectly in the top of the box.

All in all I'm really proud of how this is turning out.
 

Attachments

  • G3.jpg
    G3.jpg
    101.4 KB · Views: 18
  • G1.jpg
    G1.jpg
    111.6 KB · Views: 18
  • G5.jpg
    G5.jpg
    94 KB · Views: 17
  • G2.jpg
    G2.jpg
    147.6 KB · Views: 18
  • G4.jpg
    G4.jpg
    72.4 KB · Views: 19
  • wall control 2.jpg
    wall control 2.jpg
    115.1 KB · Views: 15
To avoid these ads, REGISTER NOW!
Top Bottom