To avoid these ads, REGISTER NOW!

Zeke's Old House wiring tip #1.

Zeke

Well-known member
Joined
Aug 13, 2009
Messages
17,176
Location
Long Beach CA, the sewer by the sea.
When you have to cut in a remodel box in the old wood lath and plaster, put a handy box cover on the existing device or screw it to the lath directly and use the metal sides to guide a jig saw or drywall saw. Rotozips don't work so good in plaster and wood.

864-2T.jpg


The metal plate will help to not only give you a form, it will hold the lath and plaster firm while cutting to produce a nice cut out with little damage to the keys. This works well when there is an existing undersized metal box (typical of old house wiring) that needs to come out and be replaced. Works well using a 2-gang plate too for your 4S boxes.

These " keys" (the squeezed through brown coat for you old house novices) should not be broken at all and they are very fragile.
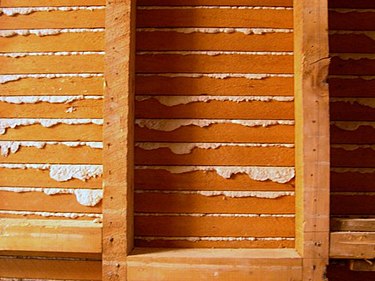
375px-Lath.jpg
 
To avoid these ads, REGISTER NOW!

Beemer533

Well-known member
Joined
May 9, 2014
Messages
2,057
Location
Syracuse, NY
Huh, damn.. So simple I can't believe I never thought of that...

I hate cutting in boxes in lath and plaster.. Or doing anything else with it for that matter.
 

C96

Well-known member
Joined
Nov 30, 2013
Messages
1,251
Is this going to turn into a series?

If so, this should be your tip #2:

Don’t work on old wiring from the ‘20s that frustrates you so bad that you drink wine, make a terse post, and then delete it.

Lol, just pulling your chain Zeke.

I think this is a great tip; I have cut-in many boxes into lath and plaster some of which I’ve screwed up pretty badly because of nothing supporting the wood lath. I can see how this would help the process.

I have learned that when doing cut-in boxes into lath and plaster, patience is a virtue.

Good tip Zeke, keep them coming…:beer:
 
OP
Z

Zeke

Well-known member
Joined
Aug 13, 2009
Messages
17,176
Location
Long Beach CA, the sewer by the sea.
Tip no. 3: to remove a knockout oh an existing box from the inside first drill a 1/8th" hole in the knockout. Then either run a tek screw into the hole or take an Allen wrench ad insert it and bend the KO out into the box.

No. 4: when pulling new wire between 2 holes with no access to the area between the holes, make up an vacuum adapter that will take 3/4" OD tubing and insert that into the lower hole. Next, dangle a string, shoe lace or lamp chain in the top and let the vacuum grab it. For horizontal runs use something very light like streamers cut from crepe paper tied to a string. Increase the size and strength back and forth until you have a pull line.

No. 5: when working alone place a plastic funnel sized just right into the hole where you are feeding in.
 
OP
Z

Zeke

Well-known member
Joined
Aug 13, 2009
Messages
17,176
Location
Long Beach CA, the sewer by the sea.
Tip no.6 (and this should be obvious): label everything. You may have a 'system' or a 'code' by which you know what are the hots and what are the legs, but even the next day you can forget due to other factors surrounding the job. Make it idiot proof. I wish I did yesterday before spending part of today pulling apart 2 boxes because I had switched (pardon the pun) a leg and a load. I had a light that was constantly powered and more that had nothing. Redid and all is well.

So that leads to tip no. 7: even though you think 9 inches of wire beyond the box is way enough, wait until you have to redo one. Hopefully you won't.
 

Daedalus

Well-known member
Joined
Sep 28, 2009
Messages
6,049
Love the wiring tips. I'll be needing them I think.

Zeke, I'm working on a '40s house in Hawthorne. Not electrical related, so I started a new thread. Would greatly appreciate your $.02 if you have time.

BTW, this house has an updated 100A breaker box (with all of 6 breakers, 2 of which go to the garage!), but the wiring is all 2-conductor (no ground), and some of the lumber is 2x3.5, and in other areas it's closer to actual 2x4. Drain pipes are cast. It's interesting to say the least.
 
Last edited:

MikeF2316

Well-known member
Joined
Dec 29, 2012
Messages
9,605
Location
Thornhill, ON
I think tip #1 will be good in my case too. My house is the post lath but still has browncoat and plaster, but over small, thin pieces of drywall. Whenever I put in any new outlet box (and in a house built in 1950, you're always finding a need) no matter how careful I am, I always chip out on one side. Of course there's nothing solid to hold a screw. Maybe I'll try a toggle bolt.
 
OP
Z

Zeke

Well-known member
Joined
Aug 13, 2009
Messages
17,176
Location
Long Beach CA, the sewer by the sea.
No. 7 — use fire block foam at any remodel box after you install the box and enter the wires. Let the foam harden (about 2 hours at average temps) before you make up the box because when shoving the device and wires back into the box further disturbs the attachment to the wall. Boxes nailed to studs don't suffer but let in boxes do.

No. 8 — Most know this but use your romex sheath cutters to cut the sheath right where it comes into the box and pull the sheathing part way out. Leave this until make up because you need the labels when you go to make up. Don't trust your memory. You can also wrap a switch leg or load around the line side but if the box is a 2-gang and a lot going on, labels are better.
 

simpler=better

Well-known member
Joined
Oct 6, 2015
Messages
499
Location
Baltimore, Maryland
Excellent tips!

A Fein tool eats plaster up without shaking everything to bits :)

Wire labels are CHEAP and save so much trouble.

I hate those old tiny metal boxes held in with the two little bent steel tabs.
 
OP
Z

Zeke

Well-known member
Joined
Aug 13, 2009
Messages
17,176
Location
Long Beach CA, the sewer by the sea.
It's been awhile.

No. 9 — If you have a screw that needs to go into a tough place, and even if you have a magnetic bit, you don't want to drop it and it's hard to get started, put a drop of super glue in the slot and fit it to the bit. Don't bother to clean the screw head much, the bond will break easily once the screw is started.
 

CoogarXR

Well-known member
Joined
Jan 11, 2016
Messages
6,867
Location
Ohio
No. 4: when pulling new wire between 2 holes with no access to the area between the holes, make up an vacuum adapter that will take 3/4" OD tubing and insert that into the lower hole. Next, dangle a string, shoe lace or lamp chain in the top and let the vacuum grab it. For horizontal runs use something very light like streamers cut from crepe paper tied to a string. Increase the size and strength back and forth until you have a pull line.

4a: Another tip in this regard- Say I have a hole drilled up from the basement into the wall cavity and I want to fish a wire from a switchbox down to it. I keep about 8" of metal beaded pull-chain (from a pull-chain light fixture, ceiling fan or whatever) in my toolbox. I tie this chain to a piece of nylon twine and drop it down the hole. The weight of the steel chain helps it fall, and the round beads glide over most obstructions. Usually I can stick a telescoping magnet up the hole in the basement and it will grab the chain. If it doesn't, I leave the magnet in the hole, go back upstairs and jiggle the rope and it'll grab.
 
To avoid these ads, REGISTER NOW!

alfredeneuman

Well-known member
Joined
Mar 3, 2011
Messages
4,590
Location
Fullerton, CA
When you have to cut in a remodel box in the old wood lath and plaster, put a handy box cover on the existing device or screw it to the lath directly and use the metal sides to guide a jig saw or drywall saw. Rotozips don't work so good in plaster and wood.

Oscillating tools work perfectly for this, and don't do as much damage as a jig saw or a drywall saw. :)
 

Crazyjake8493

Well-known member
Joined
Sep 26, 2014
Messages
3,977
Location
Upstate NY
Interesting tip. I always use an oscillating tool for cutting in to lath/plaster walls, but I score the outline with a utility knife first, to prevent old paint from splintering and cracking off.
 

Norcal

Well-known member
Joined
Mar 16, 2008
Messages
13,769
When roughing NM cable I take my lineman pliers & crimp the switch leg(s) about 1/2" from the end which will remain marked after the sheathing is stripped, that way make up is a lot simpler.
 
OP
Z

Zeke

Well-known member
Joined
Aug 13, 2009
Messages
17,176
Location
Long Beach CA, the sewer by the sea.
No. 10 — when you have stranded wire in a box and there's none to spare but the ends are a gnarly mess, cut 1/4" more of the sheathing and grab i with your 9's, twist and pull nice and slow. It will make all the unruly ends look like a million bucks. Trim just a tad and your wrapped connection will look great with no strays.

This works very well with motor wiring.
 
OP
Z

Zeke

Well-known member
Joined
Aug 13, 2009
Messages
17,176
Location
Long Beach CA, the sewer by the sea.
Oscillating tools work perfectly for this, and don't do as much damage as a jig saw or a drywall saw. :)

Interesting tip. I always use an oscillating tool for cutting in to lath/plaster walls, but I score the outline with a utility knife first, to prevent old paint from splintering and cracking off.

I'm tired of buying multi-tool blades. They last about 30 seconds in real plaster. The carbide ones are better but at 10+ bucks a pop, I save those for when I REALLY need one.

Remember, we in SoCal, Los Angles County pay 10% in sales tax, even if we buy online from a lot of places. And there's shipping so big box store prices just have to be tolerated.

However, to keep on the theme, I once saw an episode of "This Old House" where the electrician was cutting in a remodel box and he traced the box with a pencil and then took a long, narrow, beater screwdriver and gently tapped in line with the pencil mark all around until he reached the old wood strip lath behind. With the plaster out of the way, he then used the multi-tool with a nice new blade and cut the wood.

Now here is one addendum to Tip No. 1: cut the lath that is away from the nearest stud (if you can't get next to a stud) and then cut the near side. The lath will vibrate less so as to not cause too much breakage of the 'keys' when cut in this order.
 

dcg9381

Well-known member
Joined
Jun 20, 2018
Messages
11,878
Location
Austin, TX
Tip no. 3: to remove a knockout oh an existing box from the inside first drill a 1/8th" hole in the knockout. Then either run a tek screw into the hole or take an Allen wrench ad insert it and bend the KO out into the box..

Thank you
 

theoldwizard1

Well-known member
Joined
Feb 22, 2011
Messages
43,241
Location
SE MI
When dealing with an old house that do not have a ground, but you need a 3 prong outlet, install a GFCI. It meets code when you place the included sticker on the outlet that states that the ground is not connected and it is actually safer than an old 2 prong outlet !
 

ddawg16

Well-known member
Joined
Jul 11, 2008
Messages
21,005
Location
S. California
No. 8 — Most know this but use your romex sheath cutters to cut the sheath right where it comes into the box and pull the sheathing part way out. Leave this until make up because you need the labels when you go to make up. Don't trust your memory. You can also wrap a switch leg or load around the line side but if the box is a 2-gang and a lot going on, labels are better.

That should be rule #1...........

I've sometimes write on the inside of the box with a sharpie what the wire is.
 
To avoid these ads, REGISTER NOW!
Top Bottom