To avoid these ads, REGISTER NOW!

Zengineer's Wood Work Shoppe

Zengineer

Well-known member
Joined
Apr 10, 2010
Messages
781
Location
British Columbia, Canada
Ye olde wood work shoppe. (Zengineer's Metal Work Shoppe can be found at this link here)

You can see my previous shop here: https://www.garagejournal.com/forum/...ad.php?t=71959

Purchased my dream property on Vancouver Island in July 2018. Got out of the city finally, and picked up 5 acres of forested land bordering an ecological reserve.

Prior to purchase the plan was to find land and build, but land is scarce. Found a place already built that ticked every box. Including shop space. In this case, there are 2 x 400 square foot workshops. This is the tale of the wood shop.

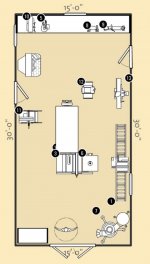
The wood shop is a 15'x30' detached shop with 10' ceilings.

Unassuming from the outside...
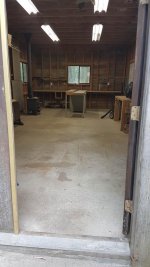
attachment.php


A blank canvas...
attachment.php


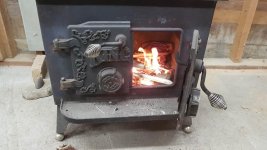
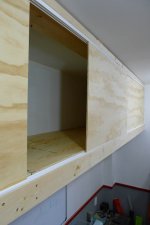
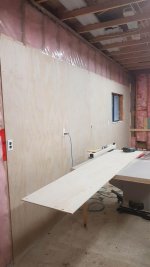
The start of insulation, and finishing...
attachment.php


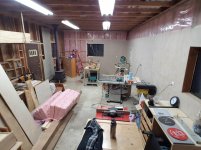
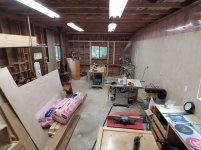
Fortunate that the lighting in here is pretty decent!
attachment.php


Rough cut fir benches. Sturdy, but in the way of my plans to insulate and finish the walls.
attachment.php


Overview:
attachment.php

attachment.php
 

Attachments

  • 20180719_143354.jpg
    20180719_143354.jpg
    156.9 KB · Views: 1,906
  • 20180719_143309.jpg
    20180719_143309.jpg
    79.9 KB · Views: 1,898
  • 20180723_152750.jpg
    20180723_152750.jpg
    63 KB · Views: 1,888
  • 20180723_152752.jpg
    20180723_152752.jpg
    67.1 KB · Views: 1,887
  • 20180723_152754.jpg
    20180723_152754.jpg
    74.2 KB · Views: 1,880
  • 20180723_152817.jpg
    20180723_152817.jpg
    146.1 KB · Views: 1,891
  • 20180723_152832.jpg
    20180723_152832.jpg
    144 KB · Views: 1,889
Last edited:
To avoid these ads, REGISTER NOW!
OP
Z

Zengineer

Well-known member
Joined
Apr 10, 2010
Messages
781
Location
British Columbia, Canada
The fun stuff... the nuts and bolts... the details that aren't particularly fun or exciting, but they make the difference between a shop and one you are comfortable and happy in.

Blocking work so the plywood had a place to end.
attachment.php


The pink stuff... fine for a shop. Makes a lovely pillow.
attachment.php


Ever tried putting up vapour barrier on your own? It *****. This actually worked pretty well putting it on the rope like this. Pull it all the way down the wall and staple as you go.
attachment.php


This represents the only studs in the whole place that are 16" on centre, lol.
attachment.php


One wall nearly done.
attachment.php


I'm having to work my way around the shop wall by wall and doing all the steps there, so that I can move things against it when I'm done. Would be faster with an empty shop for sure... but I'm not about to dump everything outside at this point!
 

Attachments

  • 20181112_140227.jpg
    20181112_140227.jpg
    54.5 KB · Views: 1,818
  • 20181111_162131.jpg
    20181111_162131.jpg
    146.2 KB · Views: 1,832
  • 20181111_122121.jpg
    20181111_122121.jpg
    144 KB · Views: 1,819
  • 20180924_134946.jpg
    20180924_134946.jpg
    149.7 KB · Views: 1,833
  • 20180917_151011.jpg
    20180917_151011.jpg
    147.7 KB · Views: 1,834
Last edited:
OP
Z

Zengineer

Well-known member
Joined
Apr 10, 2010
Messages
781
Location
British Columbia, Canada
While there has been a little more progress since the last photos (6 outlets added, another bench stripped out, beginning of blocking of rear wall) it's visually more of the same as you see above. It's also not moving too quickly, a few hours of progress per weekend.

However, the vision of the space is something like this:
attachment.php


Workbench at the top will house wood lathe, grinder, scroll saw and drill press. Table saw and good sized outfeed table (much bigger than my current 3'x4' one) mid shop. Sheet goods rack on your left as soon as you enter through the doors at the bottom. Mitre saw station along the right wall in line with the jointer. Material storage will likely be on the left between the sheet goods and the bandsaw. Still a possiblity I flip the mitresaw on that side as well.

This space feels a bit generous for woodworking (I know how quickly it will seem to small though) but I'm really happy with the shop dimensions for processing full sheets of plywood, long material, etc.

Constructive comments appreciated and welcome.
 

Attachments

  • Layout.jpg
    Layout.jpg
    50.2 KB · Views: 1,737
Last edited:
OP
Z

Zengineer

Well-known member
Joined
Apr 10, 2010
Messages
781
Location
British Columbia, Canada
One other thing I'd like to get some comments or thoughts on, is heating. I'm all for the woodstove, which makes a lot of sense in my area. However, what a wood stove doesn't do a great job of is controlling ambient moisture, which of course can reap havoc on wood stock.

My thought at this point was to use electric resistance heating to maintain ~10°C (50°F) and then make a small fire in there on days I'm working in there to bring it up to comfortable working temp. Alternatively, I could look at a split air-air A/C unit for heating to get a bit more bang for my operating dollars.

I plan to be here a long time, so up front cost vs. operating costs is a reasonable factor. Winters around here are typically between -5°C (23°F) and 5°C (41°F).

I do not have any type of gas service to the property, and it's not even close to nearby.
 

jkeyser14

Well-known member
Joined
Dec 19, 2008
Messages
1,818
Location
(rural) Maryland
Electric resistance heating will be very expensive. Why not install a minisplit instead? It can also give you dehumidification in the summer.
 
OP
Z

Zengineer

Well-known member
Joined
Apr 10, 2010
Messages
781
Location
British Columbia, Canada
Electric resistance heating will be very expensive. Why not install a minisplit instead? It can also give you dehumidification in the summer.

Dehumidification isn't a huge summer issue where I am, despite being on an island. We have pretty dry hot summers, at least the past 3 or 4. Somehow it feels wrong to invest in a minisplit here though. My rationale? The "shed" woodshop would be the only place on my property with A/C, not the house, not the suite, not the metal shop. :bounce: May be tough to justify.

That's a good looking shop space. Too bad you don't have gas on the property for heating options.

I'm in the boonies. If i really wanted to I could put a propane tank on site I suppose, though I'd need more than just this one need to justify it. Worth a thought though.
 

TurtleValley

Well-known member
Joined
Dec 4, 2017
Messages
253
Location
BC. Canada
What a great place. and two perfect shops. Really like the division. Also plywood walls are the way to go. Did that on my shop as well. You can put stuff on the walls anywhere you want and you don't have to worry about accidently punching a hole through the drywall. Great layout for the woodshop by the way. Looks very functional.

My only advice would be to add more lighting now. It is always a pain to add it in the future, or like me, you just don't get around to it and wish I did...

Must be great to be out on the island!
 
OP
Z

Zengineer

Well-known member
Joined
Apr 10, 2010
Messages
781
Location
British Columbia, Canada
Man I love that you have a woodshop and a metal shop separate. The woodshop is my favorite though. When you finish I think it will be a perfect size for you. Love the plywood walls.

Here is the electric heater I have in my 3 car garage. It is 220v and works great.

https://www.amazon.com/gp/product/B003XOZN7A/ref=ppx_yo_dt_b_asin_title_o02__o00_s02?ie=UTF8&psc=1

Looking forward to your updates.

Bret

Yeah I must admit I'm liking the separate shop idea as well, though I do tend to wander back and forth between them a fair bit, and I will need to duplicate a few tools in the long run. But having a woodshop setup and ready to go at a moments notice has always been a dream, and I think if I had one big shop, the woodwork equipment would be overrun by the metal work/mechanical repair stuff that I seem to do more often.

I've got one of those heaters that I used in my last garage. It's a pretty reasonable choice as well, though the thermostat isn't quite as easy to set as precisely as I'd like.

What a great place. and two perfect shops. Really like the division. Also plywood walls are the way to go. Did that on my shop as well. You can put stuff on the walls anywhere you want and you don't have to worry about accidently punching a hole through the drywall. Great layout for the woodshop by the way. Looks very functional.

My only advice would be to add more lighting now. It is always a pain to add it in the future, or like me, you just don't get around to it and wish I did...

Must be great to be out on the island!

Fair comment regarding lighting. I certainly need to consider that before I button up the ceiling. It's decent lighting now, but no where near my metal shop levels.
 

toomanyrocks

Well-known member
Joined
Jan 20, 2019
Messages
190
Location
Ohio
Man I love that you have a woodshop and a metal shop separate. The woodshop is my favorite though. When you finish I think it will be a perfect size for you. Love the plywood walls.

Here is the electric heater I have in my 3 car garage. It is 220v and works great.

https://www.amazon.com/gp/product/B003XOZN7A/ref=ppx_yo_dt_b_asin_title_o02__o00_s02?ie=UTF8&psc=1

Looking forward to your updates.

Bret

I have a similar heater set up to keep the storage area above my garage from freezing. (this size unit is in a 1000sq ft area. ) I put a standard electric baseboard heater wall thermostat on the wall instead of using the thermostat in the unit. It will need a 30 amp 220v circuit, but does a fine job of keeping the temp at 50 Degrees F in the winter. Set 48 degrees, it doesn't seem to affect my already outrageous electric bill too much. Our winters' are similar in temp to yours, though we usually get a week or so of 0F temps in Jan.

Be aware that with the building buttoned up tight, (all that plastic in the walls,) you may have too much humidity trapped inside. Also, once you are fully insulated you may have problems regulating your wood burner to keep the temperature down. Once you light the fire, it may get too hot to work comfortably, and the dangly bits might attract splinters as you shed layers of clothing!
 
OP
Z

Zengineer

Well-known member
Joined
Apr 10, 2010
Messages
781
Location
British Columbia, Canada
Be aware that with the building buttoned up tight, (all that plastic in the walls,) you may have too much humidity trapped inside. Also, once you are fully insulated you may have problems regulating your wood burner to keep the temperature down. Once you light the fire, it may get too hot to work comfortably, and the dangly bits might attract splinters as you shed layers of clothing!

Yes, all good points. Perhaps I should consider an exhaust fan and a humidistat as well, with an override I could use to get some air exchanges when desired. As for the wood stove blowing me out of there, well, it's small and based on my current schedule, I'd light it, load it, get it to temp and stop putting wood in it pretty quick. The insulation should help maintain temp for the few hours at a time I'm out there.

Otherwise the temptation is to remove the wood stove entirely and just stick with the electric heater. Not out of the question at this point! (The firewood will happily go to the house woodstove instead)

As for the dangly bits... I learned long ago about the perils of cooking bacon. Splinters present a lesson I can learn without experiencing them. ;)
 
OP
Z

Zengineer

Well-known member
Joined
Apr 10, 2010
Messages
781
Location
British Columbia, Canada
Well managed to spend today in the woodshop working on the back wall, made some progress.

First order of the day, cut some kindling and get a little fire going.
attachment.php


attachment.php


It is NOT going quickly, for a bunch of reasons:
  • Every stud is on a different centre measurement, so that means that every piece of insulation had to be cut to fit
  • The walls are framed with rough cut 2x4's, except some spots where rough cut 2x6's were used :lol_hitti
  • Once insulated, I had to block and shim out the walls with newer lumber to make the 2x6 sill plates and 2x4 studs even up.
  • Ran out of vapour barrier part way through the last wall, didn't feel like cutting into the new roll yet.

attachment.php


On the bright side, reblocking the wall allowed me to put studs on 48" spacing, so I could get full sheets of ply up.

attachment.php


But I just had the 2 sheets left. Need to grab some more on the next dry day around here!
 

Attachments

  • 20190126_164717.jpg
    20190126_164717.jpg
    147.7 KB · Views: 1,321
  • 20190126_131640.jpg
    20190126_131640.jpg
    149.5 KB · Views: 1,313
  • 20190126_100923.jpg
    20190126_100923.jpg
    142 KB · Views: 1,316
  • 20190126_100038.jpg
    20190126_100038.jpg
    149.4 KB · Views: 1,318

jimreed2160

Well-known member
Joined
Aug 7, 2016
Messages
3,589
Location
Tallahassee FL
That is a great start to a nice woodshop! My shop is lousy with raw wood--there never seems to be enough storage. Your 10ft ceilings would challenge me to come up with some method of overhead lumber storage.

As for your humidity problems, you might consider a dehumidifier. I use one in my 24x28 Florida garage shop and it works great. In fact, I worked in the shop for years with just that and did not install an an air conditioner until I retired.

Good luck with your build.
 
OP
Z

Zengineer

Well-known member
Joined
Apr 10, 2010
Messages
781
Location
British Columbia, Canada
That is a great start to a nice woodshop! My shop is lousy with raw wood--there never seems to be enough storage. Your 10ft ceilings would challenge me to come up with some method of overhead lumber storage.

As for your humidity problems, you might consider a dehumidifier. I use one in my 24x28 Florida garage shop and it works great. In fact, I worked in the shop for years with just that and did not install an an air conditioner until I retired.

Good luck with your build.

Thank you so much. Yeah a dehumidifer would help a bit I'm sure, but the main culprit is the temperature. As temp drops humidity goes up. Simply by raising the temp in the shop I can hold the humidity stable. Right now in my metal shop (link in my signature) I have it at 13°C (55°F) and the humidity is a stable 60%. However, in the woodshop at 5°C (41°F) its nearly 90% humidity. Same outside environment.

What a great shop. It has a very peaceful look. I bet that wood stove heats that place right up!

It actually doesn't do as good a job as I thought it would, without any insulation. All the heat goes up into the open attic space, or right through the non-insulated walls. That combined with me burning shop scraps as opposed to seasoned firewood, it takes a while just to raise the temp to comfortable levels. I really should try some seasoned Douglas Fir and see how much better that makes it.
 

sean Buick 76

Well-known member
Joined
May 7, 2013
Messages
3,221
Location
Edmonton Alberta
If you don't mind, could you let me know where you found the tracks seen in the pic here from your other place?
 

Attachments

  • P1000780.jpg
    P1000780.jpg
    60.3 KB · Views: 106

casmurbax

Well-known member
Joined
Sep 25, 2012
Messages
2,756
Location
Wilton, NY
another nice shop.

I like the idea that it is separate from the metal shop.

At least you were able to wire this one to fit your needs.
 
To avoid these ads, REGISTER NOW!

Trapps

ALLIANCE MEMBER
Joined
Feb 10, 2017
Messages
1,998
Location
The Detroit Zoo
Congrats on what looks to be a perfect space taking shape. I love a wood stove in the shop on a really cold day.

Subscribed!
 

OccupantRJ

Well-known member
Joined
May 15, 2009
Messages
10,985
Location
Eastern North Carolina
Thank you so much. Yeah a dehumidifer would help a bit I'm sure, but the main culprit is the temperature. As temp drops humidity goes up. Simply by raising the temp in the shop I can hold the humidity stable. Right now in my metal shop (link in my signature) I have it at 13°C (55°F) and the humidity is a stable 60%. However, in the woodshop at 5°C (41°F) its nearly 90% humidity. Same outside environment.


It actually doesn't do as good a job as I thought it would, without any insulation. All the heat goes up into the open attic space, or right through the non-insulated walls. That combined with me burning shop scraps as opposed to seasoned firewood, it takes a while just to raise the temp to comfortable levels. I really should try some seasoned Douglas Fir and see how much better that makes it.

Try placing a box fan on low speed flat on top of the ceiling joists to take the hotter air from the attic and push it down where you need it. Just place it away from where you are actually working. A vertical piece of stove pipe hanging from a rafter with a small fan in it pushing heat down to within a foot of the floor works well too.
 

shirk

Well-known member
Joined
Sep 2, 2011
Messages
90
Location
North Vancouver, BC
Years ago when my dad insulated our garage back in Ontario he first just put up poly vapor barrier on the ceiling to hold the insulation up. A couple years later he then had it dry walled. The insulation and poly made a huge difference. We were working on snowmobiles a lot and it was heaven once we had heat in the garage.
 
OP
Z

Zengineer

Well-known member
Joined
Apr 10, 2010
Messages
781
Location
British Columbia, Canada
Try placing a box fan on low speed flat on top of the ceiling joists to take the hotter air from the attic and push it down where you need it. Just place it away from where you are actually working. A vertical piece of stove pipe hanging from a rafter with a small fan in it pushing heat down to within a foot of the floor works well too.

Yeah no question there is a huge temperature gradient in the space, given it's 10' walls and probably 15' to the peak. Next time I get cold I should just climb a ladder in there, lol. Some air circulation would certainly help. Less important during the "construction" phase... but I do have a fan I can use out there next time and we will see if it makes a big enough difference to continue with. My focus is on insulation rather than bandaiding. ;)

Years ago when my dad insulated our garage back in Ontario he first just put up poly vapor barrier on the ceiling to hold the insulation up. A couple years later he then had it dry walled. The insulation and poly made a huge difference. We were working on snowmobiles a lot and it was heaven once we had heat in the garage.

Yeah I probably could do the ceiling now-ish, the reason I'm holding off to this point is that I want to take a really good look at the roof next spring (it's covered in moss) and possibly replace it. If I'm going through that job, it might be nice to have access from inside the building for one, but also keeps all the junk out of my nicely insulated ceiling space. Add to it that if I do the roof I'll be doing ridge and soffit vents, and it just seems easier to have full access to do that, rather than needing to get into an attic space.

For now I want to get the walls insulated and sheathed, get my tools roughly in place so they can be used, and move on to some other projects like building additional storage for my metal shop. (Likely cabinets out of plywood)
 

toomanyrocks

Well-known member
Joined
Jan 20, 2019
Messages
190
Location
Ohio
I have a similar heater set up to keep the storage area above my garage from freezing. (this size unit is in a 1000sq ft area. ) I put a standard electric baseboard heater wall thermostat on the wall instead of using the thermostat in the unit. It will need a 30 amp 220v circuit, but does a fine job of keeping the temp at 50 Degrees F in the winter. Set 48 degrees, it doesn't seem to affect my already outrageous electric bill too much. Our winters' are similar in temp to yours, though we usually get a week or so of 0F temps in Jan.

Be aware that with the building buttoned up tight, (all that plastic in the walls,) you may have too much humidity trapped inside. Also, once you are fully insulated you may have problems regulating your wood burner to keep the temperature down. Once you light the fire, it may get too hot to work comfortably, and the dangly bits might attract splinters as you shed layers of clothing!
quick followup on the little electric heater....-5 degrees and it failed. opened it up and the full current goes through a little overheat cutoff. (rated at 25 amps, the unit draws close to 24 amps at 5000 watts setting 208 volt.) Not surprisingly the overheat cutoff cooked itself as it was wired to the thermostat with spade connectors. Long story short, cheap Chinese product, failed when put to the test, obviously not long after the 1 year warranty expired. It only cost about 8 bucks get a replacement part on ebay, but I don't trust that this will last any longer. Most furnaces use a low voltage circuit to these overheat switches, that don't put all the current through them.

so...Back to the baseboard heater. Takes longer to heat up the room, but simple and no moving parts.
 
OP
Z

Zengineer

Well-known member
Joined
Apr 10, 2010
Messages
781
Location
British Columbia, Canada
quick followup on the little electric heater....-5 degrees and it failed. opened it up and the full current goes through a little overheat cutoff. (rated at 25 amps, the unit draws close to 24 amps at 5000 watts setting 208 volt.) Not surprisingly the overheat cutoff cooked itself as it was wired to the thermostat with spade connectors. Long story short, cheap Chinese product, failed when put to the test, obviously not long after the 1 year warranty expired. It only cost about 8 bucks get a replacement part on ebay, but I don't trust that this will last any longer. Most furnaces use a low voltage circuit to these overheat switches, that don't put all the current through them.

so...Back to the baseboard heater. Takes longer to heat up the room, but simple and no moving parts.

Hmm, bad news. :( I am fortunate that my heater is about 25-30 years old and built in the US (I think). Certainly not the same!
 
OP
Z

Zengineer

Well-known member
Joined
Apr 10, 2010
Messages
781
Location
British Columbia, Canada
Small update in the wood shop. I purchase this Incra 1000SE mitre gauge last week, what a nice piece of kit this is. Haven't used it much at all at this point, but the build quality is high and it does all the right things.

attachment.php


attachment.php


attachment.php


I really like this simple vernier flipper to measure in 1/10° increments. Smart!

attachment.php


attachment.php
 

Attachments

  • 20190202_155044.jpg
    20190202_155044.jpg
    94.1 KB · Views: 783
  • 20190202_155049.jpg
    20190202_155049.jpg
    151.6 KB · Views: 779
  • 20190202_162812.jpg
    20190202_162812.jpg
    138.7 KB · Views: 781
  • 20190202_164053.jpg
    20190202_164053.jpg
    67.8 KB · Views: 779
  • 20190202_164102.jpg
    20190202_164102.jpg
    73 KB · Views: 776

RickP

Well-known member
Joined
Jan 15, 2013
Messages
1,548
Location
Annapolis, MD
I'm in the boonies. If i really wanted to I could put a propane tank on site I suppose, though I'd need more than just this one need to justify it. Worth a thought though.

Great start on finishing out your shop. It's hard to believe the lengths the builder went to making every measurement different in the walls - almost like they were trying hard to do that on purpose!

I'm a big fan of propane - especially if you might want to switch to cooking with gas in the kitchen someday. And you could think about switching to a gas furnace in the house eventually too. It's a lot more work to install the pipe underground, of course, but I installed a 100 gallon tank at my old house and it wasn't as hard as I thought it would be. A big underground tank and a backup generator would be even better for you - especially since you're planning to be there a long time. (and I've always wanted to put in a pipe to the BBQ grill and stop carting those 20 lb tanks around)

I couldn't help noticing your table saw - I have almost the same model. I may have to copy your design for a big outfeed table - that looks like it would really help with sheet goods.

Good luck with finishing the rest of the interior walls. It's hard to make progress only on the weekends, isn't it? I'm always frustrated by my lack of quick progress once I get started on something. Hang in there!
 

86turbodsl

Well-known member
Joined
Jul 1, 2005
Messages
6,556
Location
Michigan
Small update in the wood shop. I purchase this Incra 1000SE mitre gauge last week, what a nice piece of kit this is. Haven't used it much at all at this point, but the build quality is high and it does all the right things.

attachment.php


attachment.php


attachment.php


I really like this simple vernier flipper to measure in 1/10° increments. Smart!

attachment.php


attachment.php

I have the same miter gage. I hope it works as well for you as it has for me.

:thumbup:
 
OP
Z

Zengineer

Well-known member
Joined
Apr 10, 2010
Messages
781
Location
British Columbia, Canada
Posted this in my metal shop thread as well, but since I used the wood shop a lot in this build, it seems only fair to share the love. :)

The latest project to be completed in my shop, both metal and wood shops had a part in this one!

My 8min long build video, please check it out!

attachment.php


attachment.php


attachment.php


This one took over 18 months start to finish. Phew!
 
To avoid these ads, REGISTER NOW!
Top Bottom