To avoid these ads, REGISTER NOW!

Zerk's garage rehab

zerk

Member
Joined
Sep 20, 2009
Messages
11
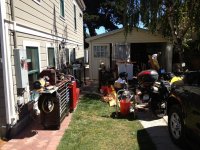
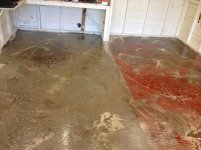
Hey all, I've been reading this board for a few years off and on and finally have something to share. After a full remodel of our house in Alameda, CA, it was time to do something about the garage.

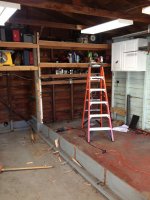
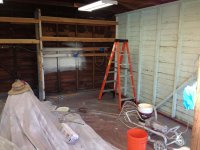
First I built a shed under my deck to hold racks of materials, that gave me enough room to start the garage fix. I emptied the garage, and knocked down the partition wall in the middle.

More to follow,

Matt
 

Attachments

  • IMG_7979.jpg
    IMG_7979.jpg
    152.2 KB · Views: 118
  • IMG_7975.jpg
    IMG_7975.jpg
    140.8 KB · Views: 111
  • IMG_7976.jpg
    IMG_7976.jpg
    145.7 KB · Views: 97
  • IMG_7980.jpg
    IMG_7980.jpg
    139.3 KB · Views: 93
To avoid these ads, REGISTER NOW!
OP
Z

zerk

Member
Joined
Sep 20, 2009
Messages
11
Then on to spray paint! It took 10 gallons with a spray rig to prime and paint my little 15'x20' space. The old wood really drank it up, and spraying is always less efficient.
 

Attachments

  • IMG_7985.jpg
    IMG_7985.jpg
    137.4 KB · Views: 55
  • IMG_7983.jpg
    IMG_7983.jpg
    139.4 KB · Views: 67
  • IMG_7982.jpg
    IMG_7982.jpg
    133.1 KB · Views: 56
  • IMG_7981.jpg
    IMG_7981.jpg
    136.4 KB · Views: 52
OP
Z

zerk

Member
Joined
Sep 20, 2009
Messages
11
Then it was time to pile the stuff back in. It was then I realized I could not leave the floor as it was. It was half grey, half red, and all pealing nasty. First I used the acid wash/etcher on the whole floor. That cleaned things up a lot, but then I decided to rent a big diamond sander thing from Home Depot to get all the paint off and get to a decent starting point. You can see the wet floor is the etching solution, the dry floor is after the big sander with the diamond wheel. I spent about 2 hours with the sander, which did a good job.

The grey paint is a basic garage floor paint. It says to wait 72 hours before putting anything heavy on it, but what could I do? I had to roll my stuff in after 4 hours. Even with that abuse, it is looking fine and has now fully hardened.

I will post more as I get my workbench and cabinets sorted. I rewired the whole space, with new 115v and 220v plugs where they are used most. I plan to run hard air lines to convenient spots as well. I also moved my 60 gallon air compressor to an enclosed space behind the garage. Still a lot to do, but it feels so much better having room to move around! The best part was hooking up the stereo and cranking it up after all the hard work.
 

Attachments

  • IMG_8048.jpg
    IMG_8048.jpg
    136.8 KB · Views: 119
  • IMG_8046.jpg
    IMG_8046.jpg
    135.1 KB · Views: 92
  • IMG_8045.jpg
    IMG_8045.jpg
    139.8 KB · Views: 110
  • IMG_8043.jpg
    IMG_8043.jpg
    142 KB · Views: 90
  • IMG_8038.jpg
    IMG_8038.jpg
    146.5 KB · Views: 86
  • IMG_8035.jpg
    IMG_8035.jpg
    144.4 KB · Views: 91
  • IMG_7989.jpg
    IMG_7989.jpg
    138.9 KB · Views: 87

HSpencer

ALLIANCE MEMBER
Joined
Nov 28, 2010
Messages
2,854
Location
South Central US
Looking great with the floor painted and the tools coming back in. I am wondering what was up with the raised portion of the floor, and it looks like you took that out? Was that a partition wall or actual raised flooring?
I like the style of the garage--reminds me of the 1940's or 50's.

Best Regards
Herb Spencer
 
To avoid these ads, REGISTER NOW!
OP
Z

zerk

Member
Joined
Sep 20, 2009
Messages
11
The grinder cost about $70 for 4 hours, which worked well for me.

There was not a raised part of the floor, just a middle wall that was only there to separate the sides. It was not even attached to the floor at all.

I plan on taking out the wood shelves I built over the welding table and putting in cabinets like the other workbench has. Then putting in a beam and some more overhead storage.

Alameda was a big military area 50 years ago, and there was some evidence that people slept in the garage presumably due to lack of housing in the area. Either that, or the husband got in trouble a lot.

Matt
 
OP
Z

zerk

Member
Joined
Sep 20, 2009
Messages
11
It is amazing what a lick of paint will do. Natural wood might look more old fashioned and classic, but white makes everything easier in my opinion. Easier to see, easier to find stuff.
 
OP
Z

zerk

Member
Joined
Sep 20, 2009
Messages
11
It is a commercial Graco airless paint sprayer, and it is a beast! It will blast on paint so fast it is scary, and a lot of fun.

The floor paint is Behr brand concrete and garage floor paint. I put down two coats, one gallon did the whole floor. It was dry enough to walk on, but I would not recommend rolling cabinets on like I did.
 
OP
Z

zerk

Member
Joined
Sep 20, 2009
Messages
11
I built this storage cabinet today. I have been thinking about how to store small parts for ages, and this is my solution. Casters on the bottom.
 

Attachments

  • IMG_8064.jpg
    IMG_8064.jpg
    129.8 KB · Views: 69
  • IMG_8065.jpg
    IMG_8065.jpg
    132.7 KB · Views: 48

HSpencer

ALLIANCE MEMBER
Joined
Nov 28, 2010
Messages
2,854
Location
South Central US
Very nice parts cabinet. I like the design and the casters, whereby you can move it if need be. Your shop is coming along very nicely.

Best Regards
Herb Spencer
 
To avoid these ads, REGISTER NOW!
Top Bottom