To avoid these ads, REGISTER NOW!

ZMotorsports Shop Projects 2.0

OP
Z

zmotorsports

ALLIANCE MEMBER
Joined
Oct 20, 2009
Messages
21,477
Location
Northern Utah
I didn't have much shop time this week but had a small machining job come in last week that I thought I had better make some progress on and get it off the white board.

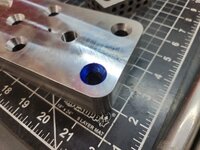
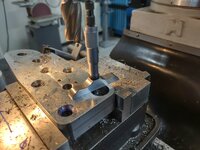
A repeat client brought me a steering bracket from a Kingpin Dana 60 that he is building. He needed the holes recessed and the taper cut back into those recessed holes.
steering1.jpg

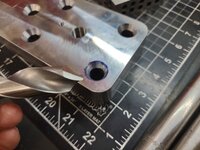
Unfortunately, I didn't have a 60-degree taper so I had to make one. As I got close I placed some bluing in the taper.
steering2.jpg

Then fine-tuned the bit until it made an even and full pattern.
steering3.jpg

Next I measured a couple of sockets to know how large to bore the holes for the 3/4" hex nuts.
steering4.jpg

After making all of my notes and measurements it was time to determine hole pattern. For that I grabbed my .500" pin gauge.
steering5.jpg

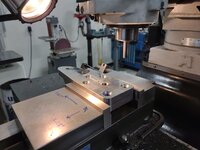
Chucked up the pin gauge in the mill spindle to determine my X and Y starting point as well as hole spacing. I have never measured one of these Dana 60 steering blocks before but I was surprised the spacing wasn't something more "standard".
steering6.jpg

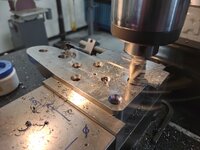
After determining a sequence I grabbed a 1" end mill for the initial bore and to bring it to depth within a few thousands. Hole #1.
steering7.jpg

Measuring the depth to make sure it's within a few thousands before locking the knee and moving to the other holes.
steering8.jpg

More to follow....
 
To avoid these ads, REGISTER NOW!
OP
Z

zmotorsports

ALLIANCE MEMBER
Joined
Oct 20, 2009
Messages
21,477
Location
Northern Utah
Continuing on.

Boring the last hole to 1" diameter with the end mill.
steering9.jpg

A 3/8" drive 3/4" socket fits perfectly in the bore.
steering10.jpg

However, I wanted to make sure even a 1/2" drive 3/4" socket would fit and that is too tight for my liking and I wanted to make sure the owner had options. I figured I would shoot for about .100" extra clearance.
steering11.jpg

So from there I grabbed my 2" Criterion boring head and inserted my Mesa boring attachment to take it out another .100" in two cuts, then the last few thousands of depth to clean up the bottom of the holes. I am quite impressed with my old Criterion boring heads for their accuracy. Landed right on 1.100".
steering12.jpg

The 1/2" drive socket now fits with clearance.
steering13.jpg

And the 3/8" drive socket has even a bit more clearance.
steering14.jpg

Touching up the bottom of a couple holes then I'm done with the boring bar.
steering15.jpg

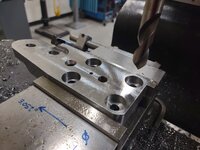
Next I inserted my large Jacobs 18N drill chuck and the 60-degree tapered bit.
steering16.jpg


That's as far as I made it last night as my son and DIL stopped by with my grandson so that took priority.
 
OP
Z

zmotorsports

ALLIANCE MEMBER
Joined
Oct 20, 2009
Messages
21,477
Location
Northern Utah
Finished up the Dana 60 last night and the owner came and picked it up.

Just finished drilling the 60-degree taper in the last hole to .200" depth. I got just a little bit of chatter in the bottom of the tapers but other than that I am quite pleased with how it turned out, as was the owner.
steering16.jpg

Removed from the mill vise, deburred and cleaned up before the owner arrived.
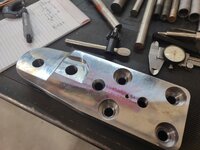
steering17.jpg

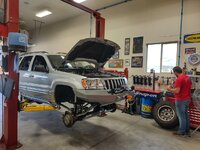
While I was awaiting the owner to pick up the steering link I thought I'd rack my Jeep and see if I could locate a slight rattle or vibration that we picked up last weekend on our Sunday drive.

I'm not sure if I mentioned this or not but after replacing the hydraulic motor mounts last week I thought it was smoother than before but also considered it just to be the placebo effect. During our drive last Saturday both on road and off, it was smooth as silk and just lumbered along like it usually does.

Our drive on Sunday went the same until we were coming back into Logan, UT and the skies opened up with a torrential downpour and even hail. As we drove out of the storm and into just a steady drizzle we decided to grab some dinner as it was getting to be early evening. Upon coming to a stoplight I could hear and almost feel a slight vibration. The wife couldn't hear it at first, I kicked it into Neutral and it went away then back into drive and it reappeared. My first thought was a heat shield on a catalytic converter because it had that same frequency sound but a different tone, if that makes any sense.

My next thought was that because I had to lift the engine I had both engine mounts removed and transmission mount loosened so maybe it didn't sit back down where it was originally and was contacting something. After a few more stops the wife could then hear it.

Upon arriving home I had the wife pull it into the shop while I popped the hood and poked around. I noticed that the new intake duct that I had installed a few weeks back had actually positioned the air filter quite close to the core support with the engine in drive and just torqued to the passenger side a bit. Upon kicking it back to Neutral the gap opened up to about an 1/8". So the next morning I went out to the shop and relocated my fog light relay so I could reposition the air filter giving me at least 3/8" on either side. We took the Jeep to breakfast and I didn't hear the noise any longer so I thought that must have been the issue.

I drove the Jeep to work Tuesday and didn't hear the noise so again, I thought the air filter was the issue. The wife and I ran to grab some dinner Tuesday night after a stressful day and sure enough as we were leaving the restaurant the noise returned. At this point I was baffled wondering what could be coming and going like that. :headscrat

Last night I racked the Jeep and dug deeper into the issue, pulling the engine cover and looking back down behind the engine paying particular attention to the head to firewall clearance, A/C compressor to steering gearbox, passenger exhaust manifold to upper control arm mount and any known areas that I knew about when I installed the LS into the Jeep. None appeared to be any different than I remembered and all had adequate clearance. Moving rearward I thought I'd double check the catalytic converters, again, and upon using a gloved hand and tapping on the driver's side, the heat shield sounded intact and not loose or rattling.

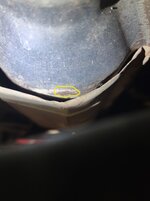
I then moved to the passenger's side cat and tapping on it resulted in a rattle. It was a bit different than the high pitched and "tinny" sound I normally find with loose heat shields but about that same frequency. I started looking at the spot welds holding the shield to the cat and all looked good. Nothing appeared to be loose but that noise was definitely coming from the catalytic converter or shield. I stuck my head up as far as I could around the skid plate and could see something bouncing around when I tapped on the heat shield. I grabbed a small prybar and bent the lip of the heat shield down slightly to reveal the issue.

Here you can see the small rub mark outlined in yellow on the underside of the catalytic converter.
Inkedcat1_LI.jpg

And here was the culprit. A freakin' rock had gotten between the heat shield and the body of the catalytic converter.:rolleyes:
cat2.jpg


Holy ****, a small pebble nearly drove me near the breaking point. :confused:

Afterwards I took the Jeep on a road test to confirm that was in fact the noise and sure enough, quiet and smooth as can be. :cool:

I pulled it back into the shop to give it a wipe down with Final Inspection before putting it back into the house garage and when I climbed out of the Jeep I caught a "wiff" of coolant. I popped the hood and noticed I had cooland splattered on the intake duct as well as my coolant surge tank. WTF is going on???

Poked around and quickly noticed I had a small pinhole leak in the upper radiator hose. 🤬

So I put the Jeep back on the lift, let it cool and that's the job for tomorrow morning. Oh well, at least it's an easy fix being right at the top and my local NAPA is being good enough to warranty the hose for me so a little time and a gallon or two of coolant is all.

At least it happened at home rather than being in the back country off-road last weekend or while we are up in the Madison Valley of Montana in a week. Either of those scenarios would have been much worse. This is nothing.
 
OP
Z

zmotorsports

ALLIANCE MEMBER
Joined
Oct 20, 2009
Messages
21,477
Location
Northern Utah
Mike, how did you make the taper on the drill bit?

JB

JB, I took an old 3/4" drill bit from my stash and ground the correct taper on it using my small protractor, then test fitting it into the blued taper to confirm. It took a little bit of time to get it accurate but ended up working out better than expected.
 

jbmatth

Well-known member
Joined
Jun 3, 2013
Messages
5,692
Location
Northern Ok.
JB, I took an old 3/4" drill bit from my stash and ground the correct taper on it using my small protractor, then test fitting it into the blued taper to confirm. It took a little bit of time to get it accurate but ended up working out better than expected.
Nice, simple enough, and glad to hear it worked out well for you. Yeah rocks getting into vehicle is very annoying, sadly living on a gravel road it happens ALL the time usually when I do a LOF I'll clean them out, otherwise I'd be doing it every day or two. Man I need to find a place on a paved road, or get in good with the county commissioner and get him to have it paved. haha

JB
 

OutlawDrifter

Well-known member
Joined
Jan 20, 2015
Messages
3,903
Location
KS
Mike, it's amazing the trouble a small rock can cause. I've chased a similar issue before.

Bummer on the radiator hose, but its not like you don't have a vehicle or two in standbye ;)
 
OP
Z

zmotorsports

ALLIANCE MEMBER
Joined
Oct 20, 2009
Messages
21,477
Location
Northern Utah
Nice, simple enough, and glad to hear it worked out well for you. Yeah rocks getting into vehicle is very annoying, sadly living on a gravel road it happens ALL the time usually when I do a LOF I'll clean them out, otherwise I'd be doing it every day or two. Man I need to find a place on a paved road, or get in good with the county commissioner and get him to have it paved. haha

JB

This one threw me a curve ball JB. I have never had a pebble caught in the heat shield before. I have gotten them in between a rotor and backing plate on a few occasions when off-roading but this was a first.


Mike, it's amazing the trouble a small rock can cause. I've chased a similar issue before.

Bummer on the radiator hose, but its not like you don't have a vehicle or two in standbye ;)

True Marc. Having another vehicle does allow some flexibility on repairs, although the costs associated with additional vehicles makes that a hard argument to justify to the wife. :confused:
 

OutlawDrifter

Well-known member
Joined
Jan 20, 2015
Messages
3,903
Location
KS
This one threw me a curve ball JB. I have never had a pebble caught in the heat shield before. I have gotten them in between a rotor and backing plate on a few occasions when off-roading but this was a first.


True Marc. Having another vehicle does allow some flexibility on repairs, although the costs associated with additional vehicles makes that a hard argument to justify to the wife. :confused:

I just renewed tags on 7 different vehicles...that doesn't include the car trailer :LOL: 🤷‍♂️
 

MadeByMiller

Well-known member
Joined
Dec 29, 2018
Messages
1,230
Location
Rapid City, SD
Nice work on the steering bracket modifications! I think the fact that you were able to feel and track down a small vibration caused by a pebble in that heat shield is testament not only to your experience in mechanics, but also to how dialed in your Jeep is!
 
OP
Z

zmotorsports

ALLIANCE MEMBER
Joined
Oct 20, 2009
Messages
21,477
Location
Northern Utah
Nice work on the steering bracket modifications! I think the fact that you were able to feel and track down a small vibration caused by a pebble in that heat shield is testament not only to your experience in mechanics, but also to how dialed in your Jeep is!

Thanks Austin. I joke with my wife that I don't bring a lot to the table, but the good Lord blessed me with a very sensitive ***. I can feel what's going on in the car. :ROFLMAO:
 
To avoid these ads, REGISTER NOW!
OP
Z

zmotorsports

ALLIANCE MEMBER
Joined
Oct 20, 2009
Messages
21,477
Location
Northern Utah
Hope everyone had a nice weekend.

The weather was absolutely beautiful here in Northern Utah other than a quick moving storm Friday night that was nothing more than wind blowing and a few lightning strikes.

Friday afternoon I arrived home and edged, trimmed and mowed the lawn then popped the lower radiator hose off the Jeep so the cooling system could drain.

After dinner the wife and I sat on the deck and watched the storm race across the sky.
Fridaynight.jpg

Saturday morning I grabbed my coffee and headed to the shop to replace the upper radiator hose on the Jeep that I had picked up on Friday.

Starting to remove the upper radiator hose.
hose1.jpg

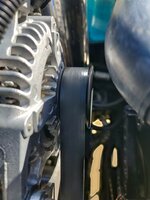
This part pains me to post.... I guess we all f**k up once in a while. The only thing I can think of is when I replaced the motor mounts the week before and had the engine raised, that when I was done and put everything back together that the engine must not have sat EXACTLY in the same orientation. I knew there were some close clearances when I installed the engine in the Jeep's engine bay but I should have confirmed them once the motor had been lifted and set back down. It appears as though the alternator pulley had rubbed on the underside of the upper radiator hose. What I initially thought was a failed hose or pinhole leak turned out to me my own doing. 🤬 I didn't realize this until I had removed the radiator hose from the Jeep. I guess I should be thankful that it happened at home and not out in the sticks the weekend before while the wife and I were off-road. This was an easy repair and could have been a show stopper had it happened last weekend away from home.
hose2.jpg

After replacing the hose I thought I'd add an adel clamp this time to assist in holding the hose in position. I don't think it would move once installed but this at least gives me some sense of security.
hose3.jpg

After installing the new hose I pulled a vacuum on the system to ensure there were no leaks. I generally will let the system sit in a vacuum for 15-20 minutes to confirm the system's integrity, but time got away from me as I was getting the pressure washer out of the storage bay the garden hose out of the house garage. The Jeep sat for well over a half hour while I was messing around outside.

System looks nice and tight.
hose5.jpg

After filling the cooling system I fired up the Jeep to back out and wash the coolant off the belt train. I noted that I have a bit more clearance between the alternator pulley and hose now. Close to 3/4" now.
hose6.jpg

Washed the coolant off the engine and belt train then blew everything off with compressed air and pulled the Jeep back into the shop to finish drying.
hose7.jpg

hose8.jpg

Completed.
hose9.jpg

Thanks for looking.
 
OP
Z

zmotorsports

ALLIANCE MEMBER
Joined
Oct 20, 2009
Messages
21,477
Location
Northern Utah
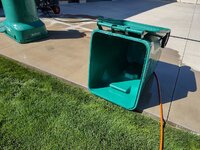
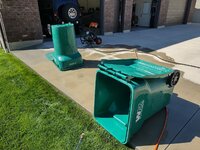
It's been a few months since I cleaned my garbage cans and with the holiday last Monday the garbage was picked up on Saturday morning rather than Friday. This gave me an opportunity to pressure wash my garbage cans and while the pressure washer was out I opted to wash the deck, house and shop so the property was clean.

The garbage cans were quite dirty but nothing a time and patience couldn't remedy.
wash1.jpg

wash2.jpg

Letting them dry in the sun while I moved on to the deck.
wash3.jpg

After the deck I washed the shop then moved around to the front of the house and did the front porch as well as the rest of the house. It wasn't as dirty as I thought it was but dirty enough that I could tell a difference when I was done.
wash4.jpg

Much better.
wash5.jpg

Yesterday morning the wife wanted to go for a drive so I pulled the cover off the Camaro, unplugged the battery tender, gave it a quick dusting and we grabbed some breakfast and took off on a few hour drive up north through some farm country and enjoyed the day. The car rolled over 65k miles yesterday and we've owned it for a year now and have only put 3500 miles on her. I guess we need to drive it more. :unsure:
drive.jpg


Thanks for looking.
 

4 FN 27

ALLIANCE MEMBER
Joined
Oct 19, 2015
Messages
4,635
Location
Minnesnowta

Mike the lawn looks nice. Real nice!

Here in MN we have gotten much rain at all this summer. The whole yard is burnt up and the weeds are taking over. 3-4 acres is too much to irrigate.

Even the trees are struggling. Lost 5 oaks on the north side of the house.

IMG_4990.JPG

This part pains me to post.... I guess we all f**k up once in a while. The only thing I can think of is when I replaced the motor mounts the week before and had the engine raised, that when I was done and put everything back together that the engine must not have sat EXACTLY in the same orientation. I knew there were some close clearances when I installed the engine in the Jeep's engine bay but I should have confirmed them once the motor had been lifted and set back down. It appears as though the alternator pulley had rubbed on the underside of the upper radiator hose. What I initially thought was a failed hose or pinhole leak turned out to me my own doing. 🤬 I didn't realize this until I had removed the radiator hose from the Jeep. I guess I should be thankful that it happened at home and not out in the sticks the weekend before while the wife and I were off-road. This was an easy repair and could have been a show stopper had it happened last weekend away from home.

The only guy that doesn't "f**k up once in a while" is the guy who doesn't do anything.
 
OP
Z

zmotorsports

ALLIANCE MEMBER
Joined
Oct 20, 2009
Messages
21,477
Location
Northern Utah
Mike the lawn looks nice. Real nice!

Here in MN we have gotten much rain at all this summer. The whole yard is burnt up and the weeds are taking over. 3-4 acres is too much to irrigate.

Even the trees are struggling. Lost 5 oaks on the north side of the house.

IMG_4990.JPG


The only guy that doesn't "f**k up once in a while" is the guy who doesn't do anything.

Thanks Pat. We have had a few nice rainstorms this year but still quite dry for the vast majority of the season. I checked my water consumption yesterday out of curiosity and I was sitting at only 56.8% of my allocated water and we only have 5 weeks remaining in this watering season, so I think I've done a decent job of balancing the water usage vs. keeping a green lawn this year.
 
OP
Z

zmotorsports

ALLIANCE MEMBER
Joined
Oct 20, 2009
Messages
21,477
Location
Northern Utah
Man time flies! You've already had the Camaro a year?!

Yeah, I was thinking the same thing yesterday. I asked the wife if she regretted selling the bike and getting the Camaro. She informed me that she's still very much enjoying the car. I actually don't think we put 3500 miles on the bike if I were to add the mileage up over the past several years we owned it. So far the newness hasn't worn off the car and we're still having fun with it.
 

GRN96WS6

Well-known member
Joined
Dec 23, 2012
Messages
2,268
Location
SOMD
I can't believe people actually pay for a service to come clean their garbage cans, saw that on YouTube or someplace and was laughing as if I recall they charged like $30 per can or something crazy to me.
 

Swanny1953

ALLIANCE MEMBER
Joined
Jul 28, 2010
Messages
1,082
Location
Lucas, TX
Mike, call me lazy, but we have a garbage can cleaning service that comes once a month on the day after trash pickup. They get the cans nice and clean and leave them with a nice clean scent as well. For around $20/mo, it's worth it to me!
Seems like yesterday you were gushing over the Camaro purchase - glad to see you enjoying it!
 

Kiwi Canuck

Well-known member
Joined
Dec 13, 2014
Messages
156
Location
Langley BC
Hi Mike, I remember you either bought or built a water softener kit that you use when you wash your vehicles, we have pretty hard well water here and when I wash my cars or my boat it leaves water spots, so looking to find something that will help if I don't get a chance to wipe it completely dry, I'm not left with water spots.

Did you review what system you have?

Thanks.
 
OP
Z

zmotorsports

ALLIANCE MEMBER
Joined
Oct 20, 2009
Messages
21,477
Location
Northern Utah
I can't believe people actually pay for a service to come clean their garbage cans, saw that on YouTube or someplace and was laughing as if I recall they charged like $30 per can or something crazy to me.

Mike, call me lazy, but we have a garbage can cleaning service that comes once a month on the day after trash pickup. They get the cans nice and clean and leave them with a nice clean scent as well. For around $20/mo, it's worth it to me!
Seems like yesterday you were gushing over the Camaro purchase - glad to see you enjoying it!

Yeah, someone posted on our city's Facebook page over the weekend that they were looking for a service to clean the garbage cans. I didn't know such service existed but then again, I don't have a problem cleaning my own as it's cheap and easy and I can get them to my satisfaction.

Gary, yes, I had some buyer's remorse about the Camaro last year, but then again I think I get that way over most of my purchases. :unsure: The wife and I are actually still very much enjoying it. I keep thinking about building another street rod or muscle car one day but just can't bring myself to spend the money at this point in time. I feel my skillset has improved so much over the past couple of decades since I built the last street rod that I would like to see what I could turn out but just can't bring myself to open that damn wallet or bank account. :rolleyes: Hell, I'm having heartburn over spending a couple thousand and building a trailer. :cool:
 
OP
Z

zmotorsports

ALLIANCE MEMBER
Joined
Oct 20, 2009
Messages
21,477
Location
Northern Utah
Hi Mike, I remember you either bought or built a water softener kit that you use when you wash your vehicles, we have pretty hard well water here and when I wash my cars or my boat it leaves water spots, so looking to find something that will help if I don't get a chance to wipe it completely dry, I'm not left with water spots.

Did you review what system you have?

Thanks.

Good memory.

Yes, I have a DI Rinse deionized filtration system that I purchased for washing the coach mainly, but I also use it for the Camaro and on some occasions the Jeep and truck.

I didn't design or build the system per se, I just built the roll around cart that I strapped the tank to. I have a couple of videos on the cart built on my YouTube channel.
 
OP
Z

zmotorsports

ALLIANCE MEMBER
Joined
Oct 20, 2009
Messages
21,477
Location
Northern Utah
My son came over last night to perform a LOF service on his Jeep WJ.

I also finally stopped by the local Michael's Craft Store the other day and bought a few poster style frames for some posters I have coming.

I removed my old Starrett wall chart above my lathe and put it into a plexiglass frame then rehung it and moved my Harley Davidson clock to the adjacent wall.
poster1.jpg

Next I put a poster that I bought a while back into another poster frame and hung it above my main workbench and cabinets. I have been searching for the Snap-on promotional posters for about 6 or 7 months now ever since mentioning them in my post many months ago. I found this go-cart one a while back that was new still in the wrapper but only last week found two more slightly used ones that should be here today. They are the Gear Head and Hot Rodder posters like the ones I gave my son and he has hanging in his home garage. I found the larger version of them last week. My son also has the one with the dog and little boy in the wagon that states "when did you learn the value of a good mechanic" but I want him to keep that one.
poster2.jpg

Shop was full last night. Son was servicing his WJ and I was checking things over on our Jeep.
shop1.jpg

shop2.jpg

shop3.jpg

I then shifted gears and got back after my grandson's wagon project. I was able to get the front axle placed and welded to the chassis then started designing the template for the steering mount.
rf217.jpg

Lastly, my daughter in law stopped by with our grandson and he had to give the wagon a test fit. Made my whole day right there.
grandsonwagon.jpg

I think he likes his first ride. Glad I went with vinyl for the interior as he's a bit of a drool monster. :D

Grandkids really are a blessing. And I felt so blessed to have our kids and grandson hang out in the shop with me last night.
 
OP
Z

zmotorsports

ALLIANCE MEMBER
Joined
Oct 20, 2009
Messages
21,477
Location
Northern Utah
Last night while mowing the lawns the last two Snap-on posters that I found online arrived, so I took a few minutes to put them in the poster frames and hung them up above my workbench and cabinets.

signs1.jpg

signs2.jpg

The seller had actually included another Snap-on poster that I hadn't planned on. I liked it so much I hung it above my welding area below my Miller metal sign.
signs3.jpg

After mowing the lawn I broke down the small chassis jig and moved it off the motorcycle lift and put it back into the storage bay and then put the mower on the lift table so I can replace the front wheels. The new ones have been sitting on my workbench for a couple of weeks now and need to be off the bench and on the mower.
mower1.jpg


Thanks for looking.
 

Kiwi Canuck

Well-known member
Joined
Dec 13, 2014
Messages
156
Location
Langley BC
Good memory.

Yes, I have a DI Rinse deionized filtration system that I purchased for washing the coach mainly, but I also use it for the Camaro and on some occasions the Jeep and truck.

I didn't design or build the system per se, I just built the roll around cart that I strapped the tank to. I have a couple of videos on the cart built on my YouTube channel.
Thanks for the info Mike, I'll need to do some research to see which model I should buy, how long did the original package of resin last for you, I believe they come with the resin already installed and you can buy extra bags of the product as needed.

Looks like about $1,000 CAD to buy the one you got, with our exchange rate and taxes, but maybe the next size down might work just need to confirm if they cost about the same to run, or maybe the larger one allows more GPH.

Did you consider plumbing it in to a dedicated tap so you didn't need to make it mobile that's what I'm thinking for mine when I get one.

David.
 
OP
Z

zmotorsports

ALLIANCE MEMBER
Joined
Oct 20, 2009
Messages
21,477
Location
Northern Utah
Thanks for the info Mike, I'll need to do some research to see which model I should buy, how long did the original package of resin last for you, I believe they come with the resin already installed and you can buy extra bags of the product as needed.

Looks like about $1,000 CAD to buy the one you got, with our exchange rate and taxes, but maybe the next size down might work just need to confirm if they cost about the same to run, or maybe the larger one allows more GPH.

Did you consider plumbing it in to a dedicated tap so you didn't need to make it mobile that's what I'm thinking for mine when I get one.

David.

David, I believe the one I have is the Pro 100 model, it's the larger one. I think they make a smaller one as well. I am still on the original charge of resin, but I will be replacing it this winter as I am starting to show a few water spots.
 
OP
Z

zmotorsports

ALLIANCE MEMBER
Joined
Oct 20, 2009
Messages
21,477
Location
Northern Utah
Finally got around last night to machining a couple of spacers for the front wheels on our Snapper 21" walk-behind mower. The new wheels have been sitting on the workbench for a few weeks now and I decided to take a few minutes to remedy that.

In the 32+ years we've owned this mower this is now the third set of front wheels I have had to install. Snapper used a 7/16" axle shaft and therefore the wheels are almost double what a 1/2" bore wheel runs and I can pick them up locally at Tractor Supply so I thought I'd go that route this time as I don't feel I got any more life out of the Snapper branded ones last time so we'll give the ones from Tractor Supply a shot.
mower1.jpg

After measuring the wheel bearings and shaft I come up with a rough measurement. I grabbed some 1/2" aluminum round stock from the drawer which fit nicely into the wheel bearings then chucked it up in the lathe drill and then ream out to .4375". After reaming I would part it off just about .020" long so I could chamfer and debur the parted end right to size. Landed right @ 1.240" in length. One down and one to go.
mower2.jpg

Second one knocked out and ready to install the wheels on the mower.
mower3.jpg

Wheels replaced but while I had it tipped back I thought I'd give the underside of the deck a quick cleaning and check the blade for sharpness and balance.
mower4.jpg

After scraping the majority of the grass buildup off I discovered it was still perfectly balanced.
mower5.jpg

And the cutting edges were still in excellent condition. No big knicks or gouges in the cutting edges.
mower6.jpg

mower7.jpg

Mess cleaned up and the mower can go back into the house garage for tomorrow's mowing.
mower8.jpg
 
To avoid these ads, REGISTER NOW!
Top Bottom