To avoid these ads, REGISTER NOW!

ZMotorsports Shop Projects 2.0

OP
Z

zmotorsports

ALLIANCE MEMBER
Joined
Oct 20, 2009
Messages
21,450
Location
Northern Utah
What a weekend.......

Friday afternoon the PCV valve that I had ordered the week before for the wife's Acura TL 3.5 liter J series engine finally arrived. I had the wife pull her car into the shop when she arrived home from work so I could give the interior a vacuum job and quickly throw the new PCV valve in the engine.

I also wanted to pull the MAF sensor and spray some cleaner on it as I forgot to do that when I had the intake duct out of the car a couple of weeks ago adjusting the valves. I remembered that Marc, @OutlawDrifter , sent me a text about a new pair of electrical pliers a couple months ago from Lisle products, part # 37960. I had ordered a pair of them shortly and have been using them since.

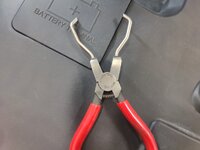
I previously had this pair of import pliers from Kyoto tools that I used as my "go-to" for electrical connectors. They work well to compress the locking tabs and pull the connector but they do seem to slip quite a bit and I am always nervous about pulling a wire or breaking a tab.
elect1.jpg

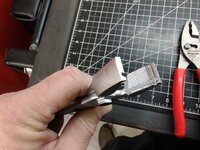
Here are the new Lisle 37960 electrical connector pliers. These have a much wider and flat lower jaw that does an excellent job of gripping the underside of the connector while the hooked upper jaw compresses the locking tabs. They create a much firmer feeling grip on the connector and I have found that I can removed electrical connectors from multiple angles with these pliers vs. the Kyoto ones.

I will admit, while they work fantastic, they don't have the high-quality feel to them that many of my other pliers have. Don't get me wrong, I don't think they're junk by any means, they just don't have the quality feel and the pivot point has a small amount of play or slop in it.
elect2.jpg

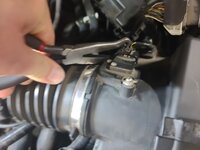
Here I am demonstrating the odd angle in which I am able to get onto the connector with these pliers to grasp the underside and pinch the locking tab.
elect3.jpg

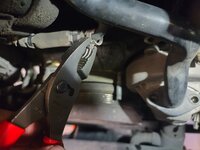
And I am easily able to push the connector off the component without slipping or fear of slipping and damaging any wires. These work fantastic.
elect4.jpg

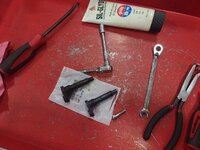
Now moving on to the reason why I pulled the car in the shop. The old PCV valve out of the front bank rocker cover along with the new valve ready to be installed. The O-rings have a light coating of Sil-Glyde applied and ready for installation.
pcv1.jpg

The location of the PCV valve is directly under the wiring harness. Just push the locking tabs and lift the wiring harness slightly to gain access, easy peasy.
pcv2.jpg


Thanks for looking.
 
To avoid these ads, REGISTER NOW!

thr3squared

Well-known member
Joined
Oct 4, 2018
Messages
391
Location
CA
So I did a stupid thing today, or impulsive rather.

I really don't need any more tools and the wife and I have been trying to keep our expenses down this year to accommodate for the wonderful economy.

I went out onto the Snap-on truck today to get a calendar for myself and my son when I spotted a new tool. 🤬

I walked off the truck with not only a couple of calendars, but also a new pair of pliers for constant tension clamps.
snapon1.jpg

I have an import pair that I've been using but they have a fixed pivot and flat blades with a groove parallel to the pliers on one side of the jaws and a groove perpendicular at the end of the jaws for grabbing the constant tension clamps from either straight on or from the side. While they work great and have been my "go-to" pliers that I reach for when removing small to mid-size constant tension clamps, I feel that these will be an improvement due to the radius on the jaws as well as adjustable pivot thus allowing to accept larger clamps sizes. Time will tell once I use them a few times but think I'll like these slightly better than my import set.
snapon2.jpg


I also thought I'd show this small screwdriver that I had made several years ago. My son was eyeballing it last week as well as a co-worker had asked about it so I brought it into work to show my co-worker and he took it out to the Snap-on truck and asked the rep to order the parts to create it.

The handle is just the same stubby handle that comes in the 8-piece screwdriver set but the blade is a short version of a 1/4" blade that has the wrench bolster on it. I had ordered the handle and short blade several years ago from my Snap-on rep and he recognized it as soon as my co-worker showed him and asked about it.

My son's comment was "that is the size of stubby the sets SHOULD come with". I agree as I reach for this screwdriver much more frequently than the original stubby from my set. I was using mine adjust valves the other day when my son grabbed it and couldn't set it down.
snapon3.jpg


Not sure if others may find that handy but I sure like the length better than the stubby stubby one. :ROFLMAO:

Hey Mike, just curious what's the length difference between that driver and the original stubby one? Do you happen to know the part number of the longer one?

And now I need to get those Lisle pliers!
 
OP
Z

zmotorsports

ALLIANCE MEMBER
Joined
Oct 20, 2009
Messages
21,450
Location
Northern Utah
Moving onto Saturday, I got to spend the day in the shop hanging out with my son talking and wrenching. Pretty good way to spend a Saturday. My wife continued to carry on the tradition of Christmas Tea with her sisters and SIL's in remembrance of her mother. My MIL's birthday is on Dec. 17th and for many years before her death my wife and her sisters would take their mother down to SLC for high tea at a local restaurant. My MIL looked forward to it each year so it became a tradition. The Christmas just before she passed and wasn't feeling very good my wife decided to have Christmas Tea at our home and invite all of the sisters and SIL's as well as her mother. We didn't realize it would be her last but this has been something that my wife has enjoyed doing every year since her passing and I think her siblings have enjoyed it. With my wife and DIL ******* with that all day on Saturday it allowed my son and I to hang out in the shop, which I was not opposed to and actually was looking forward to.

Last week my son came by and showed me a picture of the dipstick from his 2002 Silverado 2500HD Duramax and it had appeared to be milky. He was sickened by what the possibilities could be so we talked through it rather than jump to conclusions and go with what all the keyboard experts say it is means on any one of the light duty diesel forums (head gaskets), we opted to have him drive it over Friday night to the shop so we could begin a proper diagnosis of the issue. I am so thankful that he keeps a close eye on his vehicles and picks up on these issues before they become detrimental to his assets. He really does a fine job of checking things on his vehicles and it pays off.

I had him drive it over and get it fully up to operating temperature on the drive over and even push it a little to make sure that IF it was a head gasket issue that we properly pressurized the cooling system. Upon his arrival to the shop, we pulled it in and noticed the upper radiator hose was not out of the norm, just seemed like normal cooling system pressure which was a good first indicator against a head gasket issue. Now that isn't necessarily a definitive test but from my experience it is a very common occurrence with a blown head gasket to have the cooling system pressurized, more so than just putting coolant into the oil.

We tabled the diagnosis until Saturday morning so we could see if the cooling system pulled coolant back into the radiator from the surge tank overnight and could then plan further testing. Saturday morning we confirmed that the cooling system was performing as designed and we extracted some coolant from the surge tank to also confirm we had no traces of oil in coolant. Now, head gaskets can fail at any time but from my experience I have had excellent results and experiences with MLS head gaskets as they hold well and as long as the engine isn't over-heated or excessive power being pushed through these engines, they seem to hold up well and last a long time. My son has not over-heated his truck and he is only running a very mild tune so neither of those two scenarios should push a head gasket to failure under normal conditions. Now could it be a head gasket issue? Yes, but unlikely based on what we found so far.

This was a good opportunity to go through our 4 C's of a repair that we like to do in our shop and maybe a refresher course for my son as this would be a good issue that could have one of several outcomes.

Let me explain the 4 C's that I have used for many, many years in my line of work. Condition, Cause, Correction and Confirm. Some may have their own set of steps that they follow but end in trust the repair, then verify.

1. What is the condition? Don't get it confused with complaint, complaints are not always specific and seldom based on facts. People complain about a lot of things but as mechanics it is our responsibility to determine what the condition is that exists. In this case, the condition was we had coolant mix with the oil and we also went one step further to confirm that oil was not getting into the coolant, or cross-contamination.

2. What is the cause or what are the possible causes? For this issue on the LB7 Duramax, there are really one of about 4 scenarios where coolant can be getting into the oil and not having anything wrong with the coolant. Head gaskets, which seems to be the first and only response from the vast majority of the keyboard professor on the diesel forums. This is more people being parrots and repeating what they've heard and less about testing, diagnosing and using any form of troubleshooting. Next there's the possibility of the O-rings failing on the injector cups and allowing coolant up into the rocker valley and then into the crankcase where it can mix with the oil. The oil cooler is another possibility, however, in my experience with the oil coolers on these engines, they are more prone to have oil get into the cooling system as the oil pressure is around 30-60 PSI and the cooling system is at most around 15 PSI. I have also seen the coolers leak externally, like my son's did about a year ago. Lastly, and this one seems to get no love but in my opinion is one that is often over-looked, is the water pump. The water pumps on the Duramax engine is not belt driven but rather driven off the cam gear inside the timing cover. There is no oil pressure on the backside of the water pump and therefore a straight shot into the crankcase.

As we went through our troubleshooting routine we determined that the cooling system was not holding pressure. We removed the pressure cap from the surge tank and installed my Snap-on pressure tester to the cooling system and pumping it up to 15 PSI. It held that pressure just dropping ever so slightly over a period of 30-minutes or so. I would think if it were failed O-rings or a cooling passage in a head gasket it would leak more pronounced.

To rule out oil cooler we removed the oil filter and left the pressure on the cooling system for about an hour to see if any coolant worked it's way out. Again, this was not a suspected point of failure based on being recently replaced but in order to be thorough as well as demonstrate to my son the proper routing for troubleshooting we wanted to verify no coolant was escaping past the oil cooler.


While we had the truck in the air, we drained the oil as it will need a fresh charge of oil after the repair anyways. As suspected, the first to come out was straight coolant after sitting all night long. This was almost straight Dex-Cool for the first ~4-5 oz. or so.
gm1.jpg

gm2.jpg

We then removed the oil filter and allowed the milkshake mixture to escape, but no additional coolant came out after sitting for approx. an hours' time.
gm3.jpg

We pretty much ruled out the most invasive repairs based on nothing pointing to the head gaskets or injector cups other than coolant in the oil. We drained the coolant which looked like freshly added coolant.
gm4.jpg

I thought I'd take a moment to show the two different constant tension pliers that I now use. The ones on the left are imports, AST branded.
gm5.jpg

I like the AST pliers and they work well but only have two grooves for capturing the tangs on the clamps. One parallel and one perpendicular to the handles. I also like how wide the jaws are so you can be slightly off when aligning the pliers to the clamp.
gm6.jpg

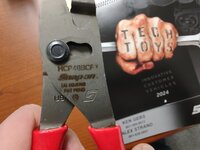
Here are the new Snap-on HCP48BCF hose clamp pliers that I purchased Friday. I like the serrated jaws and the options available for gripping the constant tension clamps.
gm7.jpg

They worked perfectly and as advertised. So far I am pleased with my purchase.
gm8.jpg

And this is what we found when we removed the water pump. I think we found the source of our coolant mixing with the oil.
gm9.jpg

Inside the timing cover there was a lack of oil residue surrounding the perimeter of the casting. Looks like it was pressure washed from the inside.
gm10.jpg


So moving on with our 4 C's, we are to the Correction process.

3. Correction being the new water pump and related O-rings and gasket are ordered and awaiting delivery. Once the parts arrive we will install the new water pump, pull a vacuum on the cooling system and fill with fresh coolant as well as install fresh oil and new oil filter.

Then we can move on to the last step.

4. Confirm. We will confirm the repair by driving it afterwards with fresh oil and coolant and verify that the oil is no longer being contaminated by coolant. If all looks good after some miles we can confirm that the repair was successful and continue on. IF for some reason we find coolant back in the oil, then we go back to step one, Condition, and go through the process all over again until we resolve the issue.

Thank you for looking and I hope this process is found to be useful to others who find themselves working through various issues, mechanical or otherwise. I have found this to be helpful in my life no matter the issue at hand.
 
OP
Z

zmotorsports

ALLIANCE MEMBER
Joined
Oct 20, 2009
Messages
21,450
Location
Northern Utah
Hey Mike, just curious what's the length difference between that driver and the original stubby one? Do you happen to know the part number of the longer one?

And now I need to get those Lisle pliers!


The length difference is 1.5" for the standard stubby vs. 3" shank for the modified stubby, or longer stubby, not sure what to call it. :unsure:
driver1.jpg

This is not something that has a Snap-on part number to be ordered complete. The handle is part number SHDP22IR.
driver2.jpg


I don't know the number of the shank but I have my Snap-on rep. order the shank with the wrench bolster rather than a standard short blade, then I just pressed the shank into the new handle.
 

thr3squared

Well-known member
Joined
Oct 4, 2018
Messages
391
Location
CA
The length difference is 1.5" for the standard stubby vs. 3" shank for the modified stubby, or longer stubby, not sure what to call it. :unsure:
driver1.jpg

This is not something that has a Snap-on part number to be ordered complete. The handle is part number SHDP22IR.
driver2.jpg


I don't know the number of the shank but I have my Snap-on rep. order the shank with the wrench bolster rather than a standard short blade, then I just pressed the shank into the new handle.

Thanks!
 

XJSuperman

Well-known member
Joined
Jan 26, 2018
Messages
3,088
Location
Central Iowa
One of the pairs I picked up recently for the Mini thermostat replacement is actually really handy for a crappy no name tool. It has a single groove in a tooth on one side and it spins, and the other has a cup. This allows for me to grab the clamp at any angle, and its super nice. I don't have to be at 0 or 90deg. I think it was on the shelf at Autozone.
20231111_174221.jpg
 
OP
Z

zmotorsports

ALLIANCE MEMBER
Joined
Oct 20, 2009
Messages
21,450
Location
Northern Utah
I bought those same Snap-on clamp pliers a couple weeks ago and got to use them yesterday. Also pleased with them.

two more types of plier tools I didn't know I needed.


Yeah, ain't this forum great for helping us lighten our wallets and fill our toolboxes???? :bounce:


One of the pairs I picked up recently for the Mini thermostat replacement is actually really handy for a crappy no name tool. It has a single groove in a tooth on one side and it spins, and the other has a cup. This allows for me to grab the clamp at any angle, and its super nice. I don't have to be at 0 or 90deg. I think it was on the shelf at Autozone.
20231111_174221.jpg

I have a pair very similar to those and they have their use but since I started using the AST's, and now the Snap-on's, I've found my "go-to's". I also have one made by the same company (KD or Lisle, can't remember) that has the long cable with the pliers. I have found it works better for those lower radiator hoses or some of those that are in more difficult to reach areas.
 
OP
Z

zmotorsports

ALLIANCE MEMBER
Joined
Oct 20, 2009
Messages
21,450
Location
Northern Utah
Really enjoyed your writeup on the Duramax diagnosis and the 4 C's. Great news that it was the water pump, which sounds like was one of the easier repairs of this fault. I always love hearing about the interactions you have with your son, very wholesome.

Thanks Austin. I sure enjoy hanging out with him and miss him most days but I know he has his own life to live and don't want to be a nuisance or bother to him. On the flip side, I'm not getting any younger and I know I won't be around forever so I want to be able to teach him as much as I can so as he goes through life he can do his best to be self-reliant and not have to be dependent on others.

I also think that we learn things when WE are ready, not always when someone wants us to learn or is trying to teach us something. My point being is that I know I have gone through many of my processes with him and showed him how to do a lot of things in the shop when he was younger. However, I don't think he was necessarily in the right mindset to receive those teachings or that information at those specific times. I find him asking questions about things that I know I've covered at some point, however, I LOVE him asking questions for two reasons. First and foremost, because he is asking the questions which means he wants to talk to me. I will take any opportunity to talk with my son I can get. Secondly, because if he is asking it must mean he is needing that particular information at that particular time and he may be more prone to retain it long term.

I wish I had my own father still around to talk to and ask questions most days as I may have taken him for granted when I was younger. I find myself missing him more and more as I get older and don't want my son to have some of the same regrets that I have.
 
OP
Z

zmotorsports

ALLIANCE MEMBER
Joined
Oct 20, 2009
Messages
21,450
Location
Northern Utah
I had some free time last night seeing as how the parts for my son's LB7 are on order.

I was able to knock two items off of my "want to do" list for the shop.

The first one was a shelf to hold my Mapp gas tanks. One with the torch on it and the other, a spare bottle. I have had this on the shelf over the east workbench along with all my other chemicals, but it seems when I reach for it the vast majority of the time I end up knocking other things over as my arms aren't long enough to raise it high enough. I thought I'd build a little shelf and place it at the end of the south workbench as it seems I am usually at the vise or on the long south workbench when I need it, so it will be within easy reach.

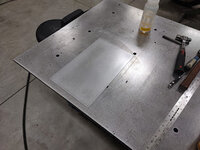
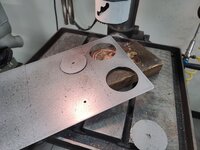
I started by cutting a 9" X 14" piece of 16-gauge P&O from a half sheet of stock. I then ran a DA over it slightly after giving it a wipe with acetone.
mapp1.jpg

I then began the layout. Marking mounting screw holes, bend lines and centering the tanks for the upper holes.
mapp2.jpg

Using a 3" hole saw I cut out the two openings.
mapp3.jpg

After a thorough deburring, I test fit the bottles.
mapp4.jpg

I really have enjoyed having the DiAcro pan brake in the shop the last few years. It's not something that gets used everyday, but when it is needed I sure am glad to have it. Makes nice bends and consistently.
mapp5.jpg

mapp6.jpg

mapp7.jpg

Test fit of the bottles on the fab table before hanging.
mapp8.jpg

Mounted to the wall just behind the workbench within easy reach.
mapp9.jpg


That project has been on my list for a couple of years and is now marked off as completed.

Thanks for looking.
 
OP
Z

zmotorsports

ALLIANCE MEMBER
Joined
Oct 20, 2009
Messages
21,450
Location
Northern Utah
Moving onto the next "want to do" project, although this one has been on my list since I was in the old shop, so over 8 years now I've wanted to build this but just haven't made the time. I just keep adding other things to the list and this one keeps getting bumped down in priority. Well, as I was looking at my list last night I chose two tasks that I figured I could knock out in one evening.

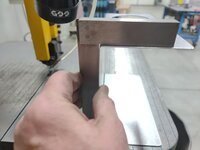
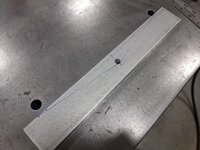
I have wanted to build a push block for my vertical bandsaw but I remember seeing something like this many years ago and cannot remember for the life of me who manufactured it. Don't quote me but I think it was a DoAll accessory for their vertical bandsaw and had to go off memory as I couldn't even find a picture online. I do remember it having two handles and the center was angled outward slightly, with notches in which the material could nest into while pushing around the saw's table.

I began with a length of aluminum I grabbed from my stock drawer, gave it a wipe with acetone and ran a DA over it.
guide1.jpg

Began the layout and drilled a 3/8" hole just offset enough in the middle to create a radius at the bottom of the V.
guide2.jpg

I dug through my bolt assortment and found a couple of 3/8"-16 flathead countersunk fasteners that screamed for this project. I drilled and countersunk the holes so they would be well below the parent material.
guide3.jpg

Next I cut the V out of the material and knocked the burrs off the edges.
guide3a.jpg

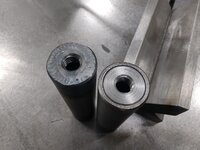
I walked to my round stock drawer and grabbed a few different sizes of round stock to see what felt good in my hands. I settled on 1" diameter but in trying to keep the tool somewhat light, I figured rather than start with solid bar stock that I would use some 1" X .083" tubing and machine a threaded boss for one end and a cap for the other. One threaded boss welded in and the other pressed in awaiting the welding process.
guide4.jpg

With the welding completed, it was back to the lathe to square off the threaded end and put a nice radius on the other. One down and one to go.
guide5.jpg

guide6.jpg

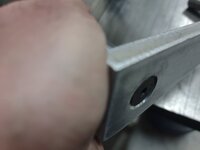
When both handles were complete I applied some Loctite 242 to the threads and installed the handles. Here you can see that the fasteners sit recessed from the parent material which will spend its life sliding against the bandsaw's table.
guide7.jpg

Handles installed. I think I am going to cut some serrations in the "V" side to capture the material being cut but not sure that it is necessary as I'm sure there will be knicks and cuts put in the tool from normal use.
guide8.jpg

Thanks for looking.
 
OP
Z

zmotorsports

ALLIANCE MEMBER
Joined
Oct 20, 2009
Messages
21,450
Location
Northern Utah
Nice torch holder!

Thank you.

Great little shelf/holder

There are several folks out there now, but there is a guy called ZTFab that makes some really nice tool/supply holders


Thanks. Yeah, Paul makes some nice stuff and his welding is over the top all the way. I talked to him a few years ago over on racedezert.com when I was looking for a weld position and he actually helped me find the older, used MK Products Model 3 weld positioner that I now have.
 

fouckhest

Well-known member
Joined
Jul 24, 2013
Messages
1,866
Location
Greer, SC
Thank you.


Thanks. Yeah, Paul makes some nice stuff and his welding is over the top all the way. I talked to him a few years ago over on racedezert.com when I was looking for a weld position and he actually helped me find the older, used MK Products Model 3 weld positioner that I now have.
Nice, should have known you'd know him!

I am a big fan of anything that makes garage organization practical and efficient
 
OP
Z

zmotorsports

ALLIANCE MEMBER
Joined
Oct 20, 2009
Messages
21,450
Location
Northern Utah
Nice, should have known you'd know him!

I am a big fan of anything that makes garage organization practical and efficient

Don't know him, know him. But exchanged some private messages back and forth with him years ago. The little interaction I've had with him he seems like a decent guy and yes, his products are nice and help to promote organization and efficient work flow from what I've seen.
 
To avoid these ads, REGISTER NOW!

Jgaz

Well-known member
Joined
Dec 16, 2016
Messages
1,705
Location
AZ
Moving onto the next "want to do" project, although this one has been on my list since I was in the old shop, so over 8 years now I've wanted to build this but just haven't made the time. I just keep adding other things to the list and this one keeps getting bumped down in priority. Well, as I was looking at my list last night I chose two tasks that I figured I could knock out in one evening.

I have wanted to build a push block for my vertical bandsaw but I remember seeing something like this many years ago and cannot remember for the life of me who manufactured it. Don't quote me but I think it was a DoAll accessory for their vertical bandsaw and had to go off memory as I couldn't even find a picture online. I do remember it having two handles and the center was angled outward slightly, with notches in which the material could nest into while pushing around the saw's table.

I began with a length of aluminum I grabbed from my stock drawer, gave it a wipe with acetone and ran a DA over it.
guide1.jpg

Began the layout and drilled a 3/8" hole just offset enough in the middle to create a radius at the bottom of the V.
guide2.jpg

I dug through my bolt assortment and found a couple of 3/8"-16 flathead countersunk fasteners that screamed for this project. I drilled and countersunk the holes so they would be well below the parent material.
guide3.jpg

Next I cut the V out of the material and knocked the burrs off the edges.
guide3a.jpg

I walked to my round stock drawer and grabbed a few different sizes of round stock to see what felt good in my hands. I settled on 1" diameter but in trying to keep the tool somewhat light, I figured rather than start with solid bar stock that I would use some 1" X .083" tubing and machine a threaded boss for one end and a cap for the other. One threaded boss welded in and the other pressed in awaiting the welding process.
guide4.jpg

With the welding completed, it was back to the lathe to square off the threaded end and put a nice radius on the other. One down and one to go.
guide5.jpg

guide6.jpg

When both handles were complete I applied some Loctite 242 to the threads and installed the handles. Here you can see that the fasteners sit recessed from the parent material which will spend its life sliding against the bandsaw's table.
guide7.jpg

Handles installed. I think I am going to cut some serrations in the "V" side to capture the material being cut but not sure that it is necessary as I'm sure there will be knicks and cuts put in the tool from normal use.
guide8.jpg

Thanks for looking.
Nice work! I’m sure it will be helpful on the bigger pieces and longer cuts.

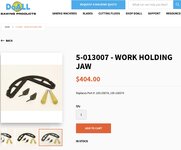
If I’m not mistaken, this might be the piece you were remembering.
IMG_0577.jpeg
I spent a lot of hours using one of these on a DoAll machine we had in our shop at work. Very handy.

I’ll be curious if you decide to add the sawtooth notches after you get some saw time with your tool.
As I remember, the notches made using the DoAll tool quite easy although I admit I’ve never used this kind of tool without notches.

Definitely not throwing rocks at your version.
Thank you for all the detail you put in your posts.
 
OP
Z

zmotorsports

ALLIANCE MEMBER
Joined
Oct 20, 2009
Messages
21,450
Location
Northern Utah
Nice work! I’m sure it will be helpful on the bigger pieces and longer cuts.

If I’m not mistaken, this might be the piece you were remembering.
IMG_0577.jpeg
I spent a lot of hours using one of these on a DoAll machine we had in our shop at work. Very handy.

I’ll be curious if you decide to add the sawtooth notches after you get some saw time with your tool.
As I remember, the notches made using the DoAll tool quite easy although I admit I’ve never used this kind of tool without notches.

Definitely not throwing rocks at your version.
Thank you for all the detail you put in your posts.

YES! THAT is exactly what I remember but it's been so freakin' long ago I wasn't sure if my memory was accurate when I thought it was a DoAll accessory. As much as it pains me to say this the last time I used one, or even saw one for that matter, was in the mid-80's in High School in our welding shop so I'm going back damn near 40 years sorting through **** in my head and who knows how accurate that is. :ROFLMAO:

As for the notches, at near the end of my post I mentioned I was going to cut some serrations into the "V" side of the tool, I just ran out of time the other night and wanted to get the handles finished and installed.

Not sure my "version" is better or not, I do remember the production model being a bit on the "bulky" side so while trying to remember as I was sorting through material in the shop I thought I'd just make something a bit lighter and more "streamline". I wasn't really going for better necessarily, it was a matter of material, lightweight and what I thought would be functional more than anything.

Thanks for posting that, it certainly brings back some memories, as well as let me know how far off I was in my head. :bounce:


^^^^^^^^^^^^
That was what I was going to post pictures of, my mentor had one with his Do-All bandsaw that he just sold a couple months ago. Really worked great for feeding material into the saw. Mike please let us know how your version works, I’m sure it works tons better than my stick!

Thanks Sterling. I'm sure it will get a good workout over the years. I just wish I would have made it about 8-10 years ago when I purchased my new Birmingham vertical bandsaw as that is when I first starting thinking about making one going off memory from High School. Just think of all the material it would have been used to cut by now. :unsure:
 

Monza Harry

Well-known member
Joined
Dec 29, 2018
Messages
1,433
Location
Windsor ON
Mike I remember that as a "Do-All" piece as well, I've seen one(?) that had attachment points for chains [#35 roller type IIRC] for the feed mechanism which was a guided weight hanging off the back. I'm sure that would have been nice however as many features in the "shop environment " goes it was missing pieces and non functional 😒! The Do-All part was a round shape front and back, but your flat back looks to be handy for larger/longer straight shapes. If you add a lip you could use vise stops to it for added stability. Oh your remarkable about the shop added "notches" is spot on the few I've seen were brutally "notched". Thanx for Sharing! Harry
https://www.amazon.com/dp/B00UVEJBPK?tag=atomicindus08-20
1702481362229.png1702481362229.png
 
OP
Z

zmotorsports

ALLIANCE MEMBER
Joined
Oct 20, 2009
Messages
21,450
Location
Northern Utah
but your flat back looks to be handy for larger/longer straight shapes. If you add a lip you could use vise stops to it for added stability. Oh your remarkable about the shop added "notches" is spot on the few I've seen were brutally "notched". Thanx for Sharing! Harry

Thanks Harry. The flat back being used for longer straight pieces was EXACTLY my thought as well. I hope it works out to be that way.

I will more than likely add some small cuts or serrations in the V side to aid in holding parts but I also realize the reality of more than likely not stopping exactly where the piece being cut ends and the tool begins. I see my tool being nicked and cut over the years from use so not sure if the serrations will aid or not. Still contemplating. :headscrat
 

Firstram

Well-known member
Joined
May 16, 2017
Messages
1,392
Agreed. However, have you priced out "smoke" lately? I have and it is quite expensive, so I am trying my darndest to keep the smoke INSIDE my machines. ;)
I'm very familiar, it makes me cringe when people stuff things. I supply the shop tools (rental package) to the crew at work. I make sure they know I'm an ******* about it and they don't even ask about certain things. They are allowed to use the Rong-Fu but not the Bridgeport, the Yost but not my Reed etc...

Per my rental agreement, expendables are covered but, broken equipment is not. It's difficult to get people to even mention a broken Annular cutter while there's time to replace it!
 

Jgaz

Well-known member
Joined
Dec 16, 2016
Messages
1,705
Location
AZ
Mike I remember that as a "Do-All" piece as well, I've seen one(?) that had attachment points for chains [#35 roller type IIRC] for the feed mechanism which was a guided weight hanging off the back. I'm sure that would have been nice however as many features in the "shop environment " goes it was missing pieces and non functional 😒! The Do-All part was a round shape front and back, but your flat back looks to be handy for larger/longer straight shapes. If you add a lip you could use vise stops to it for added stability. Oh your remarkable about the shop added "notches" is spot on the few I've seen were brutally "notched". Thanx for Sharing! Harry
https://www.amazon.com/dp/B00UVEJBPK?tag=atomicindus08-20
1702481362229.png1702481362229.png
Yes. The DoAll in our shop had the “feed assist” at one time. Waaay before my time though so I know nothing about it.

The DoAll did have the best blade welder I ever used.
In my (limited) experience a blade welder can be finicky as heck. Maybe I just was more familiar with this particular welder but I seldom had a problem with a blade I welded on it.

I used to enjoy drilling a thru hole in an inside shape or ID, passing a length of blade thru the hole and welding it back together. The inside opening waste was then cut out and the blade was cut to remove it.
Was always fun watching a new engineer try to figure out how this was done with out a Bridgeport.
 
OP
Z

zmotorsports

ALLIANCE MEMBER
Joined
Oct 20, 2009
Messages
21,450
Location
Northern Utah
The parts for my son's LB7 showed up yesterday so he came by last night and we put some of his truck back together.

New OEM water pump and gaskets.
dmax1.jpg

dmax2.jpg

Also purchased a new crankshaft bolt as it is a torque to yield fastener.
dmax3.jpg

Water pump installed and everything torqued to spec. The tube between the underside of the T-stat housing and the water pump didn't want to cooperate during assembly. Even with the O-ring lubed with Sil-Glyde it didn't go in very easily. When we pulled a vacuum on the system before fully assembling the front of the engine, sure enough, the O-ring leaked under the T-stat housing. We removed it and found the O-ring cut. Grabbed another O-ring, lubed it up double and triple checked the bore for any burrs or reasons why it didn't want to go into position and upon the next try it fell right into position.
dmax4.jpg

This time we pulled a vacuum and everything was nice and tight. Held approx. 25 inches of vacuum for about a half an hour.
dmax5.jpg

All that is left is add coolant and finish assembling the front of the engine and accessory drive system.

Thanks for looking.
 
Last edited:

SilverJimmy

Well-known member
Joined
Apr 14, 2012
Messages
1,670
Location
Prescott/Flagstaff, AZ
1702579558818.jpegFound this yesterday morning, and I thought, I need to call Mike and schedule that annual service I’ve been putting off, get my GMC some Z-Love! Then I came back to reality, I’ve got no Z-Love, crawled underneath my truck and found it was only a loose hose clamp. Still need to get new hoses and belts and do a full service….1702579558818.jpeg
 
OP
Z

zmotorsports

ALLIANCE MEMBER
Joined
Oct 20, 2009
Messages
21,450
Location
Northern Utah
Finished up my son's LB7 last night.

I started cleaning and putting tools away while my son reinstalled the driver's inner fender and put tires/wheels on.
dmax6.jpg

He pulled his Jeep into the shop to leave it for the night and decided to drive the truck home and give her a test run.
dmax7.jpg


Thanks for looking.
 
OP
Z

zmotorsports

ALLIANCE MEMBER
Joined
Oct 20, 2009
Messages
21,450
Location
Northern Utah
It’s always a pleasure to pass by the red Duramax on the off mornings. Sounds so nice !

Thanks Dave. I forgot you live near my son and probably pass him a few times.

Yes, his truck does sound pretty good. I was thinking the same thing last night as he left the shop and I was bringing the garbage out to the street.
 
To avoid these ads, REGISTER NOW!
Top Bottom