To avoid these ads, REGISTER NOW!

ZMotorsports Shop Projects 2.0

madison069

Well-known member
Joined
Nov 5, 2010
Messages
4,240
Location
Monroeville, PA
Now,now....you guys get to rake your gravel/rocks every now and again!
Growing up, I lived in a dessert town. When it came to cutting the yard, it was more about cutting what weed and tumbleweed that actually grew in the yard and then rake the yard to get the lines in the sand. So, I particularly don't like raking, but yet it doesn't feel finished till I do some raking. It's a crappy feeling.
 
To avoid these ads, REGISTER NOW!
OP
Z

zmotorsports

ALLIANCE MEMBER
Joined
Oct 20, 2009
Messages
21,477
Location
Northern Utah
Growing up, I lived in a dessert town. When it came to cutting the yard, it was more about cutting what weed and tumbleweed that actually grew in the yard and then rake the yard to get the lines in the sand. So, I particularly don't like raking, but yet it doesn't feel finished till I do some raking. It's a crappy feeling.

Somewhat similar only I grew up on a dairy farm and there was no concrete nor asphalt, and a never ending supply of weeds that needed pulling or killing at any time of the day. 🤬 My parent's had a little concrete in front of their house as the residence driveway to the carport, but EVERYTHING else was gravel, road base, dirt, mud (when it rained) and basically anything my dad could get his hands on cheap. We were not necessarily allowed to park in the house driveway, although I did at times after washing my truck and before heading out for my evening activities. I think my dad was a little more lenient about that by the time I came along but I hated paring behind the house in the "yard". I despised gravel and dirt from the street back to the barns and shop because it was next to impossible to keep my vehicle clean. I swore when I had a place of my own, I would have lush green lawn, concrete and curb & gutter.
 
OP
Z

zmotorsports

ALLIANCE MEMBER
Joined
Oct 20, 2009
Messages
21,477
Location
Northern Utah
I completely understand. Current place has a long gravel driveway and a big gravel parking area. I hate it with a passion. Next place will be all concreted.

I got criticized quite a bit by coworkers back in 2016 when the wife and I were looking at houses because I was looking at subdivisions and not a 10-acre place out in the middle of nowhere. They laughed when I told them I like curb & gutter and thought I was kidding.

I went to dinner with my siblings last weekend as my sister was in town from WY and we were joking about how we all have homes that don't resemble our family farm in the slightest. I defended my parents in the manner in which they raised us and how it was a different time back then but it also had a bigger impact on all of us than we thought when we bought homes of our own.

My oldest brother lived right down the street from my parent's farm up until 2016 and had an awesome place. Ditch out front, gravel drive with just a concrete apron to his attached garage and same with the detached garage, gravel back to about 20' of concrete for the shop apron.

Now that he has moved about 7 miles north of my wife and I, he has curb & gutter and all concrete, house garage AND shop fully from the street. He was saying the other night how much he and his wife love their new to them home and I jokingly mentioned "it's because of the concrete and curb & gutter isn't it?" :ROFLMAO: That's how we all got on the topic. I was just making a joke, but there must be more truth there than any of us originally thought. :headscrat
 
OP
Z

zmotorsports

ALLIANCE MEMBER
Joined
Oct 20, 2009
Messages
21,477
Location
Northern Utah
I lived on acreage on an unmaintained gravel county road for 20 years in Eastern Washington with a private well and septic.
Life is a lot more civilized in a gated community with paved roads, city water and sewer.
As always, YMMV.

I like civilized Scott, plus there's something about those nice square and trimmed lawn edges around concrete that just make me smile. ;)
 

madison069

Well-known member
Joined
Nov 5, 2010
Messages
4,240
Location
Monroeville, PA
Life experiences dictate how we want to live. For me I hated the sandstorms and flatness of the desert. Sweeping sand off the porch and working where everything is 200*F to the touch was miserable. I'm not big in the city lifestyle, but I see the pros enough to just go along with the wife's choice of living in a suburb area. Big hospitals within 10 miles radius and all of the shopping experience we would need. But big enough yards that we aren't building houses next to each other. If I had my choice I would live in the woods with big garages and concrete driveway and wooded property all around it.

But my experience living in a small town with the closet big city being 42 miles away made me appreciate how easy it is getting stuff for projects and doing our shopping throughout the week instead of our normal weekly trip to the city to stock up on anything we think we might need for the week. If we forgot something during a project we just had to either pay the higher price for whatever it was we needed from the local hardware store, **** it up and drove the 2 hrs round trip, or waited till the normal weekly trip to the big city.

Originally, I wanted to just move east to the wooded area of Texas but moving up to PA for my job at the time has put me in life situations where I made the choices to just stay in PA. Not a bad state overall, but I do miss the Texas culture and cuisine. Luckily, I live close to national parks, rivers, and lakes so it makes up for some of the stuff I miss.
 
OP
Z

zmotorsports

ALLIANCE MEMBER
Joined
Oct 20, 2009
Messages
21,477
Location
Northern Utah
Life experiences dictate how we want to live. For me I hated the sandstorms and flatness of the desert. Sweeping sand off the porch and working where everything is 200*F to the touch was miserable. I'm not big in the city lifestyle, but I see the pros enough to just go along with the wife's choice of living in a suburb area. Big hospitals within 10 miles radius and all of the shopping experience we would need. But big enough yards that we aren't building houses next to each other. If I had my choice I would live in the woods with big garages and concrete driveway and wooded property all around it.

But my experience living in a small town with the closet big city being 42 miles away made me appreciate how easy it is getting stuff for projects and doing our shopping throughout the week instead of our normal weekly trip to the city to stock up on anything we think we might need for the week. If we forgot something during a project we just had to either pay the higher price for whatever it was we needed from the local hardware store, **** it up and drove the 2 hrs round trip, or waited till the normal weekly trip to the big city.

Originally, I wanted to just move east to the wooded area of Texas but moving up to PA for my job at the time has put me in life situations where I made the choices to just stay in PA. Not a bad state overall, but I do miss the Texas culture and cuisine. Luckily, I live close to national parks, rivers, and lakes so it makes up for some of the stuff I miss.

You touched on several key points Cody.

First, I don't like living in a big city either, I prefer the suburb, but of a smaller sized city so things I need and use are readily available. The city that we are a suburb of only has a population of about 85k people (Ogden), but for example Salt Lake City, UT is well over 200k and pushing quarter of a million, which is about 40 miles to our south. I rarely go to SLC and usually try to avoid it at all costs. Unfortunately, the wife works in SLC and has to drive that daily, but if plans work out only for a few more years.

As for the city, I like the fact that we are out in the rural area and I tell people we are far enough away from the high density of the city, yet close enough to have everything I need readily available. Downtown Ogden is only about 10 minutes away so for places we like to eat that is convenient. My NAPA Auto Parts is probably the furthest supplier away at roughly a 10-minute drive due east of our home. Places like Grainger, Norco Welding Supply, Bolt & Nut Supply, Eric's House of Hose, Maddox Air Compressor Supply, Motion Industries, auto paint supply house and several others are all within two blocks of one another and less than 5-minutes southeast of our home. I love how far away we are yet how close we are to things.
 

Wiz02

Well-known member
Joined
Jul 13, 2007
Messages
2,399
Location
Southeastern PA
Mike, I had a conversation about this very topic with a co worker. My dad told me never buy a house that doesn't have city water and sewer and I never did. My co worker's dad said never buy a house with city water and sewer and she never did.

I too live in a suburb that has all the shopping, health care, restaurants etc. And while Philadelphia isn't that far away we seldom go.

However, the entire population of SLC is 1/4 of the size of the suburban county that I live in, so we are definitely using different yardsticks.
 

NUTTSGT

Super Moderator
Staff member
Joined
Sep 14, 2009
Messages
51,166
Location
Northern Central Ohio
Somewhat similar only I grew up on a dairy farm and there was no concrete nor asphalt, and a never ending supply of weeds that needed pulling or killing at any time of the day. 🤬 My parent's had a little concrete in front of their house as the residence driveway to the carport, but EVERYTHING else was gravel, road base, dirt, mud (when it rained) and basically anything my dad could get his hands on cheap. We were not necessarily allowed to park in the house driveway, although I did at times after washing my truck and before heading out for my evening activities. I think my dad was a little more lenient about that by the time I came along but I hated paring behind the house in the "yard". I despised gravel and dirt from the street back to the barns and shop because it was next to impossible to keep my vehicle clean. I swore when I had a place of my own, I would have lush green lawn, concrete and curb & gutter.
I think most of us, atleast those of us with goals, realized something when we were younger. . .. with ambition, you could reach those goals. Stuff you wanted but didn't get as a kid, if you worked hard enough, you could attain what you yearned for.

I wanted a decent garage and the first 9 years out of the Marines, I had no garage. Now, I have a pretty decent garage. Not as nice as some of the guys here but it's mine. I remember as a kid, looking at the Sears Wishbook, after checking out the toys, I ventured into the Craftsman section, dreaming about owning a big tool box full of tools. I'm pretty good there now.

Funny thing, I think back when I was a young lad watching "Emergency" on TV and now wonder is that where I got the inkling to do what I do now ?

We all have to start somewhere and somewhere starts with a dream.
 
OP
Z

zmotorsports

ALLIANCE MEMBER
Joined
Oct 20, 2009
Messages
21,477
Location
Northern Utah
I think most of us, atleast those of us with goals, realized something when we were younger. . .. with ambition, you could reach those goals. Stuff you wanted but didn't get as a kid, if you worked hard enough, you could attain what you yearned for.

I wanted a decent garage and the first 9 years out of the Marines, I had no garage. Now, I have a pretty decent garage. Not as nice as some of the guys here but it's mine. I remember as a kid, looking at the Sears Wishbook, after checking out the toys, I ventured into the Craftsman section, dreaming about owning a big tool box full of tools. I'm pretty good there now.

Funny thing, I think back when I was a young lad watching "Emergency" on TV and now wonder is that where I got the inkling to do what I do now ?

We all have to start somewhere and somewhere starts with a dream.

I COMPLETELY agree Eric and thank you for sharing that. I think that is a common theme among many members of this forum, we have created something that maybe we didn't have as a young person and attained what we were yearning for. And you're right, it all starts with a dream.

Thinking back to some conversations we had a few months ago and there comes a time when many of us figure out we've been living our dream for years without realizing it, in my case I think the wife and I even surpassed our original dream(s). I think it's good to reflect back on occasion and think about where we came from and where we are and take stock of our efforts, otherwise it can be easy to become frustrated by just going from day to day.
 
OP
Z

zmotorsports

ALLIANCE MEMBER
Joined
Oct 20, 2009
Messages
21,477
Location
Northern Utah
I grew up with both. I appreciate the city water and the curbs etc., but I'd rather live a little further from my neighbors.

Further from neighbors is rather subjective. I sat on the deck Saturday morning enjoying my coffee and enjoyed the tranquility of the morning coming to life; birds chirping and the quietness of everything. Even though our neighbors have chickens that can be quite noisy at times, they are a couple hundred feet away and much better than listening to a damn dog(s) barking constantly like in our last neighborhood. As I sat there enjoying my coffee I thought how nice it was to have neighbors far enough away that we don't feel like we're on top of one another. Granted my lot is only 3/4 of an acre as is the one behind me and to the side he has a 1/2 acre lot so we are still relatively close, but so, so much further apart than we were in our last neighborhood. At our last place we had no neighbors behind us due to it being a farmer's field, which is now another subdivision, but we had 14' on either side of our house's structure before the property line. At our current home, we have 100' from the back of our house to the back property line, 30' on one side before the sidewalk and 55' on the other side before the property line, so we have much more space than before and even though we lived there for 26 years and never really felt like we were on top of our neighbors with a .29 acre lot, I don't think I could go back there.


Mike, I like the pictures of your lawn greening up, it shows the micro climates that exist around your buildings. It is always interesting watching how nature uses the environment around it to bring life to our world. Welcome to Spring and rebirth!

Agreed Sterling, it's interesting to watch the areas around the house and shop green earlier in the year. I'm assuming it is due to the heat reflection off both the house and the shop's walls, and then the center come to life with the rain and as the ambient temps slightly increase. I love this time of year but if I'm being honest, our last home had a spring yard and greened up fully much earlier than here. It was the first in the neighborhood to green up and usually stayed green well into September and sometimes even early October before starting to go dormant. Here our lawn seems to be a bit slower on the uptick in the spring but then sustains well into late fall, November timeframe. Not sure if that is due to the soil composition or what, but it's just a little slower to come to life in the spring.
 
OP
Z

zmotorsports

ALLIANCE MEMBER
Joined
Oct 20, 2009
Messages
21,477
Location
Northern Utah
I didn't get nearly as much done on the cooling system last night as I had planned. My stainless steel tubing was supposed to be delivered via UPS by 4pm. I figured I'd arrive home from work and get right to cutting and tacking tubing together. It wasn't on my doorstep when I arrived home and still showed out for delivery, well after 4pm.

I figured rather than stand around and be pissed off, I'd try to be productive so I threw a can of paint in the shaker.
pump1.jpg

And began prepping the new water pump for some color to match the Cummins engine. When I replaced the water pump last time, it was an emergency repair and we were out of town when I replaced it so I didn't get the opportunity to paint it and it has bugged me since. I sanded the pulley down and gave everything a good wipe down with brake cleaner followed by Wax & Grease Remover.
pump2.jpg

Then took it outside to apply some semi-gloss black paint to it.
pump3.jpg

I no sooner finished spraying the paint and it started to rain so the timing couldn't have been better. With the water pump back inside the shop to dry, I figured I'd turn a couple of beads on the ends of the straight tubing that arrived on Saturday in preparation for the rest of the tubing to show up.
cool10.jpg

That will work perfectly.
cool11.jpg

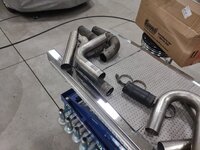
Another one completed as I'm certain I will need a short section between the last 45-degree bend and the engine for the lower tube.
cool12.jpg

I looked again at the tracking and it now stated the time was moved to 7pm for ETA. Well ****! The wife arrived home around 6:30 so I locked up the shop and called it a day. The delivery from Summit Racing didn't arrive until well after 8pm. I ran out to the shop to make sure I had everything I needed.

I ordered a 90-degree with the longest legs I could find but it is about 2" shorter than the original, so I may have to add a small amount to one leg, or I could just go from a 6" long straight section to an 8" long hose for this upper connection to the thermostat housing. :unsure:
cool13.jpg

The two 45-degrees will work perfectly, then add the long section. The small section will be added along with a 1" NPT bung that will need to be welded on for the makeup hose connection. I ordered a 1" NPT from my local Grainger that should be here today.
cool14.jpg


I think I have everything I need now to complete the radiator tubes.
 
To avoid these ads, REGISTER NOW!

SilverJimmy

Well-known member
Joined
Apr 14, 2012
Messages
1,692
Location
Prescott/Flagstaff, AZ
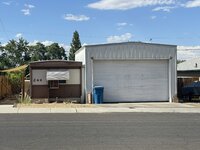
Where do shop dreams come from? Here’s where mine started…
B63A458E-9C00-4F7A-9A4A-DE9CB38D52F4.jpeg
This trailer is down the street from the trailer where I grew up in Page, Az. My best friend and I would ride our BMX bikes by it and dream about all the cool stuff we could do in that “HUGE” shop! It looks exactly the same after almost 50 years! Never seen any activity or person there, we think some out of towner keeps their Lake Powell boat and tow vehicle inside the shop. It is just one street over from the airport so maybe they fly in and fly out? I wish I could meet them someday and thank them for giving me my focus and goal so many years ago!
 

casmurbax

Well-known member
Joined
Sep 25, 2012
Messages
2,761
Location
Wilton, NY
Where do shop dreams come from? Here’s where mine started…

This trailer is down the street from the trailer where I grew up in Page, Az. My best friend and I would ride our BMX bikes by it and dream about all the cool stuff we could do in that “HUGE” shop! It looks exactly the same after almost 50 years! Never seen any activity or person there, we think some out of towner keeps their Lake Powell boat and tow vehicle inside the shop. It is just one street over from the airport so maybe they fly in and fly out? I wish I could meet them someday and thank them for giving me my focus and goal so many years ago!
I've passed through that neighborhood before... There's an abundance of dreams laid bare for all to see..
 
OP
Z

zmotorsports

ALLIANCE MEMBER
Joined
Oct 20, 2009
Messages
21,477
Location
Northern Utah
Arrived home last night to the last of my parts awaiting.

My hoses from Flex Technologies arrived. I wanted black silicone hoses but they only had one 90-degree and the straight section in black in stock. The other 90-degree and the 45-degree were at least a week out and they couldn't guarantee me delivery by the time I needed it. I wanted a bit more subdued and OE look, but these will have to do. I know Prevost when they were using the Detroit engines were using these blue hoses as was Newell and they looked ok, but I really wanted black. I should have started this project when I originally intended which was a few weeks ago but the Shelby GT500 came knocking at my door and I could use the money so I took it in. Now that I'm pressed for time beggers can't be choosers. Oh well, they will perform and do the same job, just not have the appearance I was after.
cool15.jpg

The constant tension clamps on the hoses were in fair condition, but being 23 years old with 150k miles, I figured I would replace them as well. I stopped by my local Fleetpride supply last week and they wanted $12.09/each for these things. We've used Breeze brand at work for years with excellent results but I was able to find a box of 10 for $77 so I ordered them and they arrived yesterday as well.
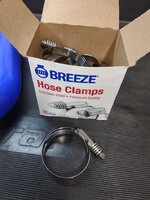
cool16.jpg

Lastly, my local Grainger called just as I was leaving work and said the 1" NPT stainless coupler that I ordered the day before was in so I swung by there on the way home and grabbed it. I ended up going with the schedule 160 as the schedule 40 coupler they had in stock seemed a bit thin and with the weight of the 90-degree and the barb along with the makeup hose hanging on it, I didn't want to risk a fatigue crack or failure down the road. They were pretty proud of these based on the price though. 😳
cool17.jpg


I didn't realize until I arrived home with it that it was the exact same one as Monaco/Roadmaster used only in carbon steel.
cool18.jpg

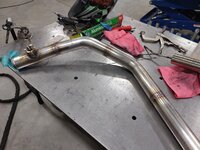
Next I laid out the original tube to mark where I wanted to place the weld joints.
cool19.jpg

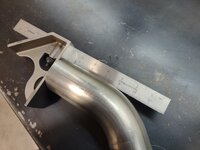
Then began cutting the tube sections based on the weld joint marks.
cool20.jpg

Making sure they are perfectly square to allow a tight fitment.
cool21.jpg

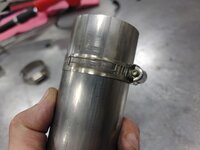
I grabbed my trusty old hose clamps from my fabrication drawer to aid in assembly.
cool22.jpg

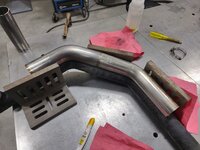
The two 45-degree tubes are in slightly different planes so once they were aligned, witness marks were place on the tubes, the hose clamp was installed and tacked.
cool23.jpg

I try to make short, quick autogenous welds (without filler) to keep the final welds consistent. I don't get full penetration with the tacks, just enough to fuse the tube sections together as I don't want them to sugar inside. I will use an argon purge during final welding but I generally don't during mockup.
cool24.jpg

The nice thing is I have a pattern to follow so it went relatively fast. This takes much more time when building a tube structure from nothing and have to build to follow routes and avoid interferences.


Stay tuned for more pictures.
 
OP
Z

zmotorsports

ALLIANCE MEMBER
Joined
Oct 20, 2009
Messages
21,477
Location
Northern Utah
Continuing on.

The section that connects to the lower engine block had to be "tweaked" a bit during mockup. The 45-degree furthest was dead nuts at 45-degrees, however, the one just down from the engine block was slightly more than a 45-degree bend originally so I had to compensate. It wasn't much, measured at about 6 degrees but to keep the circumferences of the two tubes a perfect match, rather than take all 6-degrees off of one tube end, I split it between the two to keep a perfect fit up yet still have the end align. I also shortened the end by about 3/4" as it was awfully close to the engine and made if difficult to get the 45-degree hose in place. This will give me just a little space to maneuver the hose into position.
cool25.jpg

I'm pleased with how it's turning out so far.
cool26.jpg

I changed places to stack them for a visual alignment verification because the makeup hose bung was interfering with alignment.
cool27.jpg

Pretty much spot on.
cool28.jpg


cool29.jpg

cool30.jpg

I then tacked the small section at the engine.
cool31.jpg

Once I got a couple tacks in place, I removed the hose clamps and added a few more tacks then cut and added the long piece heading to the radiator.
cool32.jpg

Again, keeping the tacks small and autogenous. I do keep .045 308L rod in hand and at the ready just in case the gap wants to open up, but if the fit up is tight this usually isn't a problem and will tack just fine without filler. It's when you get those less than perfect joints that you end up needing a dab of filler.
cool33.jpg

cool34.jpg


Stay tuned for more pictures of last night's work.
 
OP
Z

zmotorsports

ALLIANCE MEMBER
Joined
Oct 20, 2009
Messages
21,477
Location
Northern Utah
Last batch of pictures from last night's work.

With the long leg tacked in place I wanted to confirm the match was perfect. I'm pleased with this.
cool35.jpg

And even more so with this end.
cool36.jpg

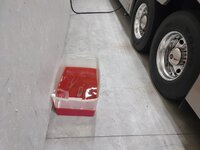
At that point I could have gone ahead with final welding, but just to be sure I wanted to do a test fit. It looked like a perfect match to the original, but this thing is a PITA to get in and out and I wanted to make 100% sure it was going to be a perfect fit in the coach so I figured I'd take the time to install it. First I drug one of the tubs of old coolant out from under the coach to allow me enough room. It was pretty much done dripping so a couple of absorbent pads were adequate to keep the floor clean.
cool37.jpg

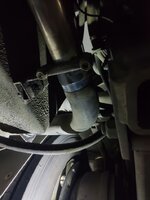
With the pipe in place, I installed the original 45-degree hose for a test alignment and was pleased with the fitment. I marked where the bung needs to be seeing as how I shorted the tube by a small amount, I wanted to ensure the hose has at least 2.5"-3" engagement on the tube before hitting the bung. This view is looking from the back of the coach's engine bay down into the void between the frame rail and the engine block. The 5/8" heater hoses that I ran back in 2016 are tucked back out of the way as they connect right near where this 45-degree hose attaches. The makeup hose will attach coming in perpendicular to the tube at the marked location.
cool38.jpg

I even went as far as to install the clamps to ensure a perfect fitment where the original tube was removed. Then figured I was right there, I may as well install the hose from the tube to the radiator to ensure it's length will be correct so I can copy it when I cut the new silicone hose to length.
cool39.jpg

New stainless tube running back parallel and under the radiator, then turning upward to go over the framerail.
cool40.jpg

And into the 45-degree hose at the block.
cool41.jpg

Just to make sure I threw the small radiator brace in as well to make sure there were no interference issues. Tube clears by about an inch, perfect.
cool42.jpg

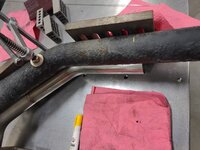
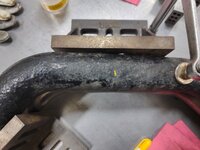
After removing the tube and hoses from the test fit, I checked out what the inside of the radiator looked like and was pleased. Preventive maintenance of coolant pays off. This will be the third time I've changed the coolant in the 18 years and 90k plus miles we've owned the coach now and I hope this may be the last time I have to pull these tubes and hoses at least. Maybe next time will just be a fluid drain and fill.
cool43.jpg

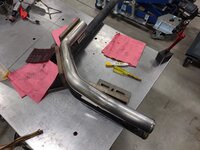
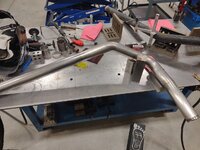
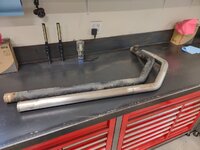
Tube out, wiped down and on the bench next to the original.
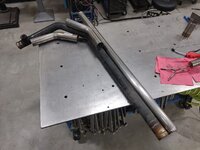
cool44.jpg


Thanks for looking.
 
OP
Z

zmotorsports

ALLIANCE MEMBER
Joined
Oct 20, 2009
Messages
21,477
Location
Northern Utah
Using the pre-made bends was cheating Mike. Since you used to build sand rails, I assumed you had a bender and would have made it all in one piece. ;) Looks awesome as usual though.

Thanks Vincent, sorry to disappoint you. My largest die for my bender is 2" and it doesn't produce a mandrel bend so this was the best option. Plus I figure I can fumble my way through the welding part.
 

signcrafter

Well-known member
Joined
May 9, 2012
Messages
12,532
Hello Mike how have you been? Catching up on your thread after a busy couple months. I've never seen a paint shaker like you posted. Do you have a brand or link for something like that? I looked into a paint shaker a long time ago and didn't see anything like yours, mostly people taping can to a sawzall blade back then.
 
OP
Z

zmotorsports

ALLIANCE MEMBER
Joined
Oct 20, 2009
Messages
21,477
Location
Northern Utah
Hello Mike how have you been? Catching up on your thread after a busy couple months. I've never seen a paint shaker like you posted. Do you have a brand or link for something like that? I looked into a paint shaker a long time ago and didn't see anything like yours, mostly people taping can to a sawzall blade back then.

Hey Scott. Hope you've been well, I haven't seen you posting much as of late.

This is the main component of the shaker that I started with and then built everything else around it.
 

stockerwithalocker

Well-known member
Joined
Dec 26, 2015
Messages
78
Location
So Cal
Mike, what did you use to roll the bead on the tubes?

On the discussion of humble beginnings, i smile every time i put air in my vehicles tires with my 70s Hill Bros compressor i got from a member on GJ. Growing up my folks didn’t have much money so my Dad would have my brother and i take turns using his garage sale metal bicycle pump to add air our vehicles tires.
 

signcrafter

Well-known member
Joined
May 9, 2012
Messages
12,532
Hey Scott. Hope you've been well, I haven't seen you posting much as of late.

This is the main component of the shaker that I started with and then built everything else around it.
I've been good Mike, just crazy busy with life right now so don't have much free time to poke around on here but trying to fit in some GJ time to wind down here and there.

That thing is way too cool to just leave it at that. It's not a need for me because I don't use spray cans all the time but now I want one. Any chance of a write up on the build of it? What are you using for a motor, I'm guessing you don't have a drill mounted in there do you? You do some sort of PLC for a timer on it? Or knowing Mike you have some sort of momentum or balance sensor in there that senses when the ball is moving at a certain speed to know when it's fully shaken? Would love to know more about this invention of yours Mike. It looks so clean I thought for sure it was made and sold by a manufacturer but I should have known better, especially when I zoomed in to look for manufacturer or model number and didn't see any. 😂
 
OP
Z

zmotorsports

ALLIANCE MEMBER
Joined
Oct 20, 2009
Messages
21,477
Location
Northern Utah
Mike, what did you use to roll the bead on the tubes?

On the discussion of humble beginnings, i smile every time i put air in my vehicles tires with my 70s Hill Bros compressor i got from a member on GJ. Growing up my folks didn’t have much money so my Dad would have my brother and i take turns using his garage sale metal bicycle pump to add air our vehicles tires.

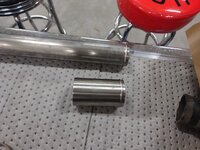
It's just my old hand crank bead forming tool that has roller and die. I'll post a picture of it in the nest round of pictures.
 
OP
Z

zmotorsports

ALLIANCE MEMBER
Joined
Oct 20, 2009
Messages
21,477
Location
Northern Utah
I've been good Mike, just crazy busy with life right now so don't have much free time to poke around on here but trying to fit in some GJ time to wind down here and there.

That thing is way too cool to just leave it at that. It's not a need for me because I don't use spray cans all the time but now I want one. Any chance of a write up on the build of it? What are you using for a motor, I'm guessing you don't have a drill mounted in there do you? You do some sort of PLC for a timer on it? Or knowing Mike you have some sort of momentum or balance sensor in there that senses when the ball is moving at a certain speed to know when it's fully shaken? Would love to know more about this invention of yours Mike. It looks so clean I thought for sure it was made and sold by a manufacturer but I should have known better, especially when I zoomed in to look for manufacturer or model number and didn't see any. 😂

Glad to hear you're doing well Scott.

If you go back a few pages I show how I constructed my paint shaker starting with the mechanism I posted earlier. It's just a small 300 RPM DC motor, a 12 VDC power supply and a timer/controller that I can program for the time I want it to run. The base and enclosure I fabricated.
 

signcrafter

Well-known member
Joined
May 9, 2012
Messages
12,532
Glad to hear you're doing well Scott.

If you go back a few pages I show how I constructed my paint shaker starting with the mechanism I posted earlier. It's just a small 300 RPM DC motor, a 12 VDC power supply and a timer/controller that I can program for the time I want it to run. The base and enclosure I fabricated.
Thanks Mike I will go back and look for it. Have a lot of other things I need more but man that thing is neat and I really want one after seeing yours. 😂
 
OP
Z

zmotorsports

ALLIANCE MEMBER
Joined
Oct 20, 2009
Messages
21,477
Location
Northern Utah
Made some good progress on the radiator tubes for the coach last night.

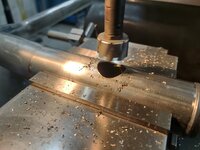
I began by measuring the angle of the bung for the makeup hose connection and then duplicated the angle on the new tube by clamping it in the mill vise and offsetting it the same 5.5 degrees as the original. I then grabbed my Rotabroach cutter (1.250") and cut the hole for the bung.
cool45.jpg

Next came chucking the 1" NPT coupler up in the lathe and parting it off to size.
cool46.jpg

cool47.jpg

While the coupler was cooling off so I could fishmouth it, I turned my attention to cutting the 90-degree bend to length and adding the beads to each end for hose retention.
cool48.jpg

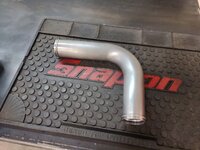
Upper coolant tube completed and ready for installation along with the new silicone hoses.
cool49.jpg

Coupler fishmouthed and test fit on the tube.
cool50.jpg

I ran a red Scotchbrite over the weld areas and then a final wipe with acetone.
cool51.jpg

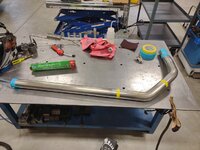
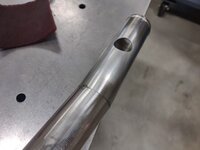
Tape added to the joints less the one I'll be welding first. The ends taped up and purge hose inserted into one end.
cool52.jpg

There is a formula you can use for determining how long and at what flow to purge at but I generally crank up the purge to around 12-15 until I can hold a flame at the outlet hole and the flame strains to stay lit. Here I just turned the purge on and the flame is at full strength. A cheap lighter works great for this.
cool53.jpg

After only a couple of minutes the flame barely will remain so at that point I reduce the argon purge flow to around 5-7 CFH just to maintain a good purge inside the tube.
cool54.jpg


Stay tuned for some more pictures.
 
OP
Z

zmotorsports

ALLIANCE MEMBER
Joined
Oct 20, 2009
Messages
21,477
Location
Northern Utah
Continuing on.

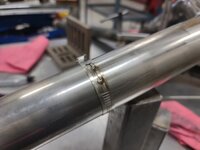
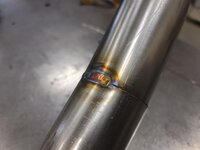
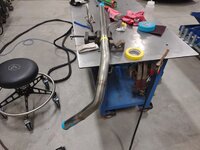
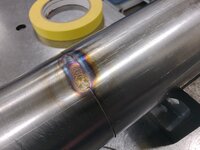
As I progressed through the joints, I removed the tape one by one as they were welded. Keeping a tight arc and beginning with a tight fitment are paramount when TIG welding thin wall stainless steel tube.
cool55.jpg

cool56.jpg

Generally try to keep the exit point of the tube elevated as argon is heavier than air so it will push out the lighter air to the opening, however, when trying to weld the circumference of a tube that isn't always possible
cool57.jpg

cool58.jpg

cool59.jpg

cool60.jpg

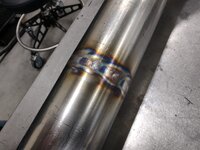
I'm not the proudest of the bung welds. I ran around it once and the weld didn't seem large enough for the mass of the coupler and the fact that it would have an elbow threaded into it adding more mass so I ran around a couple more times to widen the fillet weld around the bung.
cool61.jpg

cool62.jpg

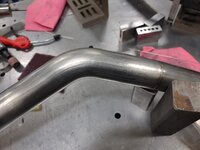
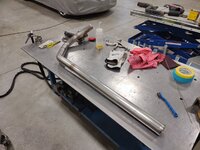
And that is the finished lower radiator tube.
cool63.jpg

cool64.jpg


Thanks for looking.
 
To avoid these ads, REGISTER NOW!
Top Bottom