You could have easily taken his money but instilled the confidence in him that he could do it with a little persuasion and guidance. I myself sometimes don't give myself enough credit, I just recently did my first timing belt job on my Eclipse which is an interference engine. It was nerve wracking but I triple checked everything and all is well....so far.Last night was a busy night in the shop. I had a young man whom I work with ask if I would assist him in tuning out the AFM in his 2007 Suburban that he recently had a lifter failure in. The AFM lifters are known to fail in the GM engines and although his lasted many miles pushing 200k the failure resulted in also taking out the camshaft. He had approached me about performing the repairs a couple of months ago and although I was willing to do so, I convinced him to tackle the job himself. I think he felt like maybe it was a bit beyond his abilities but after several conversations with him and explaining what he needed to do, what parts to use and printing out several pages for him from my FSM I think I was able to arm him with enough information and confidence to perform the repair. He had asked a few more questions during the repair but I think he did a great job and if nothing more, proved to himself he could do it. I would have been more than happy to do the work but I think the time he spent working through it was more valuable than merely getting his vehicle running.
He finished the repair last week and it was running poorly so he called me while I was on vacation and I explained what I thought the issue was and why we needed to tune out the AFM in order to restore it to proper running condition. He came by my shop last night and we performed the quick process of disabling the AFM and he was a happy camper again.
The other added benefit was he had never been to my home shop and to be honest, I don't think he even realized how much I wrench as he only knows me from work and he has only been with us about 6 or so years so I think it was good for him to see a different side of me from what he sees at work. In all honesty I think he was quite shocked when he came over. He asked if he could look through my toolbox in which I told him to have at it and afterwards I took him around my shop and I gave him the nickel tour. He kept saying he hoped to have a shop at home someday and I tried to explain that what he was seeing was not a quick or easy process and it takes time and dedication, but if I can do it anyone can do it. I really appreciate this young man and can see a lot of myself in him from my younger days and I actually have high hopes for him and his future but I don't want him to become frustrated early on in his career. As we all know acquiring tools and equipment, let alone a shop to store them in and work out of, takes a serious amount of time and dedication and is not something to be had in a year or even a few short years, unless one has more money than they know what to do with which I don't think many of us fit that bill.
As we walked around the shop he was saying over and over again how he hoped to have a shop full of tools at home someday, I explained that hope is not a plan. A plan is as simple as writing it down somewhere and breaking it up into short term goals and as you accomplish those short term goals they will get him to his long term goals and dreams. I explained that accomplishing short term goals can be beneficial as they keep us from getting lost or frustrated by long term failures and by being able to check off smaller accomplishments makes us feel as though we are progressing and moving towards our end goals. I also tried to warn him of getting caught in the trap of buying tools and equipment on credit and many things can be sourced through pawn shops or the used market yet still have incredible value as a reliable and durable tool and that none of my tools have ever been purchased on time and all were paid for by working and saving, not instant gratification by borrowing for them and that he should avoid that debt monkey at all costs. I know a few years ago he got into a spending spree on the Snap-on truck and I hated seeing him, as well as a few other mechanics, get wrapped up in that weekly tool truck payment that can feel like an anchor. I want to think the couple hours spent with him last night was beneficial but time will tell.

You are using an out of date browser. It may not display this or other websites correctly.
You should upgrade or use an alternative browser.
You should upgrade or use an alternative browser.
ZMotorsports Shop Projects 2.0
- Thread starter zmotorsports
- Start date
Boosted1
Well-known member
Still enjoying following your thread. Your shop and work sets a high bar.
Your air tool drawer tells me you are human too. Haha. Thanks for sharing all the content for us enjoying your story.
Your air tool drawer tells me you are human too. Haha. Thanks for sharing all the content for us enjoying your story.
OP
zmotorsports
ALLIANCE MEMBER
Thank you Mike... much obliged!
Rick
You're welcome Rick, happy to help.
You could have easily taken his money but instilled the confidence in him that he could do it with a little persuasion and guidance. I myself sometimes don't give myself enough credit, I just recently did my first timing belt job on my Eclipse which is an interference engine. It was nerve wracking but I triple checked everything and all is well....so far.
Agreed. I could have just had him bring it over and called him when it was done. However, I remember a very distinct time early in my career when I had asked my boss at the time (later turned into good friend and mentor as I've mentioned here before) if he would rebuild my TH400 transmission that I wanted to put in my 1984 Chevy truck. He quickly told me "nope", but he did say he would loan me his service manual and any specialty tools I would need and he'd be available IF I had any questions during the job. I remember at that time being scared shitless to dig into an automatic transmission because they were all a mystery and filled with magic.
After that first transmission rebuilt I was so proud of myself and it definitely boosted my confidence so I hope that did the same for the young man whom I work with. He may not have appreciated it now but maybe someday he will.
OP
zmotorsports
ALLIANCE MEMBER
Still enjoying following your thread. Your shop and work sets a high bar.
Your air tool drawer tells me you are human too. Haha. Thanks for sharing all the content for us enjoying your story.
Thank you for continuing to follow along. When you refer to my air tool drawer I'm assuming you mean because of how the air tools are stacked in there rather than neatly organized or shadow boxed?
 Yes, there is not much remaining room in that drawer so they have to be very strategically placed in the drawer in order to have them all fit. The days of having one layer of air tools and space between them are long gone and now have to be stacked and turned just right to get the drawer to close. I can't even move some of them into a second air tool drawer because I simply don't have any spare room in any of the drawers. First world problems I know but I apologize you had to see that. I'll do better to keep those drawers to myself so I keep up the illusion.
OP
zmotorsports
ALLIANCE MEMBER
My son stopped by after work last night so it was good to take a few minutes and shoot the **** with him before he headed home. I miss our time together but I understand he is in a hurry each day to get home and see his son and spend time with his family. I completely understand and am proud of him for that.
I was able to get some more work on the Buick done last night.
Raised the car up to get a better angle and view of the lower part of the timing cover and harmonic balancer. I did have to remove a few fasteners holding the evap purge valve and move it out of the way to gain better access but that was not a big deal.

Puller installed on harmonic balance and removed.

Prior to removing the timing cover I sprayed down the lower portion of the oil pan and side of block to remove the oil residue from the leak in preparation for reassembly. I also removed all of the lower half timing cover bolts while they were in easy reach.

After the upper fasteners were removed the timing cover was removed and set aside in the solvent tank for cleaning. The inside of the engine is actually quite clean and it is evident how the engine was maintained, even well before I was introduced into the scene.

Inside of timing cover looks the same, nice and clean with no sludge or buildup indicating neglect.

This fastener here is threaded through a hole in the timing cover which goes into a void against the engine block. By threading a 10mm x 1.5 bolt into this hole from the outside the cover can be screw jacked away from the engine block without the need to stick a prybar or something along a machined surface. This prevents gouging a seam that could later become a leak so I suggest using this threaded hole as designed.

Here is it's location on the outside of the timing cover. About @ the 10 o'clock position from the water pump.

More pictures of the progess to follow.....
I was able to get some more work on the Buick done last night.
Raised the car up to get a better angle and view of the lower part of the timing cover and harmonic balancer. I did have to remove a few fasteners holding the evap purge valve and move it out of the way to gain better access but that was not a big deal.
Puller installed on harmonic balance and removed.
Prior to removing the timing cover I sprayed down the lower portion of the oil pan and side of block to remove the oil residue from the leak in preparation for reassembly. I also removed all of the lower half timing cover bolts while they were in easy reach.
After the upper fasteners were removed the timing cover was removed and set aside in the solvent tank for cleaning. The inside of the engine is actually quite clean and it is evident how the engine was maintained, even well before I was introduced into the scene.
Inside of timing cover looks the same, nice and clean with no sludge or buildup indicating neglect.
This fastener here is threaded through a hole in the timing cover which goes into a void against the engine block. By threading a 10mm x 1.5 bolt into this hole from the outside the cover can be screw jacked away from the engine block without the need to stick a prybar or something along a machined surface. This prevents gouging a seam that could later become a leak so I suggest using this threaded hole as designed.
Here is it's location on the outside of the timing cover. About @ the 10 o'clock position from the water pump.
More pictures of the progess to follow.....
OP
zmotorsports
ALLIANCE MEMBER
Continuing on.
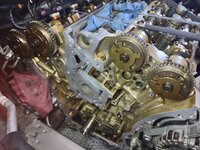
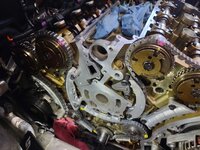
There's a lot going on in this picture and behind the timing cover. The GM High Feature engine requires 3 timing chains, 6 chain guides, three hydraulic tensioners, 4 cam phasers, 2 idlers and all must be properly timed as this is an interference engine. The good news is that although this particular car has 130k miles on it, the engine was not experiencing any of the common engine timing chain slack issues even though it is quite work and the chains have stretched significantly so timing was perfect to replace these components. Got the most life out of them without developing any adverse ramifications.

Here you can see the stage 1 (left bank) timing tensioner and how far the pluger is extended indicating the chain has stretched significantly.

The stage 2 position (right bank) back against the firewall shows even more wear as indicated by the plunger.

Here you can see the chains climbing the sprockets also showing the amount of stretch in the chains.

The phasers are in excellent condition and I marked the timing marks with a yellow paint pen to aid in visibility. This is hard to see with such little space between the engine and the frame rail of the car so highlighting the timing marks definitely helps seeing them and ensureing they are in the proper orientation.

Although not necessary, I went ahead and stuck the timing gauge on the back of the right bank camshafts to ensure it was in fact sitting at stage 2 timing.
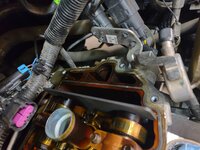
The Stage 2 position will allow the right bank (bank 1) timing components to be removed, then rolled over and put into Stage 1 timing position to allow the main and left bank (bank 2) timing components to be removed.
The easiest way to think about it is that the Stage 2 chain will be the first set removed and the last set installed when reassembling.
That was it for last night. I hope to find some time over the weekend to get the timing components replaced and at least all of the parts cleaned and ready for reassembly next week.
Thanks for looking.
There's a lot going on in this picture and behind the timing cover. The GM High Feature engine requires 3 timing chains, 6 chain guides, three hydraulic tensioners, 4 cam phasers, 2 idlers and all must be properly timed as this is an interference engine. The good news is that although this particular car has 130k miles on it, the engine was not experiencing any of the common engine timing chain slack issues even though it is quite work and the chains have stretched significantly so timing was perfect to replace these components. Got the most life out of them without developing any adverse ramifications.
Here you can see the stage 1 (left bank) timing tensioner and how far the pluger is extended indicating the chain has stretched significantly.
The stage 2 position (right bank) back against the firewall shows even more wear as indicated by the plunger.
Here you can see the chains climbing the sprockets also showing the amount of stretch in the chains.
The phasers are in excellent condition and I marked the timing marks with a yellow paint pen to aid in visibility. This is hard to see with such little space between the engine and the frame rail of the car so highlighting the timing marks definitely helps seeing them and ensureing they are in the proper orientation.
Although not necessary, I went ahead and stuck the timing gauge on the back of the right bank camshafts to ensure it was in fact sitting at stage 2 timing.
The Stage 2 position will allow the right bank (bank 1) timing components to be removed, then rolled over and put into Stage 1 timing position to allow the main and left bank (bank 2) timing components to be removed.
The easiest way to think about it is that the Stage 2 chain will be the first set removed and the last set installed when reassembling.
That was it for last night. I hope to find some time over the weekend to get the timing components replaced and at least all of the parts cleaned and ready for reassembly next week.
Thanks for looking.
OP
zmotorsports
ALLIANCE MEMBER
My Snap-on dealer called me this morning to inform me that he got my other pair of pliers in so I grabbed then as well as a new 2" telescoping mirror.
I had a bit of an incident last night and mine bit the dust.

I was using my mirror to align the timing marks on the sprockets of the phasers and had it extended out a section or two. I laid it on my fender cover while I answered my telephone. The hood strut on this Buick is a bit weak and with the weight of my underhood light it will drop once in a while. I thought I had my prop bar under the hood but evidently, I moved it while raising the car to remove the harmonic balancer and lower timing cover bolts and forgot to reposition it when I lowered the car.
While I was on the phone with my wife I heard a noise which startled me but when I looked over towards the car I saw the hood lowered and realized what had happened and didn't think anything of it. When I went back to work on the car I raised the hood to put the prop bar under it and saw my telescoping mirror bent like a pretzel about a section or two up from the end. ****!
So that little brain fart cost me twenty bucks.
I had a bit of an incident last night and mine bit the dust.
I was using my mirror to align the timing marks on the sprockets of the phasers and had it extended out a section or two. I laid it on my fender cover while I answered my telephone. The hood strut on this Buick is a bit weak and with the weight of my underhood light it will drop once in a while. I thought I had my prop bar under the hood but evidently, I moved it while raising the car to remove the harmonic balancer and lower timing cover bolts and forgot to reposition it when I lowered the car.
While I was on the phone with my wife I heard a noise which startled me but when I looked over towards the car I saw the hood lowered and realized what had happened and didn't think anything of it. When I went back to work on the car I raised the hood to put the prop bar under it and saw my telescoping mirror bent like a pretzel about a section or two up from the end. ****!
So that little brain fart cost me twenty bucks.
csp
Well-known member
GM originally had a 12k oil change interval on the 3.6 and changed it to 6k with a recall because of stretched timing chains. We had an 09 Traverse that experienced this stretch and recall in late 2010.
OP
zmotorsports
ALLIANCE MEMBER
GM originally had a 12k oil change interval on the 3.6 and changed it to 6k with a recall because of stretched timing chains. We had an 09 Traverse that experienced this stretch and recall in late 2010.
Yeah, I've had a few come into the shop that were upwards of 9k-10k miles between oil service intervals and was shocked. Personally, even 6k in my opinion is too long on these engines that rely so heavily on clean oil for VVT functions. I tell my clients to draw the line @ 5k miles between oil service intervals as oil is relatively cheap compared to the alternative.
OP
zmotorsports
ALLIANCE MEMBER
Saturday morning I was able to get a little more work done on the Buick LaCrosse.
Rags stuffed around the perimeter, under the oil pan and into the front opening to avoid foreign debris from cleaning getting where it isn't wanted.

Started with the engine in Stage 2 timing position (right bank camshafts up) and removed the right bank secondary cam chain and components.

Next rolled the engine over 2+ times to get the engine into Stage 1 timing position, locked the camshafts in place and removed the left bank secondary timing chain and components as well as the primary chain and components. Now the time consuming job of cleanup begins.

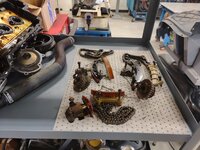
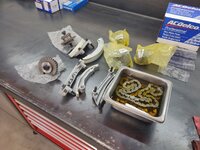
All of the original timing components removed and set aside. For the most part in fair condition considering the miles. This shows what proper oil change intervals and preventive maintenance can do for one of these engines. Although the chains were stretched a bit the remainder of the components show little to no wear. Barely any wear in the guides.
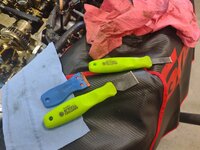
My latest tools of choice when it comes to cleaning gaskets from aluminum components.
The Melling part number for the timing kit.

All of the new components unbagged and laid out for inspection.

The engine block and heads thoroughly cleaned and prepped for reassembly.
Now to start on the timing cover making sure to remove all original engine sealant making sure to get down into the sealant groove.

Here you can see the coarse machining grooves on the timing cover. These are by design and should not be removed which is why I recommend not using mechanized means of removing sealants. These machined crosshatch patterns aid in holding engine sealant when the components are reassembled.

More pictures to follow...
Rags stuffed around the perimeter, under the oil pan and into the front opening to avoid foreign debris from cleaning getting where it isn't wanted.
Started with the engine in Stage 2 timing position (right bank camshafts up) and removed the right bank secondary cam chain and components.
Next rolled the engine over 2+ times to get the engine into Stage 1 timing position, locked the camshafts in place and removed the left bank secondary timing chain and components as well as the primary chain and components. Now the time consuming job of cleanup begins.
All of the original timing components removed and set aside. For the most part in fair condition considering the miles. This shows what proper oil change intervals and preventive maintenance can do for one of these engines. Although the chains were stretched a bit the remainder of the components show little to no wear. Barely any wear in the guides.
My latest tools of choice when it comes to cleaning gaskets from aluminum components.
The Melling part number for the timing kit.
All of the new components unbagged and laid out for inspection.
The engine block and heads thoroughly cleaned and prepped for reassembly.
Now to start on the timing cover making sure to remove all original engine sealant making sure to get down into the sealant groove.
Here you can see the coarse machining grooves on the timing cover. These are by design and should not be removed which is why I recommend not using mechanized means of removing sealants. These machined crosshatch patterns aid in holding engine sealant when the components are reassembled.
More pictures to follow...
OP
zmotorsports
ALLIANCE MEMBER
Continuing on.
Progressing on the timing cover cleanup. After the initial step using a plastic razor blade, I followed with the carbon scrapers to get right down to the machined surface and a cotter pin hook tool to remove the engine sealant from the grooves then I reached for the Scotchbrite and run around the mating surfaces. By doing this manually it doesn't take as long as it sounds but it is a bit more time consuming than using a pneumatic die grinder with a gasket remover wheel. It also ensures no damage to the aluminum components and a leak free job when completed.

Starting with the Scotchbrite step on the water pump surface after gasket remnants are removed.

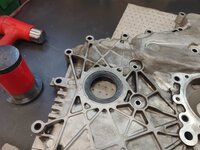
Crankshaft seal driven out from the backside. If using a hook style of seal removal tool please make sure your tool is not engaged too deep behind the seal or you can create a nice deep gouge with the tool as the seal is being removed.

Camshaft VVT valve seals removed from the backside as well, then seal bores thoroughly cleaned to accept the new seals.

New seals, water pump gasket and seal (bushing) driver at the ready.

Hydraulic valve seals being driven in place.

Driver selected for the crankshaft seal.

Crank seal driven into position.
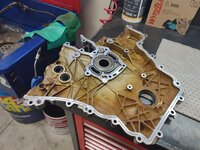
New inside timing/coolant gasket or seal installed into groove.
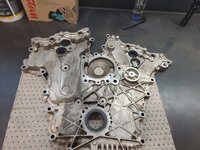
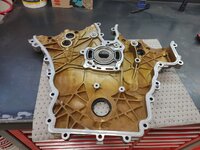
Timing cover cleaned, prepped and ready for installation.
More to follow....
Progressing on the timing cover cleanup. After the initial step using a plastic razor blade, I followed with the carbon scrapers to get right down to the machined surface and a cotter pin hook tool to remove the engine sealant from the grooves then I reached for the Scotchbrite and run around the mating surfaces. By doing this manually it doesn't take as long as it sounds but it is a bit more time consuming than using a pneumatic die grinder with a gasket remover wheel. It also ensures no damage to the aluminum components and a leak free job when completed.
Starting with the Scotchbrite step on the water pump surface after gasket remnants are removed.
Crankshaft seal driven out from the backside. If using a hook style of seal removal tool please make sure your tool is not engaged too deep behind the seal or you can create a nice deep gouge with the tool as the seal is being removed.
Camshaft VVT valve seals removed from the backside as well, then seal bores thoroughly cleaned to accept the new seals.
New seals, water pump gasket and seal (bushing) driver at the ready.
Hydraulic valve seals being driven in place.
Driver selected for the crankshaft seal.
Crank seal driven into position.
New inside timing/coolant gasket or seal installed into groove.
Timing cover cleaned, prepped and ready for installation.
More to follow....
Last edited:
OP
zmotorsports
ALLIANCE MEMBER
By this time it was just after noon and the wife and I were heading out. I figured I needed a good 1-2 hours in order to install the timing components as well as applying the sealant to the timing cover and get it installed and didn't think I had quite enough time to start that before we were to leave so that would have to wait.
I did however, take a few minutes and clean the top of the heads where the rocker covers mate in preparation for reassembly.
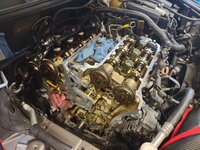
As well as soaked the chains in fresh engine oil.
Then popped the hoses off of the thermostat housing and removed it from the back of the engine (left side of engine bay).

Thermostat housing removed along with old gasket. New t-stat and gasket at the ready.

Thorough cleaning of the thermostat housing mating surface. Carbon scraper and Scotchbrite prepped.

Lastly, before closing up the shop I flipped the calendar to May, and I have a sweet spot for 67-72 C10's.

Thanks for looking.
I did however, take a few minutes and clean the top of the heads where the rocker covers mate in preparation for reassembly.
As well as soaked the chains in fresh engine oil.
Then popped the hoses off of the thermostat housing and removed it from the back of the engine (left side of engine bay).
Thermostat housing removed along with old gasket. New t-stat and gasket at the ready.
Thorough cleaning of the thermostat housing mating surface. Carbon scraper and Scotchbrite prepped.
Lastly, before closing up the shop I flipped the calendar to May, and I have a sweet spot for 67-72 C10's.
Thanks for looking.
housewolf
Well-known member
Being somewhat a “Johnny come lately” I haven’t followed this whole thread but I really enjoyed the pics of the wild horses, Utah looks beautiful. I’ve never been there but had a few friends & acquaintances over the years that were from there.
The 3.0 is a busy little motor. I believe my wife’s 2010 CTS wagon has the same motor (110K on it now). I’m not looking forward to that repair
We bought it new, it’s been well maintained and trouble free. <fingers crossed>
The 3.0 is a busy little motor. I believe my wife’s 2010 CTS wagon has the same motor (110K on it now). I’m not looking forward to that repair
We bought it new, it’s been well maintained and trouble free. <fingers crossed>
OP
zmotorsports
ALLIANCE MEMBER
Thanks for stopping by my thread.
Utah has been a great place to live and grow up. It is placed perfectly for a wide variety of outdoor exploring and activities all within a relatively short drive, within a day in most instances.
Utah has been a great place to live and grow up. It is placed perfectly for a wide variety of outdoor exploring and activities all within a relatively short drive, within a day in most instances.
Honch
Well-known member
Yeah, I've had a few come into the shop that were upwards of 9k-10k miles between oil service intervals and was shocked. Personally, even 6k in my opinion is too long on these engines that rely so heavily on clean oil for VVT functions. I tell my clients to draw the line @ 5k miles between oil service intervals as oil is relatively cheap compared to the alternative.
Agreed, that interval is even more important as they age, and the oil becomes contaminated easier. If it cost $500.00 to change your oil, then there might be a valid argument.
signcrafter
Well-known member
- Joined
- May 9, 2012
- Messages
- 12,516
Mike, I really like the carbon gasket scrapers. Mine are from napa and have a curved edge on them. Sometimes that helps but sometimes a flat one would be better. I'm going to have to look a flat ended one like yours.
OP
zmotorsports
ALLIANCE MEMBER
Mike, I really like the carbon gasket scrapers. Mine are from napa and have a curved edge on them. Sometimes that helps but sometimes a flat one would be better. I'm going to have to look a flat ended one like yours.
Scott, I think the Matco ones that I have are manufactured by Mueller Kueps so that may help as they are also quite popular. I also have heard that the Carlyle ones at NAPA are made by them as well but I cannot confirm that as they were not yet available a couple of years ago when I bought mine. The Carlyle ones from NAPA, part #'s SER 772954 and SER 772952 look identical to my Matco ones, other than the blue handles.
signcrafter
Well-known member
- Joined
- May 9, 2012
- Messages
- 12,516
Thanks Mike. I have the 772953 which is curved. When I bought it they had a small, medium, and large and I just got the medium and didn't pay attention to the curve or flat end figuring they were all the same. Think you are correct the carlyle ones look to be made by mueller kueps so I will place an order from napa for the small and large to complete the set.Scott, I think the Matco ones that I have are manufactured by Mueller Kueps so that may help as they are also quite popular. I also have heard that the Carlyle ones at NAPA are made by them as well but I cannot confirm that as they were not yet available a couple of years ago when I bought mine. The Carlyle ones from NAPA, part #'s SER 772954 and SER 772952 look identical to my Matco ones, other than the blue handles.
OP
zmotorsports
ALLIANCE MEMBER
The chains have been soaking in engine oil for a couple of days in preparation for installation but before installing I wanted to see exactly how much the originals had stretched comparted to the new ones. There's quite a difference, although with the engine oil dripping off it's hard to tell.

With the engine in Stage 1 position, I installed the secondary chain, idler, guides and tensioner. Before pulling the pin from the tensioner a quick look to ensure all timing marks were spot on and all components were properly torqued to spec. Then the primary chain, guides and tensioner were installed and torqued to spec. The two idlers are torqued to 43 ft/lbs. and all guides and tensioners are torqued to 18 ft/lbs. I apply some moly lube to the guide surfaces just prior to installing as well as some assembly lube to the pivot bolts for the tensioner guides along with some blue Loctite on the bolts for the tensioner guides. I know probably not necessary but just as precaution where those guides move and I like to add a little assembly lube to thing that move prior to a dry start to give time for lubrication once oil starts flowing and slinging.

I then rolled the engine over to Stage 2 and installed the right bank secondary chain, guides, idler, tensioner and torqued all fasteners. I then rolled the engine over a couple of times to put it back into Stage 1 timing to verify everything was in proper time and no interferences with components, then into Stage 2 and did the same check. This is where the stamped steel gauges come in handy, for double checking cam timing.
The engine sealant was applied to the timing cover and just before setting in place a final wipe down of the front of the engine block with a rag and brake wash to ensure a clean and oil free surface. The FSM calls for a 3mm bead around the perimeter with a 5mm bead where the block meets the heads and the oil pan meets the block. You want enough to create a good seal but not so much it oozes out everywhere. I like to see about a 1/16"-1/8" uniform bead form on the exterior of components when assembling. This is about what they come with from the factory letting me know I have enough sealant but not so much it will be oozing inside the engine components.
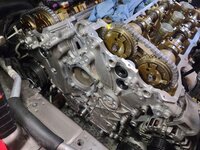
Timing cover installed and all fasteners torqued to spec.
Harmonic balancer being installed. This is torqued to 74 ft/lbs. plus 150-degrees.

That's where I left off for the evening.
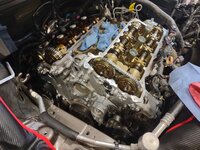
Thanks for looking.
With the engine in Stage 1 position, I installed the secondary chain, idler, guides and tensioner. Before pulling the pin from the tensioner a quick look to ensure all timing marks were spot on and all components were properly torqued to spec. Then the primary chain, guides and tensioner were installed and torqued to spec. The two idlers are torqued to 43 ft/lbs. and all guides and tensioners are torqued to 18 ft/lbs. I apply some moly lube to the guide surfaces just prior to installing as well as some assembly lube to the pivot bolts for the tensioner guides along with some blue Loctite on the bolts for the tensioner guides. I know probably not necessary but just as precaution where those guides move and I like to add a little assembly lube to thing that move prior to a dry start to give time for lubrication once oil starts flowing and slinging.
I then rolled the engine over to Stage 2 and installed the right bank secondary chain, guides, idler, tensioner and torqued all fasteners. I then rolled the engine over a couple of times to put it back into Stage 1 timing to verify everything was in proper time and no interferences with components, then into Stage 2 and did the same check. This is where the stamped steel gauges come in handy, for double checking cam timing.
The engine sealant was applied to the timing cover and just before setting in place a final wipe down of the front of the engine block with a rag and brake wash to ensure a clean and oil free surface. The FSM calls for a 3mm bead around the perimeter with a 5mm bead where the block meets the heads and the oil pan meets the block. You want enough to create a good seal but not so much it oozes out everywhere. I like to see about a 1/16"-1/8" uniform bead form on the exterior of components when assembling. This is about what they come with from the factory letting me know I have enough sealant but not so much it will be oozing inside the engine components.
Timing cover installed and all fasteners torqued to spec.
Harmonic balancer being installed. This is torqued to 74 ft/lbs. plus 150-degrees.
That's where I left off for the evening.
Thanks for looking.
Last edited:
signcrafter
Well-known member
- Joined
- May 9, 2012
- Messages
- 12,516
Going together good Mike. I don't remember seeing anything in your posts, or maybe I just missed it. But what is your method for keeping all the hardware organized during a job like this? I'm guessing the organized Mike we know has a method for keeping track of where all the nuts and bolts go on a job like this.
steves_001
Well-known member
Very professional repair. I didn’t know about the crosshatching etc on the mating surfaces. Interesting info! Nice work!
OP
zmotorsports
ALLIANCE MEMBER
Going together good Mike. I don't remember seeing anything in your posts, or maybe I just missed it. But what is your method for keeping all the hardware organized during a job like this? I'm guessing the organized Mike we know has a method for keeping track of where all the nuts and bolts go on a job like this.
Thanks Scott.
I'm not sure I have anything that is earth shattering to add as far as organizing fasteners.
I have a pretty good variety of different size and shape pans for parts and my "system" is pretty low tech in that as I'm removing components from a car I keep likes with likes. For example in this picture you'll notice in the tool cart is a round pie pan that has a bracket and a few bolts. All of these fasteners were from items such as wire looms and upper intake manifold. Once that portion has been completed the large items and parts tray move to the side, which is now on the shelving cart and used to be my other benches and/or my motorcycle lift. The mobile shelving cart is really working out well for this I must say.
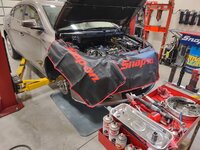
Then if you look at this picture of the shelving cart you can see the second shelf up from the bottom has a square parts tin that has fasteners from the belt train adjacent to the tensioner and engine mounts that I just stuck the bolts back into prior to setting aside. Also on the cart on the third shelf up from the bottom is a small aluminum pan that I placed the VVT solenoids/valves in which were labeled where I removed them from along with the fasteners. What isn't visible in the picture is the top shelf which has all of the new parts awaiting assembly or installation.

What I don't have pictures of is the next parts tray in the tool cart while I was working which contained all of the fasteners for the timing chain cover, power steering pump mount and related items to that step in the process. When I am cleaning parts it is easier for me to take an entire pan to the solvent tank to clean them vs. digging through one big pile and sorting which need cleaning and which don't. Once the fasteners are cleaned in the solvent tank they are either put back into the same parts tray or a clean one is used and then set aside until time of reassembly.
Most of the time fasteners are pretty easy to tell where they went and I know from when I took the car apart but on long term projects that will be some time before going back together I use plastic Ziplock sandwich bags with the location written in Sharpie.
Sorry it's nothing too grandiose Scott, but I haven't really given it much thought until you asked.
I didn't really even realize I had a system until I started thinking how to type it out as it's just been a reaction up until now and something I haven't given much thought to. As I'm tearing things apart I just toss the fasteners in various trays and set them aside more out of habit and/or instinct than any "system" per se.
OP
zmotorsports
ALLIANCE MEMBER
Very professional repair. I didn’t know about the crosshatching etc on the mating surfaces. Interesting info! Nice work!
Thank you very much. I'm glad the information is helpful and thank you for following along.
OutlawDrifter
Well-known member
Most of the time fasteners are pretty easy to tell where they went and I know from when I took the car apart but on long term projects that will be some time before going back together I use plastic Ziplock sandwich bags with the location written in Sharpie.
The ziplock/sharpie is my preferred method on big projects. Makes it SOOO much easier.
signcrafter
Well-known member
- Joined
- May 9, 2012
- Messages
- 12,516
That cart is nice Mike. I looked it up when you first posted about it because it would be nice to have for exactly what you're using it for. But decided it will have to wait after seeing the price. I'll keep an eye out for a used cart to pop up.
OP
zmotorsports
ALLIANCE MEMBER
Stretched almost 1/2 link, damn that's less then impressive considering how clean that engine is.
Agreed Cam. This is probably one of the most well maintained high feature GM engines I've worked on and it still needs timing chains @ 130k miles. The longest I've seen one go has been around 140k miles and it was starting to throw random camshaft correlation codes which I'm sure this one would as well if left to go much longer.
I don't work on a lot of these engines and nowhere near as many as some but I still feel they are a pretty good engine. That being said, I don't think it's just related to GM engines as I see this with many of the later model VVT engines that have either multiple timing chains or long timing chains that are running around multiple components.
It used to be timing chains lasted forever and timing belts got a bad reputation early on because they needed to be replaced as a preventive maintenance item at specified mileages. However, with modern engines timing chains are seeming to need similar replacements as preventive maintenance as well so there really is little to no advantage one over the other.
OP
zmotorsports
ALLIANCE MEMBER
That cart is nice Mike. I looked it up when you first posted about it because it would be nice to have for exactly what you're using it for. But decided it will have to wait after seeing the price. I'll keep an eye out for a used cart to pop up.
Agreed Scott. I've wanted a mobile cart for this purpose for some time now but the prices just couldn't justify the purchase as it wasn't a cheap option and I already had bench space which was paid for. I wanted something like this in my last shop but simply didn't have the real estate to give up for it so quit even thinking about it. Finally after a few larger jobs over the past six months or so it finally came down to a want vs. a need and I convinced myself it was a good idea. Funny how we seem to do that.
Now I wish I would have done it sooner, but I am also glad I waited a while to save up and bought the one I really wanted vs. settling on a cheaper and one of less impressive build quality. This will be a piece of equipment that will last the rest of my days anyways. Buy once, cry once strikes again. OutlawDrifter
Well-known member
Agreed Cam. This is probably one of the most well maintained high feature GM engines I've worked on and it still needs timing chains @ 130k miles. The longest I've seen one go has been around 140k miles and it was starting to throw random camshaft correlation codes which I'm sure this one would as well if left to go much longer.
I don't work on a lot of these engines and nowhere near as many as some but I still feel they are a pretty good engine. That being said, I don't think it's just related to GM engines as I see this with many of the later model VVT engines that have either multiple timing chains or long timing chains that are running around multiple components.
It used to be timing chains lasted forever and timing belts got a bad reputation early on because they needed to be replaced as a preventive maintenance item at specified mileages. However, with modern engines timing chains are seeming to need similar replacements as preventive maintenance as well so there really is little to no advantage one over the other.
Mike, my Tacoma still had its factory timing belt @ 170K miles, and the Tundra was still wearing its factory timing belt @ 210K miles. Both are supposed to be changed every 90K or 72mo, if memory serves correctly. I'll stick to the 90k during my ownership, a belt/water pump replacement is much cheaper than an engine. Saw a guy on a Tundra group the other day that had over 800k on his 4.7l V8.
OP
zmotorsports
ALLIANCE MEMBER
Mike, my Tacoma still had its factory timing belt @ 170K miles, and the Tundra was still wearing its factory timing belt @ 210K miles. Both are supposed to be changed every 90K or 72mo, if memory serves correctly. I'll stick to the 90k during my ownership, a belt/water pump replacement is much cheaper than an engine. Saw a guy on a Tundra group the other day that had over 800k on his 4.7l V8.
Yeah, I've seen some let those maintenance items go well beyond recommendations. Now do I think some of the recommendations are being a bit too conservative? Yes I do, but I'm not an engineer. I've replaced many around 110k-120k that recommend a 90k or 100k service interval and they still looked great. But like you said, the risk to me just isn't worth the reward and most are not a big job or expense to do.
The owner of this car was asking for advice on selling it and buying something else in the used category as they didn't want to spend new car money and my comment was "you know this car and if you buy something else used you don't know the history and may still need similar maintenance so if it were me, I'd just do the maintenance on this one and drive it." Ultimately it was their decision and I gave my honest opinion but personally, I think all too often people think different is better and by getting something different they are also just getting different problems or even same issues, different car and they would have been better off keeping what they had.
OutlawDrifter
Well-known member
Agreed, once you've got a baseline, you have a good point to go from. Buy another/newer car, and you get to start over again.
Finallygotit
ALLIANCE MEMBER
Very nice work Mike! Meticulous as always.

OP
zmotorsports
ALLIANCE MEMBER
Very nice work Mike! Meticulous as always.
Thank you Dan. I appreciate that.
OP
zmotorsports
ALLIANCE MEMBER
Nearing the home stretch on the Buick LaCrosse.
True to habit, once I get a repair to the point where I can close up the cooling system and pull a vacuum I do so as early in the reassembly as possible. I have had a few minor leaks many years ago and I didn't realize it until the entire project was completed and that has been the driver for this habit of checking the cooling system as early as possible. As soon as I can seal up the cooling system I attach the vacuum gauge and pull it down into a vacuum while I go about continuing the reassembly. IF there is a leak that needs to be address I would much rather find it while I still have components removed and before the entire job is completed and I have to tear back into it.
In this case I where I had replaced the thermostat which was on the complete opposite side of the engine bay as I had been working on the timing chain, I even left the ECM out of the way and all of the sound deadening materials for the high pressure fuel pump out of the way as there were several heater hoses as well as the lower radiator hose that connected to the thermostat housing. Pulling the system down into a vacuum serves two purposes. First it proves there are no leaks and secondly, by having the system in a vacuum you simply pull coolant back into the system after letting it sit for a half hour or so and you can rest assured there are no air pockets trapped in the system. With many of today's aerodynamically designed cars and trucks it is quite common that the high point of the system is actually the upper part of the engine vs. the radiator as in earlier vehicles. This design actually encourages air entrapment to some extent so pulling a vacuum in many cases is the only way to ensure you get the cooling system completely filled.
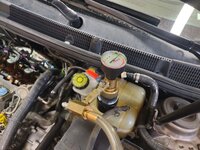
While the cooling system was in a vacuum I commenced the assembly of the serpentine belt after fighting a little bit realigning the power steering pump back into place.
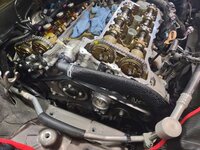
Once the belt routing was complete and I could tell the cooling system was holding vacuum I reinstalled the upper motor mount assembly so I could remove the floor jack and blocking from under the engine also lowering the engine back down the small amount in the engine bay thus giving more room for rocker cover installations when they are ready.
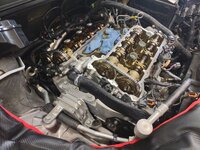
I then moved over cleaning the rocker covers by removing the old spark plug standoff seals and rubber seals around the perimeter. Both were getting brittle and in need of replacement although there didn't appear to be any signs of leaks, yet.
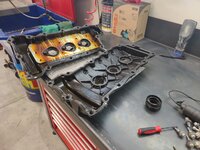
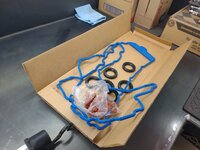
Newly designed Fel-Pro rocker cover gasket set.
Before closing up shop for the night I filled the cooling system.
Thanks for looking.
True to habit, once I get a repair to the point where I can close up the cooling system and pull a vacuum I do so as early in the reassembly as possible. I have had a few minor leaks many years ago and I didn't realize it until the entire project was completed and that has been the driver for this habit of checking the cooling system as early as possible. As soon as I can seal up the cooling system I attach the vacuum gauge and pull it down into a vacuum while I go about continuing the reassembly. IF there is a leak that needs to be address I would much rather find it while I still have components removed and before the entire job is completed and I have to tear back into it.
In this case I where I had replaced the thermostat which was on the complete opposite side of the engine bay as I had been working on the timing chain, I even left the ECM out of the way and all of the sound deadening materials for the high pressure fuel pump out of the way as there were several heater hoses as well as the lower radiator hose that connected to the thermostat housing. Pulling the system down into a vacuum serves two purposes. First it proves there are no leaks and secondly, by having the system in a vacuum you simply pull coolant back into the system after letting it sit for a half hour or so and you can rest assured there are no air pockets trapped in the system. With many of today's aerodynamically designed cars and trucks it is quite common that the high point of the system is actually the upper part of the engine vs. the radiator as in earlier vehicles. This design actually encourages air entrapment to some extent so pulling a vacuum in many cases is the only way to ensure you get the cooling system completely filled.
While the cooling system was in a vacuum I commenced the assembly of the serpentine belt after fighting a little bit realigning the power steering pump back into place.
Once the belt routing was complete and I could tell the cooling system was holding vacuum I reinstalled the upper motor mount assembly so I could remove the floor jack and blocking from under the engine also lowering the engine back down the small amount in the engine bay thus giving more room for rocker cover installations when they are ready.
I then moved over cleaning the rocker covers by removing the old spark plug standoff seals and rubber seals around the perimeter. Both were getting brittle and in need of replacement although there didn't appear to be any signs of leaks, yet.
Newly designed Fel-Pro rocker cover gasket set.
Before closing up shop for the night I filled the cooling system.
Thanks for looking.
OP
zmotorsports
ALLIANCE MEMBER
Arrived home yesterday and had my absorbent pads that I had ordered sitting on the porch. I generally don't go through a lot of them but find myself ordering a couple/few boxes about every three years and this seemed about right as it was the second time I ordered since we moved into our new home.
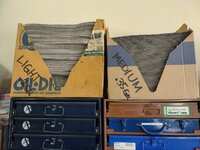
However, this time I decided to try something a little different. I generally use the lighter absorbent pads that are about 20-gallon per box or .2/gallon per pad. These are nice as they are not so thick that they get bulky and they are a bit less expensive than the thicker pads. I have noticed however, that over the past several projects I felt like I had used a few more pads than normal for spills or large dripping items. When I placed this order I had a 20% off coupon so I opted to try a couple boxes of the medium duty absorbent pads rated @ 35-gallons per box or .35 gal. per pad. Although these were a bit more expensive my thinking was maybe I'd used less of these for larger spills or pick up duties and therefore save money in the long run and continue to use the same .2 gal/pad ones for my general use.
Not sure if that is how it will work out but I thought I'd conduct a little test and see if it works out that way or not. The downside is I had to clear a spot for another box of absorbent pads.
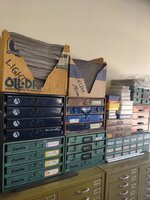
I labeled the boxes for easy identification so I don't forget.
Last week when I mowed the lawns I noticed all of my neighbor's trees were in full bloom. My wife asked when ours would be blooming and I thought they looked like they were about ready so I told her I would bet withing the week or so as they sure looked like they were ready to open up. Sure enough as I pulled into the neighborhood yesterday I was pleased to see them in full bloom and had to snap a picture of ours as well as capture the neighbors behind us and across the street all with the snow on the mountains in the background.

Now if the city would get our secondary water turned on I could start watering my lawns. Although we're supposed to get rain for the next four days so that will help as well.
Thanks for looking.
However, this time I decided to try something a little different. I generally use the lighter absorbent pads that are about 20-gallon per box or .2/gallon per pad. These are nice as they are not so thick that they get bulky and they are a bit less expensive than the thicker pads. I have noticed however, that over the past several projects I felt like I had used a few more pads than normal for spills or large dripping items. When I placed this order I had a 20% off coupon so I opted to try a couple boxes of the medium duty absorbent pads rated @ 35-gallons per box or .35 gal. per pad. Although these were a bit more expensive my thinking was maybe I'd used less of these for larger spills or pick up duties and therefore save money in the long run and continue to use the same .2 gal/pad ones for my general use.
Not sure if that is how it will work out but I thought I'd conduct a little test and see if it works out that way or not. The downside is I had to clear a spot for another box of absorbent pads.
I labeled the boxes for easy identification so I don't forget.
Last week when I mowed the lawns I noticed all of my neighbor's trees were in full bloom. My wife asked when ours would be blooming and I thought they looked like they were about ready so I told her I would bet withing the week or so as they sure looked like they were ready to open up. Sure enough as I pulled into the neighborhood yesterday I was pleased to see them in full bloom and had to snap a picture of ours as well as capture the neighbors behind us and across the street all with the snow on the mountains in the background.
Now if the city would get our secondary water turned on I could start watering my lawns. Although we're supposed to get rain for the next four days so that will help as well.
Thanks for looking.
WoodsTruck
Well-known member
- Joined
- Jan 12, 2013
- Messages
- 1,027
Didn't even think about 2 water sources into a property. Is the rate per gallon lower on the 2nd source since it won't need to be run through the treatment plant like source #1? I only have one port from the street and hate paying for treatment costs on water I put on the lawn.
jbmatth
Well-known member
Mike, what brand/model is your coolant vacuum setup? The new to me Saturn I have is giving me fits trying to bleed the air out of the cooling system and as you mentioned many parts of the engine are higher than the radiator making it difficult to bleed the air. Great work on the 3.0 as usual.
JB
JB
OP
zmotorsports
ALLIANCE MEMBER
Didn't even think about 2 water sources into a property. Is the rate per gallon lower on the 2nd source since it won't need to be run through the treatment plant like source #1? I only have one port from the street and hate paying for treatment costs on water I put on the lawn.
Yes, it is a little less expensive than normal culinary water but is billed differently as it is tied directly to our annual property taxes. The way it works is we are given an "allocated" amount per our size of property and landscaping media. Then that amount of water is calculated and the fee is added to the annual property tax. A year or so after we moved into our new home they installed meters at each property to measure the actual amount being used.
We were then sent monthly notices showing the amount we had been using compared to what we had been allocated. I have to admit, those first couple of years with the meters (2018 & 2019) I got a couple of not so nice letters in the mail stating I was overusing. They even had a frowny face on them so they must have been really upset.
After speaking with several of my neighbors I came to the conclusion that we must have all gotten them so it wasn't as selective as I initially thought. I will admit at first, I was extremely pissed off because of how much work and money I had put into my yard and I wanted a green lawn and not rock or gravel so redoing my landscaping was NOT an option in my mind. I hate being on the unfavorable side of most things so over the course of the next couple of years I went on a mission to figure out how to cut my usage but not kill my lawn. If I new then what I know now as far as my back yard I think I would have laid my sprinkler system out a bit differently. I had no idea just how much my shop would shade the back yard so if I were to do it again I think I would have tied those areas that would require less water into a zone and then the other zones used for higher usage or more sunlit areas so it would have been easier to manage from a zone to zone mindset.
Back in 2020 I started really diving into my nozzles and playing with fine tuning my system by reducing nozzle sizes in areas that were in the shade and slightly increasing the nozzle size in those that were more in direct sunlight and getting reflection off of either my fence or the house. I was able to setup a user account on the water providers website and actually monitor my daily usage so any changes could easily be observed in nearly real time data. Over the course of 2020 and 2021 I think I had my sprinkler system pretty dialed in and by viewing my daily usage data and the condition of the lawn was becoming more pleased with the results.
Then in 2022 we got an urgent notification stating that our annual allocation would be cut to 60% of normal due to the extreme drought that we were in here in Northern Utah. Again, I was pissed off because I was worried for my lawn and not to mention I didn't see a reduction in my property taxes for that portion by the 40% that we were not able to use, but that's another pet peeve.
Other than the area that we had gotten grubs in last year I was extremely pleased with how my lawn looked for the most part even with the lack of available water. I felt like the previous two years of fine tuning my system had paid off because I had neighbors who had done nothing but last year they really struggled to keep their lawns even remotely green. I had multiple neighbors ask me how I was doing it and I guarantee they didn't believe me when I informed them that I was staying under my allocated water allotment. At the end of the 2022 season I closed out at 58% of my normal allocated amount so I was pretty pleased with that.
This year they are just now turning our secondary water on and I went in to see what our allocated amount is and I was dumbfounded when I saw how much it was. Don't get me wrong, I'm not complaining as we have had an abnormally high snowpack winter but I have been allocated more than I was back in 2019 when I got the infamous frowny face letter.
I am on the fence on what to do. I'm afraid that if I don't use my allocated amount then they'll keep cutting my allocated amount year over year which I don't want, but yet I also don't want to overwater or use more than needed as that is just being wasteful as I know I can get by on much less than I have in the past.
Sorry for the long response, I am just proud of my yard and what I've been able to accomplish in terms of water reduction and how I went about it all while keeping a nice green lawn. I'm sure my neighbors will love seeing how much they have available to use this year but doubt I'll use anywhere near all of mine.
OP
zmotorsports
ALLIANCE MEMBER
Mike, what brand/model is your coolant vacuum setup? The new to me Saturn I have is giving me fits trying to bleed the air out of the cooling system and as you mentioned many parts of the engine are higher than the radiator making it difficult to bleed the air. Great work on the 3.0 as usual.
JB
JB, mine is an old kit made by AirLift. I think it is now marketed under UView, part # 550000). I think there are a couple different companies that make similar systems now as well. I looked at the new Snap-on vacuum kit a few weeks ago but my old system works just fine and I couldn't justify buying just to have new.
They're not bad priced even new as I think they're around $140~ish or so but well worth it. I bought mine initially for doing snowmobiles and ATV's for filling the cooling systems but quickly found I like it nearly as much for verifying the system's integrity before even thinking about coolant going back in.
OP
zmotorsports
ALLIANCE MEMBER
I finished up the Buick LaCrosse last night.
Started off by getting the rocker covers ready for installation and the new fastener seals that came with the gasket set. These were a PITA to remove and reinstall on each of the 28 bolts.
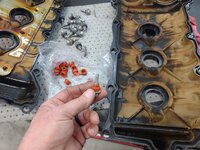
The spark plug standoff seals were installed in the rocker cover. These are a press fit but not too much of an interference fit so be careful you don't drive them in too forcefully. Just a little tap with the driver set them in place. I love these ATM bushing drivers and find myself grinning like an idiot each time I get to use them. So much nicer than digging through my stash of remnants to find the appropriate chunk of steel or aluminum.
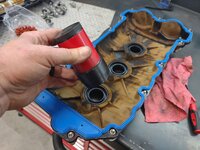
Rocker covers installed and fasteners torqued to 8 ft/lbs. I chose to use my small 1/4" torque wrench and set to 96 in/lbs. for easier access to those rear fasteners. Next was to install the coil packs and putting the wiring loom back in place.
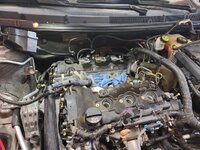
I've seen many mechanics write directly on the components or plugs/connectors but I don't like seeing those markings when the job is completed so I will mark things with masking tape that can be easily removed as the job is being reassembled. My thinking is making the job look like no one was ever in there and restoring it to as near factory appearance and conditon as possible. Maybe that is also why I am so adamant about sealer usage. I despise popping the hood on something and just seeing sealant oozing out of every seam or component. A factory GM engine has a very small (about 1/8" bead) is all that protrudes beyong the component when sealant is used. If you go back and look as some of my LB7 Duramax injector jobs with the rocker boxes sealed to the heads and this job you can see a very small bead around the components looking as close to OEM as possible yet still accomplishing the task of sealing the engine.
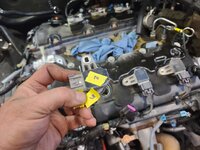
Once in place, peel the masking tape off.
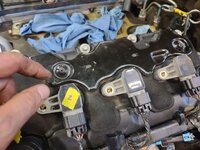
And there it is looking OEM.
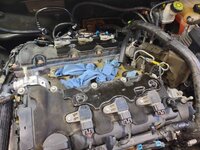
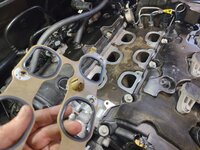
New intake manifold upper gasket at the ready.
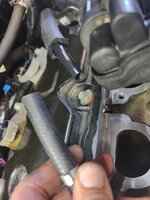
Upon disassembly I did something that I really try to avoid and that is damaging these brittle plastic vacuum lines. As these things age and get some miles on them they become brittle from age and heat so extra care must be taken. I was able to remove this line a year ago when I did the tune-up but unfortunately the freakin' line broke this time upon disassembly. The repair was to use a piece of rubber line and a couple of Oetiker clamps to make a solid repair yet one that is not very noticeable.
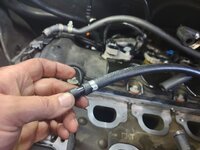
Here is the other end of the break and will have about a 3.5" length of rubber hose to repair.
More final pics to follow...
Started off by getting the rocker covers ready for installation and the new fastener seals that came with the gasket set. These were a PITA to remove and reinstall on each of the 28 bolts.
The spark plug standoff seals were installed in the rocker cover. These are a press fit but not too much of an interference fit so be careful you don't drive them in too forcefully. Just a little tap with the driver set them in place. I love these ATM bushing drivers and find myself grinning like an idiot each time I get to use them. So much nicer than digging through my stash of remnants to find the appropriate chunk of steel or aluminum.
Rocker covers installed and fasteners torqued to 8 ft/lbs. I chose to use my small 1/4" torque wrench and set to 96 in/lbs. for easier access to those rear fasteners. Next was to install the coil packs and putting the wiring loom back in place.
I've seen many mechanics write directly on the components or plugs/connectors but I don't like seeing those markings when the job is completed so I will mark things with masking tape that can be easily removed as the job is being reassembled. My thinking is making the job look like no one was ever in there and restoring it to as near factory appearance and conditon as possible. Maybe that is also why I am so adamant about sealer usage. I despise popping the hood on something and just seeing sealant oozing out of every seam or component. A factory GM engine has a very small (about 1/8" bead) is all that protrudes beyong the component when sealant is used. If you go back and look as some of my LB7 Duramax injector jobs with the rocker boxes sealed to the heads and this job you can see a very small bead around the components looking as close to OEM as possible yet still accomplishing the task of sealing the engine.
Once in place, peel the masking tape off.
And there it is looking OEM.
New intake manifold upper gasket at the ready.
Upon disassembly I did something that I really try to avoid and that is damaging these brittle plastic vacuum lines. As these things age and get some miles on them they become brittle from age and heat so extra care must be taken. I was able to remove this line a year ago when I did the tune-up but unfortunately the freakin' line broke this time upon disassembly. The repair was to use a piece of rubber line and a couple of Oetiker clamps to make a solid repair yet one that is not very noticeable.
Here is the other end of the break and will have about a 3.5" length of rubber hose to repair.
More final pics to follow...