To avoid these ads, REGISTER NOW!

ZMotorsports Shop Projects 2.0

Jayman17

Well-known member
Joined
Feb 6, 2017
Messages
3,818
Location
Seattle, Wa
Those are nice lightning photos Mike. Curious if you have ever been to a place called The Pie Dump, I forget which city it was in but I saw it on Diners, Drive-ins and Dives the other night. Looked like an awesome spot to eat.
 
To avoid these ads, REGISTER NOW!
OP
Z

zmotorsports

ALLIANCE MEMBER
Joined
Oct 20, 2009
Messages
21,470
Location
Northern Utah
Those are nice lightning photos Mike. Curious if you have ever been to a place called The Pie Dump, I forget which city it was in but I saw it on Diners, Drive-ins and Dives the other night. Looked like an awesome spot to eat.

Sorry, I'm not familiar with any place called the Pie Dump.
 
OP
Z

zmotorsports

ALLIANCE MEMBER
Joined
Oct 20, 2009
Messages
21,470
Location
Northern Utah
The next project actually rolled into the shop on Monday evening but I was neck deep in yard work so I didn't get a chance to begin work on it until last night.


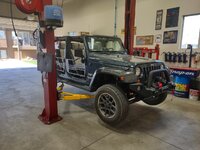
I have done some work for this gentleman on numerous occasions as he was a client when we had our speed shop and has also brought a few things to me over the last couple of years in our new shop. He just took possession of this Jeep a short while ago as he bought it with engine issues and really didn't get a chance to drive it before now. Once he got the powertrain back in running condition he quickly realized he had a pretty good case of death wobble and called to ask for advice seeing as how he is new to this Jeep thing. I recommended a few things to check and shortly after he called telling me he found the issue and we scheduled an appointment for him to drop it off.

Usually these issues arise on lifted Jeeps running oversize tires as they put more stress on suspension and steering components but I thought this one would be good to document to show that it can happen to a bone stock Jeep as well.

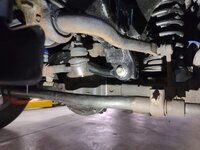
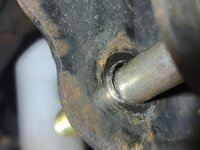
There are several things that can cause death wobble but a common one is the track bar holes being elongated. The issue seems to begin with a track bolt coming a little loose and then the back and forth stresses elongate the bolt holes, usually in the axle bracket but this one appears to be both with the bracket at the frame end actually being a little worse. The end result is usually a nasty case of death wobble that is quite often explained as a "near death experience". :ROFLMAO: Those that have had a case of death wobble know exactly what I mean and I've driven a few that definitely got my attention. 🤬

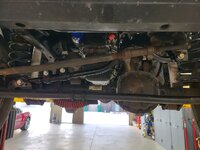
The Jeep racked and giving the suspension a good once over. I like to barely lift the Jeep to the middle of the suspension range so the suspension is neither fully drooped out with weight hanging on the components nor sitting at ride height with the suspension in compression with a load. By having it in the middle of the range I have found it easier to roll around under it on a creeper and with a prybar check each suspension connection point to check the bushings. Then I'll raise the Jeep up in the air a few inches to check front ball joints and unit bearings before raising it further to get a full view of the undercarriage.

Everything seems to be in order with the exception of the track bar where I was able to get a bit of play at both ends. Also worth noting is that both ends (axle and frame) are completely stock with no aftermarket components. There are several aftermarket companies that manufacture heavy duty brackets for these to address issues either as a direct replacement part or as preventative as a Jeep is being built. I've done upgrades for people under both situations but it's usually after the fact vs. preventative.
tb1.jpg

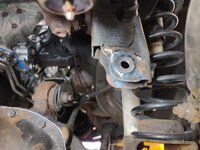
It's kind of hard to see but if you look around the 2 o'clock to approx. 5 o'clock range you can see where the head of the bolt has been moving. This is far from one of the worst cases I've seen but this is about when things start becoming noticeable that something is going on that isn't right.
tb2.jpg

Not quite sure what is going on here as from the outside it looked like electrical tape but once I got it apart it almost took the consistency of RTV.
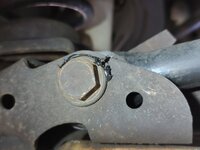
tb3.jpg

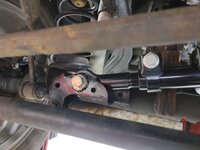
This case actually got bad enough that it wore the rubber encapsulated bushing in the track bar ends. The new owner attemped to stake the bushings in place just to buy some time until I could get it in the shop. The bushing was now firmly mounted in the track bar but unfortunately, the elongated holes in the brackets still allowed a substantial amount of movement.
tb4.jpg

tb5.jpg

I also have found that there is just enough clearance in the new bushings and in new aftermarket track bars that the 14mm bolt can be replaced with a 9/16" bolt and therefore close up a few more thousands of clearance. I didn't think about putting the OEM 14mm bolt in the hole for a visual but I did put the larger 9/16" bolt in the hole and you can see how much the hole is elongated.
tb6.jpg

I've had some come in the shop that have been so severe that the bracket is either ripped from the mounting location or it has been damaged so badly that a complete bracket replacement is the only option. At that point I have used one of the various aftermarket brackets and welded them to the Jeep's axle or frame after removing the OEM bracketry. This is a great option as they are also thicker than the OEM brackets, most are around 1/4" with a few only being 3/16" material. The factory bracket thickness seems to be about 10-gauge or slightly over 1/8" steel.

This Jeep fortunately was not that bad and a perfect candidate for a repair using weld washers. Now most probably know what a weld washer is as it is exactly what is sounds like, a washer welded to the outside of an existing hole to give the material more thickness and therefore strength for the fastener. I've used weld washers as well as doubler plates on everything from race cars to Jeeps and even snowmobiles, ATV's and sandrails as they are quite popular in the off-road and racing industries. They give the extra strength by adding thickness and therefore surface area for fasteners to capitalize on without having to make the entire brackets out of 1/4" or 3/8" thick plate. Strength without all of the extra weight is the main advantage. Those that have followed along with some of my previous work may note that when we built my son's suspension under his WJ that I machined weld washers and used them in multiple locations for suspension mounting points.

Now the examples above were from the beginning of a project so the material is actually multiplied when using a weld washer. However, in a scenario such as this where the hole is damaged and there will be no support from the original material, I feel there is a better option. Most people I've seen do this repair just simply weld a washer to the outside of the hole in the bracket, bolt it back together and run with it. That is not the way I do this repair because it will only net you the support based on the washer being used and not to the tolerances I prefer. Most standard washers are made from 1018 or 1020 mild steel with a zinc coating and are only about .100" in thickness. This is less than the OEM material that wore away and therefore it is a repair with a relatively short shelf life and generally just a bandair repair.

I use a bit more intrusive method by machining a weld washer that is also taking the thickness of the OEM bracket into the equation plus approx. another .125" so at least doubling the material thickness from OEM. This takes it from a bandaid or temporary repair to a permanent repair that will be stronger and have a longer life than the OEM component. It does take a bit longer and requires some machining but in my opinion, the only proper way to repair these.
tb7.jpg

The slightly larger diameter 9/16" bolt is a much nicer fitment into the new track bar bushings.
tb8.jpg

For this repair I like to reach for some old hydraulic rams that I keep a small assortment of. I've done a lot of hydraulic work over the years and I've kept the damaged or broken hydraulic rods as they are perfect for such repairs. If you look at most off-road parts suppliers that sell weld washers you will find most are machined from 1018 or 1020 mild steel. While there is nothing wrong with that, those grades are considered low carbon steel and I have found that most hydraulic rods are machined from 1045 mild steel, which is considered a medium carbon steel and extra carbon gives this grade excellent strength as well as wear characteristics. I dug through my remnants of hydraulic rods, which is getting low I might add as I haven't replaced a rod in several years. I found a complete 24" rod in that was 2" in diameter but that would require quite a bit of material removal to fit the OEM brackets. Upon further digging I found a couple of smaller drops in the 1.250" diameter which will be perfect.
tb9.jpg

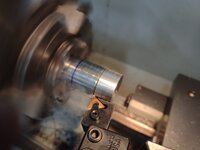
The 1.250" rod chucked up in the 6-jaw and being faced off.
tb10.jpg


More pics to follow.......
 
Last edited:
OP
Z

zmotorsports

ALLIANCE MEMBER
Joined
Oct 20, 2009
Messages
21,470
Location
Northern Utah
Continuing on....

Rather than assume the thickness based on past repairs I like to verify each one to ensure I machine the step to the correct depth per vehicle. Yep, this OEM material is about 10-gauge.
tb12.jpg

I turned just a few thousands off the OD to remove the chrome plating from the hydraulic rod.
tb13.jpg

Next I drilled the center to .500" using a drill bit then switched to a boring bar to sneak up on the final dimension. This way I can control the clearance right from the beginning and ensure a proper repair and one without beginning life with clearance.
tb14.jpg

Landed right on my dimension. I placed a gauge pin into the hole and felt some resistance from compression.
tb15.jpg

Released the gauge pin and it pushed back out. Not a bid fitment.
tb16.jpg

I just barely removed the burr to the ID using a deburring tool rather than a chamfer bit. I feel a chamfer bit will remove too much material and the whole point of going through this process is to keep as much material around the bolt as possible.
tb17.jpg

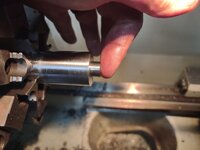
Next I machined the .130" deep step into the weld washer and turned it down to .750" in diameter which is what I will ream the elongated holes out to. This will provide .250" of material thickness for the fastener, double what the OEM was and a much tighter tolerance.
tb18.jpg

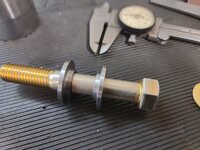
Two weld washers complete and test fit. Nice and snug on the bolt's shoulder.
tb19.jpg

Now let's talk fasteners. I just grabbed this off the shelf as it won't be the fastener I use, can't believe I don't have the correct fasteners for this repair. I must have not bought replacements from the last one. I prefer to use fine threaded fasteners for these repairs as I feel the more shallow helical angle of the thread aids in preventing loosening from vibration. Also, I hate having the threads coming in contact with the bracket material. This just acts like a file and eats away at the parent material of the bracket or tab mount. This is what bothers me about the OEM fasteners that are threaded the majority of the shank with no specific shoulder length. I shoot to have no threads actually come in contact with the brackets or tabs and only the full shoulder engages with the bracket material. I need 2.250" from outside of weld washer to outside of weld washer and I am right there. I will grab a couple of 9/16"-18 Grade 8 fasteners with 2.250" shoulder length and locknuts for this project. I will then cut the threads down to length as needed.
tb20.jpg

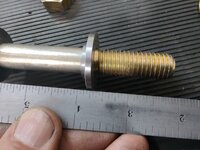
Here is how the shoulder should properly mate with the weld washer when in its final assembly phase. I will cut the extra threads off as I only like to have 2-3 threads extend past the nuts.
tb21.jpg


That's all I have at the moment but will post more of the repair as it progresses.

Thanks for looking.
 
Last edited:
OP
Z

zmotorsports

ALLIANCE MEMBER
Joined
Oct 20, 2009
Messages
21,470
Location
Northern Utah
Good info mike.
I'll add that mis-alignment spacers used with heims get hammered and deformed as well. Good to replace with the heim even if they 'look' OK. Smallest gap only gets wider.

Agreed Justin. The discussion around Heim joints/rod ends is a whole other can of worms we could open. But yes, I agree, anytime I replace a rod end that uses mis-alignment spacers, if they have even the slightest ding, dent or deformation in them at all, OD or ID, they get replaced.
 

Just Fishing

Well-known member
Joined
Dec 21, 2020
Messages
57
Location
Utah
Mike, you're always worth the wait. (y)
I forgot to warn you about the electrical tape "patch", I'm surprised it held up as well as it did. :ROFLMAO:

And it actually did "fix" the death wobble for the most part, however I could still feel the front axle shifting.
It was a very odd sensation.
 
OP
Z

zmotorsports

ALLIANCE MEMBER
Joined
Oct 20, 2009
Messages
21,470
Location
Northern Utah
Mike, you're always worth the wait. (y)
I forgot to warn you about the electrical tape "patch", I'm surprised it held up as well as it did. :ROFLMAO:

And it actually did "fix" the death wobble for the most part, however I could still feel the front axle shifting.
It was a very odd sensation.

Thanks Chris. I wondered about the black residue because from the outside it appeared to look like electrical tape but once I got it apart it looked more "spongy" and I couldn't determine what exactly it was. This could also be why it appeared to have more slop coming from the frame mount than the axle mounting location before I disassembled it. Once I got the track bar removed the elongation of the holes seemed to be quite similar between the axle bracket and frame bracket. Not terrible nor as bad as I've seen but definitely enough to be a handful while driving and hitting a few bumps and throwing it into full blown death wobble.
 

Just Fishing

Well-known member
Joined
Dec 21, 2020
Messages
57
Location
Utah
Thanks Chris. I wondered about the black residue because from the outside it appeared to look like electrical tape but once I got it apart it looked more "spongy" and I couldn't determine what exactly it was. This could also be why it appeared to have more slop coming from the frame mount than the axle mounting location before I disassembled it. Once I got the track bar removed the elongation of the holes seemed to be quite similar between the axle bracket and frame bracket. Not terrible nor as bad as I've seen but definitely enough to be a handful while driving and hitting a few bumps and throwing it into full blown death wobble.

3M super 33!
I had some jokes I shared with friends and family while I waited for you to have some time. :LOL:
"fixed with the finest electrical tape" as I explained why I won't drive it on the freeway.

I'm also glad to see that staking held up. :ROFLMAO:


👽
 

Just Fishing

Well-known member
Joined
Dec 21, 2020
Messages
57
Location
Utah
I'll also note that the engine block from a Wrangler that Mike did the cam bearings (and cylinder hone) on earlier this year (and in this thread) was also this Jeep.

Mike did a fantastic job with it.
Chrysler did a weird thing and made it so you HAD to install the bearings in one direction, and you couldn't skip like you can in an LS due to the oil galleys blocking access to the bearings.
The fact you got it in that straight w/o another hole to help align the tool = :beer:

That engine also pumped bearing material through the entire system, the fact that the cylinder bores came out unscathed amazed me.
The Crankshaft was a different story. :lol:
 
Last edited:

Bigblue&Goldie

Well-known member
Joined
Mar 12, 2009
Messages
10,730
Location
AZ
The last post is a master class on how to properly fix a wallowed out hole. 99% of these problems would be eliminated if properly shouldered hardware was used in the first place. Also, factory bolt hole tolerances are usually all over the place. On a high end chassis the suspension bolt holes are reamed to size (this is for extreme use vehicles).

On a UTV that's beat on hard, the best money that a person could spend is on a shouldered bolt replacement kit (both RZR's and CanAm's are horrible from the factory).
 
OP
Z

zmotorsports

ALLIANCE MEMBER
Joined
Oct 20, 2009
Messages
21,470
Location
Northern Utah
I'll also note that the engine block from a Wrangler that Mike did the cam bearings (and cylinder hone) on earlier this year (and in this thread) was also this Jeep.

Mike did a fantastic job with it.
Chrysler did a weird thing and made it so you HAD to install the bearings in one direction, and you couldn't skip like you can in an LS due to the oil galleys blocking access to the bearings.
The fact you got it in that straight w/o another hole to help align the tool = :beer:

That engine also pumped bearing material through the entire system, the fact that the cylinder bores came out unscathed amazed me.
The Crankshaft was a different story. :lol:

Thanks for the feedback Chris. Glad the engine turned out so good and I was able to assist. I agree, those cam bearings were not like others I've done where I could support the tool and new bearing being installed. That closed off cam valley made it a bit more problematic when installing new cam bearings.


The last post is a master class on how to properly fix a wallowed out hole. 99% of these problems would be eliminated if properly shouldered hardware was used in the first place. Also, factory bolt hole tolerances are usually all over the place. On a high end chassis the suspension bolt holes are reamed to size (this is for extreme use vehicles).

On a UTV that's beat on hard, the best money that a person could spend is on a shouldered bolt replacement kit (both RZR's and CanAm's are horrible from the factory).


I completely agree Ryan. I have yet to see one of these repaired in this fashion by another shop. I am sure there are those who do it this way but I think they are far and few between. Unfortunately, I have seen them with just a washer welded to the outside and that makes the next proper repair much more problematic. Back when I was racing as well as building snowmobiles, sand drag ATV's and sandrails, all of the holes I used for "critical" fasteners, suspension components in particular, the brackets were drilled undersized and then reamed to size before welding in place. Prior to the welding process I would machine a spacer for the component that was going to be installed so the tabs would be held in the correct spacing and orientation. When machining the spacer I would either make the spacer the exact width of the component, such as a rod end, and then add a small shim or I would simply add the extra length to the dimension and machine the spacer to include about another .025"-.045" to compensate for finishing touches such as paint or chrome. Much of the decision was based on how many I was welding for or commonality. If it was a standard dimension that would be used in multiple places around the chassis then I'd just machine the spacer to include the extra width. If it was a one-off or sparcely used configuration I'd just machine the spacer to the exact width of say the rod end and then just add a shim. That way when installing the shock or control arm into a mounting location the components actually fit without having to pry the tabs apart damaging either the chrome or paint finish, like I see all too often. :mad:

As for fasteners and shoulder lengths, that is just something I have learned over time based on observations of vehicles that have come through my shop. Upon witnessing patterns I determined that the threads from various fasteners were actually damaging mounting tabs or weldments on the non-serviceable chassis components. I started seeing a tab on one side of say a shock mount or control arm mount perfectly fine while the one on the other side had been hammered away or worn oversize. Many times I could tell that the shoulder side was the perfect one and the threaded end was where the damage was which pointed to the threads actually causing the damage and repairs were painstakingly difficult and time consuming. What was frustrating at times was when I would see both sides worn out and couldn't figure out why. Upon in-depth discussions with the owners I often times discovered that there were no pattern for how some of the fasteners were being installed when the owners were working on their toys at their home garages or in the field. One time they may install the bolt one direction and the next the opposite. Not only did this drive me crazy from the standpoint of recognizing patterns but it was also messing with my OCD from an aesthetics point of view. 🤬 It would drive me crazy seeing a shock bolt on one side going in from the front and just the opposite on the other side of the car. :rolleyes: I don't think the owners really gave it a second thought but it would mess with my head and I would try to educate my clients of not treating them like a lawnmower or snowplow but rather a finely tuned instrument or race car and to think through the process rather than merely hurrying through the procedure just to get done.

I was fortunate that I recognized many of these failures on production powersports toys that would come to my shop for repairs and/or mods. At first I thought maybe the manufactures were using inferior materials but then I realized it had more to do with fastener selection and orientation so I was determined that at least any chassis I worked on that left my shop as well as any chassis that I built in-house would not have these issues designed into them. I was slowly gaining some exposure in the snowmobile and sand dune crowds in our area for repairs of such damage. I got in the habit of purchasing over-length bolts in order to get the correct shoulder length, or grip length being the technical term, and then trim the excess threads off to allow only a couple of threads past the nut. On high dollar builds I started using either AN or NAS fasteners but WOW, they come at a premium. $$$$$

It gets time consuming when building chassis from scratch as everything has to be mocked up, then broken back down for finish work. I remember when building my street rod as well as our sand drag quads and sandrails that it was not uncommone to assemble a car 2-4 times before being comfortable with moving to paint work. I also remember sweating when I sent off fasteners to the chrome shop because although I had things labeled I was always worried about getting my correct length and trimmed down fasteners back correctly. Also I used a lot of SHCS (Socket Head Cap Screws) on my sandrail and ATV chassis and I despised the knurls on them so each bolt would get chucked up in the lathe and the knurls turned off before heading off to the chrome shop. THAT was time consuming and tedious job but OOHHH how awesome the finished product looked without having to see those but ugly knurls on the bolt heads. :ROFLMAO: I felt like those little touches were what set my cars apart from the crowds but unfortunately nearly all of those little details would go unnoticed by most.
 
OP
Z

zmotorsports

ALLIANCE MEMBER
Joined
Oct 20, 2009
Messages
21,470
Location
Northern Utah
Last night was a bit of a circus around the shop. I got home later than expected then the guy I did the timing chains on with the Buick called to tell me he noticed a drip of coolant on his garage floor so I told him to run it by and let me give it a look. He informed me that he thought it looked like it was coming from the upper radiator hose connection at the radiator.

On my way home I tried to catch my local Bolt & Nut Supply before they closed to pick up fasteners but missed them by minutes of closing.

Once I arrived home I went straight to work trying to "true-up" the elongated holes in the frame and axle brackets. I started by scribing a circle around the holes and then used a fine toothed rotary bit to "sneak up" and bring the holes back to round. I then used a Unibit or step drill to bring the holes out to 11/16, then a drill bit to 23/32" and finished with a 3/4" reamer for final sizing.
tb22.jpg


Holes ready for reaming.
tb23.jpg

tb24.jpg

This is where it pays off to keep short pieces of Tungsten and not throw them away prematurely. I dug through my assortment and found the shortest pieces and installed my short back cap.
tb25.jpg

Unfortunately, access was not good. This is the backside of the frame mounted bracket. I am left handed so I used the torch in my left hand reaching up between the coil spring and suspension control arm and my right hand around the differential to add the filler rod. Not ideal by a long shot but thankful I had a lift and not doing this on my back.
tb26.jpg

Access to the front of the bracket was a bit better but still not ideal. My out of position TIG welds need some improvement as I am out of practice. But they are solid welds and weld washers now provide .250" per side of support. Double what the OEM provided.
tb27.jpg

tb28.jpg


I was just finishing up with the rear weld washer on the frame mount when the Buick LaCrosse came into the shop for inspection. The owner informed me that he thought it was coming from the upper radiator hose clamp but I reused the OEM constant tension clamps on the radiator hoses and I can't tell you the last time I had one of those leak, they simply don't leak for the most part. I thought to myself before he got there that I was due for a leaky clamp but going over it in my head I knew I pulled a vacuum on this thing and it held for well over a half hour without bleeding off so I figured it had to be a heat/cool cycle issue with the hose after the last week and a half of driving.

After removing some covers and investigating it did appear to be coming around or near the upper radiator hose. I released the tension on the clamp and moved the hose a bit to try and reseal the connection before releasing the tension back onto the hose. I used some brake wash and compressed air to clean the area of a bit of coolant and it appeared to not be leaking.

Next to be sure it was sealed I grabbed my pressure tester and applied 10 PSI of pressure to the cooling system and it stayed dry. I felt around it and watched carefully for a couple of minutes with no coolant leaking. I commented that must have been the issue and then thought I'd pump it up a few more pounds. I stopped at 15 PSI and sure enough, just a little drop of coolant formed. DAMNIT. Another clean and adjust process and repeat of pressure. Sure enough, at 15 PSI a small droplet formed just above the upper radiator hose. Better lighting and moving some wiring out of the way revealed that it was in fact a crack in the radiator tank.

Well that's not what he wanted to hear. I was happy it wasn't anything I did but at the same time, hated to be the bearer of bad news that he now needs a new radiator. :( I really don't have the time for this as I have a full schedule and other things to work on but I feel obligated to replace the radiator. I'm still awaiting the approval to order parts. Stay tuned.....

Plans for tonight include purchasing fasteners, then machining the last two weld washer and getting them welded into place, then paint and final assembly and back to Chris so he can enjoy it this weekend.

I also have a friend of my son's coming by to have me listen to an engine noise in his GM truck. I'm told it isn't good.

Sometime in the near future I need to take a step back from side work and get some personal projects done as well as finish up my grandson's wagon. I don't necessarily want to be quite this busy the entire summer. :unsure:
 
Last edited:

OutlawDrifter

Well-known member
Joined
Jan 20, 2015
Messages
3,898
Location
KS
Mike, there comes a point when you've got to put your priorities first. (I understand the radiator issue, and would feel the same).

I'm currently sitting on 3 different volunteer boards, by the middle of the Summer that will be shaved down to 1, and down to 0 by the end of the year (hopefully). I've got parts sitting on the shelf that need installed on personal vehicles, trees that need trimmed, tractor work to do at the FIL's place...and instead I'm chasing other nonsense that I don't even get paid for :rolleyes:

Stacking money doing side jobs isn't all bad, don't get me wrong, but make sure and take some time for you!
 
OP
Z

zmotorsports

ALLIANCE MEMBER
Joined
Oct 20, 2009
Messages
21,470
Location
Northern Utah
Mike, there comes a point when you've got to put your priorities first. (I understand the radiator issue, and would feel the same).

I'm currently sitting on 3 different volunteer boards, by the middle of the Summer that will be shaved down to 1, and down to 0 by the end of the year (hopefully). I've got parts sitting on the shelf that need installed on personal vehicles, trees that need trimmed, tractor work to do at the FIL's place...and instead I'm chasing other nonsense that I don't even get paid for :rolleyes:

Stacking money doing side jobs isn't all bad, don't get me wrong, but make sure and take some time for you!

Agreed Marc.

Don't get me wrong, I'm not complaining and I enjoy doing side work not only for the money aspect but to continue to fine tune my skills and expand my knowledge, which at times I feel is just as important or even more than the money.

I feel bad as a few of the people I've put off for weeks and even months as I thought I would have completed the jobs before spring. Maybe I loaded myself up a bit too heavy with work over the winter and kept adding to the list. :unsure:
 

Just Fishing

Well-known member
Joined
Dec 21, 2020
Messages
57
Location
Utah
Looking fantastic Mike!
Don't worry about rushing too much, it would be nice to have it for this weekend.
But if not that's fine too, just knowing it's being done correctly is good enough for me.

As for getting projects done within a specified timeframe, I hear ya.
I remember a few years ago I could get my C4 vette up on jackstands, pull that 700R4 and strip it down within a few hours from start to finish.

But that's something I did several times until I was happy with the build (aka first transmission rebuild). :ROFLMAO:

Now days I'm really slowing down.
same task would probably take me half the day or more.
 
Last edited:
OP
Z

zmotorsports

ALLIANCE MEMBER
Joined
Oct 20, 2009
Messages
21,470
Location
Northern Utah
Looking fantastic Mike!
Don't worry about rushing too much, it would be nice to have it for this weekend.
But if not that's fine too, just knowing it's being done correctly is good enough for me.

As for getting projects done within a specified timeframe, I hear ya.
I remember a few years ago I could get my C4 vette up on jackstands, pull that 700R4 and strip it down within a few hours from start to finish.

But that's something I did several times until I was happy with the build (aka first transmission rebuild). :ROFLMAO:

Now days I'm really slowing down.
same task would probably take me half the day or more.

Thanks Chris. I told you you'd have it for the weekend and you've got it. It was a late night, but I finished it up and she's ready to go play this weekend. :thumbup:
 
OP
Z

zmotorsports

ALLIANCE MEMBER
Joined
Oct 20, 2009
Messages
21,470
Location
Northern Utah
My son stopped by the shop last night and we got to talking about our conversation here yesterday about reaming holes vs. drilling and fastener selection. It was kind of funny because he mentioned that he remembered seeing me stand at the lathe for hours knocking the knurls off of the SHCS (Socket Head Cap Screws) before taking the lot to the chrome shop. It's funny what kids remember.

We also talked about reaming the holes in brackets and he mentioned that he remembers me spec'ing out fasteners to obtain the correct grip length and then cutting the bolts to length so only a couple threads went past the nuts and how although painstaking the process was but how the finished product looked compared to many we saw at the track or on the dunes. Again, it's funny what our kids remember and the things that stick with them. He even mentioned that this was all before we had our current machines and this was with our old Smithy 3-in-1 machine.

However, it got me thinking that in the later years of building sand toys and cars I did two things differently. I started prepping the fasteners by machining the knurls off as I was cutting the bolts to length in the mockup phase so I didn't have to do them all at once after breaking the car or quad down and before dropping them off at the chrome shop. This was more of a mental thing I'm sure as it didn't seem like it was as much time doing them a few at a time while I was cutting the bolts to length as compared to standing at the lathe for a night or two doing all of the fasteners at the same time.

Secondly, in later years I discovered annular cutters and started using those more and more with the bracket fabrication process. I still reamed certain holes after drilling but for the vast majority of holes I really liked the annular cutters as it was a time saving step compared to drilling then reaming.

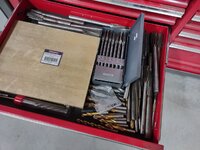
My reamer drawer. I have a few that actually need to be replaced as they are getting pretty worn.
reamers.jpg

I tried a set of Rotacut annular cutters about 15 or so years ago and liked them so much I've purchased a couple more sets when I've found them either on sale or discounted.
rotacut.jpg

Then my son's friend brought his 2008 Silverado 1500 by the shop to have me listen to it as he has developed a not so good noise.

gm1.jpg

gm2.jpg


I went old school and grabbed my long screwdriver and began poking about the engine and listening with the handle in my ear. I was able to determine the noise was definitely in the bottom end and sounded more front of block so thinking either rod or crank bearing. The truck has 200k on it but also noted it seems to have low oil pressure.

For further diagnosing we hooked up the scanner and attempted to disable injectors one at a time and see if I could detect if it was specific to one particular cylinder such as a rod bearing but unfortunately with the low oil pressure some of these functional tests were disabled by the ECM and wouldn't let me proceed with the scanner. I guess I could have physically pulled an injector connector one at a time and accomplished the same thing but either way the noise is deep and with 200k miles not a good candidate to go in and fix the specific issue.

I hope I gave him enough information to make an informed decision on how to proceed. I'm sure it wasn't what he wanted to hear.
 
To avoid these ads, REGISTER NOW!

OutlawDrifter

Well-known member
Joined
Jan 20, 2015
Messages
3,898
Location
KS
That L76 6.0L is a weird duck in a pickup/suv. Makes good power, but I still don't understand the push from the iron block based 6.0L. The VVT is cool, but the AFM definitely needs to go!
 
OP
Z

zmotorsports

ALLIANCE MEMBER
Joined
Oct 20, 2009
Messages
21,470
Location
Northern Utah
After my son and his friend left, I proceeded with the Jeep track bar repair and although it turned out to be a late night, I was able to finish it up so Chris can have it back for the weekend.

I installed the front and rear weld washer in the axle bracket with a bolt holding them in tightly in position and tack welding about a quarter of the way around 180-degrees across before removing the fastener and completing the welds. Not sure why I didn't show the finished weld before painting. I wish I could say all my welds looked this good but as I was finishing up the front weld washer I ran out of Argon gas in my TIG welder and had to switch over to my smaller MIG welder for the rear washer. That probably worked out for the best anyways as there was no way I could get both hands up behind the axle around the coil spring and control arm on the passenger side. Many times when repairing these there are other things I'm doing to the axle such as a regear or something so it justifies removing the axle and performing this repair on the fabrication table where they are easier to access for welding but this job didn't warrant removing the axle so I hit the rear weld washer on the axle end with the squirt gun. I'll have to run and grab a refill of Argon this afternoon so I'm not left without over the weekend.
tb30.jpg

Seeing as how the suspension is stock on this Jeep there is no need to mess with the track bar width so I matched the OEM track bar with the new one by inserting bolts through the bushings and matching eye to eye.
tb31.jpg

Repaired areas at both frame and axle end were painted with some epoxy paint and then the track bar was installed. When doing suspension work make sure that you do not fully tighten suspension components until the vehicle is loaded at ride height otherwise damage to the bushings can occur.
tb32.jpg

Axle end installed and fastener tightened to just before snug.
tb33.jpg

One final look over before lowering the Jeep and fully tightening the track bar joints.
tb34.jpg

Ride height and track bar fully torqued.
tb35.jpg

After the road test and ready for Chris to go play.
tb36.jpg


Thanks for following along on this repair.
 
OP
Z

zmotorsports

ALLIANCE MEMBER
Joined
Oct 20, 2009
Messages
21,470
Location
Northern Utah
That L76 6.0L is a weird duck in a pickup/suv. Makes good power, but I still don't understand the push from the iron block based 6.0L. The VVT is cool, but the AFM definitely needs to go!

Agreed Marc. Believe me, there was a lot of discussion last night around rebuilding this motor and deleting the AFM hardware that is internal as well as tuning it out in the ECM vs. a remanned engine and just tuning out the AFM in the ECM until a later date vs. selling the truck as is and putting the money towards something that is in better condition. If this was only a 100k mile truck it would have been a completely different discussion but where it's sitting at 200k miles and with other known issues I was trying to be open and honest with him about his options and potential areas for concern.

It's not my place to make that decision for him but he's a good young man and he's been almost like a member of our family for many years as he and my son's friendship goes back to Jr. High School so I was pleased that he at least came to me for advice but I felt bad there wasn't anything more I could do other than just give him as much information as possible so he can make a wise decision.
 
OP
Z

zmotorsports

ALLIANCE MEMBER
Joined
Oct 20, 2009
Messages
21,470
Location
Northern Utah
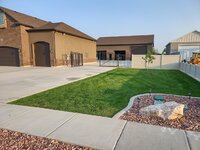
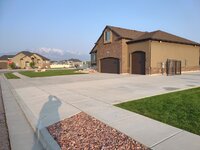
After my morning cup of coffee on Saturday on the deck and looking out over my beautifully mowed lawn I headed to the shop to work on a couple of small personal projects as it was going to be a short day in the shop.

I started by installing the new Directv satellite receiver in the coach as the old one was obsolete and they sent me a replacement. I pulled the coach outside, raised the dish to find satellites and while it was locking on I swapped out the old receiver for the new one and realized it was about 1/2" shorter in height and almost 2" wider so I would have to modify my hold-down bracket.

Coach pulled out of the shop and dish raised.
bracket9.jpg

I removed the hold-down bracket that I fabricated back in 2013 when I installed the last receiver and came up with a plan to add to it rather than build an entire new one. At first I figured I'd just cut the end off at the bend and add a 2" piece. However, I realized that I had already modified it once before so rather than mod a mod, I figured I would bend a new leg and then weld it onto the top strap for only one weld joint.
bracket1.jpg

I have to admit, it's nice having a small pan brake in the shop for such work. I cut another length of 1" wide x 11 gauge strap and began duplicating the leg plus 2 inches at the top.
bracket2.jpg

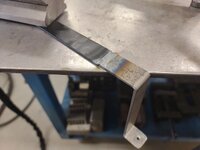
New leg bend, hole drilled for screw and end chamfered to allow a full weld and blend.
bracket3.jpg

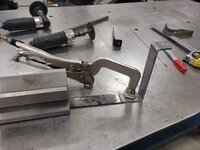
Clamped in position and ready to weld the back side.
bracket4.jpg

With the underneath welded I moved to the top.
bracket5.jpg

Now to compensate for the 1/2" height difference I found a small piece of 1/2" x .065" square tubing to keep it light yet rigid. I removed the foam tape from the area where the tubing will be welded, cleaned with acetone and stitch welded the tubing to the bracket's top side.
bracket6.jpg

bracket7.jpg

A little sanding and masked the foam tape so I didn't have to replace all of it and hit it with a couple light coats of semi-gloss black trim paint. Ready to install once I add a small piece of foam tape to the square tube.
bracket8.jpg

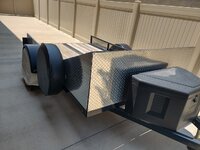
Before closing up shop my wife came out and handed me the new tire cover that had just arrived. The last one I put on the trailer in 2015 when I built my utility trailer but over the years it had become pretty sun damaged.
trailer1.jpg


Thanks for looking.
 

OutlawDrifter

Well-known member
Joined
Jan 20, 2015
Messages
3,898
Location
KS
Welds look nice on bracket Mike.

What are the dimensions on the utility trailer? It's looking good too! (also reminded me about the spare tire/bracket for my car trailer)
 
OP
Z

zmotorsports

ALLIANCE MEMBER
Joined
Oct 20, 2009
Messages
21,470
Location
Northern Utah
Welds look nice on bracket Mike.

What are the dimensions on the utility trailer? It's looking good too! (also reminded me about the spare tire/bracket for my car trailer)

Marc, my utility trailer is a 6'x10'. I built it back in 2015 while at our old home and shop.

Here is a video that I did while building it.

I incorporated quite a few custom touched into the build to set it apart from anything else available but it's been a great trailer for the past 8+ years now.
 

OutlawDrifter

Well-known member
Joined
Jan 20, 2015
Messages
3,898
Location
KS
Marc, my utility trailer is a 6'x10'. I built it back in 2015 while at our old home and shop.

Here is a video that I did while building it.

I incorporated quite a few custom touched into the build to set it apart from anything else available but it's been a great trailer for the past 8+ years now.
Thanks for the follow up Mike! I'll check the video out.
 
OP
Z

zmotorsports

ALLIANCE MEMBER
Joined
Oct 20, 2009
Messages
21,470
Location
Northern Utah
Mike, your yard looks great…but it reminds me that never having to mow again was one of the reasons I moved to Arizona! I know some people find it therapeutic, but I am definitely not one of them.

Thanks Scott. I'm one of those who actually finds it therapeutic. I love mowing my lawn and the feeling of accomplishment afterwards. I also seem to do some of my best thinking while mowing my lawn. Maybe it's because it is such a simple task that I can clear my mind of the unimportant things and just focus on what really matters while doing such a mundane task. Not sure of the reasoning but I like it.

However, don't even get me started on clearing snow...... 🤬
 
OP
Z

zmotorsports

ALLIANCE MEMBER
Joined
Oct 20, 2009
Messages
21,470
Location
Northern Utah
Lawn looks amazing!! Your Hard work shows!!! I love a beautiful lawn

Thank you. I mowed the yard again last night and then after dinner the wife and I sat out on the deck enjoying the view of the freshly mowed lawn while watching a storm roll in. It was a lot of hard work getting the yard, home and shop to this point but well worth every second of it to be able to sit back and enjoy the fruits of one's labor.
 

Just Fishing

Well-known member
Joined
Dec 21, 2020
Messages
57
Location
Utah
Good to hear Chris. Hope you had a great trip this weekend.

Thanks for the feedback.

I had an absolute hoot of a time over the weekend.
Top off and doors off resulted in a little too much sun, but I needed the vitamin D. :alien: :ROFLMAO:

First time going offroad with the Jeep, and I have to say I am an absolute fan of how well it handled.
Last solid axle 4x4 I had was an old K5 blazer.

Even with the "street" tires on those gladiator wheels, and open diffs, it didn't slip once.
I found myself going up the side of a mountain side our property that I had a hard time hiking up prior.

the top,
1684873664809.png

On the way there and back I got up and over 80mph a few times and I had 0 issues.
Nice solid tracking down the road.

Thank you, sir! :beer:
 
OP
Z

zmotorsports

ALLIANCE MEMBER
Joined
Oct 20, 2009
Messages
21,470
Location
Northern Utah
I had an absolute hoot of a time over the weekend.
Top off and doors off resulted in a little too much sun, but I needed the vitamin D. :alien: :ROFLMAO:

First time going offroad with the Jeep, and I have to say I am an absolute fan of how well it handled.
Last solid axle 4x4 I had was an old K5 blazer.

Even with the "street" tires on those gladiator wheels, and open diffs, it didn't slip once.
I found myself going up the side of a mountain side our property that I had a hard time hiking up prior.

the top,


On the way there and back I got up and over 80mph a few times and I had 0 issues.
Nice solid tracking down the road.

Thank you, sir! :beer:

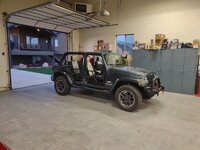
That's great to hear Chris. Glad to have had the opportunity to do this repair and glad to hear you are pleased with the results.

Just remember what Jeep stands for....... Just Empty Every Pocket. You're journey has only begun. :ROFLMAO:
 

Just Fishing

Well-known member
Joined
Dec 21, 2020
Messages
57
Location
Utah
That's great to hear Chris. Glad to have had the opportunity to do this repair and glad to hear you are pleased with the results.

Just remember what Jeep stands for....... Just Empty Every Pocket. You're journey has only begun. :ROFLMAO:

Yup, the J.e.e.p. part has me smiling when I pull out my wallet. :ROFLMAO:
Doing everything I can to hold back on those BFG 35in tires I want, reminding myself I need gears at a minimum before I start making it look cool. :cry:

Gears of course mean I need a locking differential...
🐈‍⬛
 
To avoid these ads, REGISTER NOW!
Top Bottom