Last week, one of our mechanics came to me asking for advice on a hydraulic cylinder in one of our compactors. I went and looked at it with him and gave him some suggestions on how I would go about removing it from the compactor. Once he got the covers removed, the pin in the rod end came out easily, however the pin in the cylinder end was seized. He had beat on it trying to remove it, but it wasn't budging. I suggested making a slit in the pin's sleeve then liberally spraying with Kroil and even using some heat if needed to expand it enough to get the pin to move. I suggested extending the ram a foot or so to keep the heat away from the packing and to just cover the rod to protect the finish/surface. He looked at me like I had two heads. WHAT? Cut the area where the pin goes? I said, well you've been here for two hours beating on it and haven't gotten anywhere so at what point to you want to shift gears and try something different. I then mentioned that just use a small cut off disc and then simply weld up the slit while doing the repair in the shop. I could see the gears turning so it at least got him thinking outside the box a bit.
Once he was able to get the cylinder out of the compactor, he asked me to look at where he "thought" it was leaking from. He mentioned it was leaking from the non-serviceable end. I simply explained that this is a common area where hydraulic cylinders can crack and the repair is pretty straight-forward. He did not really know where to begin so I explained how to proceed with the repair, which consisted of identifying the full extent of the crack, grinding a "V" in the cracked area to get down near the seam of the end cap, then weld it back up. Easy peezy.
He was still rather hesitant and asked me if I would show him as he had never performed anything like this. Granted, this was commonplace 15+ years ago, especially on the Hyster forklifts we had as the tilt cylinders were very prone to cracking and we welded these a lot seeing as how we had about 40 of these lift trucks. Nowadays, we simply don't see these failures nearly as often, especially our newer mechanics that have only been in the industry for a couple of years.
Friday I brought my welding helmet in to work and grabbed my penetrant and die from home to demonstrate the proper way to repair such failures. Turns out I had several of our mechanics who wanted to learn so it was nice to turn it into a little learning opportunity for about four of our mechanics who had never done this type of repair and a refresher for two who had.
Using our MHE lift to lower the ram onto some sawhorses and to extend the rod end back out a little bit. As we were beginning to grind on the end, I suggested removing the plugs in the end to prevent pressures from building and I could see the light bulbs come on as none had thought about how heat will cause the area behind the piston to expand. Simply explaining that they need to think ALL the way through the process, not to focus on the repair to the point of having blinders on to other factors that can be affected.
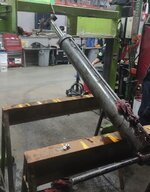
Flattened the area off to remove paint, scale and corrosion. This revealed much of the crack where he had identified the fluid coming from.
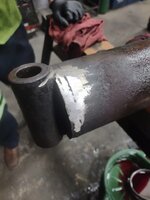
But to be certain we grind enough out to repair the crack, yet not more than necessary, I grabbed some penetrant die from home to show them how this works.

First clean the area thoroughly, then apply the penetrant and allow it to creep into the low areas, cracks and crevices.
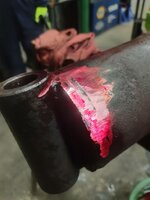
After letting it dry for a few minutes, take a rag and wipe "over" the area with cleaner to remove the penetrant from the surface. I think this is where people get it wrong as they spray the area down again with cleaner, which washed the penetrant out from any cracks or defects. You want to just wipe over the area with cleaner sprayed on a rag, not saturate the area being inspected.
Once the area is wiped down, grab the developer and spray it on the area.
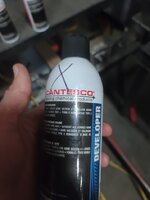
And it reveals the crack or any other defects. This crack actually went a little further than we could see with the naked eye.
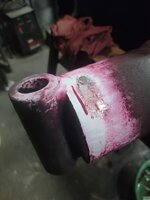
It was ground out about a quarter inch past each end, then cleaned again before welding. I hadn't stick welded (SMAW) in quite some time and several of our mechanics have never stick welded so it was definitely a learning opportunity for them. I was so involved in explaining the process and the "why" behind what we were doing I forgot to take pictures of the process. The welded area is shown here after we rolled the cylinder over to address the slit cut in the pin end. It actually welded up quite well.

With the cylinder rolled over, I used some 7018 rod to fill in the slit that was cut to soak the pin down as this was compromised slightly. I think the guys realized that sometimes the mounting hardware doesn't cooperate and alternate methods need to be explored to remove the fasteners, before you can even attempt to address the reason why the component is being removed. I explained that if something is either damaged or compromised during the removal process, then you simply address that along with the repair. That's the nice thing about working with metal, if you remove some, you can put it back.

All in all, I think the little demonstration went well and opened their eyes to the fact that many times in this industry, you have to alter repair plans as you progress through the actual repair and seldom do they ever go exactly as planned. A couple of them came from the automotive world (dealerships) and never thought about a repair being done other than unbolting one part and bolting on another. I explained that THIS is not the automotive world and many times a repair is not a bolt on affair. This was a great real-world example of that.
I also have to accept that some of the repairs that I just seem to take for granted as everyday tasks from the past nearly 40 years, are not so commonplace anymore and definitely with the younger group of mechanics that we have. I hope this was a good learning opportunity for them and it was nice to have them ask a lot of questions.
Thanks for looking.


 I had all kinds of blocks and straps holding it in place so I could weld it, but he was nice enough to come and check on me at midnight when it was time to go home. I was so pissed at him I couldn't even look at him and just told him to leave and I'd figure it out.