
You are using an out of date browser. It may not display this or other websites correctly.
You should upgrade or use an alternative browser.
You should upgrade or use an alternative browser.
ZMotorsports Shop Projects 2.0
- Thread starter zmotorsports
- Start date
ntsqd
Well-known member
I've got one of those now. It is a '96 though.......
I note the large tube aluminum drive-shaft under Mike's truck. Seems like when those showed up is when the two-piece, carrier bearing drive-shafts went away. Makes sense, the issue is maximum length to diameter ratio and the AL tube allows for a larger diameter than does a steel tube if rotational inertia is going to be kept down.
BTW, a friend tracked down that Ford part. It is the trans cooler, but it's currently only about $140
I note the large tube aluminum drive-shaft under Mike's truck. Seems like when those showed up is when the two-piece, carrier bearing drive-shafts went away. Makes sense, the issue is maximum length to diameter ratio and the AL tube allows for a larger diameter than does a steel tube if rotational inertia is going to be kept down.
BTW, a friend tracked down that Ford part. It is the trans cooler, but it's currently only about $140
mercracing
Well-known member
- Joined
- Feb 14, 2015
- Messages
- 158
All this troubleshooting talk reminds me of a problem with an early 2000s Chev diesel bus. I looked for hours to find troubleshooting for the "pulse driver module"(or named something similar). Literally the ONLY troubleshooting I could find anywhere was, "Replace PDM, if problem goes away, it was the PDM"... Are you kidding me?!
OP
zmotorsports
ALLIANCE MEMBER
Mike, I know that I am only a DIY guy, but lubing a driveshaft as part of a normal LOF on a truck that's newer than a 1930's model is a new one for me.
I was surprised how easy it was for you to remove the driveshaft. It would have taken me all day and it's more than likely that I would have broken something.
I wouldn't necessarily call this a regular maintenance task on these trucks, but it is on mine. Early on these trucks suffered from the symptom mentioned above and it was discovered that the splines on the output of the transfer case to driveshaft being the culprit as they would not slide freely, especially under acceleration with side load on the splines. Even over on the Duramax forum when new owners of these older trucks post questions about this noise or "feel" they are told the solution, and many argue that it can't be the issue.
 I just added
it to my routine maintenance every other oil change because it is so easy to perform and prevents not only the noise or feel but also wear to the splines.
Mike, do you remember when many pickup trucks had two piece driveshafts, a center bearing, and a grease zerk where the rear shaft slid slid in and out on the splines as the rear axle moved up and down?
Yes, I remember them very well. All of our farm trucks had them and even my 1988 F250 extended cab daily driver/tow rig had a two-piece driveshaft with carrier bearings. They were heavy and awkward to work with when work was needed, especially with one person. The larger aluminum driveshafts are so easy to work with in comparison.
All this troubleshooting talk reminds me of a problem with an early 2000s Chev diesel bus. I looked for hours to find troubleshooting for the "pulse driver module"(or named something similar). Literally the ONLY troubleshooting I could find anywhere was, "Replace PDM, if problem goes away, it was the PDM"... Are you kidding me?!
Yeah, some of our forklift FSM's show the same troubleshooting flowchart with the last section mentioning to replace the computer. It's frustrating because many of the younger mechanics want to immediately to go the computer as the faulty part. I try to explain that the computer is seldom, if ever, the actual issue but it seems that is the first place their minds go. Same on vehicles for that matter. I have only replaced a couple of ECM's or PCM's during my career as the problems are almost always something well before the ECM. However, it's odd how many I've worked on that came from another shop and they replaced the ECM already.
OP
zmotorsports
ALLIANCE MEMBER
I haven't been in the right frame of mind lately to really work in the shop but last night I figured I would try to make a little more progress on the aerosol paint can shaker as I am nearly done with it. Time to get it off the workbench and hanging on the wall in use.
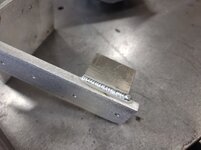
Started by adding a small tab to the vertical support in which to fasten the upper part of the sheet metal cover to.
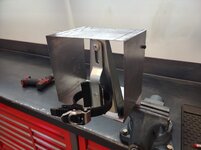
Then drilled and tapped the tab and installed a fastener and mounted the shaking mechanism in place.
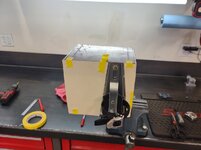
Next cut out a template for the front of the cover.
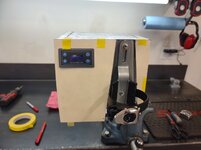
Decided on a location for the timer/controller.
Transferred that to some 18-gauge P&O.
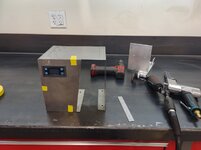
Then the small side cut out of sheet metal.
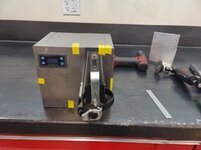
Tacked everything together.
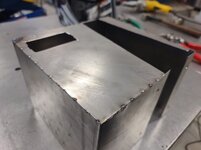
And that's where I left off for the night and closed up the shop.
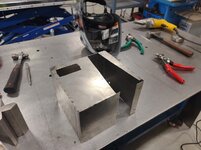
Thanks for looking.
Started by adding a small tab to the vertical support in which to fasten the upper part of the sheet metal cover to.
Then drilled and tapped the tab and installed a fastener and mounted the shaking mechanism in place.
Next cut out a template for the front of the cover.
Decided on a location for the timer/controller.
Transferred that to some 18-gauge P&O.
Then the small side cut out of sheet metal.
Tacked everything together.
And that's where I left off for the night and closed up the shop.
Thanks for looking.
Looking good Mike.
Frame of mind/lack of time in the shop must be in the air, I really wanted/needed to get out into mine last night, just wasn't feeling it....went for a walk instead. However, seeing you back at it might just give me some motivation to get out there tonight and do some tinkering of my own, thanks!
Frame of mind/lack of time in the shop must be in the air, I really wanted/needed to get out into mine last night, just wasn't feeling it....went for a walk instead. However, seeing you back at it might just give me some motivation to get out there tonight and do some tinkering of my own, thanks!
aka Larry
Well-known member
Mike I'm ready to see a short video of this thing in action.
OP
zmotorsports
ALLIANCE MEMBER
Looking good Mike.
Frame of mind/lack of time in the shop must be in the air, I really wanted/needed to get out into mine last night, just wasn't feeling it....went for a walk instead. However, seeing you back at it might just give me some motivation to get out there tonight and do some tinkering of my own, thanks!
Thanks Mike. Yeah, I haven't really been "feeling it" for the past several weeks. Too much **** going on in my head to really focus. I need to snap out of this funk though, I've got too much to do.
Mike I'm ready to see a short video of this thing in action.
I missed the boat on this one Vincent. I should have been doing a video for my YouTube channel of the build process. Unfortunately, I didn't really give that any thought until I was nearly done. I will post up a short though showing it in action. Thanks.
Thanks Mike. Yeah, I haven't really been "feeling it" for the past several weeks. Too much **** going on in my head to really focus. I need to snap out of this funk though, I've got too much to do.
You aren't alone, I think its that time of year when you have to transition into all the spring time activities that are precursors to the upcoming lawn care, gardening, travel, vacation, etc., season(s)
Support team here on GJ, engage! Time to refocus!
bugnut
ALLIANCE MEMBER
Mike, paint shaker is looking good.
I know from previous writing you are a list maker. Might be time to break out a sheet of paper and start a fresh list. That helps me to prioritize and focus, so I can get the RLS behind me.
Good Luck, open the shop door soon!
I know from previous writing you are a list maker. Might be time to break out a sheet of paper and start a fresh list. That helps me to prioritize and focus, so I can get the RLS behind me.
Good Luck, open the shop door soon!
OP
zmotorsports
ALLIANCE MEMBER
Mike, paint shaker is looking good.
I know from previous writing you are a list maker. Might be time to break out a sheet of paper and start a fresh list. That helps me to prioritize and focus, so I can get the RLS behind me.
Good Luck, open the shop door soon!
Thanks Joel. Yeah, I have a couple of lists already, but it's just been a hell of a last month or so and I need to get my **** together and get busy to clear my head.
OP
zmotorsports
ALLIANCE MEMBER
I was able to work on the paint shaker for about an hour or so last night. My son and DIL brought my grandson over to visit and I didn't really feel like doing anything but playing with him and watching him run around the shop and touch and feel everything. It is such a joy to watch him love to be in the shop and his curious little mind going crazy with all of the questions. Hard to believe he'll be 2-years old already next week. I know he's at that stage right now testing his boundaries with his parents, but I love it when it doesn't want to leave "Papa's shop".
I was just finishing up welding the cover when the kids and my grandson arrived, so it was a perfect time to take a break and let things cool. Once I started welding the edges and got my settings and hand speed down, it went pretty quick.
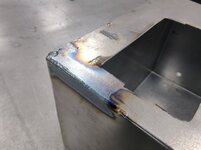
With the small rounded welds on the corner joints, metal finishing went quickly too. I ran an 80-grit Roloc disk over the edges, then a DA with 80-grit to metal finish it.
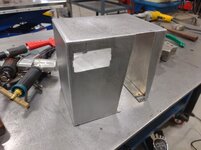
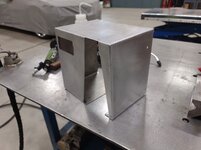
Once metal finished, I was going to paint it but had to stop and think about the color. I had originally concluded that I was going to paint it the Snap-on red that I've been using lately on things like the fixture mount and a few other items. However, I then thought that would be too vibrant hanging on the wall and decided to go with the Rustoleum hammered gray like my work benches and some of the other mounting fixtures around the shop.
Before slapping paint on it, I thought I'd mock it up one last time to determine everything fits properly.
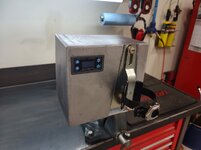
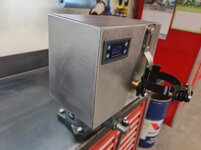
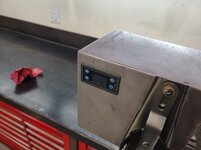
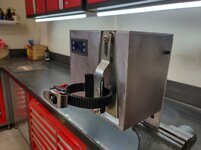
And that is where I left off for the night. When I have a little time I should be able to get it painted, wired and completed.
Thanks for looking.
I was just finishing up welding the cover when the kids and my grandson arrived, so it was a perfect time to take a break and let things cool. Once I started welding the edges and got my settings and hand speed down, it went pretty quick.
With the small rounded welds on the corner joints, metal finishing went quickly too. I ran an 80-grit Roloc disk over the edges, then a DA with 80-grit to metal finish it.
Once metal finished, I was going to paint it but had to stop and think about the color. I had originally concluded that I was going to paint it the Snap-on red that I've been using lately on things like the fixture mount and a few other items. However, I then thought that would be too vibrant hanging on the wall and decided to go with the Rustoleum hammered gray like my work benches and some of the other mounting fixtures around the shop.
Before slapping paint on it, I thought I'd mock it up one last time to determine everything fits properly.
And that is where I left off for the night. When I have a little time I should be able to get it painted, wired and completed.
Thanks for looking.
ScepterToad
Well-known member
- Joined
- Nov 9, 2023
- Messages
- 346
Really nice work on the shaker Mike!
OP
zmotorsports
ALLIANCE MEMBER
Really nice work on the shaker Mike!
Thanks Keith.
SilverJimmy
Well-known member
Do you accept PayPal for mine? I’d like the Snap-On Red version, direct wire and red iron compatible! Any ETA yet, I know it shouldn’t be long as I’m sure I’m first in the queue!!! 
SilverJimmy
Well-known member
Very nice, I wish I was as committed to developing my skills as completely as you have yours!
OP
zmotorsports
ALLIANCE MEMBER
Very nice, I wish I was as committed to developing my skills as completely as you have yours!
Thank you Sterling. Unfortunately, I wasn't completely pleased with how the weld turned out on one section. But I can say without hesitation that it was much more gooder than what I could have produced a decade or two ago. I actually doubt my skillset will ever be where I am pleased with it though. I continuously find faults in all my work and push myself to get better with each and every task.
SilverJimmy
Well-known member
Well…. Let me help you out with that. When you build ZPaintShaker2.0 I’ll gladly accept the proof of concept exercise! 
ntsqd
Well-known member
If a guy were going to build his own, would a 1725/1740 motor be enough, or should it be a 3600 motor?
OP
zmotorsports
ALLIANCE MEMBER
If a guy were going to build his own, would a 1725/1740 motor be enough, or should it be a 3600 motor?
Thom, I hope you're joking because I used a 300 RPM motor. I can't imagine what that little mechanism would look like running at 1800-3600 RPM.

ntsqd
Well-known member
Yes, I was joking.
Started doing the simple math in my head and was guessing about one shake per second at the most would be more than good enough.
Just realized where I can lay my hands on a bunch of Thomson Frelon Linear Bearings......
Started doing the simple math in my head and was guessing about one shake per second at the most would be more than good enough.
Just realized where I can lay my hands on a bunch of Thomson Frelon Linear Bearings......
XJSuperman
Well-known member
On the subject of driveshafts......I enjoy the aluminum ones at truckpulls, they come out from underneath all twisted up like a wrinkled pop can. The steel ones just come flying out in one piece
Everything I've got has a steel shaft, but both the Toyota and the Cherokee have telescoping front and rears. Off the top of my head Id have to guess the GMT400 is a onepiece shaft with a slipyoke on the transfercase like the Cherokee was from the factory. They seem to do the job for many. Now if only I could find a decent set of ujoints for the Jeep...thats where all my issues are.
With spring coming, does that mean its WheelHorse time yet?
Everything I've got has a steel shaft, but both the Toyota and the Cherokee have telescoping front and rears. Off the top of my head Id have to guess the GMT400 is a onepiece shaft with a slipyoke on the transfercase like the Cherokee was from the factory. They seem to do the job for many. Now if only I could find a decent set of ujoints for the Jeep...thats where all my issues are.
With spring coming, does that mean its WheelHorse time yet?
OP
zmotorsports
ALLIANCE MEMBER
On the subject of driveshafts......I enjoy the aluminum ones at truckpulls, they come out from underneath all twisted up like a wrinkled pop can. The steel ones just come flying out in one piece
Everything I've got has a steel shaft, but both the Toyota and the Cherokee have telescoping front and rears. Off the top of my head Id have to guess the GMT400 is a onepiece shaft with a slipyoke on the transfercase like the Cherokee was from the factory. They seem to do the job for many. Now if only I could find a decent set of ujoints for the Jeep...thats where all my issues are.
With spring coming, does that mean its WheelHorse time yet?
I got out of truck pulling about 30 years ago so I can't comment on the aluminum shafts in pulling competition. I can say for a daily driver and tow rig standpoint, I haven't seen any issues with aluminum shafts. The GMT400 chassis with the steel driveshafts worked well as the predecessor but when they went to the aluminum with the GMT800 chassis I didn't notice any more failures than previously.
The slip yoke style outputs have their pro's and con's. For the most part they work well, but for heavy off-road I much prefer an actual yoke style with the slip designed into the shaft.
Not sure what you're using for U-joints, but I haven't seen a high failure rate in the Jeeps I've wheeled with. Personally, I've been using either the Spicer, which I run on my personal Jeep, or the Federal Mogul ones branded under NAPA's label.
As for the Wheel Horse, I hope to be able to start on it here shortly. I have a few maintenance items I want to address on the coach before our traveling starts for the year, then some work around the yard and then I think I can commence work on the yard tractor project. It's sad seeing it under tarp alongside the shop so I'm anxious to get going on it. I hope my son and DIL will let my grandson come over and help me with disassembly.
Last edited:
bugnut
ALLIANCE MEMBER
Mike paint shaker upper is looking good!
OP
zmotorsports
ALLIANCE MEMBER
Mike paint shaker upper is looking good!
Thanks Joel. That was a fun little project and one I hope to get many years of use out of and one my son and grandson can get a lot of use out of as well.
OP
zmotorsports
ALLIANCE MEMBER
Paint shaker is done. I had a couple hours last night so I was able to finish it up.
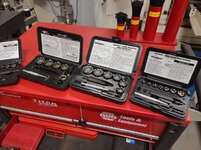
The first few pictures are for Mike, aka @fouckhest as he recently purchased a Rotacut set. I have several that I have picked up over the years and use them quite often. Kimball Midwest provided our fasteners at work back in the late 90's/early 2000's and the sales rep turned me on to them, with their labeling/branding of course. He made me a good deal on a couple sets so I added them to my arsenal. I started really using these heavily as I was building sand drag ATV chassis and hillclimber snowmobiles at the time. These were the hot ticket for perfectly round holes in sheet metal, aluminum and thin plate.
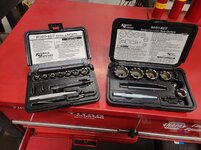
The ones on the right, the Hougen Rotacut's, I bought just about 10 years ago to have as "back-ups" as I stumbled across them at an estate sale in like new condition and I couldn't pass up the price.
Cutters in action.
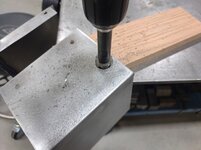

With the hole for the cord cut and deburred, it was time to give the housing a good wipe down with Wax & Grease Remover.

Then let it dry.
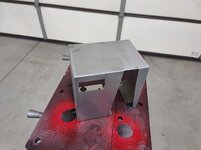
And apply a couple coats of Rustoleum Hammered Gray paint. Boy, a paint can shaker really could have come in handy to shake that can up.

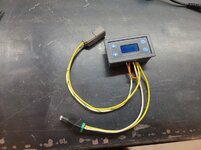
With the paint drying, I turned my attention to the wiring. With the housing fitting so tightly to the structure of the shaker, I thought it would be more beneficial to make the connections a plug & play for ease of assembly once it was mounted on the wall. I started by tinning all of the wires before inserting into the connection points on the back of the timer/controller.

I then used a Deutsch connector between the motor and the controller.

Soldered the connections at the motor.
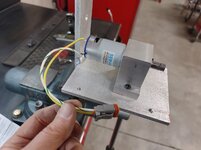
Stay tuned for more...
The first few pictures are for Mike, aka @fouckhest as he recently purchased a Rotacut set. I have several that I have picked up over the years and use them quite often. Kimball Midwest provided our fasteners at work back in the late 90's/early 2000's and the sales rep turned me on to them, with their labeling/branding of course. He made me a good deal on a couple sets so I added them to my arsenal. I started really using these heavily as I was building sand drag ATV chassis and hillclimber snowmobiles at the time. These were the hot ticket for perfectly round holes in sheet metal, aluminum and thin plate.
The ones on the right, the Hougen Rotacut's, I bought just about 10 years ago to have as "back-ups" as I stumbled across them at an estate sale in like new condition and I couldn't pass up the price.
Cutters in action.
With the hole for the cord cut and deburred, it was time to give the housing a good wipe down with Wax & Grease Remover.
Then let it dry.
And apply a couple coats of Rustoleum Hammered Gray paint. Boy, a paint can shaker really could have come in handy to shake that can up.
With the paint drying, I turned my attention to the wiring. With the housing fitting so tightly to the structure of the shaker, I thought it would be more beneficial to make the connections a plug & play for ease of assembly once it was mounted on the wall. I started by tinning all of the wires before inserting into the connection points on the back of the timer/controller.
I then used a Deutsch connector between the motor and the controller.
Soldered the connections at the motor.
Stay tuned for more...
OP
zmotorsports
ALLIANCE MEMBER
Last pictures of the paint can shaker construction.
Controller ready for installation into the cover with the two connectors.
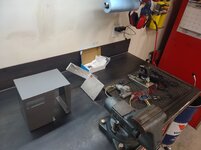
At this point I was ready to close up the shop for the night and figured I would mount it on the wall sometime over the weekend. However, the wife's plane was delayed, and she was still an hour or so away from being home so I figured I would stay out in the shop and complete the mounting. Here are all of the parts at the ready.

Main structure located and mounted on the wall. Then the motor was secured in place onto the mounting plate.

The power supply cord was fed through the bottom of the cover and grommet.

The cover was set into place.
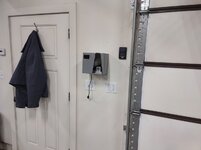
Test to make sure the door won't contact it. A little late at this point regardless of if would hit it.

Shaker mechanism aligned with the coupler and tightened down, then the cover was secured into place. Test run.

Time to test it out with a can of paint. Oh yeah, that should work.
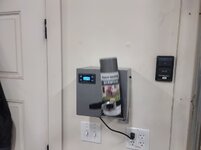
I actually think it looks quite nice on the wall and doesn't look out of place. My son came up with the mounting location as I couldn't figure out where to mount it where it wasn't going to be in the way and I didn't want it in the RV/storage bay. I wanted it closer to my paint cabinet and seeing as how I generally paint outside, having it mounted on an exterior wall near the doors was the perfect location.

I consider that project done and marked off the "to-do" list.
Thanks for looking.
Controller ready for installation into the cover with the two connectors.
At this point I was ready to close up the shop for the night and figured I would mount it on the wall sometime over the weekend. However, the wife's plane was delayed, and she was still an hour or so away from being home so I figured I would stay out in the shop and complete the mounting. Here are all of the parts at the ready.
Main structure located and mounted on the wall. Then the motor was secured in place onto the mounting plate.
The power supply cord was fed through the bottom of the cover and grommet.
The cover was set into place.
Test to make sure the door won't contact it. A little late at this point regardless of if would hit it.
Shaker mechanism aligned with the coupler and tightened down, then the cover was secured into place. Test run.
Time to test it out with a can of paint. Oh yeah, that should work.
I actually think it looks quite nice on the wall and doesn't look out of place. My son came up with the mounting location as I couldn't figure out where to mount it where it wasn't going to be in the way and I didn't want it in the RV/storage bay. I wanted it closer to my paint cabinet and seeing as how I generally paint outside, having it mounted on an exterior wall near the doors was the perfect location.
I consider that project done and marked off the "to-do" list.
Thanks for looking.
OP
zmotorsports
ALLIANCE MEMBER
Just as the wife pulled into the garage and I had locked up the shop for the evening, this **** rolled in.

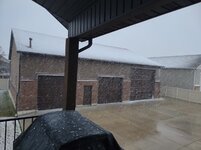
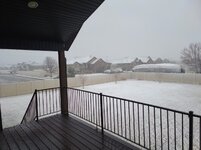
This *****. We have had low 60 degree days all week and even my grass was starting to green up and grow along the house and shop. You can't see that because it is now covered with white ****.....
This *****. We have had low 60 degree days all week and even my grass was starting to green up and grow along the house and shop. You can't see that because it is now covered with white ****.....
OP
zmotorsports
ALLIANCE MEMBER
Love the Rota-cut set Mike!
...also, the irony of shaking the can to paint the paint can shaker cover is CLASSIC!
Thanks Mike. Yeah, I thought some of you would get a kick out of that. I had given thought to hooking everything up without the cover for a test run to shake up the can of paint but decided for time sake to just go old school and manually shake it up.
OP
zmotorsports
ALLIANCE MEMBER
I need to add that large set to my collection. That small set has been fantastic would be nice to poke big holes that turn out just as nice.
Agreed. I use the large set nearly as much as the smaller set.
OutlawDrifter
Well-known member
Keep that white **** in Utah! It was 78° here yesterday...
PS - Great job on the paint shaker, enjoyed the video on IG
PS - Great job on the paint shaker, enjoyed the video on IG
OP
zmotorsports
ALLIANCE MEMBER
PS - Great job on the paint shaker, enjoyed the video on IG
Thanks Marc. That was actually kind of a fun little shop project.
madison069
Well-known member
Digging the paint shaker! I've been slowly migrating from paint can to HVLP painting for anything big. But those little project still calls for the paint can application as it's not worth the hassle of setting up the HVLP gun.
OP
zmotorsports
ALLIANCE MEMBER
Digging the paint shaker! I've been slowly migrating from paint can to HVLP painting for anything big. But those little project still calls for the paint can application as it's not worth the hassle of setting up the HVLP gun.
Agreed. I've actually gone the other direction. I used to mix up epoxy primer and use automotive urethane paint for almost everything. However, lately I reserve to only use the automotive paints for large projects and those that deem worthy of the hassle. Aerosol's can do a very nice job for small brackets, etc. if used properly. Unfortunately, I don't think I was shaking them long enough to say I was using them properly, so this should help in that manner.
madison069
Well-known member
Yea, I'm sure we all should be shaking the paint cans longer. Usually, I start the time when I hear the marble hitting the can and try to shake for a minute or 2. But this morning, the paint can in the truck was so cold that I couldn't hear the marble ever hitting the can. After shaking it for a while I got tired and just went ahead and sprayed the road with the marking and went on about my other chores. I did set the can on the defroster vent to let the can warm up while riding around after that first marking.Agreed. I've actually gone the other direction. I used to mix up epoxy primer and use automotive urethane paint for almost everything. However, lately I reserve to only use the automotive paints for large projects and those that deem worthy of the hassle. Aerosol's can do a very nice job for small brackets, etc. if used properly. Unfortunately, I don't think I was shaking them long enough to say I was using them properly, so this should help in that manner.
OP
zmotorsports
ALLIANCE MEMBER
Cody, I am positive I don't shake the can 2-3 minutes like recommended. I may start out with the intention of doing so, but for me what seems like 2-3 minutes of hearing that ball bearing rattle around is probably closer to 30-45 seconds if I'm being honest. I have the timer on the shaker set for 150-seconds, so now I can strap the can in, hit the power switch and it will take off and count down until zero and stop. Meanwhile, I can walk away and go back to doing something else knowing without question that the paint is being shaken much more than I ever did by hand.
I have the timer on the shaker set for 150-seconds, so now I can strap the can in, hit the power switch and it will take off and count down until zero and stop. Meanwhile, I can walk away and go back to doing something else knowing without question that the paint is being shaken much more than I ever did by hand. Mike, I received the economy version shaker. Mounted to an old 2x6......my cordless drill requires a zip tie around the trigger for constant power and Alexis tells me when two minutes are up. Then I have to cut the zip tie. It's a hell of a time saver though 