To avoid these ads, REGISTER NOW!

ZMotorsports Shop Projects 2.0

shortykorte

Well-known member
Joined
Sep 1, 2014
Messages
8,039
Location
Tallahassee, Fl
That's not a lot of concrete to shovel. A sprinkler and cold weather I see Mike's Winter Wonderland Ice Skating Park. Tickets $20 for one hour sessions.

So what is the saying, if you want it quick and right, it's not cheap. lol


Sent from my iPhone using Tapatalk
 
To avoid these ads, REGISTER NOW!
OP
Z

zmotorsports

ALLIANCE MEMBER
Joined
Oct 20, 2009
Messages
21,476
Location
Northern Utah
That's not a lot of concrete to shovel. A sprinkler and cold weather I see Mike's Winter Wonderland Ice Skating Park. Tickets $20 for one hour sessions.

So what is the saying, if you want it quick and right, it's not cheap. lol


Sent from my iPhone using Tapatalk

I hear ya Shorty. I'm not gonna lie, I'm a bit nervous about snow and ice on that much concrete to have to clear. My wife and I talked about this at great length both before we even started looking at houses last year knowing what size shop/RV garage we were going to build and especially as work progressed on the shop and the size of the back yard was becoming more apparent. My wife's comment, and it made sense to me as well, was it will only be a few snowstorms a year and the rest of the time it will be great having all of that concrete. While I agreed, and even repeated on here, now that summer is winding down and the white stuff is looming on the horizon I am starting to think more and more about it. It's easy for the wife to say it is no big deal because she isn't the one shoveling or blowing it off the drive.:wtf: An ice skating rink is exactly what I do NOT want to have.:eyecrazy:
 

WhiffySpark

Well-known member
Joined
Oct 22, 2009
Messages
6,252
You could get a Deere 1 or 2 series. Small pusher box would be fine for the snow. If you go with a 1 series get a small box. They are incredibly useful to have around. I have a 4400 but we may be trading it in for a skid steer woon
 
OP
Z

zmotorsports

ALLIANCE MEMBER
Joined
Oct 20, 2009
Messages
21,476
Location
Northern Utah
You could get a Deere 1 or 2 series. Small pusher box would be fine for the snow. If you go with a 1 series get a small box. They are incredibly useful to have around. I have a 4400 but we may be trading it in for a skid steer woon

Thanks for the info but don't plan on purchasing any additional equipment at this time. Actually after spending more money than I wanted initially on my new home and then the shop and yard I am about sick and tired of spending money.:mad:

At my old place I had an ATV with a nice 48" blade but there were two things I don't like about pushing snow. Firstly, you can only push so much until you can't push any more up and over the existing pile, so then you end up encroaching inward onto the driveway and/or the street depending on which way you're pushing. Secondly, and my biggest pet peeve, is that when pushing you end up with very dense compacted piles around the perimeter of your property that then turn into ice and take until freaking June to melt. Meanwhile you have green grass showing up in areas that were in more direct sunlight and didn't have these dense piles of snow stacked up on them. This then ends up promoting fungus growth in the lawn which is an entirely different issue to have to address.

Again, I am very familiar with pushing snow as we have a large complex at work that I am responsible for and due to overall cost and time in a commercial environment it really doesn't make much sense to anything else. I purchased several various sizes of snow boxes about 5 years ago and they work well for what we bought them for, however, for a residential property I personally don't think it is the best option. I had my ATV/Plow setup for 20+ years before switching over to a snowblower about 4 years ago and much prefer the blower to be able to place the snow in areas that can receive more sunlight and therefore distribute the snow more evenly throughout the property.

I appreciate the comments but I think I'm just going to have to accept the inevitable and plan on spending time blowing snow in several sections and it not being a quick process.
 

WhiffySpark

Well-known member
Joined
Oct 22, 2009
Messages
6,252
Thanks for the info but don't plan on purchasing any additional equipment at this time. Actually after spending more money than I wanted initially on my new home and then the shop and yard I am about sick and tired of spending money.:mad:

At my old place I had an ATV with a nice 48" blade but there were two things I don't like about pushing snow. Firstly, you can only push so much until you can't push any more up and over the existing pile, so then you end up encroaching inward onto the driveway and/or the street depending on which way you're pushing. Secondly, and my biggest pet peeve, is that when pushing you end up with very dense compacted piles around the perimeter of your property that then turn into ice and take until freaking June to melt. Meanwhile you have green grass showing up in areas that were in more direct sunlight and didn't have these dense piles of snow stacked up on them. This then ends up promoting fungus growth in the lawn which is an entirely different issue to have to address.

Again, I am very familiar with pushing snow as we have a large complex at work that I am responsible for and due to overall cost and time in a commercial environment it really doesn't make much sense to anything else. I purchased several various sizes of snow boxes about 5 years ago and they work well for what we bought them for, however, for a residential property I personally don't think it is the best option. I had my ATV/Plow setup for 20+ years before switching over to a snowblower about 4 years ago and much prefer the blower to be able to place the snow in areas that can receive more sunlight and therefore distribute the snow more evenly throughout the property.

I appreciate the comments but I think I'm just going to have to accept the inevitable and plan on spending time blowing snow in several sections and it not being a quick process.

As long as you have somewhere to blow it to snow blowers are fine. Which as much concrete as you have pile it up on the corner somewhere shouldn't be an issue :lol:

And yeah you can only push so much. That's entirely dependent on machine weight and traction. But usually you can push with the storm so not a huge issue.

We have 30-40 commercial properties we take of. Some of them are VerY large and nationally known.. I personally hate straight blades, you can't get much more inefficient than those. The only thing we use blowers for is side walks. Blades are used mostly in drivelanes skid steer/tractors and snow boxes on anything else.
 
OP
Z

zmotorsports

ALLIANCE MEMBER
Joined
Oct 20, 2009
Messages
21,476
Location
Northern Utah
As long as you have somewhere to blow it to snow blowers are fine. Which as much concrete as you have pile it up on the corner somewhere shouldn't be an issue :lol:

And yeah you can only push so much. That's entirely dependent on machine weight and traction. But usually you can push with the storm so not a huge issue.

We have 30-40 commercial properties we take of. Some of them are VerY large and nationally known.. I personally hate straight blades, you can't get much more inefficient than those. The only thing we use blowers for is side walks. Blades are used mostly in drivelanes skid steer/tractors and snow boxes on anything else.

Agreed. The main immediate issue is I don't want to purchase any more equipment, the next issue after the initial expense is storing the equipment. I don't want to eat up all of my newly gained space with equipment that won't get used but a couple months out of the year. Before long I will be right back to where I was at my last place, storing 10-gallons of **** in a 5-gallon bucket.:willy_nil

Unfortunately I won't know exactly what I am faced with until I have a few storms under my belt to get a feel for what to blow where and for how far. At my last place I had it down to a science, or sequence if you will, but it will just take a bit to get to that point here.

Either way I am still so much more pleased with our new place vs. our old I can deal with the snow issue and still be happy and feel like we made the right move.:D
 
OP
Z

zmotorsports

ALLIANCE MEMBER
Joined
Oct 20, 2009
Messages
21,476
Location
Northern Utah
Finished up the '34 Ford grille shell tonight. Turned out pretty well for being 80+ year old steel that's been sitting in a farmer's field for half of its life.

6d0997fab1ae9b43db79bb91431b3f36.jpg

Bars turned out very straight.
0f887143f22357276f08d4cd37743b74.jpg


Sent from my iPhone using Tapatalk
 

Attachments

  • 0f887143f22357276f08d4cd37743b74.jpg
    0f887143f22357276f08d4cd37743b74.jpg
    784 KB · Views: 1
  • 6d0997fab1ae9b43db79bb91431b3f36.jpg
    6d0997fab1ae9b43db79bb91431b3f36.jpg
    799.6 KB · Views: 0
Last edited:
OP
Z

zmotorsports

ALLIANCE MEMBER
Joined
Oct 20, 2009
Messages
21,476
Location
Northern Utah
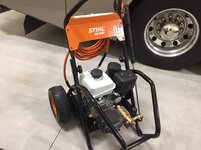
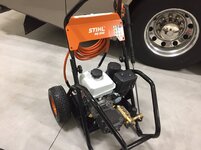
Added a new tool to the arsenal today. Returned the '34 Ford grille shell to its owner and ended up working a deal on a Stihl RB600 pressure washer into the equation.
962154f99e8452444cca6d1e08ef20fb.jpg

My old pressure washer is just over 17 years old and although it is still functioning fine I wanted to upgrade and have had my eye on one of these since they came out.


Sent from my iPhone using Tapatalk
 

Attachments

  • 962154f99e8452444cca6d1e08ef20fb.jpg
    962154f99e8452444cca6d1e08ef20fb.jpg
    109.3 KB · Views: 5
Last edited:

Ohmthis

Well-known member
Joined
Jan 20, 2013
Messages
3,021
Location
Outside of Louisville KY
Mike, great job on the grill! The chromer will be happy to work with that piece. I understand closing a business and still feeling pressure to do work. I had a small electric/HVAC company years ago. I closed it once the kids came and life was getting too busy. I still get old customers calling me to do work. It's hard to turn them down isn't it? Great work as aways!
 
OP
Z

zmotorsports

ALLIANCE MEMBER
Joined
Oct 20, 2009
Messages
21,476
Location
Northern Utah
Mike, great job on the grill! The chromer will be happy to work with that piece. I understand closing a business and still feeling pressure to do work. I had a small electric/HVAC company years ago. I closed it once the kids came and life was getting too busy. I still get old customers calling me to do work. It's hard to turn them down isn't it? Great work as aways!


Thanks for the comments.

I agree about it being hard to turn work down. Although I won't be doing the volume of work I did at my old place especially without a license I figured once I got my shop setup and organized as well as got caught up on my personal vehicles I would take on a few side jobs for friends and family but I wasn't planning on it quite this soon.

I really want to get the shop organized and things put away.

I did make a pretty good sized dent in it tonight as I was able to get the remainder of my supplies out of the basement and out into the shop. There were about ten boxes and I was able to get a couple of them put away before calling it a day. I hope put the other right or so boxes away tomorrow night.


Sent from my iPhone using Tapatalk
 

ttpete

Well-known member
Joined
Mar 8, 2011
Messages
6,737
Location
Dearborn, MI
Mike, great job on the grill! The chromer will be happy to work with that piece. I understand closing a business and still feeling pressure to do work. I had a small electric/HVAC company years ago. I closed it once the kids came and life was getting too busy. I still get old customers calling me to do work. It's hard to turn them down isn't it? Great work as aways!

That grille is stainless. All it needs is a good polishing job.
 
To avoid these ads, REGISTER NOW!
OP
Z

zmotorsports

ALLIANCE MEMBER
Joined
Oct 20, 2009
Messages
21,476
Location
Northern Utah
That grille is stainless. All it needs is a good polishing job.

Nope, this grille is not stainless it is chromed steel. There is however a small stainless trim piece that resides down inside of the groove and is held in place by clips.

What I thought would look great and told the owner is rather than have the entire grille re-chromed, because it will be difficult to properly get down in between those bars to polish them without damaging them, is to chrome the exterior frame reveal and polish the stainless steel trim piece. Then paint the center section (bars) red to match the car. It would be quite simple due to the definitive edge down just inside the reveal where the stainless trim ring lives so masking and prepping would be simple and there would be absolutely no tape edge showing when completed. However, I think the owner really wants to have the entire grille in chrome.:dunno: Oh well, his money, his choice but I think the red and chrome would look sick.
 
OP
Z

zmotorsports

ALLIANCE MEMBER
Joined
Oct 20, 2009
Messages
21,476
Location
Northern Utah
What a GREAT Saturday!

Weather was absolutely beautiful today and much cooler than it's been lately. My son was working on his Jeep and I was knocking some items off of my "to do" list.

I didn't get anything big done today but several little things that made a huge difference in the overall feel of the shop.

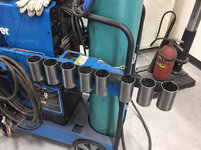
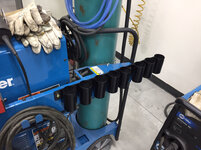
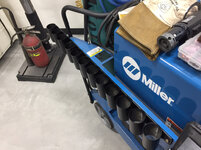
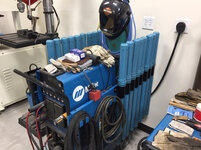
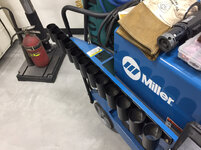
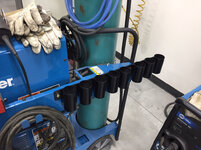
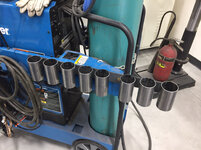
I was able to get my Morse taper drill bit wall index hung next to the lathe, drop light reel hung on the wall next to the two-post lift, wire rack hung on the wall, mill accessories moved to the opposite side of the tool cart so the tooling is now within easy reach from standing at the mill, cleaned off my surface plate so it is usable again, hose clamp assortment hung on the wall, put away several boxes of items from my pegboard at the last shop into drawers under my workbenches and lastly I fabricated some TIG rod guard holders for my various assortment of TIG welding rods.

Cutting some 2.25" exhaust tubing into 4" lengths.
5d9a3d10421b5673aa6f8a799d8efbff.jpg

Deburred inside and outside.
4997b5e6449d75e9b37381c910051380.jpg

Flatstrap bolted to the side of my TIG cart.
21fedff559aaff714d987dfdc6712fd1.jpg

Two tacked into place to determine proper spacing.
cd0d770d23a288af3647c2f83022e186.jpg

One side completely tacked together.
edea1c211635db6a1b3cf20b5773340f.jpg

Both sides painted semi-gloss black after final welding. Didn't have any Miller blue paint so black had to do.
a01023cf5d506dab45abaa280a2cb1d2.jpg

Bolted in place.
416d48f047393e1d743bbc4102107ca3.jpg

bd2690c16a9180f118c0f75aedddc772.jpg

TIG Rod Guards loaded into their new home.
d0ed6c364f7879faf3a816bab991bbcc.jpg

7059209816a3ae95a6cc166b8400791b.jpg

Again, nothing big today but these little things sure give the shop more of a "completed" feeling. I'm especially happy to get my TIG Rods out of those 5-gallon buckets I have had them stored in.


Sent from my iPhone using Tapatalk
 

Attachments

  • d0ed6c364f7879faf3a816bab991bbcc.jpg
    d0ed6c364f7879faf3a816bab991bbcc.jpg
    837.5 KB · Views: 4
  • bd2690c16a9180f118c0f75aedddc772.jpg
    bd2690c16a9180f118c0f75aedddc772.jpg
    778.8 KB · Views: 3
  • 416d48f047393e1d743bbc4102107ca3.jpg
    416d48f047393e1d743bbc4102107ca3.jpg
    805.3 KB · Views: 2
  • a01023cf5d506dab45abaa280a2cb1d2.jpg
    a01023cf5d506dab45abaa280a2cb1d2.jpg
    798.3 KB · Views: 2
  • 4997b5e6449d75e9b37381c910051380.jpg
    4997b5e6449d75e9b37381c910051380.jpg
    785.7 KB · Views: 1
  • edea1c211635db6a1b3cf20b5773340f.jpg
    edea1c211635db6a1b3cf20b5773340f.jpg
    829.4 KB · Views: 1
  • 21fedff559aaff714d987dfdc6712fd1.jpg
    21fedff559aaff714d987dfdc6712fd1.jpg
    783.5 KB · Views: 1
  • 5d9a3d10421b5673aa6f8a799d8efbff.jpg
    5d9a3d10421b5673aa6f8a799d8efbff.jpg
    838.1 KB · Views: 1
  • 7059209816a3ae95a6cc166b8400791b.jpg
    7059209816a3ae95a6cc166b8400791b.jpg
    815 KB · Views: 1
  • cd0d770d23a288af3647c2f83022e186.jpg
    cd0d770d23a288af3647c2f83022e186.jpg
    823.6 KB · Views: 1
Last edited:

fnieto

Well-known member
Joined
Aug 27, 2013
Messages
1,401
Location
Tucson,Arizona
Looking good Mike! It's the "icing on the cake" OMO that makes a great functional shop.
Great work as usual brother.
 
OP
Z

zmotorsports

ALLIANCE MEMBER
Joined
Oct 20, 2009
Messages
21,476
Location
Northern Utah
Looking good Mike! It's the "icing on the cake" OMO that makes a great functional shop.
Great work as usual brother.

Thanks Paco. You're right about it being the icing on the cake. It seemed like every time I walked past or looked at those TIG rod holders in those 5-gallon buckets I cringed. It was like a knife in the back and now just walking through the shop it feels much more organized and functional.

Still a lot more to do but overall a huge step yesterday. I at least feel like I can work on other things and be comfortable in the shop rather than working on other things and looking around the shop thinking I should be working on the shop getting things put away.

Trying to get my shop as organized and looking as great as yours Paco.:bowdown: I love seeing pictures of your setup.
 
OP
Z

zmotorsports

ALLIANCE MEMBER
Joined
Oct 20, 2009
Messages
21,476
Location
Northern Utah
Went out to the shop to knock out two small projects this afternoon before mowing the lawn and then relaxing.

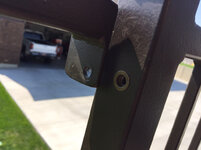
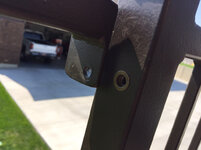
Our deck railing had a gap between two sections that drove me nuts every time I looked at it. When I had the railing powder coated earlier this spring I couldn't find my threadserts nor had access to my mill so I decided to wait until I was further along in the shop setup stage before addressing.

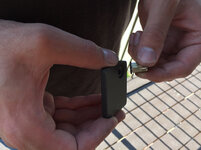
I took a piece of quarter inch aluminum and machined a step on the back side to allow for the threadsert to sit in.
bb5a98fb1fbdd7e8c51fa8c41a1d5d43.jpg

Beadblasted and painted it to match the railing.
621d657154d68210b13eb6246414b48f.jpg

Recess for the head of the threadsert.
6956bb1e3367286c60711ff0df069715.jpg

Gap and tek screw. The tek screw had actually stripped out and allowing the railing to "rattle" about.
6b24e7e0181c65ab77f903016141a628.jpg

Threadsert installed.
155aea0ed1ae84ee21d53895b8598fbe.jpg

Completed. I used a 1/4"-20 stainless steel bolt on both sections threaded into the threadserts.
b51a7087c264f6273ec95b18a4cf58b4.jpg

Now both sections of railing are secured firmly and very rigid.


Sent from my iPhone using Tapatalk
 

Attachments

  • 6b24e7e0181c65ab77f903016141a628.jpg
    6b24e7e0181c65ab77f903016141a628.jpg
    873 KB · Views: 1
  • bb5a98fb1fbdd7e8c51fa8c41a1d5d43.jpg
    bb5a98fb1fbdd7e8c51fa8c41a1d5d43.jpg
    645.8 KB · Views: 1
  • 621d657154d68210b13eb6246414b48f.jpg
    621d657154d68210b13eb6246414b48f.jpg
    567.2 KB · Views: 1
  • 6956bb1e3367286c60711ff0df069715.jpg
    6956bb1e3367286c60711ff0df069715.jpg
    676.3 KB · Views: 0
  • 155aea0ed1ae84ee21d53895b8598fbe.jpg
    155aea0ed1ae84ee21d53895b8598fbe.jpg
    660.5 KB · Views: 0
  • b51a7087c264f6273ec95b18a4cf58b4.jpg
    b51a7087c264f6273ec95b18a4cf58b4.jpg
    652.7 KB · Views: 0
OP
Z

zmotorsports

ALLIANCE MEMBER
Joined
Oct 20, 2009
Messages
21,476
Location
Northern Utah
Project #2 for this Sunday afternoon.

I needed a place to hang my air blow gun on just inside my shop door. I use this quite a lot to blow off line trimmer and mower after finishing the lawn each time before putting the lawn equipment back into the garage. I've become used to having one there after installing one at my last shop so I made sure to run an air drop in the new shop as well but didn't like not having a place to hang the blow gun.

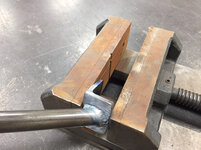
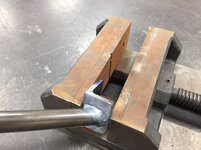
A quick down & dirty little hanger. I used a piece of angle iron with a couple of countersunk holes for grabber screws. I also used a piece of .625" 4130 from my drop box and ground an angle on it. This will attach to the framework just inside the overhead rollup door.
3c6a180b956e09b3c8aa57d68414696b.jpg

Welded on about a 45* angle.
3ff804889fbb642d01c7b06a0d56ba4b.jpg

I then beadblasted and painted it gloss black before securing to the wall.
eb4d72b3933e5729ad7d0ed94ed33e27.jpg

655907eee412963fbc52d1592bd87c6a.jpg

Funny how a simple little hanger can make you grin with excitement and look forward to using.


Sent from my iPhone using Tapatalk
 

Attachments

  • 655907eee412963fbc52d1592bd87c6a.jpg
    655907eee412963fbc52d1592bd87c6a.jpg
    591.6 KB · Views: 0
  • eb4d72b3933e5729ad7d0ed94ed33e27.jpg
    eb4d72b3933e5729ad7d0ed94ed33e27.jpg
    587.5 KB · Views: 0
  • 3ff804889fbb642d01c7b06a0d56ba4b.jpg
    3ff804889fbb642d01c7b06a0d56ba4b.jpg
    782.2 KB · Views: 0
  • 3c6a180b956e09b3c8aa57d68414696b.jpg
    3c6a180b956e09b3c8aa57d68414696b.jpg
    746.6 KB · Views: 0
Last edited:

sanddan

Well-known member
Joined
Jul 7, 2005
Messages
708
Location
Oregon
Thanks.

My wife and I are extremely grateful for their generosity. Absolutely great guy and I enjoy his company when he stops by to visit. Unfortunately, he stops by at the worst times.:eyecrazy:

So far we are loving the new neighborhood and hope it stays on the current course that it is on as far as friendly and everyone keeping up on their properties.

Funny thing, I was concerned when we bought the house because I thought we would end up being the noisy ones in the subdivision with my shop activities and all. Come to find out almost every household in the neighborhood has a RZR or some form of side by side and they rip **** up and down the street and house to house all the time. We have to really watch out going in and out of our driveway as there many times is a RZR driving by. Usually by 9:00 or so it is so quiet you can hear insects having ***.:lol:

Mike

RZR's are the new golf cart in many areas of the country.
 
OP
Z

zmotorsports

ALLIANCE MEMBER
Joined
Oct 20, 2009
Messages
21,476
Location
Northern Utah
RZR's are the new golf cart in many areas of the country.

We see that a lot around here as well but in my opinion that is a pretty damn expensive mode of transportation to run around the neighborhood. Many of these are tricked out and well into the mid to upper $20k range. To each their own but to see these things running up and down the road seems like a huge waste of equipment. From the soft tire compounds wearing out prematurely to CV's, CVT's and belts there are a lot of wear items that just don't make sense to run these around on the streets.

Then again, I think some use it as a status symbol. That being said, I don't care if they run them around as long as it isn't all hours of the night and so far by 8:30-9:00 they are shut down and it is quite as can be. The last few nights it has been quite a bit cooler here and we have been sleeping with our windows open and all we can hear is the sound of silence. LOVE IT!!!
 
OP
Z

zmotorsports

ALLIANCE MEMBER
Joined
Oct 20, 2009
Messages
21,476
Location
Northern Utah
On our return trip from Ouray, CO it was raining pretty hard with a lot of road spray and a passing semi kicked up a rock and SMACK, hit the windshield right above the driver's view. It put a nice sized chip in my otherwise virgin windshield. I have been tired of having to take the time to juggle vehicles around with either my wife or son when necessary to have chips fixed so I decided to purchase a windshield repair kit so I can repair my own. Even though my glass place has been fixing them for me free I feel guilty and almost as if I am taking advantage of them do this will work so I can fix my own at my convenience.

Here is the kit I purchased. Nothing too elaborate but does the job.
84e155ea9d4d0e9d0d142581bc336e83.jpg

Pretty nice quality bridge and injector assembly.
283cce6955346f67474b08faf3bcdbde.jpg

For my first rock chip repair it turned out quite good with just the center pit visible. I was surprised because it was a pretty substantial star.


Sent from my iPhone using Tapatalk
 

Attachments

  • 84e155ea9d4d0e9d0d142581bc336e83.jpg
    84e155ea9d4d0e9d0d142581bc336e83.jpg
    744.4 KB · Views: 0
  • 283cce6955346f67474b08faf3bcdbde.jpg
    283cce6955346f67474b08faf3bcdbde.jpg
    715.3 KB · Views: 0
Last edited:
OP
Z

zmotorsports

ALLIANCE MEMBER
Joined
Oct 20, 2009
Messages
21,476
Location
Northern Utah
After fixing my windshield chip on the coach last night a buddy of mine stopped by to check out the new place and needed a small bracket welded. It was soooo nice to walk over to my TIG welder and grab the proper Rod Guard and extract the correct rod without digging through a 5-gallon bucket and even nicer than the shelf I had all of my TIG rods on at my last shop. I should have done a better job of organizing my welding rods a long time ago. It sure made the flow of the work better and gave the entire shop a more organized and professional feeling.
 
OP
Z

zmotorsports

ALLIANCE MEMBER
Joined
Oct 20, 2009
Messages
21,476
Location
Northern Utah
I arrived home from work this afternoon and figured I had better run and get my welding tanks refilled as I have a bit of welding coming up. I was completely out of C25 as my son has been practicing lately and ran the bottle out a few nights ago. My Argon was sitting on empty so I ran to my local welding supply that is now just up the street from me less than 3 miles. I sure like having my regularly visited vendors all within a few miles of my new home.[emoji106]

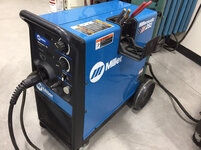
I am a bit behind on my equipment PM's as I usually tackle all of them between Christmas and New Year's each year. However with the move last year and most of my equipment under blankets until early July, I have neglected my duties. As I have been moving tools and equipment into the new shop I have been slowly addressing them one by one and I was down to the last of them. Tonight I completed the checks and cleaning of my welders.

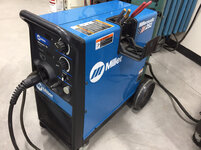
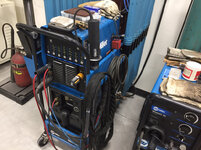
I pulled the covers off, blew out the inside of them, wiped the exteriors down and applied a coat of wax to them. My Miller MM251 looks pretty good and is holding up well for a ten year old welder that sees quite a bit of use. I purchased this one in January of 2007.
cadda500b2eb05e79b0e949feebdc47a.jpg

1db72d1c389bfaf102fc584367a1d6f9.jpg

5354351fba0dc0f001380f4a2a00a60d.jpg

I performed similar maintenance to my Miller Dynasty 300DX a couple of nights ago when I fabricated the TIG Rod Guard holders but hadn't gotten around to the exterior until tonight. My Dynasty is nearly twelve years old and still looks and performs flawlessly. I purchased this welder in February of 2006.
14c9ea6dbcc0315aee3ebfc27cbd62a4.jpg

After finishing up my welders I cut some material for my wall hanging metal storage rack that I have been wanting to get built. I sure like my Baileigh BS210 horizontal miter head bandsaw. It makes for quick adjustments to cut angles and is very accurate.

Here is the material after being cut, wiped down, ends chamfered and deburred ready for drilling and welding.
a51774138b5a1d5fa085797158bbbcc9.jpg

Holes drilled in four of the vertical supports.
ee39cab5ae51d84c0ac280866e6bd280.jpg

Next up is to get some welding done but I'm beat and calling it a night. I have to go into work early the next two mornings but I hope to wrap up my metal rack by the weekend so I can get the metal out of my third bay attached garage and I can then start parking my truck in the house garage.


Sent from my iPhone using Tapatalk
 

Attachments

  • ee39cab5ae51d84c0ac280866e6bd280.jpg
    ee39cab5ae51d84c0ac280866e6bd280.jpg
    762.1 KB · Views: 0
  • a51774138b5a1d5fa085797158bbbcc9.jpg
    a51774138b5a1d5fa085797158bbbcc9.jpg
    774.8 KB · Views: 0
  • 14c9ea6dbcc0315aee3ebfc27cbd62a4.jpg
    14c9ea6dbcc0315aee3ebfc27cbd62a4.jpg
    871.9 KB · Views: 0
  • 5354351fba0dc0f001380f4a2a00a60d.jpg
    5354351fba0dc0f001380f4a2a00a60d.jpg
    841.3 KB · Views: 0
  • 1db72d1c389bfaf102fc584367a1d6f9.jpg
    1db72d1c389bfaf102fc584367a1d6f9.jpg
    792.1 KB · Views: 0
  • cadda500b2eb05e79b0e949feebdc47a.jpg
    cadda500b2eb05e79b0e949feebdc47a.jpg
    793.9 KB · Views: 0

C_F

ALLIANCE MEMBER
Joined
Jan 21, 2005
Messages
9,675
Location
Utah...SNOW BLOWS!
You know what they say, a waxed welder is a happy welder!:D

I like your rock chip repair tool, that looks pretty spiffy.
 
OP
Z

zmotorsports

ALLIANCE MEMBER
Joined
Oct 20, 2009
Messages
21,476
Location
Northern Utah
You know what they say, a waxed welder is a happy welder!:D

I like your rock chip repair tool, that looks pretty spiffy.

Thanks. The welders just seem "happier" when they're all polished up.:D

The windshield kit isn't by any means a high end one, just a bare bones kit that I purchased after getting tired of having to take my vehicles somewhere to be repaired. I will admit that it worked well but I was not that impressed with the UV light that came in the kit by any stretch of the imagination. I broke down and ordered a nicer 120-vac UV light that should work much better.

Thanks for following along on my projects.
 
Last edited:
To avoid these ads, REGISTER NOW!
Top Bottom