To avoid these ads, REGISTER NOW!

ZMotorsports Shop Projects 2.0

OP
Z

zmotorsports

ALLIANCE MEMBER
Joined
Oct 20, 2009
Messages
21,441
Location
Northern Utah
Looks great as usual.

I wanna be like Mike!

Looks like you've been staying busy Mike! The bumper is coming along nicely.

Another great project Mike.

Thanks for the comments guys.

Yeah, it's been crazy busy here lately with everyone wanting their Jeeps, RV's and other **** ready for EJS (Easter Jeep Safari) in Moab this week. By looking at my shop the past few weeks you would never know I closed my business down for hell's sake. I had just figured since the weather was foul I may as well get some promised out work done and make a few bucks at the same time. My wife made a comment last night when she got home from work that "she thought I closed the business down". By her comment I got the feeling that she is/was concerned I may be going back to filling the shop with paying jobs again. I had to reassure her that this was just a few projects that I had promised out and was trying to get caught up then I would slow down and enjoy our summer traveling and enjoying our yard.

My wife and I were actually waffling on heading down to Moab with our local Jeep club but then my shop started filling up with other people's stuff a few weeks ago and unfortunately that sealed the deal on us not being able to go. My cousin was actually pretty accommodating in the fact that he wasn't planning on heading to Moab for the safari and didn't need his right away so he let me get the other Jeeps done before bringing his into the shop.

I should be able to get his carrier completed over the weekend and off to powder coating next week. Then I have one more Jeep to work on within the next few weeks and I am pretty much caught up on promised jobs.

Then I can focus on my stuff, adding some ornamental rock to the front yard and then hopefully helping my son on his Jeep WJ for the rest of the summer.

Thanks all for your comments and for taking the time to follow along.
 
To avoid these ads, REGISTER NOW!

BC1

Well-known member
Joined
Jan 16, 2011
Messages
203
Location
Temecula CA, plotting my escape!
Yeah, kind of a fun one. I’ve built a few bumpers for JK’s and a couple front bumpers for ZJ’s but this is my first TJ rear bumper.

It’s always fun to do something new rather than the same thing over and over.

Thanks for stopping by my projects thread and checking out what I’m working on.

Have any pictures of said ZJ bumpers? It's the only jeep I haven't built a bumper for and the only one I own at the moment so it's a dilemma.
 
OP
Z

zmotorsports

ALLIANCE MEMBER
Joined
Oct 20, 2009
Messages
21,441
Location
Northern Utah
Have any pictures of said ZJ bumpers? It's the only jeep I haven't built a bumper for and the only one I own at the moment so it's a dilemma.


Here we go. It took me a minute but I located them from an RV site that I posted them on many years ago when I built my ZJ bumper. I incorporated attachment points under the front bumper in which to connect my Roadmaster Sterling towbar to as I used our old ZJ as our daily driver and our toad behind our coach like my now JKU. We owned that particular 1996 Grand Cherokee for 14 years and towed it behind our two coaches for a total of around 100k miles.


Here is the front bumper cover and grille removed to determine placement of the attachment points for the bumper.
2uqlt2v.jpg


Center section completed and tacking the outer ears on.
2rqzga8.jpg


I also incorporated some auxiliary driving lights into the bumper. Here it is ready prepped and ready to send off for powder coating.
2di34me.jpg


Bumper back from powder coater and installed/completed. I had it powder coated in a textured gray to match the lower body panels on the rest of the Jeep. I think it looked pretty good with the gray trim.
e5nxhw.jpg


Another angle.
24webmt.jpg


Here it is hooked up to our coach heading out on vacation somewhere.
rbip10.jpg


That was a damn good vehicle. We had a 1991 Cherokee (XJ) that we bought in 1993 for the wife's daily driver and toad. In 1998 a friend of mine picked up this 1996 Grand Cherokee with the 5.2 liter engine for his 16 year old son but decided it was too nice for a 16-year old. He wanted my wife's XJ for his son so we worked a pretty good deal and my wife loved the upscale interior compared to her XJ, the ZJ only had about 33k miles on it when we took possession of it. I put a few inches of lift under it with larger tires/wheels and we drove the hell out of it for 14 years with very few issues. We towed it around 100k miles in that time frame and did a fair amount of off-roading, although not quite to the degree we do with our current Jeep, and it never left us stranded in all those years whether on or off road. When we sold it in about 2012 it had just under 200k miles on it, no major engine or transmission issues in all of those miles and the paint looked just like it was off the showroom floor, it was a great vehicle and I still kind of have a soft spot for Grand's. My son does as well as he recently sold his 2004 LJ in order to build up a 2004 WJ.

Thanks for inquiring, I enjoyed drumming up the pictures and reminiscing about my old Jeep Grand Cherokee.
 
Last edited:
OP
Z

zmotorsports

ALLIANCE MEMBER
Joined
Oct 20, 2009
Messages
21,441
Location
Northern Utah
Thanks for the pictures, that's a cool design. Mine's been on my lift for 3 months and feeling lonely. I think I'll do a bumper as a reward when I get it driving again.

Be sure to post up some pictures of it on the fabrication section, I would love to see them.


Funny story about my front bumper on my ZJ. My wife and I along with my in-laws were on a road trip to Mt. Rushmore about ten years or so ago. My in-laws had never been to the Bear Country USA so while in the area we decided to take them over to Rapid City and drive through the exhibit.

One of the major cautions that they try to enforce and communicate to everyone as they are entering is to keep ALL windows rolled up and hand/arms inside the vehicles. They have signs up as well as make sure to tell you that if caught they will ask you to leave without a refund so keep the windows rolled up. Well you know as well as I do that taking pictures behind a glass window just doesn't sell the picture very well. As we were driving through the caged areas and the bears were wandering around I rolled my driver's side window down a bit to get a "clear" picture. There was a park worker along the fence line trimming the grass. He started waving his arms at me to stop as he was walking towards us. When he neared our Jeep and it was evident he wanted to scold me for having my window lowered, I proceeded to apologize for having my window down and told him I knew the rules and sorry I didn't comply but will keep my window up the remainder of the time inside the park. He said, "oh, that's not what I was stopping you for, I wanted to ask you where you got your front bumper on your Jeep. I've been looking for one for mine and there just isn't the aftermarket support for them".:confused:

I was relieved that he didn't ****** us out of the park but we all got a laugh about why he was stopping us. My father-in-law just looked at me with disgust and said "that **** never happens to me, I would have been kicked out". We still get a chuckle about it every so often when it comes up.
 

C_F

ALLIANCE MEMBER
Joined
Jan 21, 2005
Messages
9,675
Location
Utah...SNOW BLOWS!
That's a good looking front bumper on your old ZJ.:thumbup: That's great that it was a trouble free Jeep for you. My neighbor had one very near the same year as yours, for about three years...it gave him nothing but grief the whole time he owned it. He bought it used from a car lot, so who knows what the previous owners had done to it.

Looking forward to seeing how your current rear bumper project turns out.
 
OP
Z

zmotorsports

ALLIANCE MEMBER
Joined
Oct 20, 2009
Messages
21,441
Location
Northern Utah
That's a good looking front bumper on your old ZJ.:thumbup: That's great that it was a trouble free Jeep for you. My neighbor had one very near the same year as yours, for about three years...it gave him nothing but grief the whole time he owned it. He bought it used from a car lot, so who knows what the previous owners had done to it.


Looking forward to seeing how your current rear bumper project turns out.


Thanks for the comments.

Yeah, I kinda miss the ole’ ZJ at times. I love my JKUR but for some reason that ZJ seemed to get quite a bit of attention wherever we went, especially when we took it off road. People seemed to be shocked. I remember when we took it up on the Top of the World trail in Moab. There was a group up there that was shocked I took it up that trail. I did have to stack some rocks in a few places but it did great. I had True Tracs front & rear and that thing wheeled great but looked like it never left the trail.
 
Last edited:
OP
Z

zmotorsports

ALLIANCE MEMBER
Joined
Oct 20, 2009
Messages
21,441
Location
Northern Utah
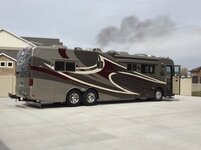
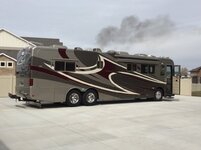
Yesterday I pulled the coach out of the RV bay and dewinterized it, hopefully for the last time. After monitoring the RV bay all winter long it never dropped below the 39-40 degree range so I should be fine to not have to winterize it any more for the few months a year it goes unused.

Here she is pulled outside, filling with water after checking tire pressures. The smoke is from a farmer who was burning ditch to the west of us, the coach isn’t actually on fire.
bf754fb99d20ca1a4ea607e21233099b.jpg

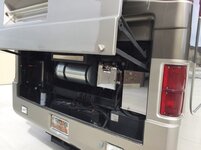
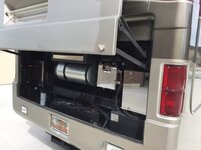
Double checking all the fluids. The engine bay turned out pretty decent.
e66533f88fc419482824d5b96745fc69.jpg

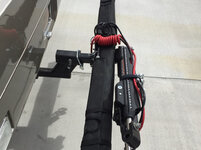
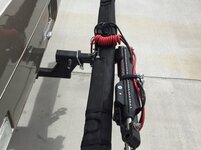
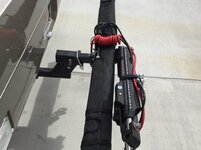
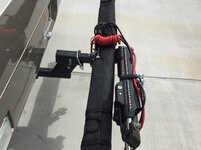
I also installed and secured the new Roadmaster Night Hawk towbar.
8eb67cc76318c7c2d383f8b92e5c28ca.jpg
 

Attachments

  • bf754fb99d20ca1a4ea607e21233099b.jpg
    bf754fb99d20ca1a4ea607e21233099b.jpg
    639.9 KB · Views: 4
  • e66533f88fc419482824d5b96745fc69.jpg
    e66533f88fc419482824d5b96745fc69.jpg
    666 KB · Views: 3
  • 8eb67cc76318c7c2d383f8b92e5c28ca.jpg
    8eb67cc76318c7c2d383f8b92e5c28ca.jpg
    750.2 KB · Views: 0
Last edited:
OP
Z

zmotorsports

ALLIANCE MEMBER
Joined
Oct 20, 2009
Messages
21,441
Location
Northern Utah
Happy Easter everyone.

This morning I went out to the shop and worked on the Jeep TJ bumper for a couple of hours.

I cut a top plate, cut a 1.5” hole in the top plate as well as the bumper and test fit the spindle.
737ba2ab63641e8fa5888ae7d410bf05.jpg

After measuring the spindle I cut the bottom at a 15-degree angle to match the bottom of the bumper.
5b9c086a17ca2520085527bc1b1114bb.jpg

Spindle welded in place with a gusset added from the spindle to the frame mount.
9df7044a3b9f1106fb186404a8682f6f.jpg

I drilled a 17/32” hole to accommodate the push pin for holding the tire carrier open then welded the top plate into position.
140eb07538eadfdedf10da09966869a8.jpg

cfcd65e26e9fe4f93a38008f55975209.jpg

44f1763c3bd9eccf273a76946ca3e07f.jpg

Then welded the top of the spindle.
84fe3a34c5c82e09a52c48aa063f61c5.jpg

Spring loaded push pin welded in place and the lower 2”x .125” tube cut and mocked into position.
4ee2bc6a9b966784824fe946195deb9c.jpg

06530e251d5b7167ce1d25c613787bed.jpg

That’s about it for today. Time to relax and enjoy the afternoon and the beautiful weather we have today.

Thanks for looking.
 

Attachments

  • 737ba2ab63641e8fa5888ae7d410bf05.jpg
    737ba2ab63641e8fa5888ae7d410bf05.jpg
    704.2 KB · Views: 2
  • 44f1763c3bd9eccf273a76946ca3e07f.jpg
    44f1763c3bd9eccf273a76946ca3e07f.jpg
    778.1 KB · Views: 0
  • 84fe3a34c5c82e09a52c48aa063f61c5.jpg
    84fe3a34c5c82e09a52c48aa063f61c5.jpg
    770.1 KB · Views: 0
  • 4ee2bc6a9b966784824fe946195deb9c.jpg
    4ee2bc6a9b966784824fe946195deb9c.jpg
    695 KB · Views: 0
  • 140eb07538eadfdedf10da09966869a8.jpg
    140eb07538eadfdedf10da09966869a8.jpg
    719.5 KB · Views: 0
  • 9df7044a3b9f1106fb186404a8682f6f.jpg
    9df7044a3b9f1106fb186404a8682f6f.jpg
    754.3 KB · Views: 0
  • 06530e251d5b7167ce1d25c613787bed.jpg
    06530e251d5b7167ce1d25c613787bed.jpg
    704.7 KB · Views: 0
  • 5b9c086a17ca2520085527bc1b1114bb.jpg
    5b9c086a17ca2520085527bc1b1114bb.jpg
    608.3 KB · Views: 0
  • cfcd65e26e9fe4f93a38008f55975209.jpg
    cfcd65e26e9fe4f93a38008f55975209.jpg
    690.5 KB · Views: 0
Last edited:
OP
Z

zmotorsports

ALLIANCE MEMBER
Joined
Oct 20, 2009
Messages
21,441
Location
Northern Utah
any concern of that pin hole collecting water under the plate and rusting out? bumper look awesome btw.

Nope. This will be the sixth bumper that I've done the same way as far as carrier position retention and no issues thus far. I put some 3M urethane seam sealer down inside once it is back from powder coating. Mine being the longest in service at nearly 7 years and 80K+ driven miles and another 25k of flat-towed miles through all kinds of weather.

Thanks for stopping by and checking out my projects.
 
Last edited:

sanddan

Well-known member
Joined
Jul 7, 2005
Messages
708
Location
Oregon
Yesterday I pulled the coach out of the RV bay and dewinterized it, hopefully for the last time. After monitoring the RV bay all winter long it never dropped below the 39-40 degree range so I should be fine to not have to winterize it any more for the few months a year it goes unused.

Here she is pulled outside, filling with water after checking tire pressures. The smoke is from a farmer who was burning ditch to the west of us, the coach isn’t actually on fire.
bf754fb99d20ca1a4ea607e21233099b.jpg

Double checking all the fluids. The engine bay turned out pretty decent.
e66533f88fc419482824d5b96745fc69.jpg

I also installed and secured the new Roadmaster Night Hawk towbar.
8eb67cc76318c7c2d383f8b92e5c28ca.jpg

Mike, did you put the coil on the safety cables or did they come that way? I just replaced my coiled ones with straight so they could fit through the channels in the tow bar arms. Some coils would be nice to help keep the cables out of harms way.
 

Attachments

  • bf754fb99d20ca1a4ea607e21233099b.jpg
    bf754fb99d20ca1a4ea607e21233099b.jpg
    84.8 KB · Views: 0
  • e66533f88fc419482824d5b96745fc69.jpg
    e66533f88fc419482824d5b96745fc69.jpg
    90.6 KB · Views: 2
  • 8eb67cc76318c7c2d383f8b92e5c28ca.jpg
    8eb67cc76318c7c2d383f8b92e5c28ca.jpg
    113.1 KB · Views: 2
OP
Z

zmotorsports

ALLIANCE MEMBER
Joined
Oct 20, 2009
Messages
21,441
Location
Northern Utah
Mike, did you put the coil on the safety cables or did they come that way? I just replaced my coiled ones with straight so they could fit through the channels in the tow bar arms. Some coils would be nice to help keep the cables out of harms way.

Dan, that is how the new Night Hawk came, a few coils at the coach end. My Sterling safety and electrical cables were straight and I know what you mean about a few being nice. These should stay tucked up a bit higher out of the way compared to my Sterling. I test fit the Jeep to it on Saturday and they appear to have just enough tension to keep tucked up tight yet easily expand upon turning. I also kept my vinyl cover from my Sterling and it fits over this Night Hawk, but a bit more snug than over the Sterling. I like to put the cover over it when parked at a campground.

Have you had that new coach out yet Dan? She sure is a beauty.:beer:
 

NUTTSGT

Super Moderator
Staff member
Joined
Sep 14, 2009
Messages
51,093
Location
Northern Central Ohio
I have collected a pretty good assortment of plastic caps and plugs over the years for situations like this. These are o-ring fittings so I capped each one after removing from the gearbox to minimize the mess and oil running down the frame.
56f656ac121277156bfebf2145da5d14.jpg


Thanks for looking.


Finally, something to prove Mike is mortal. . . . he uses a simple (beat up) cardboard box.


:lol_hitti


As always Mike, great work and love to stop by your thread. :beer:
 
OP
Z

zmotorsports

ALLIANCE MEMBER
Joined
Oct 20, 2009
Messages
21,441
Location
Northern Utah
Finally, something to prove Mike is mortal. . . . he uses a simple (beat up) cardboard box.


:lol_hitti


As always Mike, great work and love to stop by your thread. :beer:


Thanks Eric. Sorry to disappoint ya, you’re right, nothing special just a cardboard box from a Wiseco piston to store my plastic caps in.

Trust me, I’m definitely a realist and use what’s available, even if it’s just a regular box.

Thanks for checking in and commenting.
 
OP
Z

zmotorsports

ALLIANCE MEMBER
Joined
Oct 20, 2009
Messages
21,441
Location
Northern Utah
Tonight I was able to get the bottom tube for the tire carrier cut, end capped, fishmouthed and welded to the pivot tube.

6463598d3325aebb9aa596013605103b.jpg

3d5efc7a1141f8bebff3319968f0ab6f.jpg

1d4d3298851432161f03d3a3d3f3be40.jpg

Also mocked up the latch and welded the clasp on the bumper.
8f5c582d04622ec9dd551c6c4059f498.jpg

Lastly for the night I bolted the lower tube in place to double check my 115-degree swing vs the 110- degree swing of the tailgate to ensure everything will clear when open.
717e7590d68de5c618f5c634269ba6f2.jpg

Before closing up the shop for the night I cut a .188” thick 6” diameter plate into a circle and drilled for a 5 on 4.5” bolt pattern. I also measured for the tire placement so tomorrow night I should be able to mount the tire.

Thanks for looking.
 

Attachments

  • 6463598d3325aebb9aa596013605103b.jpg
    6463598d3325aebb9aa596013605103b.jpg
    737.8 KB · Views: 0
  • 1d4d3298851432161f03d3a3d3f3be40.jpg
    1d4d3298851432161f03d3a3d3f3be40.jpg
    738.6 KB · Views: 0
  • 8f5c582d04622ec9dd551c6c4059f498.jpg
    8f5c582d04622ec9dd551c6c4059f498.jpg
    667.8 KB · Views: 0
  • 717e7590d68de5c618f5c634269ba6f2.jpg
    717e7590d68de5c618f5c634269ba6f2.jpg
    759 KB · Views: 0
  • 3d5efc7a1141f8bebff3319968f0ab6f.jpg
    3d5efc7a1141f8bebff3319968f0ab6f.jpg
    692.9 KB · Views: 5
Last edited:
To avoid these ads, REGISTER NOW!
OP
Z

zmotorsports

ALLIANCE MEMBER
Joined
Oct 20, 2009
Messages
21,441
Location
Northern Utah
Finished up the fabrication on the TJ bumper/tire carrier tonight.

Once I determined the backspacing I cut a tube to length and capped the end.
IMG_3270.jpg

I then welded it to the tube to the backing plate for the tire/wheel mount.
IMG_3272.jpg

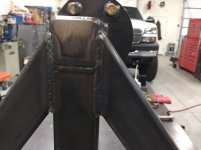
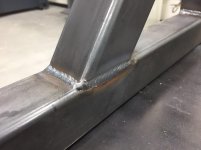
A few of the welds on the tire carrier.
IMG_3274.jpg

IMG_3276.jpg

IMG_3277.jpg

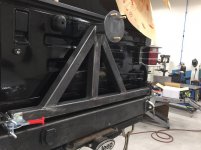
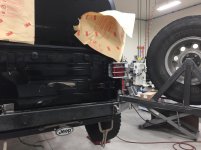
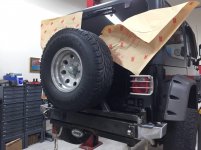
Bolted to the Jeep for the last time for fitment.
IMG_3278.jpg

IMG_3280.jpg

IMG_3279.jpg

Broken down and ready to go off to the powder coater.
IMG_3281.jpg
 
Last edited:

mooch

Member
Joined
Feb 7, 2008
Messages
18
Mike,
Thanks for taking the time to post all of your work, I dont know how you find the time to do it all, let alone take pictures and then post them for us. That 3M paper you put on the jeep, is that some kind of special paper to keep weld splatter off or just regular masking paper? When I weld on vehicles I try to use a welding blanket to protect it but its sometimes hard to get it/keep it where you want it.
thanks,
joe
 
OP
Z

zmotorsports

ALLIANCE MEMBER
Joined
Oct 20, 2009
Messages
21,441
Location
Northern Utah
Mike,
Thanks for taking the time to post all of your work, I dont know how you find the time to do it all, let alone take pictures and then post them for us. That 3M paper you put on the jeep, is that some kind of special paper to keep weld splatter off or just regular masking paper? When I weld on vehicles I try to use a welding blanket to protect it but its sometimes hard to get it/keep it where you want it.
thanks,
joe

Thanks for the comments Joe. It is definitely a challenge finding time, even now that I have closed my business down. Working 10-hour days, 5 days a week at my full-time job then trying to get several hours of shop time in each day is not easy but very rewarding when I do find the time. Very much looking forward to retirement when I can spend all day long in my shop.

As for the 3M paper, that is not standard masking paper. It is specifically made for protecting surfaces from weld spatter, grinding sparks, etc. It is much thicker than standard masking paper, has a waxy finish and a light adhesive backing that sticks fairly decent to most surfaces. I've been using it for quite a few years now and although not cheap, it is definitely worth it. I have welding blankets as well that I use to throw over certain areas but for painted or plated surfaces, the 3M paper works well and very convenient.

Thanks for following along on my projects thread and for commenting.
 

NUTTSGT

Super Moderator
Staff member
Joined
Sep 14, 2009
Messages
51,093
Location
Northern Central Ohio
As for the 3M paper, that is not standard masking paper. It is specifically made for protecting surfaces from weld spatter, grinding sparks, etc. It is much thicker than standard masking paper, has a waxy finish and a light adhesive backing that sticks fairly decent to most surfaces. I've been using it for quite a few years now and although not cheap, it is definitely worth it. I have welding blankets as well that I use to throw over certain areas but for painted or plated surfaces, the 3M paper works well and very convenient.

Thanks for following along on my projects thread and for commenting.


Does that come on a roll, does it stick together or is there a non-stick sheet between the layers ?


Tire carrier came out nice.
 
OP
Z

zmotorsports

ALLIANCE MEMBER
Joined
Oct 20, 2009
Messages
21,441
Location
Northern Utah
Does that come on a roll, does it stick together or is there a non-stick sheet between the layers ?


Tire carrier came out nice.

Thanks Eric. Yes it comes on a roll but does not have anything between the layers/sheets. The exterior is a wax like film that prevents the adhesive from sticking too severely. It actually unrolls quite easily for cutting and using.
 

JCQuick

Well-known member
Joined
Nov 29, 2008
Messages
4,933
Location
Apopka Fla.
Thanks Eric. Yes it comes on a roll but does not have anything between the layers/sheets. The exterior is a wax like film that prevents the adhesive from sticking too severely. It actually unrolls quite easily for cutting and using.

Mike do you use a lot of that 3m paper? reason I ask is we have a roll here that does not get used much. when we do go to use it sometimes we waste a wrap or 2 as it seems to stick to much. once we are past that it works as you said.

Just curious I do live where we have very high humidity
 
OP
Z

zmotorsports

ALLIANCE MEMBER
Joined
Oct 20, 2009
Messages
21,441
Location
Northern Utah
Mike do you use a lot of that 3m paper? reason I ask is we have a roll here that does not get used much. when we do go to use it sometimes we waste a wrap or 2 as it seems to stick to much. once we are past that it works as you said.

Just curious I do live where we have very high humidity

JC, I use it in spurts. I can go a couple of months without using any then in a month on several projects use it on each one. I don't waste it and use it sparingly whenever I do use it. That roll of 3M paper has lasted me about three years and I still have about a quarter of the roll remaining, so actually about two years of actual work because of the one year off for building the new shop.

We live in a very low humidity area so I have no issues with the way it rolls off. Stick well but no so well it is hard to remove. I can usually remove and reinstall several times before the "stickiness" is gone.:lol:
 

Kiwi Canuck

Well-known member
Joined
Dec 13, 2014
Messages
156
Location
Langley BC
Mike, can you comment a little more on your welding, as far as what machines you are using, TIG or MIG.

I see those nice welds and wonder what you have used to get them that nice.

I have a MIG/Stick setup (Miller 215) and my welds don't look anything like yours, in fact they look terrible most of the time and I'm not getting much better, I know it's takes practice but I guess I need a bit of technical setup advice.

Cheers.

David.
 
Last edited:
OP
Z

zmotorsports

ALLIANCE MEMBER
Joined
Oct 20, 2009
Messages
21,441
Location
Northern Utah
Mike, can you comment a little more on your welding, as far as what machines you are using, TIG or MIG.

I see those nice welds and wonder what you have used to get them that nice.

I have a MIG/Stick setup (Miller 215) and my welds don't look anything like yours, in fact they look terrible most of the time and I'm not getting much better, I know it's takes practice but I guess I need a bit of technical setup advice.

Cheers.

David.

Sorry for the delayed response David. I wasn't ignoring you, I have merely been out of town doing a little resting and relaxing with the wife, first vacation we've had in six months and I had no internet nor cell phone reception, absolute heaven.:D

As for my welding machines, I bleed blue, I'm a Miller fan. For my MIG (GMAW) welding process I use my Miller MM251 machine and for my TIG (GTAW) process I use a Miller Dynasty 300DX Tigrunner machine with liquid cooler setup. Both machines are 12+ years old and still perform perfectly.

I appreciate the comments on my welds. You are right about the biggest contributing factor being practice, practice and more practice. I don't weld all day every day so I get a bit rusty between projects, especially after the past year plus being away from welding while building my new shop. It is taking me a bit to get back in the swing of things behind the helmet.

Thanks for following along and if I can be of assistance with any specific question, please don't hesitate to ask and I will try to answer them.
 

4 FN 27

ALLIANCE MEMBER
Joined
Oct 19, 2015
Messages
4,635
Location
Minnesnowta
I have merely been out of town doing a little resting and relaxing with the wife, first vacation we've had in six months and I had no internet nor cell phone reception, absolute heaven.:D

Well that explains it...towards the end of last week I was thinking where is Mike? Was going to start checking the Obits tonight...LOL...
 
To avoid these ads, REGISTER NOW!
Top Bottom