To avoid these ads, REGISTER NOW!

ZMotorsports Shop Projects 2.0

csp

Well-known member
Joined
Mar 23, 2010
Messages
5,720
Location
Franktown, CO
I shouldn't answer for Mike but. Yes the heater is used for the final bearing.....

I'm familiar. The question was the result of confusion between the setup and final in the sequence of the post.

I wasn't sure if Mike's setup bearings were just tight enough that they also needed a little bit of help.
 
Last edited:
To avoid these ads, REGISTER NOW!
OP
Z

zmotorsports

ALLIANCE MEMBER
Joined
Oct 20, 2009
Messages
21,495
Location
Northern Utah
I'm familiar. The question was the result of confusion between the setup and final in the sequence of the post.

I wasn't sure if Mike's setup bearings were just tight enough that they also needed a little bit of help.

No worries. My setup bearings are what I would call "snug". They will slide on/off with a little help but not merely drop on. I don't like them too loose or I feel they won't provide adequate dimensions for preliminary setup.

Thanks for asking and for checking in on my projects.
 
OP
Z

zmotorsports

ALLIANCE MEMBER
Joined
Oct 20, 2009
Messages
21,495
Location
Northern Utah
Last night I was able to get the last of the welding done on the actual WJ. We were trying to determine where to mount the limiting straps and decided on mounting them just inboard of the rear coil springs, up under the frame box and the lower mount for the straps on the outermost upper corner of the rear axle truss. This should keep the limiting strap away from the rotating tire and yet provide enough clearance for the strap to be loose at ride height. My son fabricated a couple of plates the night before out of 3/16" plate to weld the actual upper clevis mounts to and last night I welded the 3"x6"x3/16" plates to in inside of the frame boxes to obtain some surface area. While I was finishing up the welding my son ran a flap disk over the undercarriage where we have ben welding for the past several months in preparation for paint.

After the welding was complete and my son was done blending the welds we walked around the entire undercarriage and applied 3M Urethane Seam Sealer to any and all seams that needed it in preparation for paint hopefully tonight. IF we can get it painted tonight we plan on commencing final assembly tomorrow.

Sorry no pictures of last nights work as it was getting late when we closed up the shop and I was dead tired. I will try to post up as many as possible of the painted chassis as well as the assembly.
 

LXCam

ALLIANCE MEMBER
Joined
Apr 23, 2013
Messages
19,215
Location
AZ
Exciting stuff Mike and not just for you two. Hopefully this means we're just a couple more days from....


What's in the box! :p
 
OP
Z

zmotorsports

ALLIANCE MEMBER
Joined
Oct 20, 2009
Messages
21,495
Location
Northern Utah
Exciting stuff Mike and not just for you two. Hopefully this means we're just a couple more days from....


What's in the box! :p

Still probably a few weeks away on the unveiling of the box. I have another Jeep to get in and work on and my son wants to use the lift to put his winter tires/wheels on THEN I can move on to my project.

Trust me Cam, I am even more excited than you are and I think it will be worth the wait.:thumbup:
 
OP
Z

zmotorsports

ALLIANCE MEMBER
Joined
Oct 20, 2009
Messages
21,495
Location
Northern Utah
Geeeez you're a tease.


:beer:

Sorry Dan. I actually may have been a little overzealous on my initial projection on how long my son's project was going to take. We ran into a couple of hurdles as far as trying to figure out the best way to put JK axles into this WJ but I honestly didn't think it was going to take 4 months to do this project. To say I wasn't being practical in my estimate is an understatement.:lol_hitti

I definitely appreciate you following along with anticipation however.
 
OP
Z

zmotorsports

ALLIANCE MEMBER
Joined
Oct 20, 2009
Messages
21,495
Location
Northern Utah
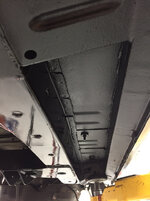
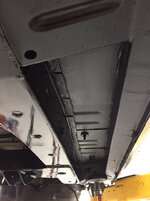
My son and I were able to get the undercarriage painted tonight.

First step was a couple coats of gloss chassis black along the frame boxes and frame stiffeners that we welded in.
d83da0afcc9caba39dd5adaf62b7bf85.jpg

8b2757383eceeb4643e3dfb41ae78b61.jpg

ffeb0db16d3dd8b311375fd47c008203.jpg

01e44873c4ff1a47d9844dd401397432.jpg

Next step was to apply the Duplicolor Bedliner to the area that sparsely had undercoating,mainly the wheelwell areas.
3f5e15c1af646417b7b9030dd9d1579f.jpg

e39752b0939e4085c9f8ee6987f13cef.jpg

cbcd9703d72a8b8bac2db5480299bed2.jpg

9c06d988a1fce00498c146098260e009.jpg

7cf3fad96bd54266355e08bc1200a133.jpg

b44b7210729e70384499ae4e8e0a9559.jpg

That concludes the painting process.
 

Attachments

  • d83da0afcc9caba39dd5adaf62b7bf85.jpg
    d83da0afcc9caba39dd5adaf62b7bf85.jpg
    747.4 KB · Views: 0
  • 8b2757383eceeb4643e3dfb41ae78b61.jpg
    8b2757383eceeb4643e3dfb41ae78b61.jpg
    710.6 KB · Views: 0
  • 7cf3fad96bd54266355e08bc1200a133.jpg
    7cf3fad96bd54266355e08bc1200a133.jpg
    637.3 KB · Views: 0
  • b44b7210729e70384499ae4e8e0a9559.jpg
    b44b7210729e70384499ae4e8e0a9559.jpg
    695 KB · Views: 0
  • 01e44873c4ff1a47d9844dd401397432.jpg
    01e44873c4ff1a47d9844dd401397432.jpg
    809.4 KB · Views: 0
  • 3f5e15c1af646417b7b9030dd9d1579f.jpg
    3f5e15c1af646417b7b9030dd9d1579f.jpg
    732 KB · Views: 0
  • e39752b0939e4085c9f8ee6987f13cef.jpg
    e39752b0939e4085c9f8ee6987f13cef.jpg
    632.5 KB · Views: 0
  • cbcd9703d72a8b8bac2db5480299bed2.jpg
    cbcd9703d72a8b8bac2db5480299bed2.jpg
    742.8 KB · Views: 0
  • 9c06d988a1fce00498c146098260e009.jpg
    9c06d988a1fce00498c146098260e009.jpg
    695.3 KB · Views: 0
  • ffeb0db16d3dd8b311375fd47c008203.jpg
    ffeb0db16d3dd8b311375fd47c008203.jpg
    751.7 KB · Views: 0
Last edited:
OP
Z

zmotorsports

ALLIANCE MEMBER
Joined
Oct 20, 2009
Messages
21,495
Location
Northern Utah
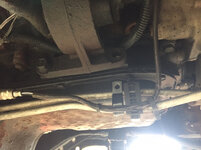
We were able to accomplish quite a lot today but still not as much as we had hoped. One of the reasons for slow progress today was due to addressing items that we noticed along the way that we had on the white board and trying to knock them down while completing the final assembly. I noticed while painting the other night that the transmission cooler lines that run up along the oil pan were hanging freely and not secured. The small plastic keeper had broken and I’m not impressed with the ones that merely slide on over the threaded studs.

We fabricated a small metal bracket that mounted to the passenger motor mount and then used an Adel clamp to hold the trans lines.
8e8739499fc4b96e1dfc6221854166a9.jpg

9abc449f4a904684571147fe7ec8a291.jpg

64202fa0772872c9f7f3446194122f15.jpg

Overview of the driver’s side after paint, undercoat, bump-stop, limiting strap and steering gearbox all mounted and ready to accept the axle.
4b68235da6e718db3bab0c177dbe7573.jpg

Passenger front.
628c90d9aca3b5861d7279d35c415ed9.jpg

Driver’s rear assembled. Axle installed, bump-stops, shocks and limiting straps.
a7244b5e76653e32ef6c96afeff9b0db.jpg

58bfb48ce630a1e087860d637d46724a.jpg

4745059ef5939a493cff0cd93a7e305b.jpg

a25b747e0e337fb0648eb61c032b2777.jpg

Next on to the front axle. Ten Factory chromoly axle shafts at the ready.
fa121285f340f72d73ce7daa492f0dc2.jpg

Reid Racing knuckles installed.
0edbf290f9506242f000792676199103.jpg

e778d8a11d7bdb1c7168ccecd072eb2f.jpg

Axle shafts in place along with dust shields prior to the unit bearing.
37e93ac231c841766eb5ae53082357ea.jpg

SKF unit bearing and ABS sensor installed and torqued in place.
c75d61de74c1f8787bb6c7a12284a49e.jpg

941e1609a3d0c937f40bc8c7ce83d2db.jpg

Teraflex Big Brake rotors installed.
a31f0a1017c78e6931a66ea8758e82c1.jpg

Tires mocked into place.
82814e0c9d0790b287e9968485f04ab6.jpg

0777bc93f67e7e47f5a87189bbb8c017.jpg

ef95f06395b769aba3fc8fa33fa61b2e.jpg

9210145608cdc288f1a330068a02d33a.jpg

Here she is sitting back down on its tires/wheels for the first time in nearly four months. We put a floor jack under the front to see just how much of a spacer we need to get everything where we want it. Looks like a 1” spacer will do the trick.
0f1078aa6b518ca086d1d49a5065bd5e.jpg

Thanks for looking.
 

Attachments

  • 0f1078aa6b518ca086d1d49a5065bd5e.jpg
    0f1078aa6b518ca086d1d49a5065bd5e.jpg
    714.2 KB · Views: 0
  • 9210145608cdc288f1a330068a02d33a.jpg
    9210145608cdc288f1a330068a02d33a.jpg
    691.9 KB · Views: 0
  • ef95f06395b769aba3fc8fa33fa61b2e.jpg
    ef95f06395b769aba3fc8fa33fa61b2e.jpg
    673.4 KB · Views: 1
  • 0777bc93f67e7e47f5a87189bbb8c017.jpg
    0777bc93f67e7e47f5a87189bbb8c017.jpg
    614.5 KB · Views: 0
  • 82814e0c9d0790b287e9968485f04ab6.jpg
    82814e0c9d0790b287e9968485f04ab6.jpg
    629.4 KB · Views: 0
  • a31f0a1017c78e6931a66ea8758e82c1.jpg
    a31f0a1017c78e6931a66ea8758e82c1.jpg
    700.3 KB · Views: 0
  • 941e1609a3d0c937f40bc8c7ce83d2db.jpg
    941e1609a3d0c937f40bc8c7ce83d2db.jpg
    779.4 KB · Views: 0
  • c75d61de74c1f8787bb6c7a12284a49e.jpg
    c75d61de74c1f8787bb6c7a12284a49e.jpg
    727.5 KB · Views: 0
  • 37e93ac231c841766eb5ae53082357ea.jpg
    37e93ac231c841766eb5ae53082357ea.jpg
    691 KB · Views: 0
  • e778d8a11d7bdb1c7168ccecd072eb2f.jpg
    e778d8a11d7bdb1c7168ccecd072eb2f.jpg
    723.5 KB · Views: 0
  • 0edbf290f9506242f000792676199103.jpg
    0edbf290f9506242f000792676199103.jpg
    713.8 KB · Views: 0
  • fa121285f340f72d73ce7daa492f0dc2.jpg
    fa121285f340f72d73ce7daa492f0dc2.jpg
    728.8 KB · Views: 0
  • 4b68235da6e718db3bab0c177dbe7573.jpg
    4b68235da6e718db3bab0c177dbe7573.jpg
    793.7 KB · Views: 0
  • 628c90d9aca3b5861d7279d35c415ed9.jpg
    628c90d9aca3b5861d7279d35c415ed9.jpg
    661 KB · Views: 0
  • a7244b5e76653e32ef6c96afeff9b0db.jpg
    a7244b5e76653e32ef6c96afeff9b0db.jpg
    674.5 KB · Views: 0
  • 58bfb48ce630a1e087860d637d46724a.jpg
    58bfb48ce630a1e087860d637d46724a.jpg
    656.2 KB · Views: 0
  • 64202fa0772872c9f7f3446194122f15.jpg
    64202fa0772872c9f7f3446194122f15.jpg
    732.7 KB · Views: 0
  • 4745059ef5939a493cff0cd93a7e305b.jpg
    4745059ef5939a493cff0cd93a7e305b.jpg
    672.3 KB · Views: 0
  • 9abc449f4a904684571147fe7ec8a291.jpg
    9abc449f4a904684571147fe7ec8a291.jpg
    741.8 KB · Views: 0
  • a25b747e0e337fb0648eb61c032b2777.jpg
    a25b747e0e337fb0648eb61c032b2777.jpg
    654.7 KB · Views: 0
  • 8e8739499fc4b96e1dfc6221854166a9.jpg
    8e8739499fc4b96e1dfc6221854166a9.jpg
    706 KB · Views: 1
Last edited:
OP
Z

zmotorsports

ALLIANCE MEMBER
Joined
Oct 20, 2009
Messages
21,495
Location
Northern Utah
The reveal moment is always a special one and I’m sure your son was grinning ear to ear. I think it looks fantastic.

Hope your sons wife is on the taller side. ;)

Thanks Matt. I think it looks pretty sweeeeeet as well. I always like the final assembly part of a project as things come together for the last time.

As for my son's girlfriend, yes she is quite tall @ 6' and my son is 6'4". They "tried" it out last night when she came over. I was ready to put it back up in the air but he wanted to leave it on the ground for when she came over.

To be honest, I think she was shocked. They started dating back in March of this year and it was stock. She has not been around automotive and gearhead minded people as I get the impression that none of the men in her family give much thought to anything automotive as long as it gets them from A to B. My son was impressed that she takes good care of her car and gets the tires rotated and oil changed regularly. When my son told her he was tearing it down to the shell to build the suspension and swapping axles and that it would be a mean looking WJ when it rolls out of the shop, I don't think she knew what to expect. For nearly four months now my son would show her the progress but I still don't think she could really envision it. Last night when I asked her what she thought her eyes lit up and she had a big ole smile and said how nice it looked and not even close to what she expected. I think she's getting a feel for just how bad my son has the bug. My son jokingly said to her, "now to get you on the trails and see how ya do."

They went looking at rings yesterday afternoon so I guess it's getting serious.:lol_hitti
 
OP
Z

zmotorsports

ALLIANCE MEMBER
Joined
Oct 20, 2009
Messages
21,495
Location
Northern Utah
Very nice work.
Full compression clearance check is ok for tires x fenders?

Thank you.

Yes, full compression and droop were all checked, verified and determined during the build process. Most of the build was done without the springs in place to check for movement and interference issues so we should be fine. We still have to fabricate the lower part of each of the four bumpstops but that is on the list of things to do yet.

Thanks for stopping by and checking on the progress.
 

LXCam

ALLIANCE MEMBER
Joined
Apr 23, 2013
Messages
19,215
Location
AZ
That looks great Mike and I really like those rims. The first time I read the comment about your son and her going out shopping for rims I thought WTF, those are already cool.

Maybe I should grab my glasses outta the truck eh?

I remember when I went shopping for rings sooo long ago....

The wife never did catch on to why the bowl of cracker jacks was always full

:lol:
 

NUTTSGT

Super Moderator
Staff member
Joined
Sep 14, 2009
Messages
51,183
Location
Northern Central Ohio
I got caught up again Mike, great progress, pictures and story telling as always.

When you weld something up in the shop, do you wait for a time period before leaving the shop for the evening as a "fire watch" period ?


What's in the box ?
 
To avoid these ads, REGISTER NOW!
OP
Z

zmotorsports

ALLIANCE MEMBER
Joined
Oct 20, 2009
Messages
21,495
Location
Northern Utah
That looks great Mike and I really like those rims. The first time I read the comment about your son and her going out shopping for rims I thought WTF, those are already cool.

Maybe I should grab my glasses outta the truck eh?

I remember when I went shopping for rings sooo long ago....

The wife never did catch on to why the bowl of cracker jacks was always full

:lol:


Thanks Cam. I think the wheels fit the build great. I was looking at those a while back thinking I may upgrade wheels on my Jeep with the next set of tires but then he went and bought the ones I was looking at. Oh well maybe I’ll get new ones maybe not but I think those look better on his silver WJ than they would on my black JKU.
 
OP
Z

zmotorsports

ALLIANCE MEMBER
Joined
Oct 20, 2009
Messages
21,495
Location
Northern Utah
I got caught up again Mike, great progress, pictures and story telling as always.

When you weld something up in the shop, do you wait for a time period before leaving the shop for the evening as a "fire watch" period ?


What's in the box ?


Thanks for stopping by and checking in on my projects Eric.

As for welding, I do exactly as you stated, I plan my welding around quitting time and don’t weld anything before calling it a night. I like to have at least and hour plus before closing up the shop after welding, even more if I’m welding under a vehicle such as on my son’s Jeep where the heat can get into the floor boards and or inner panels.

As for the box, I’m afraid you’ll have to wait just a bit longer to find out. Stay tuned....

Sent from my iPhone using Garage Journal
 
OP
Z

zmotorsports

ALLIANCE MEMBER
Joined
Oct 20, 2009
Messages
21,495
Location
Northern Utah
Good to hear she might enjoy his hobbies and you get a daughter in law.

Guess I’ll bring my step ladder so I can go for a ride. lol


Sent from my iPhone using The Garage Journal mobile app


Thanks Shorty. So far she has been very interested in my son’s Jeeping and motorcycle hobbies but she has admitted that she has never been off-roading before and is a bit anxious. I told my son we need to be very respectful of that and ease her into the hobby so she will enjoy it and not scare her.

Thanks for checking in Shorty.


Sent from my iPhone using Garage Journal
 
OP
Z

zmotorsports

ALLIANCE MEMBER
Joined
Oct 20, 2009
Messages
21,495
Location
Northern Utah
Today after breakfast my son and I went out in the shop to work on a couple of items as well as measure for brake lines.

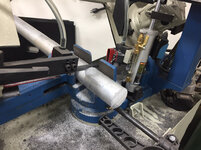
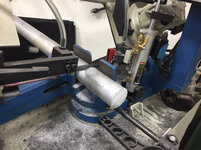
I cut the aluminum for the front bump-stops.
2439db2a8c4c204d2e3816a3b07cdb04.jpg

One down, one to go. These will require minimal machining.
ff9ced83dd23c9a0e07927a55eaebb75.jpg

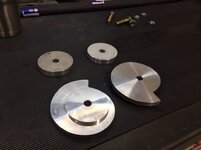
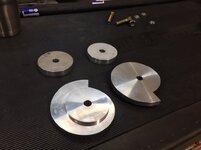
While I had the bandsaw going I also went ahead and cut two pieces .625” thick from a chunk of 6” diameter 6061 that I had. The rear doesn’t require much of a lower bumpstop so we decided to machine some lower spring retainers and have them serve double duty as lower bumpstops.

These really put my horizontal bandsaw to the test but it did a nice job. I don’t think it would cut much larger diameter than this.
27e5fe36f14d1d3cc953052d2c293fc0.jpg

While the saw was cutting I machined two smaller pieces measuring 2.850” which is the inside diameter of the bottom of the rear coil springs. These will serve as a spacer/spring locator for the rear springs.
be41bd2c8b7aa1367422741436647b9c.jpg

Here they are sitting in place. They measure about .125” lower than the spring diameter so I will machine a small step in the top portion of the spring retainer.
cee438a0b1f652c39ea0956bcdfcc174.jpg

Machining the step on the spring retainer. This step will measure the same 2.850” diameter by .125” deep. The outside of the spring retainer was taken down to 5” diameter from the original 6”.
b33f426c3b5e79198afc39253dd91a01.jpg

e2cb43c0b2840968d6e511beed4587d0.jpg

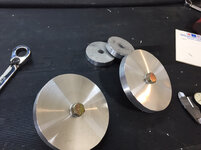
Parts ready for test fitment before cutting the upper retainer. I used a piece of cardboard to test and mark for final trimming.
4b9543504f4f64758e65389c7d905fad.jpg

Parts complete and ready for final assembly. The top part will capture the lower spring coil and sit firmly against the spacer.
7a71bb31371ea86878cefd8fe4b1bec1.jpg

Thanks for looking.
 

Attachments

  • 27e5fe36f14d1d3cc953052d2c293fc0.jpg
    27e5fe36f14d1d3cc953052d2c293fc0.jpg
    635.8 KB · Views: 0
  • ff9ced83dd23c9a0e07927a55eaebb75.jpg
    ff9ced83dd23c9a0e07927a55eaebb75.jpg
    746.2 KB · Views: 0
  • 2439db2a8c4c204d2e3816a3b07cdb04.jpg
    2439db2a8c4c204d2e3816a3b07cdb04.jpg
    812.5 KB · Views: 0
  • be41bd2c8b7aa1367422741436647b9c.jpg
    be41bd2c8b7aa1367422741436647b9c.jpg
    724.8 KB · Views: 0
  • cee438a0b1f652c39ea0956bcdfcc174.jpg
    cee438a0b1f652c39ea0956bcdfcc174.jpg
    640.8 KB · Views: 0
  • 7a71bb31371ea86878cefd8fe4b1bec1.jpg
    7a71bb31371ea86878cefd8fe4b1bec1.jpg
    86.7 KB · Views: 0
  • 4b9543504f4f64758e65389c7d905fad.jpg
    4b9543504f4f64758e65389c7d905fad.jpg
    672.6 KB · Views: 0
  • e2cb43c0b2840968d6e511beed4587d0.jpg
    e2cb43c0b2840968d6e511beed4587d0.jpg
    700.1 KB · Views: 0
  • b33f426c3b5e79198afc39253dd91a01.jpg
    b33f426c3b5e79198afc39253dd91a01.jpg
    643.8 KB · Views: 1
Last edited:

Wanna Ride

Well-known member
Joined
Jul 28, 2010
Messages
2,790
Not to my knowledge. My son keeps telling me he is going to post it here but he hasn't yet. He isn't active on any Jeep forums any longer either, he got tired of all of the wanna-be's and their lame *** comments. You know, the guys that think they are the only real Jeepers because they buy their parts out of the junkyard and then half-*** their **** together and break down on the trail for bragging rights.:lol_hitti

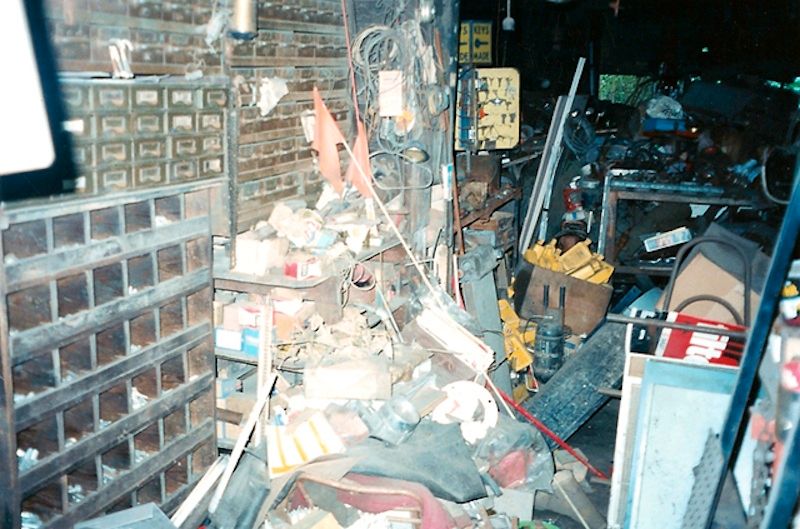
Yep. They exist in every form of motorsports and other hobbies too. Idiots who are proud of cobbing **** together and looking like they swim in grease vats, in the process. They’re relatively easy to spot in every environment, including their shops; black, oily floors with two dozen air hoses and hack-sliced extension cords everywhere. Every drawer and cabinet door hung open, looking like an abandoned industrial shop from the turn of the century (not the current one, either) requiring a tetanus shot and various other inoculations, prior to entry, wearing clothes that look like spill containment textiles. I get it... you and your shop can become sloppy and disorganized in the middle of a late night thrash project, but c’mon, don’t sacrifice at least some minimal standards.

Sorry... rant over. Proceed.
 

Firstram

Well-known member
Joined
May 16, 2017
Messages
1,394
Yep. They exist in every form of motorsports and other hobbies too. Idiots who are proud of cobbing **** together and looking like they swim in grease vats, in the process. They’re relatively easy to spot in every environment, including their shops; black, oily floors with two dozen air hoses and hack-sliced extension cords everywhere. Every drawer and cabinet door hung open, looking like an abandoned industrial shop from the turn of the century (not the current one, either) requiring a tetanus shot and various other inoculations, prior to entry, wearing clothes that look like spill containment textiles. I get it... you and your shop can become sloppy and disorganized in the middle of a late night thrash project, but c’mon, don’t sacrifice at least some minimal standards.

Sorry... rant over. Proceed.

That's it, I'm cleaning the shop first thing this morning!
 

Bob Heine

ALLIANCE MEMBER
Joined
Oct 24, 2009
Messages
10,709
Location
Boca Raton, Florida
I always close the cabinet doors. Guess I better get to work on the rest...:(

Actually it sounds a lot like Mr. Johnson's shop (and grounds) that Thomas and Chris restored. https://www.garagejournal.com/forum/showpost.php?p=706042&postcount=1

OrganizedChaosSm1.jpg
 

C_F

ALLIANCE MEMBER
Joined
Jan 21, 2005
Messages
9,675
Location
Utah...SNOW BLOWS!
Mike, I have the perfect Christmas present idea for you son & soon to be daughter in law, a set of AMP Research retractable running boards. :thumbup:


Oh, and lookie, they are even on sale! :D LINK
 
OP
Z

zmotorsports

ALLIANCE MEMBER
Joined
Oct 20, 2009
Messages
21,495
Location
Northern Utah
Thanks. I’ll let him know but actually they seem to be able to get in quite easily. A 6.5” lift on a WJ is actually much like a 4” on a Wrangler as they sit extremely low.


Sent from my iPhone using Garage Journal
 
OP
Z

zmotorsports

ALLIANCE MEMBER
Joined
Oct 20, 2009
Messages
21,495
Location
Northern Utah
Tonight we ran the rear brake lines, finished up the limiting straps, mounted the sway bar and fastened the coil springs using the spring retainers that I machined yesterday.

For brake lines we used an extended steel braided single line for an XJ (Cherokee) and ran it from the inside left framerail to the middle left rear axle truss where we drilled and tapped the truss to mount the “T” block. We then used extended rear brake lines for a JK/JKU and mounted the frame tabs on the truss outside corners. This will allow a nice low profile line to each caliper.
89b3d5eed66b6ba5d01101cca7ac9e26.jpg

35b64076ca5ad39a5f3126187f53892e.jpg

Next order of business was to get my 3/16” tubing bender out and my Mastercool flaring tool to form the rigid lines.
adcac227da72549eb79298ec65ab659c.jpg

f8625f9d99f04d4a680a9fa4cf6571c5.jpg

Left side rigid line complete.
5b560ac9daa41b9e1e90e51d32bc976e.jpg

Right side rigid line bent and forming the flair for the outside connection.
f2068a1d60c983c3088123f9a506f49e.jpg

Right rear rigid line complete.
d826499e18750224d1aa554f78b269e6.jpg

98763129e4e269d8663990a201d39a76.jpg

Once we get the rear calipers installed we will determine if we need to add another Adel clamp on each side to hold the hose between the rigid line and caliper.

Thanks for looking.
 

Attachments

  • 98763129e4e269d8663990a201d39a76.jpg
    98763129e4e269d8663990a201d39a76.jpg
    764.1 KB · Views: 0
  • d826499e18750224d1aa554f78b269e6.jpg
    d826499e18750224d1aa554f78b269e6.jpg
    752.4 KB · Views: 0
  • f2068a1d60c983c3088123f9a506f49e.jpg
    f2068a1d60c983c3088123f9a506f49e.jpg
    749.2 KB · Views: 0
  • 5b560ac9daa41b9e1e90e51d32bc976e.jpg
    5b560ac9daa41b9e1e90e51d32bc976e.jpg
    770.2 KB · Views: 0
  • f8625f9d99f04d4a680a9fa4cf6571c5.jpg
    f8625f9d99f04d4a680a9fa4cf6571c5.jpg
    726.1 KB · Views: 0
  • adcac227da72549eb79298ec65ab659c.jpg
    adcac227da72549eb79298ec65ab659c.jpg
    705.3 KB · Views: 0
  • 35b64076ca5ad39a5f3126187f53892e.jpg
    35b64076ca5ad39a5f3126187f53892e.jpg
    96.9 KB · Views: 0
  • 89b3d5eed66b6ba5d01101cca7ac9e26.jpg
    89b3d5eed66b6ba5d01101cca7ac9e26.jpg
    766.7 KB · Views: 0
Last edited:

lilscorpion

Well-known member
Joined
Mar 15, 2010
Messages
3,600
Location
Colorado
Correct Cam, just made a cardboard template and transferred to the retainer, cut on the vertical bandsaw then blended with the disc sander. Sorry, nothing too high tech.


d4f8d7465de6c8226ad771b6c698369c.jpg

It’s true than I’m a sucker for the freshly machined aluminum part but these are really cool and a neat idea Mike.
 

Attachments

  • d4f8d7465de6c8226ad771b6c698369c.jpg
    d4f8d7465de6c8226ad771b6c698369c.jpg
    243.2 KB · Views: 0

lilscorpion

Well-known member
Joined
Mar 15, 2010
Messages
3,600
Location
Colorado
They went looking at rings yesterday afternoon so I guess it's getting serious.:lol_hitti


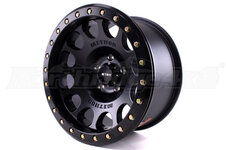
Sounds like he might have found a keeper. If they’re going to get serious by looking for rings I’d recommend the Method 105’s. They’re what I’m putting on the LJ. ;)

85036853acc0c016270da376d87ab0b9.jpg
 

Attachments

  • 85036853acc0c016270da376d87ab0b9.jpg
    85036853acc0c016270da376d87ab0b9.jpg
    171.9 KB · Views: 0

Com_VC

Well-known member
Joined
Oct 7, 2005
Messages
135
Location
Australia
How are you liking that Mastercool flaring tool? Noticed there are quite a few different styles around now.
 
OP
Z

zmotorsports

ALLIANCE MEMBER
Joined
Oct 20, 2009
Messages
21,495
Location
Northern Utah
Sounds like he might have found a keeper. If they’re going to get serious by looking for rings I’d recommend the Method 105’s. They’re what I’m putting on the LJ. ;)

Funny you mentioned those Matt, he was looking at going black but opted to go with the machined finish of the same wheel. He's running the machined finish Method 105's. And yes, I think he's found a keeper, she's a sweetheart and they appear to be happy. I'm excited and happy for them. I think she's getting a feel for his addiction.:)


It’s true than I’m a sucker for the freshly machined aluminum part but these are really cool and a neat idea Mike.

Thanks Matt. I too am a fan of freshly machined aluminum. I asked him if we should paint them black to blend in with the springs but he wanted to leave them machined finish so it would match the suspension links, shocks and even the silver body. I worry about what the winter and daily driving will do because there is no way to completely protect the undercarriage finishes. He is so happy with the way the paint on the undercarriage, the powder coated links and everything has turned out underneath but I know it won't look like that for long.:mad:

Thanks for following along Matt, I appreciate the comments.
 
OP
Z

zmotorsports

ALLIANCE MEMBER
Joined
Oct 20, 2009
Messages
21,495
Location
Northern Utah
How are you liking that Mastercool flaring tool? Noticed there are quite a few different styles around now.

I love it. I've had mine for probably close to 10 years now. They are not cheap but I really like how simple, neat and clean the results are.

Thanks for stopping by and checking out my projects thread.
 
OP
Z

zmotorsports

ALLIANCE MEMBER
Joined
Oct 20, 2009
Messages
21,495
Location
Northern Utah
Nice work as usual Mike. What brand tubing benders are those your using?

Rigid tubing benders. I have them from 3/16" up to 3/8". They are a bit pricey but sure work nice. I like them because the handle pivots to allow more than a 90-degree bend as one handle can be pivoted back out to grab more than 90-degrees.

Thanks for stopping by and thanks for the comments.
 
Last edited:
To avoid these ads, REGISTER NOW!
Top Bottom