
You are using an out of date browser. It may not display this or other websites correctly.
You should upgrade or use an alternative browser.
You should upgrade or use an alternative browser.
VISE REPAIR 101 all vise repairs, lubricants, sources for parts and the tricks to fix
- Thread starter drivesitfar
- Start date
Shiftless
Well-known member
Touching up means different things to different people. To get it to look really good again, I think you will have to respray the whole thing. I have seen guys cut a hole in a sheet of cardboard and spray through that onto the target. I’ve never done that. I would certainly practice a lot before doing an important job.
Touching up a scratch will still leave the scratch unless you use filler and sand it smooth. If that’s OK, then go for it. The color of paint and gloss level changes over time and useage. That won’t exactly match.
Touching up a scratch will still leave the scratch unless you use filler and sand it smooth. If that’s OK, then go for it. The color of paint and gloss level changes over time and useage. That won’t exactly match.
fishwatcher
Well-known member
- Joined
- Jan 26, 2023
- Messages
- 754
Link won’t open
Paint for restoring a vise?
I all of a sudden felt bad for my Wilton this weekend, so I took it off the bench and started stripping it. I'd like to paint it a medium-to-dark blue. Any advice on first of all what paint to use, but also where to get it? When I was a kid we would use oil based paint and brush it on if it...
 www.garagejournal.com
ALLFAST
Well-known member
Evening Shift! Solid points BTW.Aerosol or brush on ?
fishwatcher
Well-known member
- Joined
- Jan 26, 2023
- Messages
- 754
Aerosol spray. Specifically Rustoleum No Rust gloss enamel.Aerosol or brush on ?
I just wanted to touch up one area, went heavy on the end side which is now nice and glossy and the over spray made the surrounding areas more matte.
I know this is eye-roll worthy for a user.. but it’d be nice to have one uniform glossy finish. Kind of like I had before I started messing around with more paint.


Mr. Wonderful
Well-known member
When I did my 205 I scuffed the paint driving the jaw pins back in. I sanded the area with 500 grit lightly and resprayed. I wasn't going for a high shine but it really surprised me. I didn't sand all the way through the paint. It came out much smoother and shinier than the rest of the vise. The photo doesn't do it justice. Good luck!Aerosol spray. Specifically Rustoleum No Rust gloss enamel.
I just wanted to touch up one area, went heavy on the end side which is now nice and glossy and the over spray made the surrounding areas more matte.
I know this is eye-roll worthy for a user.. but it’d be nice to have one uniform glossy finish. Kind of like I had before I started messing around with more paint.

fishwatcher
Well-known member
- Joined
- Jan 26, 2023
- Messages
- 754
That looks great! I just refreshed my sand paper supply so knowing the grit to use is super helpful. Thanks.When I did my 205 I scuffed the paint driving the jaw pins back in. I sanded the area with 500 grit lightly and resprayed. I wasn't going for a high shine but it really surprised me. I didn't sand all the way through the paint. It came out much smoother and shinier than the rest of the vise. The photo doesn't do it justice. Good luck!
Shiftless
Well-known member
Be really careful when sanding curved surfaces. Uneven pressure will cause you to burn through high spots and miss low spots. I prefer old sanding sponges for that kind of work. They come in different grits. I use “fine” for that kind of work. When they get used they get softer and work even better at conforming to curved shapes.
fishwatcher
Well-known member
- Joined
- Jan 26, 2023
- Messages
- 754
For sure! Thx again.Be really careful when sanding curved surfaces. Uneven pressure will cause you to burn through high spots and miss low spots. I prefer old sanding sponges for that kind of work. They come in different grits. I use “fine” for that kind of work. When they get used they get softer and work even better at conforming to curved shapes.
Sorry for the delay in replying!Looks good! Surprized that a 1" section would yield enough material for that job. Assume you annealed it first? Going to do the same for my vises, thanks.
I did not anneal it, just hammered it flat, cut it to length, and bent it to shape. No problems with them yet; guess we'll see.
Outlawmws
Well-known member
1" copper pipe should get you over 3-1/8" wide material, less the kerf of the cut.lilredex said:
Looks good! Surprized that a 1" section would yield enough material for that job. Assume you annealed it first? Going to do the same for my vises, thanks.
Mr. Wonderful
Well-known member

Finally landed a swivel base for my Reed 406. Stupidly I didn't even look at the bottom of the vise and couldn't figure out why the swivel bolt wouldn't go in. Any tips on saving these threads would be greatly appreciated! I don't have a tap or thread chaser that big available. Does anyone know the thread pitch for this bolt?
Shiftless
Well-known member
I used to have a 406 but no longer have it to measure the swivel bolt thread size. 
When you find out what size you need, let me know. I’m probably not the only guy who has a box full of big taps from partial sets and could mail you one to use. One of mine might work to clean up that rusty mess.
In the mean time, try cleaning with light oil and a straight wire brush. Something like this.
Last edited:
RTM
Well-known member
If you can figure out the pitch I have a couple of thread chasers that are just L-shape that you stick into the threads to clean. But mine are pretty low TPI.
A toothbrush could also be considered especially the metal versions.
A toothbrush could also be considered especially the metal versions.
Shiftless
Well-known member
Yeah… good idea RTM…I use the wire toothbrushes a lot. Steel and brass versions. The big Reeds have big fittings so one of those wooden toothbrushes just might fit. If not, you can modify the tool by thinning down the wooden head and radius the square edges.
Mr. Wonderful
Well-known member
I worked on it for a few minutes today with the drill and wire brush. I got close to being able to start the bolt. I think I need to remove the dynamic and get the drive nut out. I’m guessing the hole goes all the way through???? I can’t remember if reeds go through under the dovetail.
Shiftless
Well-known member
Mr. W. :

Shiftless
Well-known member
This past weekend I began restoration of a sadly neglected 4 inch bullet. It was outdoors for many years. It bears a date code of Jan. 1980

Shiftless
Well-known member
One big problem with that vise is that the handle won’t slide through the nose. Rusted up solid.
I tried multiple applications of penetrating oil several times per day for 3 days along with banging the end with a big hammer.
So I rigged up an electrolysis set up as shown. Five 6 inch long nails wired together for the cathode and some scrap 14 ga. white stranded to connect up the screw to the battery charger. The vise screw and handle becomes the anode. Direct current makes the rust migrate from the part you are cleaning to the sacrificial cathode - in this case the nails.
If you do this make sure to connect the negative lead to the part you are cleaning and the positive lead to the sacrificial steel whatever. Lots of guys use rebar. Graphite bars would be cool but I don’t have any laying around and I see no reason to buy them for my purposes. I like the nails because I can position them exactly where they will work the best. Electrolysis is a line of sight kind of deal.
I used washing soda (sodium carbonate) to make an electrolyte using one tablespoon per gallon of water.
I strongly suggest wiring in an ammeter like I did to monitor current flow. One or 2 amps seems to be OK. This is only the second time I have done it.
OP
drivesitfar
Well-known member
Nothing like having a scientist (or chemist) show how he sets up his electrolysis tank. Looks like it should work so best of luck.
If I recall correctly Fretters has his 24/7 electrolysis tank monitored for power using an old computer for power and he said low power and time are his keys to success.
In case it doesn’t maybe buy a gallon of vinegar and soak it for a couple days.
I saw your post on vise thread asking about the base and my guess is a prior owner just found a base maybe from a machinist vise and bolted it on since so many of these old Wilton bullets were sold without a swivel base.
Good luck!!
Shiftless
Well-known member
Thanks Drives!
After maybe 24 hours of electrolysis I’ll try heat, penetrating oil, and banging on it some more. I have a short length of train rail for a poor man’s anvil to support the nose while I hit the long end with a BFH. (That’s shorthand for big effing hammer… a GJ approved shorthand)
I was hoping you’d hop back on and comment. This thread you started 9 years ago is great!
I see it’s approaching the milestone of 10,000 posts.
Thanks for your input about that base. I’m betting it was shop made by a guy with a nice machine shop. I will clean it up and post pics later. The bolts holding that to the vise were super rusty as you can see in the pic. After penetrating oil for a few days, I tried my M12 Fuel impact driver with an adapter and a 3/4 inch socket…no go.
So I upped my game and dusted off my old pneumatic impact gun. I snapped on a half inch drive 6 point impact rated socket and adjusted my air compressor regulator to 100 psi.
Those nuts came loose right away.
Last edited:
ShadowBoxer
Well-known member
Shiftless,
While your task is just getting things apart and mine was largely clean up - everything worked and came apart easily.
I have to say my innocent, never took a vise apart before, starting point mentality, was very impressed with Evapo-Rust.
If you still need to, I would clean off any oil, brush off any loose stuff and submerge the parts in Evapo-Rust for at least 24 hours. Hell, why not just submerge the whole thing while you’re at it anyway. You might get the parts to release and even if not, you get rid of at least 90% of the rust.
You win either way.
Some pix of my before and after:
A very rusty Wilton Baby Bullet and Reypo swivel stand from the 1940s (maybe, I don’t know)
BEFORE


And about 20 hours later after a quick reassembly to compare.
AFTER


Probably not a big deal to you experienced types but this is my first time.
All I saw was HOURS saved from scuffing and scrubbing it down to raw steel. And it never would have looked like this.
Clean, raw, gray, steel.
All I had to do was set it up before dinner, go to sleep and re-visit the next afternoon.
I was impressed.
Now I’m not sure what to do.
Re-paint or just leave it raw steel under some oil. I guess I need to clean off the remaining paint first. Some paint came off. Probably because there was rust under it.
So Shiftless, or to whom it may concern, I would try that first.
You have nothing to loose and it’s a guaranteed win, one way or the other.
While your task is just getting things apart and mine was largely clean up - everything worked and came apart easily.
I have to say my innocent, never took a vise apart before, starting point mentality, was very impressed with Evapo-Rust.
If you still need to, I would clean off any oil, brush off any loose stuff and submerge the parts in Evapo-Rust for at least 24 hours. Hell, why not just submerge the whole thing while you’re at it anyway. You might get the parts to release and even if not, you get rid of at least 90% of the rust.
You win either way.
Some pix of my before and after:
A very rusty Wilton Baby Bullet and Reypo swivel stand from the 1940s (maybe, I don’t know)
BEFORE
And about 20 hours later after a quick reassembly to compare.
AFTER
Probably not a big deal to you experienced types but this is my first time.
All I saw was HOURS saved from scuffing and scrubbing it down to raw steel. And it never would have looked like this.
Clean, raw, gray, steel.
All I had to do was set it up before dinner, go to sleep and re-visit the next afternoon.
I was impressed.
Now I’m not sure what to do.
Re-paint or just leave it raw steel under some oil. I guess I need to clean off the remaining paint first. Some paint came off. Probably because there was rust under it.
So Shiftless, or to whom it may concern, I would try that first.
You have nothing to loose and it’s a guaranteed win, one way or the other.
Shiftless
Well-known member
S.B.
Your baby bullet came out great.
I would leave it alone and just apply a thin coat of boiled linseed oil to retard rusting and to enhance the appearance of the original paint.
Thanks for your upvote on the Evaporust. I too am a big fan of the stuff and have been using it for years. I have about half of a 5 gallon bucket of the stuff down in the garage.
As seen in my pics above, I am set up for electrolysis right now. I ran it for 12 hours and then took it apart and hammered on the handle to see if it was loose at all. After repeated blows with a 2 pound hammer it moved about 1 millimeter.
Right now, it is back in the electrolysis tank. Patience is a virtue. I have to keep reminding myself of that fact.
I had a stuck handle on a Prentiss jeweler’s vise I bought at an estate sale. It too was very rusty. It was actually laying on bare dirt at the sale. I soaked it in Evaporust for a week with no success. After 24 hours in the electrolysis tank it was far enough along that I could hammer on it a bit and free it up.
So that was a combination of electrolysis and Evaporust.
Stay tuned…I will report here on my success or lack of success.
Last edited:
ShadowBoxer
Well-known member
I like the idea electrolysis. Never tried it but looks like a good idea and relatively easy.
I just think Evapo-Rust is easier at this point.
As I understand things, Evapo-Rust will only work on surfaces it can reach.
So if something is covered in oil or paint, etc, it will not affect the metal below.
If the rust is packed in, between two surfaces for example, maybe deep down inside the hub of a vise handle for example, it will have to remove rust from the edges before it can seep in and work in the deeper rust. That of course takes time.
I wonder if that is also true of electrolysis?
For that handle, besides banging on it, I might try clamping it to a bench with the handle hanging over the edge.
Then grab the handle (maybe with some pliers) and try to twist it rather than push it with a hammer.
That might break up the internal rust at least enough to let the Evapo-Rust or the electrolysis juice get in deeper and do more work.
Just a thought.
Shiftless
Well-known member
Thanks for your thoughts. S.B.
I plan to give it another 24 hours in electrolysis, then bang it a bit more. Then maybe a few days in Evaporust if it’s still stuck. My thinking is that the impact of the hammer blows is way more force than any twisting force I can administer with pliers. I know that twisting is a force in a different direction.
I suppose I could epoxy a socket onto the handle end and then 24 hours later use a pneumatic impact gun to apply torque. Does heat break the bond between epoxy and steel or would I have to grind off the socket after this maneuver?
Mr. Wonderful
Well-known member
Maybe an air hammer with a flat sacrificial piece between the handle end and the hammer?Thanks for your thoughts. S.B.
I plan to give it another 24 hours in electrolysis, then bang it a bit more. Then maybe a few days in Evaporust if it’s still stuck. My thinking is that the impact of the hammer blows is way more force than any twisting force I can administer with pliers. I know that twisting is a force in a different direction.
I suppose I could epoxy a socket onto the handle end and then 24 hours later use a pneumatic impact gun to apply torque. Does heat break the bond between epoxy and steel or would I have to grind off the socket after this maneuver?
Shiftless
Well-known member
That’s a great idea.Maybe an air hammer with a flat sacrificial piece between the handle end and the hammer?
I also considered a 20 ton press. Too bad I don’t have a press.

RTM
Well-known member
With electrolysis being seriously line of sight, it won’t be fast clearing the gap. Evaporust May win this round.
Best I can offer to help is an arbor press rated at 1-1/2 tons. Or a porto power, Hilift jack, bottle jack……
Best I can offer to help is an arbor press rated at 1-1/2 tons. Or a porto power, Hilift jack, bottle jack……
Shiftless
Well-known member
Thanks for reminding me. I have a Walker hydraulic bottle jack rated for 8 tons. HmmmWith electrolysis being seriously line of sight, it won’t be fast clearing the gap. Evaporust May win this round.
Best I can offer to help is an arbor press rated at 1-1/2 tons. Or a porto power, Hilift jack, bottle jack……

Shiftless
Well-known member
I also have a 10 pound long handled sledge hammer.
What will deliver more rust busting force… a 10 pound sledge hammer impact or an 8 ton bottle jack with continuous push?
Here is evidence of some progress. This pic was taken after 12 hours of electrolysis. You can see erosion of the rust bond between the handle and the nose.
When I started, there were bits of solid rust here sitting up proud of the joint. I scraped a bit with an ice pick and a hacksaw blade to get started.
Seeing all of this rust, I was amazed that the dynamic jaw cranked out without too much effort.
The worst bullet I have worked on had a very badly rust frozen slide but the handle was nice and loose. (I fixed it but that’s a long story)
Last edited:
OP
drivesitfar
Well-known member
Shift: I had a 100+ year old Prentiss that was set outside a barn for close to 75 years before new owner found it and I bought it with a few more vises he found inside the barn.
It was the rustiest vise I’d ever seen and I put it in a Costco plastic storage box with 2 gallons of vinegar and let it sit for 2 weeks. Amazingly it loosened things up but it still looked pretty bad so I set it aside and worked in something else. I know you know this but if you try the vinegar make sure to rinse it off with water and dry it real good cause I found out the hard way that vinegar does EAT cast iron.
Or BFH might work too.
Yep I’m happy this thread has survived like a few others I started and still enjoy. I believe GJ and other forums to use your brain and memory might help more than a few of us avoid Alzheimer’s.
Good luck too!!
Outlawmws
Well-known member
Drives, isn't that the one that got left for months later and mostly dissolved? that's the story I remember.
OP
drivesitfar
Well-known member
Yep but I still have it sitting around her somewhere. Didn’t quite dissolve but yes vinegar ate some cast before I washed it off.
See what I mean about this place helping our memory!!
See what I mean about this place helping our memory!!
Shiftless
Well-known member
Thats why I spend the money for Evaporust instead of using vinegar.
But I did consider an eye dropper with hydrochloric acid to put a drop or two right there in the gap between the handle and the nose.
But I did consider an eye dropper with hydrochloric acid to put a drop or two right there in the gap between the handle and the nose.
RTM
Well-known member
With my ability to aim a sledgehammer, I choose the jack.I also have a 10 pound long handled sledge hammer.
What will deliver more rust busting force… a 10 pound sledge hammer impact or an 8 ton bottle jack with continuous push?
Shiftless
Well-known member

OP
drivesitfar
Well-known member
Shift: how did the BFH work? Nice pic you found of me to post that’s a few root beer floats ago!!
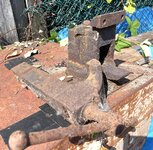
All (&outlaw): I’ve posted this old Prentiss swivel jaw vise more than a few times on several threads cause soaking in vinegar actually freed it up. AND I set it aside forgot to rinse it off for about another week or so and vinegar pitted it even more than the PNW winter seasons did. Well I rinsed it off with water and set it in the sun and then forgot about it. Fast forward maybe 5 years and it’s frozen again. Since I’m not really interested in working on it during our awesome summer weather it might sit til drizzle season before I see if vinegar frees it up again.
These little Prentiss swivel jaw vises are amazing and Carla (GOD rest her wonderful soul) thought she could restore this one but she passed before I could drive it to her.
Hope you’re all having a fantastic day and feel free to post up some before and after vise restore pics with stories too
Attachments


Shiftless
Well-known member
Vise handle still in electrolysis. I am doing crack repair on a drywall ceiling right now so it’s easy to just leave it in the soup. More time can’t hurt and might make a difference between success and failure with the BFH.
Current has dropped to about 250 milliamperes but that is not zero so something is working.
Current has dropped to about 250 milliamperes but that is not zero so something is working.
454ragtop
Well-known member
Drives, not sure there will be anything left of that Prentiss once you strip the rust again, looks fubar.
Been working on the vises that have been hanging around waiting for me to fabricate the parts to complete them. Started with the handle for the giant Parker 436 I posted in the vise mega thread a couple weeks back. Nice to put that vise into service, it's been great to use.
Next up is a Columbian 4-1/2" swivel jaw swivel base machinist vise, Sad ******* was rusted solid everywhere, bought it for dirt at a swap meet, Had to drill and tap the swivel pin to be able to pull it out. The swivel base lock was rusted and seized. no hope for it. Had a spare lock handle and nut, but the toothed bolt that engages the teeth inside the base was a little tougher. The bolt was so far gone I had to buy another Columbian vise to see what the bolt was supposed to look like. Pics show the original bolt (blob of rust), bolt from second vise, and bolt I fabricated for the swivel jaw vise, works perfect. Had to make a new swivel jaw lock pin, taper angle is just a little different from the Prentiss swivel lock pin, of which I've made a bunch.


