To avoid these ads, REGISTER NOW!

What did you do "IN" your garage today?

kaymccampbell

Well-known member
Joined
Feb 27, 2015
Messages
29,598
Location
Upstate New York
Going a second pass after yesterdays dismal results


I made a second pass at the solar heating of camp water today. The overcast did burn off adn clouds mostly went away. not a particularly hot day, but the key here is sunlight more than temp to get this to work.

First three hours was about like yesterday, not enough sun to make progress.
Then there was good sun and I was getting 8 or 9 degrees of gain per hour.
then it peaked, and then it fell off, and that seems tied to the ambient temp as well.

I think there is a direct relationship between what it can gain, and what it loses off the shady side. So radiant from the sun, good. but there is radiant off the back side as well and the threshold seems to be about 35-40 degrees from ambient. It's peak was 110 F with an ambient temp of 70, but that fell to 104F at 68. I did find that in the heat of the day, trading sun sides front to back seemed to do better.

I also want do a side by side test with one of my stainless steel wash stations, to compare temp rise. I know I have used a reflector off the back for the SS tanks with just aluminum foil, but I can also get mirrored plexi from Tap plastics and make a good reflector.

I'm also thinking this plastic tank can benefit from a "bed" of Styrofoam for the back? I'm also wondering about the ability of the thick black plastic to get heat into the water, vs, the SS (painted flat black)

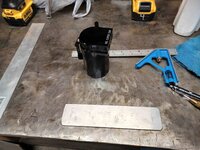
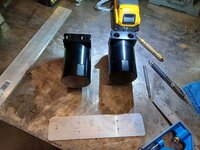
This is the GoSpout(R) water sprayer I've been testing just to get a read on if its a good option. I like that my wash home built Stations stand securely, and are easier to get on and off with one person. Moreover add a riser and mine are showers, easily, the GoSpout need to set on something chest high and is a hassle to lock open flow. The sprayer on the GoSpout has some headiness, but now you are one handed?

One advantage the GoSpout and Hudson sprayer based units I have made have, is a built in air pump for pressure


GOSPOUT tank.jpg
Inflate a clear plastic bag over it. Performance should improve.
 
To avoid these ads, REGISTER NOW!

rayra

Well-known member
Joined
Dec 1, 2014
Messages
4,724
Location
Escaped from Los Angeles
If you panel the back of that area with your beadboard, then install the carcasses against it, it'll have the same effect, without the precision problems of cutting n fitting individual little panels. I'd prefinish the strips, and use construction adhesive to glue them to the wall. And the finish nailer to tack them into place while the glue sets.
That would require removing and reinstalling the cabinets and renting the ladder again, no thank you. The back panels were deliberately left out to reduce the weight in handling the bookcase bodies to get them up there.
With a 1/4" thick luan backer and the ~5/16" thick beadboard and that all the bookcase pieces were batch cut to the same dimensions, I'm fairly confident I can size the back panels to a close enough fit. And with a close fitting 9/16" thick panel in between 3/4" thick flanges you'd have to have your eye AND light looking right down a joint to have any chance of seeing any perceptible gap.

In hindsight, I could have but a small rabbet in the back edge of the upper flange and sized the back panels to slip in and up into that rabbet and rest on top of the bottom horizontal flange and that would have obviated any concern about fit or visible gaps. But I don't expect to have any. Worse comes to worse and just put a black stripe on the wall behind the possible future gaps and then nothing will show at all.

As it stands now, the cabinets are screwed into the wall studs. horizontal spacings are set. I start crafting the vertical facias tomorrow. With a snug fitting plywood backer, such that the 7 pieces in each stack go in / on as a single unit, brad nailed in place.
Oak prices are high here (and everywhere, I guess, almost $13 a board foot. The 15'+ run for the top fascia is nearly $100 in 1x6 solid oak, so that isn't happening.
I'll use more of the oak-veneer plywood remnants and iron edge banding onto their arched edges. With this dark stain and looking at them 10' in the air, no one will see a difference.

/and I've got several more sheets of oak veneer 3/4" ply to purchase and shape into more furniture in the coming months.
 

kaymccampbell

Well-known member
Joined
Feb 27, 2015
Messages
29,598
Location
Upstate New York
That would require removing and reinstalling the cabinets and renting the ladder again, no thank you. The back panels were deliberately left out to reduce the weight in handling the bookcase bodies to get them up there.
With a 1/4" thick luan backer and the ~5/16" thick beadboard and that all the bookcase pieces were batch cut to the same dimensions, I'm fairly confident I can size the back panels to a close enough fit. And with a close fitting 9/16" thick panel in between 3/4" thick flanges you'd have to have your eye AND light looking right down a joint to have any chance of seeing any perceptible gap.

In hindsight, I could have but a small rabbet in the back edge of the upper flange and sized the back panels to slip in and up into that rabbet and rest on top of the bottom horizontal flange and that would have obviated any concern about fit or visible gaps. But I don't expect to have any. Worse comes to worse and just put a black stripe on the wall behind the possible future gaps and then nothing will show at all.

As it stands now, the cabinets are screwed into the wall studs. horizontal spacings are set. I start crafting the vertical facias tomorrow. With a snug fitting plywood backer, such that the 7 pieces in each stack go in / on as a single unit, brad nailed in place.
Oak prices are high here (and everywhere, I guess, almost $13 a board foot. The 15'+ run for the top fascia is nearly $100 in 1x6 solid oak, so that isn't happening.
I'll use more of the oak-veneer plywood remnants and iron edge banding onto their arched edges. With this dark stain and looking at them 10' in the air, no one will see a difference.

/and I've got several more sheets of oak veneer 3/4" ply to purchase and shape into more furniture in the coming months.
No spirit of adventure.
 

ObnoxiousFumes

Well-known member
Joined
May 22, 2023
Messages
1,510
Location
Southwest Sask
Finally (with help from Dad) got a shelf finished/modified so I can put ALL my fluids/fuels/lubricants/aerosols etc. in one location in the shop. Phew! Makes such a difference in organization.
Still have a lot to clean up and reorganize now that I got my Dodge out of the shop, but progress is being made in that direction!
Need to make a rack to store all my raw steel tubing still... maybe that will end up under my weld table once I get that built.
 

CudaChick1968

Member Emeritus
Joined
Jul 1, 2011
Messages
1,800
Location
Northwest Tennessee (38230)

dcg9381

Well-known member
Joined
Jun 20, 2018
Messages
11,883
Location
Austin, TX
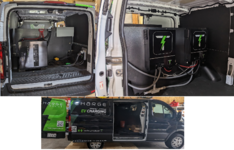
Final branding touches on our mobile EV charging platform. This is an EV powered Ford Transit. It's designed to do side-of-the-road service for EVs where a driver "runs out of fuel". We're adding tire change services for Teslas, as they don't carry spares and don't have runflats.


1685459405240.png
 

niget2002

Well-known member
Joined
Oct 2, 2012
Messages
11,213
Location
Josephine, TX
Hmm, that would work, Not sure about Inflating one, but a clear plastic bag enclosure would definitely help hold the heat.
It would act as a little green house. It'd also serve to insulate the container from the outside air after heated up.

Could make a small cover out of PVC and thick vinyl plastic too.
 

Mike65

Well-known member
Joined
Mar 7, 2007
Messages
3,102
Location
Horse Pasture, Va.
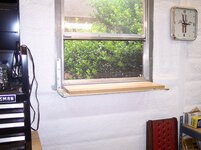
Started building a shelf for my laptop when I need it in the garage. I get very good wi-fi if I am near the window as it is a direct sightline to the house. So I figured the only thing that will go there is a low cabinet for storing automotive related chemicals & the cabinet is only 36" high so this was a perfect spot for the shelf.

100_2103.JPG
 

Wrench97

Well-known member
Joined
Jun 23, 2018
Messages
12,146
Location
Southeastern Pa
Final branding touches on our mobile EV charging platform. This is an EV powered Ford Transit. It's designed to do side-of-the-road service for EVs where a driver "runs out of fuel". We're adding tire change services for Teslas, as they don't carry spares and don't have runflats.


1685459405240.png
I gotta ask how do charge the EV? IE using the battery in the van, a generator or?
 

dcg9381

Well-known member
Joined
Jun 20, 2018
Messages
11,883
Location
Austin, TX
I gotta ask how do charge the EV? IE using the battery in the van, a generator or?
It'd be a lot cheaper to throw a 12KW generator in the back of a truck and buy a generic level 2 charger... I'm just the engineer that makes it work, someone else has to sell this idea.

This van contains large batteries, somewhere between 15-30kWh. We use those to power a standard "level 2" charger which is pretty much compatible with all EVs. It's no different than the charger in any EV owner's garage.

The idea isn't to re-fuel the whole thing, just enough to get you another 10 miles to a real charging station.
 

ecotec

Well-known member
Joined
Oct 5, 2010
Messages
5,468
I bought 8 sockets and 2 extensions today. Two of the sockets (the 22mm Armstrong) and both extensions had light corrosion. I cleaned off the corrosion with Fluid Film and a brass brush.

I did not take a before picture.
 

Attachments

  • F435B0CC-347C-4689-831F-CAD7C5D8AAB8.jpeg
    F435B0CC-347C-4689-831F-CAD7C5D8AAB8.jpeg
    1.3 MB · Views: 37
Last edited:

rayra

Well-known member
Joined
Dec 1, 2014
Messages
4,724
Location
Escaped from Los Angeles
No spirit of adventure.
And I'm lazy, too!

/


How's this for adventure - finished priming and painting 2-1/2 walls in the master bedroom and decided to change a few old outlets while the big heavy furniture was out of the way, and found this incredible garbage. And had to spend some extra time verifying other wiring wasn't screwed up, after correcting these and re-energizing things.
 

Attachments

  • sparta electric nightmare outlet 01 burned.jpg
    sparta electric nightmare outlet 01 burned.jpg
    46.2 KB · Views: 76
  • sparta electric nightmare outlet 02 reversed.jpg
    sparta electric nightmare outlet 02 reversed.jpg
    44 KB · Views: 75
  • sparta electric nightmare outlet 03 ludicrous.jpg
    sparta electric nightmare outlet 03 ludicrous.jpg
    60.5 KB · Views: 75

rharman

Well-known member
Joined
Apr 22, 2012
Messages
8,894
Location
SoCal
Did some straightening.

Looked at the shock absorbers on our front-load washer. I had replaced them in 2021 with aftermarket but it's shaking pretty good now.
Will probably try replacing the front ones with OEM as a test - seems those get the most workout. OEM is pricey!

Painted over some rusty spots on the lower cover of our washing machine.

Cut (4) 6" pieces of 2x4 to space some Pex away from the underside of the roof deck.
Getting a new roof soon and paranoid about nail sticks into the new Pex that was run to replace some leaky copper in our master bath.
 
To avoid these ads, REGISTER NOW!

ZRX61

Well-known member
Joined
Aug 15, 2006
Messages
28,716
Location
Solar Blight Valley, SoCal
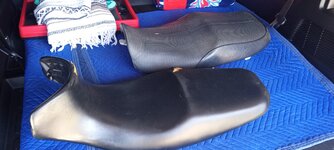
Took a couple of bulky items from the garage to storage. Grabbed a restored Paramo vise & my spare ZRX11 seat from storage & bought them back to the garage.
Then I called my former B-i-L & he dropped by then went home with the Paramo.
Cleaned the spare ZRX11 seat.
Tomorrow the spare ZRX11 seat & the spare ZX11 seat are going on a road trip to Victorville for custom rework in leather.

Before:IMG_20230531_101314445.jpg
 
Last edited:

Magnum440d100

Well-known member
Joined
Dec 2, 2018
Messages
3,581
Location
Indiana
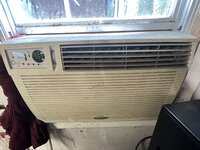
HVAC guy just left after installing this window AC for me. What do you think?


In all seriousness. This was the window AC that was installed through the wall between the house and garage. I took it out last (?) season, in anticipation of making the hole into a doorway. I have no whole idea of it’s working condition.

It’s been sitting outside on my patio, basically in the way. Today, I shoved it into the outside window hole and turned it on. If it cools the garage “decently”, I will permanently install it (insulation and bracketry).


It did take the inside temp from 83° to 75°, so maybe it “works”.
 

Attachments

  • IMG_1575.jpeg
    IMG_1575.jpeg
    837.5 KB · Views: 71
  • IMG_1574.jpeg
    IMG_1574.jpeg
    1.3 MB · Views: 69

kaymccampbell

Well-known member
Joined
Feb 27, 2015
Messages
29,598
Location
Upstate New York
HVAC guy just left after installing this window AC for me. What do you think?


In all seriousness. This was the window AC that was installed through the wall between the house and garage. I took it out last (?) season, in anticipation of making the hole into a doorway. I have no whole idea of it’s working condition.

It’s been sitting outside on my patio, basically in the way. Today, I shoved it into the outside window hole and turned it on. If it cools the garage “decently”, I will permanently install it (insulation and bracketry).


It did take the inside temp from 83° to 75°, so maybe it “works”.
Get thee a fin comb.
 

rayra

Well-known member
Joined
Dec 1, 2014
Messages
4,724
Location
Escaped from Los Angeles
So the PO really had no clue whatsoever...
Nope. Somebody in the preceding 24yrs changed plugs, stabbed wires in the wrong holes - the one with the two hots in the bottom holes was upstream of the charred outlet. And the wires to the charred outlet were reversed to accommodate the upstream outlet mistake. That's presumably when / after the outlet got charred. I figure only after that did its wires get switched, instead of correcting the other mistake. And then that charred outlet was left in place.
I changed a 3rd outlet, not pictured, further upstream towards the panel, found its wires correct. But both it and the 2nd outlet had 2" drywall screws driven as their top anchors. And almost every light switch in the house is mounted upside down. Down is On. Total shitshow.

Sad part was I'm working from shopping bags full of decor plugs and plates which I bought the first month we moved in place. Then I promptly got hospitalized with covid, then working like hell to refurb the palce THEN my folks decided to move two and I spent several months cranking on three houses AND moving my folks. Then back to work on just our house then ill and hospitalized again and got a toe cut off. And then my wife lost two siblings in 4mos and I've been busting *** solo for months as she's been back in CA dealing with probate on her sister's estate. I'm so far behind on my projects list that I've been desperately triaging what gets done when, around the weather in Vegas. I didn't get ANY of the attic work done this past winter which I had intended to do.

This coming winter I'm having a service upgrade and panel upgrade, added high amp circuits in the garage (for welding and EV charging), a generator connection with transfer / lockout switch, etc. Whatever horrors I find then will be corrected.

I was up in the attic a couple days ago, spotting the rafters for cutting a vent turbine hole in the roof, and found romex is just running wild and direct, no attachments, no regard for tripping or pinching. Someone even ran a run across the attic hatchway, when a corner post of the opening was just a few more inches outboard of the run, could have been readily routed around the hatch for a couple inches more wire.
I might just sever that and put a junction box at the base of the post and rig a switch and some attic lighting. Have to see if I can pull enough slack on that run to get the ends safely secured in a box. Solve a couple things in one go.
 

Outlawmws

Well-known member
Joined
Aug 9, 2011
Messages
39,308
Location
The Badlands
I'd test every single outlet with a verification plug...

I had to pull and replace every single outlet in a buddy's old hose after 20 years of the same family renting it. when the man of the houe was there a dream renter, then a year or so of the wife and her kids as the renters from H&##... such a confused mess... We went to just wires and tested as we went...

Amazing they didn't burn the place down
 

ezriderga

Well-known member
Joined
Apr 1, 2009
Messages
1,741
Location
NW GA
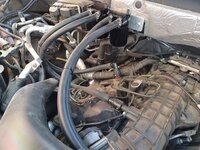
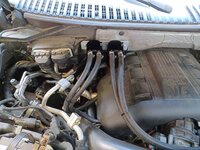
Every month I do a preventative maintenance check on our vehicles. Check oil level, battery, tire pressure etc. It looks like I need to detail the engine bay in my truck, after all it only has a little over 423,000 miles with original drivetrain.
IMG_1981.jpeg
 

Magnum440d100

Well-known member
Joined
Dec 2, 2018
Messages
3,581
Location
Indiana
Well, the AC cooled down the garage fairly nicely, for being started at pretty much the hottest part of the day. So I’m going to leave it on overnight and see how cold it is when I get home tomorrow after work. Low 60’s tonight and 85 tomorrow, so thermostat set to 76. Not looking for icebox cold, just don’t want hot wet blanket muggy feeling haha.

I did mow and edge some of the yard, but my main focus today (besides the AC), was this tube for the wheelbarrow.

I bought a new complete wheel, because I could not for the life of me find an inner tube the correct size. Sold out. Sold out. Sold out. Then I finally found one at Rural King, all by its lonesome. Last one on the shelf lol. So I grabbed it. And put it in. And put the original wheel back on the wheelbarrow. Reason being? The wheel I bought was too small(ish). it was the ONLY one of ANY size on the shelf. It worked, but I could not lift the wheel barrow up enough to wheel it comfortably, without the front digging in. So it’s on the shelf now as a spare wheel.


Get thee a fin comb.
Yes yes. Marvelous idea. Now that the functionality of the unit has been established as “functional”, I fully intend to attend to proper install and care, including brushing it out with a fin comb 😛
 

Attachments

  • IMG_1576.jpeg
    IMG_1576.jpeg
    541.5 KB · Views: 44

DGersic

Well-known member
Joined
Mar 12, 2017
Messages
6,369
Location
DeKalb, IL
Removed the distributor for a rebuild with a bunch of new parts.

Swearing about the quality of new parts.

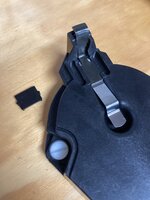
New pickup coil - center of the sheet metal piece is 1/32” too tall, so the retaining clip won’t install. Had to make it shorter to fit.

New rotor - the electrode is not actually attached, the mounting plastic piece fell off.

IMG_2739.jpeg

That little plastic tab is important. It’s supposed to be holding the electrode in place.

So, need to call tomorrow about getting another rotor.
 

rayra

Well-known member
Joined
Dec 1, 2014
Messages
4,724
Location
Escaped from Los Angeles
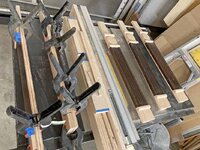
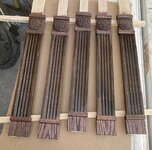
Vertical fascias formed. In about an hour I'll go out and stain them. Friday I can temp install them and get measurements for the arched lintels. Ripping those pieces tomorrow mid-day, before finishing bathroom painting.

Getting too many things intermingled again. AND pulling some more boxes out of storage for my folks in the morning.

By the end of this weekend I should have both the painting projects done and the bookcases completed.

Next mon-tue we start the kitchen / dinette floor tiling and the grill counter tile ring, that's going to take all of next week.
 

Attachments

  • sparta high bookcases 27 vert fascias.jpg
    sparta high bookcases 27 vert fascias.jpg
    54.2 KB · Views: 25
  • sparta high bookcases 28 vert fascias.jpg
    sparta high bookcases 28 vert fascias.jpg
    106.1 KB · Views: 20
  • sparta high bookcases 26 rosettes.jpg
    sparta high bookcases 26 rosettes.jpg
    72.2 KB · Views: 20

Arne73

Well-known member
Joined
Mar 20, 2010
Messages
1,477
Pulled the carb off of my stubborn generator and found an orifice clogged with old gas Goo.
Cleaned, reassembled and started. Ran great, tomorrow I'll run it dry and dump the carb bowl rather than rely on the drain.
 

ObnoxiousFumes

Well-known member
Joined
May 22, 2023
Messages
1,510
Location
Southwest Sask
Cleaned and greased a few more ratchets. I have a few newer ones left to do for a rainy day.

20230531_091500.jpg
I did a little of that yesterday, found out my one Pro Point 1/2” doesn’t like to be greased, it works perfectly when all is dry inside but it seems with the lube in there the ratchet mechanism jams up in reverse... 😝
I got it working mostly okay with just some light oil
 

rd65

Well-known member
Joined
Sep 29, 2017
Messages
2,818
Location
Granite Falls, WA
Pulled the carb off of my stubborn generator and found an orifice clogged with old gas Goo.
Cleaned, reassembled and started. Ran great, tomorrow I'll run it dry and dump the carb bowl rather than rely on the drain.
Dont know why they put the drain up the side of the float bowl, doesnt do much good when you can drain with the bowl bolt. Loosen up a bit and push the bowl up to drain the fuel. If that is a honda engine check your sediment bowl - separate from the float bowl. If I am just running unit dry-ish, when it starts dying, add some choke to keep it running until it has pulled all the fuel it can from bowl.
 

rayra

Well-known member
Joined
Dec 1, 2014
Messages
4,724
Location
Escaped from Los Angeles
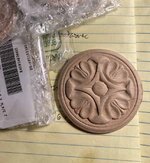
The vertical facias for the high bookshelves. Tomorrow I'll put them up temporarily to get the span dimensions for the 4 top facias, which will have slightly arched bottoms. Arching from rosette to rosette.
 

Attachments

  • sparta high bookcases 29 vert fascias stained.jpg
    sparta high bookcases 29 vert fascias stained.jpg
    94.5 KB · Views: 20
  • sparta high bookcases 21 fascia figuring.jpg
    sparta high bookcases 21 fascia figuring.jpg
    69.8 KB · Views: 22

nadogail

Well-known member
Joined
Jan 23, 2009
Messages
32,032
Location
Coronado, CA
I am recutting the plastic sheeting to make sails for my Kite Project. I did some more reading and came to the conclusion that for a Box Kite that will be 72” long 18” wide sails are the most appropriate size. The ones I made earlier were 24” wide.
 
To avoid these ads, REGISTER NOW!
Top Bottom