To avoid these ads, REGISTER NOW!

How do I center this nut?

paulmars

Well-known member
Joined
Jun 7, 2013
Messages
207
F25\F20 westwood oil furnace filter housing.

This should come from the factory with that nut very tight on the lower bolt. To replace the filter element you remove upper bolt, remove the can, chng fltr element, reassemble & replace upper bolt. Those are the instructions and there are many youtubes showing this.

It seems to me that if upper bolt was over tightened, then that might cause the nut to come off the lower bolt the next time upper bolt is removed to chng element. I think this is bad design. Still, I found no one else posting issues

I bought F25 new ebay. Upper bolt was so tight i could not remove it. I sent it back for replacement. I was sent refund.

Bought another lowes online. It came in pieces. Literally upper & lower bolts removed from nut. I returned it for replacement. Store refused. I contacted hq and got refund.

I wrote to rw beckett who owns westwood. They sent me one. Then another a week later. One of those the nut came off the bottom bolt when i removed upper bolt. The other one worked fine, but it leaked where can seats against upper red piece. So I had to tighten the upper bolt twice to stop leak(yes there is rubber gasket between). I hope nut stays on lower bolt when I chge element next year

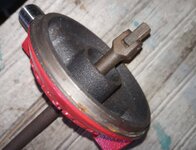
I now have 2 extra units and I'd like to assemble as spares. Ive tried but i cant keep the nut exactly centered when tightening it onto lower bolt, which means that upper bolt won't thread in. Ideas?
 
To avoid these ads, REGISTER NOW!
OP
P

paulmars

Well-known member
Joined
Jun 7, 2013
Messages
207
The pics I forgot
 

Attachments

  • edited_IMG_20240201_134202845.jpg
    edited_IMG_20240201_134202845.jpg
    511.7 KB · Views: 136
  • edited_IMG_20240201_134308494.jpg
    edited_IMG_20240201_134308494.jpg
    561 KB · Views: 135
  • edited_IMG_20240202_113612072.jpg
    edited_IMG_20240202_113612072.jpg
    606.7 KB · Views: 137

snod83

Well-known member
Joined
May 23, 2010
Messages
84
I'm not completely sure what you are going for because it isn't clear to me, but could you loctite the one that you want to stay connected and then assemble it to have it find it's own center?
 
OP
P

paulmars

Well-known member
Joined
Jun 7, 2013
Messages
207
Bolt in pic one is not centered. Using rachet to hold nut in can while tightening lower bolt. Results in nut being slightly off center. Put lid on and upper bolt wont thread in. Need hold that nut in exact ctr while holding it from spinning, while tightening lower bolt
 
OP
P

paulmars

Well-known member
Joined
Jun 7, 2013
Messages
207
My guess is to help matters. Maybe it does once nut is tightened properly on lower bolt.
 

LopezBart

Well-known member
Joined
Oct 13, 2023
Messages
2,564
Location
Lopez Island, WA
The lock washer will tend to **** the coupling nut unless really torqued down, which give the sheet metal design of the 'can' doesn't look like a good idea. You can try putting a small diameter washer under the bottom flanged bolt to keep the flange clear of the bends in the bottom of the can, and then tightening the coupling nut against the bottom bolt using a socket + extension. That should keep things square...
 

Snip's

Well-known member
Joined
Apr 29, 2017
Messages
1,863
Location
Ohio
Replace the center bolt with one that's fully threaded...
Add a new nut thats run up the new fully threaded bolt tight to the underside of the red lid...
Re-install the existing coupling nut...
Reassemble the filter / canister & bottom nut...
 
OP
P

paulmars

Well-known member
Joined
Jun 7, 2013
Messages
207
I don't understand how that work. If the new bolt is same height and i hold or tighten it with rachet, while wrenching bottom bolt, then both bolts are equally tight. Ok, if the new nut height was exactly the space needed, then the original nut couldn't spin up the upper bolt?
 

The Cobbler

Super Moderator
Staff member
Joined
Oct 24, 2013
Messages
25,962
Location
Niagara Region, Ontario, Canada
I'm not quite understanding either, but, to me, I would use the coupling nut & short bolt & lock nut on the top, tight . even use thread locker.
use the long bolt on the can , threaded in to the coupling nut . it shouldn't need to be that tight to form a seal
 

geneg

Well-known member
Joined
Oct 19, 2020
Messages
468
Location
Midwest
Replace the top bolt with a stud long enough to protrude thru the cap. Use a flange nut to hold the cap on. Also, like LopezBart said, get rid of that lock washer between the coupler & the bottom bolt.
 

PCustoms

Well-known member
Joined
Jul 23, 2011
Messages
23,354
Location
VT
I'm very confused here....

Why are you loosening there bolt on the bottom of the filter housing?

Why do you care if it is "centered", is there a leak?
 

Jswain

Well-known member
Joined
Apr 26, 2013
Messages
2,465
Location
Calgary, AB
I'm very confused here....

Why are you loosening there bolt on the bottom of the filter housing?

Why do you care if it is "centered", is there a leak?
I'm thinking a seperate bolt threads into each end of the coupler. He wants the couple to stay on the end he doesn't have to remove to change the filter but it does. That's what I'm getting anyways
 
OP
P

paulmars

Well-known member
Joined
Jun 7, 2013
Messages
207
Replace the top bolt with a stud long enough to protrude thru the cap. Use a flange nut to hold the cap on. Also, like LopezBart said, get rid of that lock washer between the coupler & the bottom bolt.
How does long stud & flange nut get the nut tight on bottom bolt?
 
OP
P

paulmars

Well-known member
Joined
Jun 7, 2013
Messages
207
I'm very confused here....

Why are you loosening there bolt on the bottom of the filter housing?

Why do you care if it is "centered", is there a leak?
Ive never loosened the bottom bolt, it came that way. When i told rw Beckett it was loose, they sent replacement. If nut is tightened on bottom bolt, but not centered the upper bolt wont thread into it.
 
OP
P

paulmars

Well-known member
Joined
Jun 7, 2013
Messages
207
I'm thinking a seperate bolt threads into each end of the coupler. He wants the couple to stay on the end he doesn't have to remove to change the filter but it does. That's what I'm getting anyways
Exactly and it is not supposed to loosen from bottom bolt.
 
To avoid these ads, REGISTER NOW!
OP
P

paulmars

Well-known member
Joined
Jun 7, 2013
Messages
207
Tightening the upper bolt Will pull the lid tight and everything seems alright. Untill it fills with oil and leaks out the bottom, because the coupling nut is not tight against the bottom of the can.
 

Skiff Builder

Well-known member
Joined
Jun 7, 2016
Messages
1,783
Location
Southern NJ Coast
I'd cut a 1/4" plywood disc to fit the inside of the canister. In the disc I'd bore a hole that would just fit over the lower nut.

You now have an assembly alignment jig.

After torquing the lower nut remove disc and finish assembly.
 
OP
P

paulmars

Well-known member
Joined
Jun 7, 2013
Messages
207
U won. Thank you. Would lock tight or epoxy be better to hold coupling nut tight on lower bolt?
 

geneg

Well-known member
Joined
Oct 19, 2020
Messages
468
Location
Midwest
How does long stud & flange nut get the nut tight on bottom bolt?
Use a socket & extension thru the top to tighten the connector while holding the bottom nut with a wrench. Should be able to center it easily. Thenscrew in stud.
 
OP
P

paulmars

Well-known member
Joined
Jun 7, 2013
Messages
207
Use a socket & extension thru the top to tighten the connector while holding the bottom nut with a wrench. Should be able to center it easily. Thenscrew in stud.
That results in both having same tightness and both loosening when it is taken apart. Also requiring that the upper bolt be tightened more then designed. Results in coupling nut possibly staying in upper bolt when disassembled. Resulting in lower gasket needing to be replaced frequently. The unit is designed to be fastened tighter to lower bolt and skiff b provided the solution.


Tks to all who wade in.
 

PCustoms

Well-known member
Joined
Jul 23, 2011
Messages
23,354
Location
VT
That results in both having same tightness and both loosening when it is taken apart. Also requiring that the upper bolt be tightened more then designed. Results in coupling nut possibly staying in upper bolt when disassembled. Resulting in lower gasket needing to be replaced frequently. The unit is designed to be fastened tighter to lower bolt and skiff b provided the solution.


Tks to all who wade in.
Read what he wrote again, it does not involve the upper bolt. that's the perfect way to do it.
 

Innovate1

Well-known member
Joined
Jul 28, 2014
Messages
4,291
Location
Illinois near St. Louis, Missouri
Is there some sort of gasket under the bolt head at both the top and bottom? Without that I don't see how any of this won't leak and I don't see any.

You could replace the lockwasher with a star lockwasher type. They have multiple teeth around the edge so wont try to push things off center. They make them with internal or external teeth.
https://www.homedepot.com/p/Everbil...ooth-Lock-Washer-20-per-Pack-802791/204276523
Some sort of centering piece would help - I see someone already suggested that. Put a long screw through the plywood so you can pull it out after tightening. Some removeable locktite on the lower thread will keep it from loosening when taking out the upper.
 

PCustoms

Well-known member
Joined
Jul 23, 2011
Messages
23,354
Location
VT
Put the bottom bolt up through the housing.

Put loctite in the coupling nut. Put nut on lower bolt.

Put socket on coupling nut.

Put 3/8" extension down through top piece.

Put housing and top together while dropping extension into socket over coupling nut. Hold everything in alignment.

Tighten the **** out of the coupling nut.

Remove housing from top. Coupling nut is now aligned and tight to top bolt hole. Let sit for 24hrs before stressing/using top bolt.
 
OP
P

paulmars

Well-known member
Joined
Jun 7, 2013
Messages
207
Put the bottom bolt up through the housing.

Put loctite in the coupling nut. Put nut on lower bolt.

Put socket on coupling nut.

Put 3/8" extension down through top piece.

Put housing and top together while dropping extension into socket over coupling nut. Hold everything in alignment.

Tighten the **** out of the coupling nut.

Remove housing from top. Coupling nut is now aligned and tight to top bolt hole. Let sit for 24hrs before stressing/using top bolt.
Been considering that. Top hole fits 1\8" drive extension. I have 1\2" drive deep socket that fits coupling nut. Either buy reverse adapter if available or drill out top center hole for 1\2" drive extension. After tightening, scrap that one red top piece or keep it in case coupling nut gets loose. But I like skiff b's idea better.
 
OP
P

paulmars

Well-known member
Joined
Jun 7, 2013
Messages
207
Use a socket & extension thru the top to tighten the connector while holding the bottom nut with a wrench. Should be able to center it easily. Thenscrew in stud.
Same idea I just misunderstood. Two winners.
 
OP
P

paulmars

Well-known member
Joined
Jun 7, 2013
Messages
207
Please enter a valid message
 

Attachments

  • edited_IMG_20240211_152256866.jpg
    edited_IMG_20240211_152256866.jpg
    757.5 KB · Views: 49
  • edited_IMG_20240211_152024966.jpg
    edited_IMG_20240211_152024966.jpg
    627.3 KB · Views: 44
  • edited_IMG_20240211_151937233_MP.jpg
    edited_IMG_20240211_151937233_MP.jpg
    609.6 KB · Views: 41
  • edited_IMG_20240211_151922034_MP.jpg
    edited_IMG_20240211_151922034_MP.jpg
    537.2 KB · Views: 50
To avoid these ads, REGISTER NOW!
Top Bottom