Hope round 2 works better!And now we wait


You are using an out of date browser. It may not display this or other websites correctly.
You should upgrade or use an alternative browser.
You should upgrade or use an alternative browser.
Between 265 & 485 SQ/FT Nick's Two-Car Detached Vdub Garage
- Thread starter nicholam77
- Start date
Workspaces sized between 265 and 485 squarefeet.

Finallygotit
ALLIANCE MEMBER
I have this itch to go and carve my initials in that concrete.And now we wait


Mr. Roboto
Well-known member
And now we wait
I'm anxious for you, when you walk down tomorrow morning. Though if you're anything like me, you wont be able to sleep and you'll be checking it every hour all night hahaha.
RickP
Well-known member
I've been meaning to thank you for posting about the gridfinity system last month. I'd never heard of it before, but it looked a good solution for me. I just got a 3d printer and I've already filled a couple drawers with the gridfinity bases and various size boxes. It brought some much needed order to the chaos of my lathe tooling drawer!I'm still undecided if the Gridfinity system itself is actually useful to me, but the compact 3D-printed tool holders definitely help conserve space.
OP
nicholam77
Well-known member
Hope round 2 works better!
Spoiler: It did!
I have this itch to go and carve my initials in that concrete.
Ha! I kept asking for sample photos and in another customer's project they shared with us there was little paw prints throughout the whole floor in one picture

I'm anxious for you, when you walk down tomorrow morning. Though if you're anything like me, you wont be able to sleep and you'll be checking it every hour all night hahaha.
I was very anxious, but it was halfway dry even before I went to bed so I could tell it seemed to be ok. They other stuff failed within a couple hours so it was pretty obvious right away.
I've been meaning to thank you for posting about the gridfinity system last month. I'd never heard of it before, but it looked a good solution for me. I just got a 3d printer and I've already filled a couple drawers with the gridfinity bases and various size boxes. It brought some much needed order to the chaos of my lathe tooling drawer!
No problem! The nice thing is there are sooo many existing boxes out there to download, and multiple CAD plugins for box generation. It's not the *most* efficient to stick to a grid unit for box sizes and custom tool holders, but it does make everything line up in a more predictable way. I'm still debating going back to redo my socket drawer "on the grid". I also think even without the baseplates it could be a nice system with magnets or just throwing them in their loose.
Do you have a thread or a pic anywhere? I'm a sucker for drawer organization.
So here it was the next day, dry:
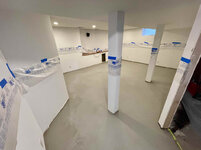

It seems to have worked well.
Because they hand troweled it, they decided a 2nd coat was needed to smooth out some areas and lumps. They did that yesterday, which dried over night.
This morning I thought they would be sanding it, but instead they were basically hand sanding it and with small hand sanders or oscillating tools. I raised concerns about this (because the end goal is still a polished concrete look, and we had originally discussed something around 300 grit with satin finish for some sheen). I guess something about this overlay product didn't make sense to use a big sander, but I didn't walk away from our conversation fully understanding why, but he told me even with the self-leveler from the first attempt they wouldn't do that.
I think there will be a *bit* of waviness since this was hand troweled, but my main concern is getting the texture smooth enough. The contractor assured me it would be smooth, even without a big sander, and that the spray on Aerokoat layers (primer coat and final coat) would also create a smooth layer on top. I guess it's a polymer / concrete product, not just coloration, so it's about 1/32" thick itself.
I had to go into the office today and my wife is way less nosey than me, so I don't know how it's going but they are supposed to spray both coats of the Aerokoat today! I'm just crossing my fingers I communicated well enough what we want. I guess I will find out tonight how it looks!
And then they will come back Monday for sealer.
I don't think I've ever felt so out of control with a renovation project. Not my comfort zone but I am trying to give them the benefit and trust the process.

MadeByMiller
Well-known member
I'm glad to see the second round went a bit smoother - pun intended. I completely understand the sentiment quoted. When we had the work done on the exterior of our house last fall, I couldn't even watch them. I'm not sure I have it in me to trust someone working on something of mine unless I know them personally or have worked with them several times in the past. In general, no one has the motivation to do as good of work on your property as you have yourself. I treat every project the same, whether it's for myself or a customer (sometimes I'm more critical on customer projects actually) but I understand that's not normal.I don't think I've ever felt so out of control with a renovation project. Not my comfort zone but I am trying to give them the benefit and trust the process.
OP
nicholam77
Well-known member
I'm glad to see the second round went a bit smoother - pun intended. I completely understand the sentiment quoted. When we had the work done on the exterior of our house last fall, I couldn't even watch them. I'm not sure I have it in me to trust someone working on something of mine unless I know them personally or have worked with them several times in the past. In general, no one has the motivation to do as good of work on your property as you have yourself. I treat every project the same, whether it's for myself or a customer (sometimes I'm more critical on customer projects actually) but I understand that's not normal.
Yeah. Good people are out there, but it's not the norm. Unfortunately it seems like every time I've used a contractor I've been unhappy in some way.
Just to give an example, our tree contractor who said he knew how to do concrete because his dad was in the business for 30 yrs, literally chopped the paver to be replaced in half, and only replaced half of it, and filled it with literal sand. He was going to leave the other half protruding as a tripping hazard, but I made him pound it back into the ground which opened up the expansion joint a ton, and he left no expansion joints on the new piece. It looks so bizarre.
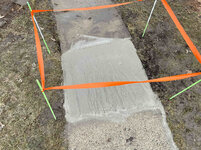
I don't know what the heck he used, or if you can even call it concrete. Months later it is constantly wet, holds no thermal mass, and is disintegrating into sand.

And he called himself an expert.
So yeah, gonna half to get a whole new back sidewalk probably, it looks like ****.
Back to the basement project, unfortunately I've been steamrolled a bit on that, too. I just finished writing an email with pictures to the contractors complaining, but essentially they did not sand the hand troweled overlay, so it is NOT as smooth as we were expecting. I was under the impression they would be sanding it. So there are areas that are lumpy and wavy and it does not look like the "300 grit, light sheen" surface we had discussed. Despite expressing my concern about it in person.
More on that later.
OP
nicholam77
Well-known member
So there were some issues with the floors and they are still being worked on. Essentially when I saw the spray coating, it was not smooth enough. Definitely not the ~300 grit "polished concrete" look we had talked about. I sent them pics last Saturday morning and they agreed. They said they couldn't floor sand the new hand-troweled overlay at this point because it was too hard. So they proposed taking another moisture reading to make sure the hydrostatic pressure was finally under control, and then do a layer of their original self-leveler product, sand that, and then re-do the Aerokoat.
Of course they checked the moisture one day, did a primer coat the next day, did the self-leveler the next day, which had to dry for two days, and then on Friday they sanded it. I was at my downtown office when that happened. I came home and parts of it were really smooth and shiny, and parts look "scratched" and chewed up for lack of a better word. I haven't been able to speak with them yet but I'm guessing they are assuming the Aerokoat primer and top coat will fill in any imperfections? Personally I'm still nervous it will telegraph through.
So yeah, that's where we're at. They are coming tomorrow, but unfortunately I have to be downtown at 9am and my wife is working, too, so no one will be here. It's been tricky to manage this project when I have to go into the office more. I'll post more pics once I feel like it's going to come to a positive ending.
In the meantime, the GTI got some much needed love recently. I cleaned the interior and took out the car seats to vacuum. I swapped my daughter's car seat for a booster seat, and I removed the leatherette car seat protector on my son's seat which was causing some excess squeaking. It's quieter in the cabin now.
Next, I did an oil change. The interval is 10k / 1 year, but I don't drive much and every time except one have done every 5k miles. Now that I have the tune I'm going to stick to that.
I ordered one of those oil-extractor-thingies from Amazon and did a topside oil change for the first time. It was awesome!

This one has an air compressor inlet that makes it automatic so you don't even have to pump. It took about 15min to drain the pain.


So easy. Now I just need to make some storage for the tubes like @jbrentd
Another thing I picked up while I was getting the oil change kit from FCPEuro is a VW oil cap locking adapter and friction fit funnel. The funnel I used before I had to hold it place with one hand and hold the 5L jug with the other. This is so much better!

Then yesterday I swapped to my summer wheels! I think this is the earliest in the season I've done it, but we've had next to no snow this winter and warm temps, and I don't see any snow coming!

I feel like the Milwaukee is going to be a twice a year tool for me, but it's still nice to have.

While I had the wheels off I attempted to tweak my suspension.
The short of it is I've been disappointed. It's harsh over bumps, and the front driver side makes this awful screeching sound on full compression.
I wish I had done the coil overs. For aesthetics, and probably for the ride.
Originally I had trimmed the foam bump stops / spring jounces a little bit as I've heard some people do. I even went back and trimmed the rears more. But after some additional research, I decided to trim them even more.
Basically I think the rears didn't have much free travel at all before engaging them. For the uninitiated, is the little yellow foam bit at the top of the shock.

So I had already taken 26mm off the rear, but Eibach recommends taking 32mm off, including that white hard plastic ring, for their own pro kit, which is a similar drop to what I've got with the VWR springs.

So I removed it with a multi-tool and cut another 6mm off the bottom of the foam spring.

And for fun, drilled a few 1/4" holes in the bottom of the foam, to try to make it more progressive. No idea if that will matter at all.

The fronts were trickier because the spring was in the way, but I ended up taking another 10mm off the fronts, too.
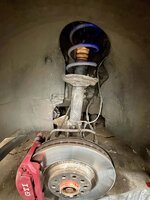
And added these rubber spring isolator pads to the top of the coils that I am hoping will eliminate the horrible screech noise. I think the deal coils were rubbing.

Lastly, when I put the wheels back on, I adjusted my spacers. It seems silly, but before I was running 5mm spacers in the front, and 10mm spacers in the rear, for a "flush" fitment. But I wanted to try going slightly less than that to hopefully reduced the perceived wheel gap a little more, and so I eliminated the spare in the front and did 5mm in the rear. So it's not "tucked" since I'm not that low, but that sort of slight inboard fitment. So far I like it.


So far after a few short drives, I think the additional bump stop trimming helped the harshness!
I still haven't hit a big bump so no tests on the screech yet.
I still feel like coil overs are on the menu for someday.
But I'm optimistic I won't be quite as annoyed with my setup for now.
Of course they checked the moisture one day, did a primer coat the next day, did the self-leveler the next day, which had to dry for two days, and then on Friday they sanded it. I was at my downtown office when that happened. I came home and parts of it were really smooth and shiny, and parts look "scratched" and chewed up for lack of a better word. I haven't been able to speak with them yet but I'm guessing they are assuming the Aerokoat primer and top coat will fill in any imperfections? Personally I'm still nervous it will telegraph through.
So yeah, that's where we're at. They are coming tomorrow, but unfortunately I have to be downtown at 9am and my wife is working, too, so no one will be here. It's been tricky to manage this project when I have to go into the office more. I'll post more pics once I feel like it's going to come to a positive ending.
In the meantime, the GTI got some much needed love recently. I cleaned the interior and took out the car seats to vacuum. I swapped my daughter's car seat for a booster seat, and I removed the leatherette car seat protector on my son's seat which was causing some excess squeaking. It's quieter in the cabin now.
Next, I did an oil change. The interval is 10k / 1 year, but I don't drive much and every time except one have done every 5k miles. Now that I have the tune I'm going to stick to that.
I ordered one of those oil-extractor-thingies from Amazon and did a topside oil change for the first time. It was awesome!
This one has an air compressor inlet that makes it automatic so you don't even have to pump. It took about 15min to drain the pain.
So easy. Now I just need to make some storage for the tubes like @jbrentd
Another thing I picked up while I was getting the oil change kit from FCPEuro is a VW oil cap locking adapter and friction fit funnel. The funnel I used before I had to hold it place with one hand and hold the 5L jug with the other. This is so much better!
Then yesterday I swapped to my summer wheels! I think this is the earliest in the season I've done it, but we've had next to no snow this winter and warm temps, and I don't see any snow coming!
I feel like the Milwaukee is going to be a twice a year tool for me, but it's still nice to have.
While I had the wheels off I attempted to tweak my suspension.
The short of it is I've been disappointed. It's harsh over bumps, and the front driver side makes this awful screeching sound on full compression.
I wish I had done the coil overs. For aesthetics, and probably for the ride.
Originally I had trimmed the foam bump stops / spring jounces a little bit as I've heard some people do. I even went back and trimmed the rears more. But after some additional research, I decided to trim them even more.
Basically I think the rears didn't have much free travel at all before engaging them. For the uninitiated, is the little yellow foam bit at the top of the shock.
So I had already taken 26mm off the rear, but Eibach recommends taking 32mm off, including that white hard plastic ring, for their own pro kit, which is a similar drop to what I've got with the VWR springs.
So I removed it with a multi-tool and cut another 6mm off the bottom of the foam spring.
And for fun, drilled a few 1/4" holes in the bottom of the foam, to try to make it more progressive. No idea if that will matter at all.
The fronts were trickier because the spring was in the way, but I ended up taking another 10mm off the fronts, too.
And added these rubber spring isolator pads to the top of the coils that I am hoping will eliminate the horrible screech noise. I think the deal coils were rubbing.
Lastly, when I put the wheels back on, I adjusted my spacers. It seems silly, but before I was running 5mm spacers in the front, and 10mm spacers in the rear, for a "flush" fitment. But I wanted to try going slightly less than that to hopefully reduced the perceived wheel gap a little more, and so I eliminated the spare in the front and did 5mm in the rear. So it's not "tucked" since I'm not that low, but that sort of slight inboard fitment. So far I like it.
So far after a few short drives, I think the additional bump stop trimming helped the harshness!
I still haven't hit a big bump so no tests on the screech yet.
I still feel like coil overs are on the menu for someday.
But I'm optimistic I won't be quite as annoyed with my setup for now.
slodat
ALLIANCE MEMBER
Years ago I had a '72 Datsun 510 with some really nice, fully adjustable suspension. It was a really frustrating process getting the suspension dialed in. I ultimately got some help because I hadn't done that sort of thing before. Once I accepted the trade offs and with the help of an experienced friend, I absolutely loved driving that car. I miss it. All that to say, keep at your small adjustments. They add up and you'll get it dialed in.
I'm a fan of the coilovers.
I'm a fan of the coilovers.
Mr. Roboto
Well-known member
Man, this floor thing is really putting you through the wringer! Thankfully it sounds like the company is being receptive to making things right, so I really hope it all works out and you're happy with the end result.
The GTI is looking sweet, I like the new fitment without the spacers. Your summer wheels really set the look off. Bummer to hear you're not super happy with the new suspension setup. hopefully your latest tweaks will change that, but if you do go the coilover route, I think you'll be happy. I really use to beat myself up about car projects if/when I was not super happy with changes I'd make. However, with time, I've come to realize that it's all a learning experience, and sometimes trial and error for yourself is the only way you will be happy in the end. It doesn't make spending the time/money to do something more than once any easier to swallow of course, but it is what it is. The cost of chasing perfection
The GTI is looking sweet, I like the new fitment without the spacers. Your summer wheels really set the look off. Bummer to hear you're not super happy with the new suspension setup. hopefully your latest tweaks will change that, but if you do go the coilover route, I think you'll be happy. I really use to beat myself up about car projects if/when I was not super happy with changes I'd make. However, with time, I've come to realize that it's all a learning experience, and sometimes trial and error for yourself is the only way you will be happy in the end. It doesn't make spending the time/money to do something more than once any easier to swallow of course, but it is what it is. The cost of chasing perfection
Trapps
ALLIANCE MEMBER
I agree with Domo Arigato; the new fitment looks very good. And, you know I love the wheels!
I hope the basement resolves itself as soon as possible; I know how disruptive it is to have your home all torn up with 'littles' on the scene.
Regarding the sidewalk, you can do most of the whole thing yourself. You have all the skills and ability. Find one friend with experience, or hire a guy to finish it. Bribe a couple of others to 'help' on the day of the pour and add some rental tools.
I hope the basement resolves itself as soon as possible; I know how disruptive it is to have your home all torn up with 'littles' on the scene.
Regarding the sidewalk, you can do most of the whole thing yourself. You have all the skills and ability. Find one friend with experience, or hire a guy to finish it. Bribe a couple of others to 'help' on the day of the pour and add some rental tools.
OP
nicholam77
Well-known member
Years ago I had a '72 Datsun 510 with some really nice, fully adjustable suspension. It was a really frustrating process getting the suspension dialed in. I ultimately got some help because I hadn't done that sort of thing before. Once I accepted the trade offs and with the help of an experienced friend, I absolutely loved driving that car. I miss it. All that to say, keep at your small adjustments. They add up and you'll get it dialed in.
I'm a fan of the coilovers.
Had to look it up, but wow, that is a nice looking little car. Must have been sweet!
I have no idea what I'm doing with the suspension either and don't have an experienced friend to call upon. Just the internet

Good advice, though, I will say with the latest tweaks of the bump stops it really helped! I've been able to do more driving / testing and this is an improvement to the point where it feels like what I would expect now. AND I don't know if it's the extra free travel or the addition of the spring coil padding but the horrible screech noise isn't happening either (even on confirmed roads known to do it). So I'm pretty happy!
I hope you removed the oil filter before doing the suction so that old oil will drain into the oil pan.
Yes, I did

Man, this floor thing is really putting you through the wringer! Thankfully it sounds like the company is being receptive to making things right, so I really hope it all works out and you're happy with the end result.
Yeah... I think it's going to turn out with an acceptable result... it's mostly just the time and anxiety eating away at me. They are here today doing the Aerokoat, then sealer probably tomorrow or Wednesday, so I should be able to post some pics soon.
The GTI is looking sweet, I like the new fitment without the spacers. Your summer wheels really set the look off. Bummer to hear you're not super happy with the new suspension setup. hopefully your latest tweaks will change that, but if you do go the coilover route, I think you'll be happy. I really use to beat myself up about car projects if/when I was not super happy with changes I'd make. However, with time, I've come to realize that it's all a learning experience, and sometimes trial and error for yourself is the only way you will be happy in the end. It doesn't make spending the time/money to do something more than once any easier to swallow of course, but it is what it is. The cost of chasing perfection
Thanks! The bump stop tweaks did help. Like, a lot. I guess I still needed to trim them more. My springs and shocks are made by a UK company I think, and came with zero instructions. I should have just followed the Eibach instructions from the beginning.
I agree with you about it being a learning experience. If time and money were infinite, I'd probably buy every suspension combo out there and drive it before making a decision. But... that's not the case and it does hurt a bit when you put the time and money into it and it's not what you were hoping for. As per above, I think I've mostly straightened it out. If I could go back in time I would like to try the coil overs, but at this point I'm going to save that for when this setup wears out. Or maybe if I get bored in 5 yrs.

I agree with Domo Arigato; the new fitment looks very good. And, you know I love the wheels!
I hope the basement resolves itself as soon as possible; I know how disruptive it is to have your home all torn up with 'littles' on the scene.
Regarding the sidewalk, you can do most of the whole thing yourself. You have all the skills and ability. Find one friend with experience, or hire a guy to finish it. Bribe a couple of others to 'help' on the day of the pour and add some rental tools.
Thanks Mark!
I am excited to get our furniture back in the basement. But not that excited to have to start the trim work.
I will give the sidewalk some thought, but I have enough other projects planned for the summer where I'm not sure I can take on another like that. I appreciate the vote of confidence though. It's not super urgent as it's not hurting anything the way it is... just an eye sore.
OP
nicholam77
Well-known member
I don't have enough energy to detail all the little steps that happened between where I left off, and where we are now with the floors, but they are finished:

Still waiting for the sealer to fully cure.
Tbh they are not perfect, and a bit of a departure from our original polished concrete goal.
But... it will do.
Hard to capture it in pics, actually. In my opinion it looks better in person. The color shows up a bit darker and warmer in the photo than it actually is, and it's very hard to see the subtle texture and sheen.
Next steps are to move some of the furniture back, and start figuring out trim / doors / closets.
In any case I'm really glad to have the contractor portion behind me.
Still waiting for the sealer to fully cure.
Tbh they are not perfect, and a bit of a departure from our original polished concrete goal.
But... it will do.
Hard to capture it in pics, actually. In my opinion it looks better in person. The color shows up a bit darker and warmer in the photo than it actually is, and it's very hard to see the subtle texture and sheen.
Next steps are to move some of the furniture back, and start figuring out trim / doors / closets.
In any case I'm really glad to have the contractor portion behind me.
MadeByMiller
Well-known member
How frustrating! If you want it done right you have to become an expert in the process and do it yourself I guess. A sad reality.
Maybe some cool rugs are in your future?
Maybe some cool rugs are in your future?
OP
nicholam77
Well-known member
How frustrating! If you want it done right you have to become an expert in the process and do it yourself I guess. A sad reality.
It is indeed... but the other reality is I don't have time to become a basement concrete expert.
There are aspects that I am slightly unhappy with the result... but big picture, I'm happy enough with it. I'll try to get some better pictures, but I do like the color a lot and it is lighter, cooler, and more reflective in real life.
Maybe some cool rugs are in your future?
Oh, 100%. In fact, in that sense, I don't mind the more monochrome color because aside from the durability and simplicity of cleaning, the purpose of concrete was for it to be minimal and recede into the background.
There will definitely be area rugs for comfort and color and sound absorption, and once the furniture is back, cabinets are made, art is on the walls etc... the floors will be a supporting element. I'm not worried about it, I think grand scheme it will still more or less turn out according to plan.
fourmotioneer
Well-known member
Glad to see you fix your GTI as well as accept your floor situation in the basement. At our old house I had hoped to polish the concrete in our 3 seasons room but went a different route.
Looking forward to seeing the finished product
Fortunately our economy doesn’t work this way. My biggest successes in my career have been in projects I’ve completed with teams from multiple entities.
Looking forward to seeing the finished product
How frustrating! If you want it done right you have to become an expert in the process and do it yourself I guess. A sad reality.
Fortunately our economy doesn’t work this way. My biggest successes in my career have been in projects I’ve completed with teams from multiple entities.
MadeByMiller
Well-known member
My comment was a generalization, my bad. My anecdotal experiences and what I've collected from others is that quality and care in workmanship is trending downwards. Not to speak for Nick, but he hired the contractor based on an expectation that was not exactly met and there doesn't appear to be any good reason aside from perhaps misunderstanding at best and incompetence at worst.Fortunately our economy doesn’t work this way. My biggest successes in my career have been in projects I’ve completed with teams from multiple entities.
I'm glad you've found great success!
sawduststeve
Well-known member
Well said Sir, I’ll second that.My comment was a generalization, my bad. My anecdotal experiences and what I've collected from others is that quality and care in workmanship is trending downwards. Not to speak for Nick, but he hired the contractor based on an expectation that was not exactly met and there doesn't appear to be any good reason aside from perhaps misunderstanding at best and incompetence at worst.
Nick, I’m glad the floor is done , after a fashion, and that your getting the lounge back.
The GTI looks great, nice wheels.
These guys fitted the coil overs on my T6, maybe worth an email, what this guy doesn’t know ain’t worth knowing.
CRS Performance – Specialist Suspension Systems and Tuning
 crsperformance.co.uk
Have a good weekend
Steve
Sorry the floor isn't as envisioned, but in good news it looks good from the pictures and the only people who will know it's not like you wanted are you and your wife...well and the folks on here
But either way, it lets you move on and get towards the next step and put your living room back into a less chaotic state
But either way, it lets you move on and get towards the next step and put your living room back into a less chaotic state
OP
nicholam77
Well-known member
Not to speak for Nick, but he hired the contractor based on an expectation that was not exactly met and there doesn't appear to be any good reason aside from perhaps misunderstanding at best and incompetence at worst.
It was incompetence.
I don't think I could have had any more conversations / sent them more reference pictures / intervened any further than I did.
It was a husband and wife team (they owned the company together). She was the sales person, and was very knowledgeable from what I could tell. He was the main guy doing the work (although he had a bunch of 'kids' doing less critical steps... wasn't thrilled with that, either). In the end, I think my conversations with her and what she promised, did not translate to what he was actually able to deliver, so there was a bit of a disconnect there.
They were polite, professional, and honestly I think they tried their best... it just wasn't up to snuff.
Nick, I’m glad the floor is done , after a fashion, and that your getting the lounge back.
RIP kids' couch gymnasium
Definitely feels good to get the living room back in order.
The GTI looks great, nice wheels.
These guys fitted the coil overs on my T6, maybe worth an email, what this guy doesn’t know ain’t worth knowing.
CRS Performance – Specialist Suspension Systems and Tuning
Thanks! My latest improvements have been put to the test and seriously made a positive difference, but I might just email them, anyways. Looks like a neat shop.
Sorry the floor isn't as envisioned, but in good news it looks good from the pictures and the only people who will know it's not like you wanted are you and your wife...well and the folks on here
But either way, it lets you move on and get towards the next step and put your living room back into a less chaotic state
Yes. In the end it won't be the focal point. Like others warned, it IS cold to the feet, so I need rugs to cover it up, anyways.
The TV side I posted was the better side. Smoother. It still looks more like a coat of paint than I had hoped, but fairly smooth.
The office side, though, has many 'impressions' left from the sander I believe? Now that the sealer is on, it catches the light more and is very obvious. Basically like someone took a belt sander to it and stopped there. That's my biggest complaint. Maybe I'll share some pics of that at some point but for now I just want to forget about it.
OP
nicholam77
Well-known member
I wish I had more progress, but so far next-to-nothing has happened on the basement. I think I'm procrastinating the next phase. In addition, I've been very busy with work, so not much extra time.
I did move the TV down and wire up the home theater receiver and speakers so I could watch a movie on the "big screen". Put the couch and TV in the old configuration for now.

As usual, the iPhone pic is not accurate, but I was pleasantly surprised that the white walls weren't too much of an issue with light reflection. I was expecting to regret that decision for movie-watching, but it's totally doable.
A rug should help... but I do need to do something about the sound reflection.
One of my New Year's Resolutions was to watch more movies this year. Last year I only watched 13. Before kids, my wife and I would go to the theater every Friday. I wouldn't call myself a cinephile, but my education is in film and I do love movies. Lately I've really enjoyed watching movies alone (sometimes my wife works evening shifts which is the perfect time to turn off all the lights and sit in a dark room and watch something with intent). So far I've watched 29 films this year, including 4 in theaters, which I think is a pretty good start!
Anyways, here's another tangent instead of basement work. 3D printing some supports for my son's BRIO bridge. He's obsessed.


This was actually mine when I was a kid. Classic genuine BRIO my parents saved all this time.
The trouble is, the supports for the suspension bridge are incredibly unstable, and the bridge falls over every two minutes. Then my son gets frustrated and starts shrieking at the top of his lungs. Then I fix it for him. Rinse and repeat.
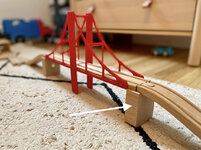
3D printer to the rescue!
Of course there are a bajillion BRIO models out there on the printing websites. I found this one and modified it to work for my bridge.
Had to make it taller, and for some reason the track width of the bridge was wider than the regular BRIO track, so I had to widen the connection point and make a 'male' and 'female' specific version. Since he normally plays with it on the rug, I also added a large base to the model so it wouldn't ever tip.



Pleased to see the 1st layer going down nicely.
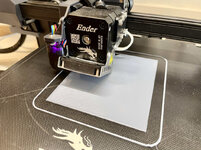
And all done!

It finished overnight so I'm excited for him to test it after daycare today.
I did move the TV down and wire up the home theater receiver and speakers so I could watch a movie on the "big screen". Put the couch and TV in the old configuration for now.
As usual, the iPhone pic is not accurate, but I was pleasantly surprised that the white walls weren't too much of an issue with light reflection. I was expecting to regret that decision for movie-watching, but it's totally doable.
A rug should help... but I do need to do something about the sound reflection.
One of my New Year's Resolutions
was to watch more movies this year. Last year I only watched 13. Before kids, my wife and I would go to the theater every Friday. I wouldn't call myself a cinephile, but my education is in film and I do love movies. Lately I've really enjoyed watching movies alone (sometimes my wife works evening shifts which is the perfect time to turn off all the lights and sit in a dark room and watch something with intent). So far I've watched 29 films this year, including 4 in theaters, which I think is a pretty good start!Anyways, here's another tangent instead of basement work. 3D printing some supports for my son's BRIO bridge. He's obsessed.
This was actually mine when I was a kid. Classic genuine BRIO my parents saved all this time.
The trouble is, the supports for the suspension bridge are incredibly unstable, and the bridge falls over every two minutes. Then my son gets frustrated and starts shrieking at the top of his lungs. Then I fix it for him. Rinse and repeat.
3D printer to the rescue!
Of course there are a bajillion BRIO models out there on the printing websites. I found this one and modified it to work for my bridge.
Had to make it taller, and for some reason the track width of the bridge was wider than the regular BRIO track, so I had to widen the connection point and make a 'male' and 'female' specific version. Since he normally plays with it on the rug, I also added a large base to the model so it wouldn't ever tip.
Pleased to see the 1st layer going down nicely.
And all done!
It finished overnight so I'm excited for him to test it after daycare today.
...I wouldn't call myself a cinephile, but my education is in film and I do love movies...
Right there with you buddy... not the education part, but I've always been a movie guy. Old, new, foreign, action, romance (yeah, I said it)... I'll give anything a shot. I don't really get into horror that much, but I will give certain movies a watch based on a friend's recommendation (he is a horror guy but knows my tastes). Good for you for making a point to spend more time doing something you enjoy!
If you ever want to nerd out on movies, definitely shoot me a PM.
Also, that pic of your son watching the printer reminds me of my daughter watching my printer when I first got it setup. Definitely pretty cool to be able to share this kind of tech with our kids.
Trapps
ALLIANCE MEMBER
By printing something your son values and can actually use, you’re getting him stoked on tools/technology at a young age. Very cool.
Love the Brio stuff. Very much a precursor to Lego for my son at that age.
Love the Brio stuff. Very much a precursor to Lego for my son at that age.
OP
nicholam77
Well-known member
Right there with you buddy... not the education part, but I've always been a movie guy. Old, new, foreign, action, romance (yeah, I said it)... I'll give anything a shot. I don't really get into horror that much, but I will give certain movies a watch based on a friend's recommendation (he is a horror guy but knows my tastes). Good for you for making a point to spend more time doing something you enjoy!
If you ever want to nerd out on movies, definitely shoot me a PM.
Nice! I am all over the place, too. Genre doesn't matter to me and I'll give almost anything a chance unless I know it's going to be a total stinker. I think over the past 5 yrs I've mostly gravitated towards lighter watches (comedies and action or sci-fi) just because at the end of the day I rarely had the energy for a deeper story or a tough watch, but lately I've had the urge to dive deeper and push my boundaries a little bit. If there's any must-watch films for 2024 releases in your opinion, or any other suggestions to add to my watch list, send them my way!
Are you on Letterboxd? I recently discovered and am using to keep track of this year!
And there's nothing wrong with a good romance... rom com or otherwise
Also, that pic of your son watching the printer reminds me of my daughter watching my printer when I first got it setup. Definitely pretty cool to be able to share this kind of tech with our kids.
By printing something your son values and can actually use, you’re getting him stoked on tools/technology at a young age. Very cool.
Love the Brio stuff. Very much a precursor to Lego for my son at that age.
100%. I had him watch the printer, because I knew he would be interested. I don't know if he understood any of it but I actually explained how the whole thing works. He is very mechanically inclined and wants to know how things work. And he is obsessed, and I mean obsessed, with cars. Cars, trucks, busses, semi's, heavy construction vehicles, snow plows... anything with wheels. He can correctly identify a Ferrari from a Lamborghini from a Bugatti from a 911. And it originated from him... it's been his primary interest since I can remember. Well before he could talk. All he does is play with his toy cars and trains all day long, parking them so meticulously. He calls them by their proper names, too "My Dodge Viper, my Dodge Viper!".
I took him to a model train museum recently and now his latest thing is trains, Thomas the tank engine, and the BRIO set. The amount of vehicles, construction vehicles, and trains (steam engine, diesel engine, freight train, electric train, bullet train, monorail, etc) he can identify is probably more than most adults!A bit of a tangent, but all that is to say I know he's going to have an interest in tools and technology. I was a big LEGO nut and I am hoping he will be, too. It is so fun to relive and foster some of those interests.
Brilliant extension to the BRIO system. Our boys love to pull the set out every few weeks. Have you shared your support file anywhere?
I can't take full credit since I remixed it from an existing model, but I threw my version up on Printables:
Printables
 www.printables.com
It's pretty specific to that red bridge... would probably work with regular tracks but the fit would be a little loose where the bridge goes. Otherwise the original model is decent but a tight fit.
And if you haven't searched 'BRIO', there's quite a few models out there!
Great updates and family projects Nick. I'll be following suit shortly with an update. Also, I can't remember where you landed on wether or not to tune your GTI, but my stage 1 Mk7.5 Golf R @ 40k miles definetly needs a new clutch. And I wouldn't say I've beat on it. Pay to play.
OP
nicholam77
Well-known member
Great updates and family projects Nick. I'll be following suit shortly with an update. Also, I can't remember where you landed on wether or not to tune your GTI, but my stage 1 Mk7.5 Golf R @ 40k miles definetly needs a new clutch. And I wouldn't say I've beat on it. Pay to play.
Thanks, Jake! Looking forward to your update as always.
I did tune the GTI since last April, coming up on a year. I went with Integrated Engineering stage 1 low torque 93 file. I believe it targets around ~310-315 wheel torque.
I went with IE because they have flash at home, flash on mobile iOS app, and give you all the files for stage 1 (high torque, low torque, all octanes, flex fuel ethanol, etc). And no cost to flash between them. And on sale it was quite cheap, around $450 including the powerlink flashing dongle.
Anecdotally I've read people have pretty good luck on IE's 'clutch saver' low torque file, but I know it's pay to play. If it happens to me... it will be an excuse to go full stage 1. Although mine's a 2016 and I just crossed 45k miles, so I really don't put many miles on it, which might help out with longevity, we'll see. Even if you didn't beat on it, APR full stage 1 + R power is a significant bump in torque from what mine is I think.
Are you gonna get a new clutch for it? And if so I would be very interested to know what you go with!
OP
nicholam77
Well-known member
¡Hola, Amigos!
About a week ago, we got a late season snow storm.

The past week we were in Mexico (Cozumel). Drove to the airport in this, last Monday:

It snowed heavy a few more times while we were gone, so it was a perfect time to leave!
Got some much needed R&R.

Of course we went during Spring Break week... it was a *little* busy ... made for some long travel days with the kids.

Got back Saturday, so yesterday, with a renewed outlook on life, I decided to go to Home Depot and pick up some baseboard for the basement. Best decision ever... Easter Sunday so there was like 5 cars in the lot. About the best Home Depot trip I've had lol.

16' lengths so I had to borrow my dad's truck.
At one point I had thought about doing wood trim with a clear coat, but I'm taking the easy, cheap route. This is primed MDF, 99 cents a linear foot.
Good thing I have a spacious 18'x20' to store it in


Maybe having it blocking the human door, and being in the way when I get out of the car, will help inspire some urgency in getting this done. Maybe.
I did bring one piece inside to see how it would look.
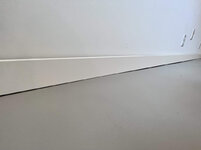
Damn!
My worst fears, confirmed. I think I'm going to have to scribe it all. The concrete is too wavy. There's some 1/4" gaps on this long stretch.
I watched this video:
But does anyone have any tips on how to go about this? My other thought was to tack the board in place at a defined height (measured at the ends from the floor, say 4". And then set a scribe to 1" and run it across to get a 3" height on every end. The baseboard itself is 3.5" tall.
When I was out in the garage, I also tested some new Chinesium MFT clamps I got from Aliexpress that were delivered while I was in Mexico.


At $16 each, they are much cheaper than the Festool ones at $49 each.
Interestingly, they chose a red that very closely resembles "Bessey red", and Bessey makes the clamps for Festool.
I also got this guy for $20:
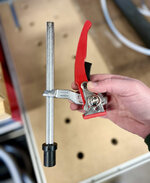
It has a 20mm bench dog attached to the bottom instead of the L-shaped tracksaw rail bit.
Pretty nice because it's really easy to put in and out of the dog holes, much easier than the L-shape.

It also has a collar so the 'stem' of the clamp doesn't fall down like it does with the L-style. Easier one handed clamping. AND it can be placed right next to the middle support of my work top, whereas the L-shape clamps interfere with it when rotated in those dog holes closest.

All-in-all my .02 is the build quality is slightly less than the German ones, but they seem to perform the same, have similar clamping pressure, etc. I'll still reach for the Festool ones, but these should fill in the gaps nicely for those rare times I need more than two clamps. Including my Microjig dovetail clamps I probably have more than I need now!

Ok, I think that's enough words and pics for one post.
About a week ago, we got a late season snow storm.
The past week we were in Mexico (Cozumel). Drove to the airport in this, last Monday:
It snowed heavy a few more times while we were gone, so it was a perfect time to leave!
Got some much needed R&R.
Of course we went during Spring Break week... it was a *little* busy
... made for some long travel days with the kids.Got back Saturday, so yesterday, with a renewed outlook on life, I decided to go to Home Depot and pick up some baseboard for the basement. Best decision ever... Easter Sunday so there was like 5 cars in the lot. About the best Home Depot trip I've had lol.
16' lengths so I had to borrow my dad's truck.
At one point I had thought about doing wood trim with a clear coat, but I'm taking the easy, cheap route. This is primed MDF, 99 cents a linear foot.
Good thing I have a spacious 18'x20' to store it in
Maybe having it blocking the human door, and being in the way when I get out of the car, will help inspire some urgency in getting this done. Maybe.
I did bring one piece inside to see how it would look.
Damn!
My worst fears, confirmed. I think I'm going to have to scribe it all. The concrete is too wavy. There's some 1/4" gaps on this long stretch.
I watched this video:
But does anyone have any tips on how to go about this? My other thought was to tack the board in place at a defined height (measured at the ends from the floor, say 4". And then set a scribe to 1" and run it across to get a 3" height on every end. The baseboard itself is 3.5" tall.
When I was out in the garage, I also tested some new Chinesium MFT clamps I got from Aliexpress that were delivered while I was in Mexico.
At $16 each, they are much cheaper than the Festool ones at $49 each.
Interestingly, they chose a red that very closely resembles "Bessey red", and Bessey makes the clamps for Festool.
I also got this guy for $20:
It has a 20mm bench dog attached to the bottom instead of the L-shaped tracksaw rail bit.
Pretty nice because it's really easy to put in and out of the dog holes, much easier than the L-shape.
It also has a collar so the 'stem' of the clamp doesn't fall down like it does with the L-style. Easier one handed clamping. AND it can be placed right next to the middle support of my work top, whereas the L-shape clamps interfere with it when rotated in those dog holes closest.
All-in-all my .02 is the build quality is slightly less than the German ones, but they seem to perform the same, have similar clamping pressure, etc. I'll still reach for the Festool ones, but these should fill in the gaps nicely for those rare times I need more than two clamps. Including my Microjig dovetail clamps I probably have more than I need now!
Ok, I think that's enough words and pics for one post.
Nick I am going to check out those clamps. My god that picture of the airport gave me anxiety. Good on you for being able to navigate that with kids. With my son Nick in a wheel chair that just wouldn't be something I could do mentally.
As far as the bas board have you considered a small quarter round at the bottom?
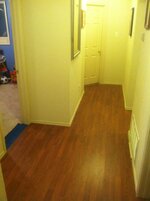
This picture of the hallway in our old house after I did the laminate floors. There wasn't a straight wall in that house. I know the picture is really bad(Iphone 4). Basically the qtr round can be pressed down to cover the gap to the floor and if you paint the qtr round the same color as the baseboard it will blend in.
 DSCN4967 by bjohnson388, on Flickr
Bret
As far as the bas board have you considered a small quarter round at the bottom?
This picture of the hallway in our old house after I did the laminate floors. There wasn't a straight wall in that house. I know the picture is really bad(Iphone 4). Basically the qtr round can be pressed down to cover the gap to the floor and if you paint the qtr round the same color as the baseboard it will blend in.
DSCN4967 by bjohnson388, on FlickrBret
Attachments
kaymccampbell
Well-known member
Shoe molding is the cure for where uneven floors meet straight trim, or vice versa.¡Hola, Amigos!
About a week ago, we got a late season snow storm.
The past week we were in Mexico (Cozumel). Drove to the airport in this, last Monday:
It snowed heavy a few more times while we were gone, so it was a perfect time to leave!
Got some much needed R&R.
Of course we went during Spring Break week... it was a *little* busy
Got back Saturday, so yesterday, with a renewed outlook on life, I decided to go to Home Depot and pick up some baseboard for the basement. Best decision ever... Easter Sunday so there was like 5 cars in the lot. About the best Home Depot trip I've had lol.
16' lengths so I had to borrow my dad's truck.
At one point I had thought about doing wood trim with a clear coat, but I'm taking the easy, cheap route. This is primed MDF, 99 cents a linear foot.
Good thing I have a spacious 18'x20' to store it in
Maybe having it blocking the human door, and being in the way when I get out of the car, will help inspire some urgency in getting this done. Maybe.
I did bring one piece inside to see how it would look.
Damn!
My worst fears, confirmed. I think I'm going to have to scribe it all. The concrete is too wavy. There's some 1/4" gaps on this long stretch.
I watched this video:
But does anyone have any tips on how to go about this? My other thought was to tack the board in place at a defined height (measured at the ends from the floor, say 4". And then set a scribe to 1" and run it across to get a 3" height on every end. The baseboard itself is 3.5" tall.
When I was out in the garage, I also tested some new Chinesium MFT clamps I got from Aliexpress that were delivered while I was in Mexico.
At $16 each, they are much cheaper than the Festool ones at $49 each.
Interestingly, they chose a red that very closely resembles "Bessey red", and Bessey makes the clamps for Festool.
I also got this guy for $20:
It has a 20mm bench dog attached to the bottom instead of the L-shaped tracksaw rail bit.
Pretty nice because it's really easy to put in and out of the dog holes, much easier than the L-shape.
It also has a collar so the 'stem' of the clamp doesn't fall down like it does with the L-style. Easier one handed clamping. AND it can be placed right next to the middle support of my work top, whereas the L-shape clamps interfere with it when rotated in those dog holes closest.
All-in-all my .02 is the build quality is slightly less than the German ones, but they seem to perform the same, have similar clamping pressure, etc. I'll still reach for the Festool ones, but these should fill in the gaps nicely for those rare times I need more than two clamps. Including my Microjig dovetail clamps I probably have more than I need now!
Ok, I think that's enough words and pics for one post.
cccoltsicehockey
Well-known member
Crazy how some of the stampings actually look better on the Chinese ones. Cool to see the comparison.
sawduststeve
Well-known member
Nick, Mexico looks great, the snow not so much, well done being away when it fell.
A scotia moulding on the skirting would do it, sorry in American, a shoe moulding on the base board would be the simplest way out, scribing it would be better( festool plane in your future), not every piece would need to be scribed surely.
The floor is finished now? no more levelling it out ?
Good luck
Steve
A scotia moulding on the skirting would do it, sorry in American, a shoe moulding on the base board would be the simplest way out, scribing it would be better( festool plane in your future), not every piece would need to be scribed surely.
The floor is finished now? no more levelling it out ?
Good luck
Steve
OP
nicholam77
Well-known member
Nick I am going to check out those clamps.
Crazy how some of the stampings actually look better on the Chinese ones. Cool to see the comparison.
Yeah, check 'em out! I think 2x minimum are needed to cover many clamping scenarios. $100 for two of the Festool ones is pretty steep. I only played with the cheap ones for about 5min, but I can't really see any downsides in functionality.
As far as the bas board have you considered a small quarter round at the bottom?
Shoe molding is the cure for where uneven floors meet straight trim, or vice versa.
Thanks... I am aware of shoe and I did consider this for a brief moment. But I intentionally removed it / didn't use it when I re-did the baseboard in the rest of the house, so I guess I'd like the basement to match. I personally don't like the way it looks on the plain square profile like I like to use. And for what I have planned for the cabinets, closets, and desk, a more minimal look would be best.
The other thing, like Steve mentioned, is I might not have gaps everywhere, and it would be quite a bit of extra work to put shoe on everything.
A scotia moulding on the skirting would do it, sorry in American, a shoe moulding on the base board would be the simplest way out, scribing it would be better( festool plane in your future), not every piece would need to be scribed surely.
The floor is finished now? no more levelling it out ?
Yep, floor is finished. You couldn't tell??
I think I'm committed to scribing, I'm just trying to wrap my head around the really long runs. I don't want to get into the business of continuing scribes from piece-to-piece... and there are a few long runs.
What I'm thinking is kind of what I outlined earlier... the stock baseboard is 3.5" tall, but I would be fine with a 3" finished height. So I'd position the ends 4" above the floor, scribe an inch off the floor to lose 0.5" at the ends, and then more or less in the middle as the hills and valleys dictate. That way every connecting piece is 3" at the ends where they might possibly join together. And if some areas don't need it, I'd just rip those down to a clean 3".
sawduststeve
Well-known member
My bad, I’d forgotten where we were with it.Yep, floor is finished. You couldn't tell??

Sounds like a plan. Want it done right, do it yourself, you’ll be good.I think I'm committed to scribing, I'm just trying to wrap my head around the really long runs. I don't want to get into the business of continuing scribes from piece-to-piece... and there are a few long runs.
What I'm thinking is kind of what I outlined earlier... the stock baseboard is 3.5" tall, but I would be fine with a 3" finished height. So I'd position the ends 4" above the floor, scribe an inch off the floor to lose 0.5" at the ends, and then more or less in the middle as the hills and valleys dictate. That way every connecting piece is 3" at the ends where they might possibly join together. And if some areas don't need it, I'd just rip those down to a clean 3".
Steve
kaymccampbell
Well-known member
If you don't like shoe molding, then you scribe and plane. There are compass or circular planes to more easily perform what you want. Or, you can use a rotary or belt ander, which is lots less effort, and cheaper.
I wouldn't overthink the baseboard trim too much, it's white and so far away from your normal FOV that you can easily get away with caulking it. Install it, put painters tape on floor and on trim, run bead of caulk, pull tape, done. No one will ever know and you will save yourself hours of time and headaches.
jar944
Well-known member
Rip a 45 degree bevel on the back of the baseboard first so you have less to remove when cutting the scribe.
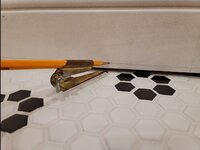
OP
nicholam77
Well-known member
If you don't like shoe molding, then you scribe and plane. There are compass or circular planes to more easily perform what you want. Or, you can use a rotary or belt ander, which is lots less effort, and cheaper.
Was thinking belt sander since it's MDF
I wouldn't overthink the baseboard trim too much, it's white and so far away from your normal FOV that you can easily get away with caulking it. Install it, put painters tape on floor and on trim, run bead of caulk, pull tape, done. No one will ever know and you will save yourself hours of time and headaches.
That would be an option if the gaps were fairly minimal. Unfortunately they are not. In that long board above, some of the gaps are 1/4" or more which IMO is too much for caulk. And then below I'm about to show a much worse example.
Rip a 45 degree bevel on the back of the baseboard first so you have less to remove when cutting the scribe.
Thanks Jar. Planning on it, or possibly adding the back bevel when I rough remove the material from the scribe. Depends on how much I need to take off but it's looking like it's going to be a lot.
So, yeah... it's not going great so far.
I borrowed my dad's old miter saw, but then decided I didn't want the dust mess inside, and didn't want to be carrying the long pieces in and out. So I'm going to use the track saw like a maniac!!!

With these super long pieces it's almost easier to do it on the floor anyways.

It's been a long time since I've used these tools.


And the first board cut to length:

Notice any problems???

WTF I am supposed to do here?!? It's just over 3/4" dip, pretty much just in that right corner. I don't even know if shoe would cover it.
With my plan of setting each end to 4" off the floor, and then taking an 1" off with the scribe... this would result in a run that's 3/4" out-of-level. Making the end not perpendicular. Maybe that's better than continuing a scribe around the room? I can't visualize how obvious it would be if it's 3/4" off over 12'.
Also I don't understand why there's such a big dip in the corner when we did like 5 layers of self leveler
Can you use a 360° laser level to create a consistent height on the molding throughout the room, and then scribe to the floor somehow?With my plan of setting each end to 4" off the floor, and then taking an 1" off with the scribe... this would result in a run that's 3/4" out-of-level. Making the end not perpendicular. Maybe that's better than continuing a scribe around the room? I can't visualize how obvious it would be if it's 3/4" off over 12'.
Also I don't understand why there's such a big dip in the corner when we did like 5 layers of self leveler