

You are using an out of date browser. It may not display this or other websites correctly.
You should upgrade or use an alternative browser.
You should upgrade or use an alternative browser.
What did you do "IN" your garage today?
- Thread starter mayhemman
- Start date


LeeG
Well-known member
My neighbor wanted a steel table frame that would fit over his printer stand. Drew it up in Fusion 360, verified dimensions, and cut and welded it all in a few hours. I didn't get a photo of the finished project, but here's the design. He'll add a butcher block top to it.

Pretty basic build, 1x1 16g, 1x2 14g, and 1x3 16ga tubing with some threaded stem casters. 50" x 20" x 41"
Lee
Pretty basic build, 1x1 16g, 1x2 14g, and 1x3 16ga tubing with some threaded stem casters. 50" x 20" x 41"
Lee
DGersic
Well-known member
Maybe I missed it - what is an "old man door"?

The door for old men, silly. What’d you expect?
DAVE94LIGHTNING
Well-known member
- Joined
- May 24, 2024
- Messages
- 198
Designed and built a few of these T handle racks. Made them for my moto service tool box because I didn't like the available options. If anyone wants the .dxf cut files to make your own let me know. Or if you want the pre cut pieces to weld one yourself I can do that too.


Brent T
Well-known member
Finished cleaning / polishing all the chrome bits for the CBX. Next up is all the painted parts. Just need to clean and touch up a few scuffs here and there. Fuel tank is packed up ready to get a liner since it's rusty inside, then need to clean and touch up the fairing, side panels and saddlebags (which I recently learned are called "panniers" if you want to sound sophisticated  ). After that, I'll drop the engine, pull the carbs and start cleaning all the aluminum pieces. I'll get the carbs rebuilt and start putting it all back together. Today a big box of miscellaneous small parts showed up from the UK and other parts are on order from Germany. It's getting tough to find OEM pieces for these old bikes.


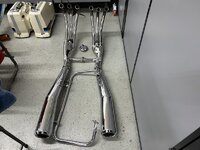
). After that, I'll drop the engine, pull the carbs and start cleaning all the aluminum pieces. I'll get the carbs rebuilt and start putting it all back together. Today a big box of miscellaneous small parts showed up from the UK and other parts are on order from Germany. It's getting tough to find OEM pieces for these old bikes.DAVE94LIGHTNING
Well-known member
- Joined
- May 24, 2024
- Messages
- 198
What equipment did you use to get those pipes so nicely polished especially in the difficult to reach areas?Finished cleaning / polishing all the chrome bits for the CBX. Next up is all the painted parts. Just need to clean and touch up a few scuffs here and there. Fuel tank is packed up ready to get a liner since it's rusty inside, then need to clean and touch up the fairing, side panels and saddlebags (which I recently learned are called "panniers" if you want to sound sophisticated
nadogail
Well-known member
Glued and nailed enough legs together for three more Elevated Raised Bed Planter Boxes.
I find that building the boxes in batches from interchangeable parts speeds things up.
I will have more room in my Workshop after the repair technician brings and installs the heating element for the electric dryer that will be moved into a rental. The washer and dryer are taking up a 4 X 8 space in my Workshop that is in a Two Car Garage.
I find that building the boxes in batches from interchangeable parts speeds things up.
I will have more room in my Workshop after the repair technician brings and installs the heating element for the electric dryer that will be moved into a rental. The washer and dryer are taking up a 4 X 8 space in my Workshop that is in a Two Car Garage.
Outlawmws
Well-known member
My initial thought, and was wondering "why???I dunno, could be a door for old men.

The door for old men, silly. What’d you expect?
I like that! has a lot of possibilities too.Designed and built a few of these T handle racks.
Roger M
Well-known member
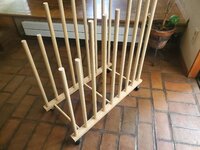
Built a rack for artwork.
My daughter's birthday is this week, and she mentioned awhile back that she wanted to buy a rack to store her paintings. I thought I could make something for relatively cheap that would suit her needs.
Anyhow, a learning process for me being a novice woodworker. I found out the hard way that a spade bit is not ideal for this project(especially for drilling 1x2 oak). Ended up bending a good 3/4" spade bit in short time, and ruining some wood.
Bought a cheap set of forstner bits and all is well again. In the end, I probably could have picked up something from Amazon for the same money as I invested. I'm confident that this is a better quality piece though. I still have some sanding to do(glue residual).
My daughter's birthday is this week, and she mentioned awhile back that she wanted to buy a rack to store her paintings. I thought I could make something for relatively cheap that would suit her needs.
Anyhow, a learning process for me being a novice woodworker. I found out the hard way that a spade bit is not ideal for this project(especially for drilling 1x2 oak). Ended up bending a good 3/4" spade bit in short time, and ruining some wood.
Bought a cheap set of forstner bits and all is well again. In the end, I probably could have picked up something from Amazon for the same money as I invested. I'm confident that this is a better quality piece though. I still have some sanding to do(glue residual).
Attachments

Outlawmws
Well-known member
Those for larger holes; Brad point for smaller:Bought a cheap set of forstner bits

rburke65
Well-known member
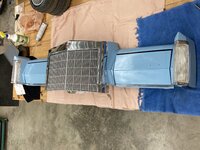
Bought this ‘80-‘83 Lincoln Continental front end years ago at a swap meet…$75. Going to be a wall hanger, so I started on it about 10 days ago. Taking it apart…removing hoses, wiring and cutting away pieces in an attempt to make it lighter. 95% of it was fiberglass ….who knew? Clean up the chrome, wash it….primer n spray bomb. Still have to wire in some LEDs and figure how to hang/mount it. Getting there
Attachments


kaymccampbell
Well-known member
Gonna make the doors open?Bought this ‘80-‘83 Lincoln Continental front end years ago at a swap meet…$75. Going to be a wall hanger, so I started on it about 10 days ago. Taking it apart…removing hoses, wiring and cutting away pieces in an attempt to make it lighter. 95% of it was fiberglass ….who knew? Clean up the chrome, wash it….primer n spray bomb. Still have to wire in some LEDs and figure how to hang/mount it. Getting there
kaymccampbell
Well-known member
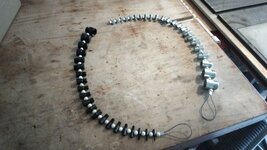
Opened a happy box from Jeff's Jungle. Pneumatic foot pedal and a thread checker. Gathered tools n parts, and headed out. Returned and put the tools away hours later. Cleaned, flung, put away.
Outlawmws
Well-known member
Trying to stay out of it! over 90 today, so only a couple quick in, grab, and out trips, and 2X out to the t-van in the drive for some planing pics for the dash (vac gauge pod positioning) and holster position possibilities for my Contender for hunting.
bulletpruf
Well-known member
Opened a happy box from Jeff's Jungle. Pneumatic foot pedal and a thread checker. Gathered tools n parts, and headed out. Returned and put the tools away hours later. Cleaned, flung, put away.
Have the same thread checker, I think. Very handy.
bulletpruf
Well-known member
Working on organization in my new rental 20' x 50' shop while HVAC crew was installing a few mini-splits.

kaymccampbell
Well-known member
I like it because it can be brought to the item to test, and shoved into tight spaces to test, unlike the ones on a card. I hesitated buying it a couple years ago. Glad it showed up today. It was more than handy checking new machine screws for tapping the box on the garden shed receptacle project.Have the same thread checker, I think. Very handy.
oldman_pottering
Well-known member
that looks neat ! do you have plans available ?Cut up an old patio table for kindling. Made a Soma cube puzzle out of the legs.

that looks neat ! do you have plans available ?
Not as such. All you need to do is cut 27 identical blocks and glue them together in these shapes:

Those seven puzzle pieces fit together to form the large cube, and any number of other interesting figures.
Some advice if you try it: Make sure all your angles are exact. A little slop in each small block produces a lot of slop in the assembled puzzle. I glue the blocks together with cyanoacrylate and finish with teak oil.
Mikeske
Well-known member
I am back on the mower deck for the JD 2305 today as the wife had the social worker in to check on her dementia so I had limited time and I had to be present. She is getting the home health aide for another year so that helps. I went back on the mower deck as I found the grass defector and rod and spring. I got that put on and found I missing a 5/16ths wave washer, I stop at Fastenal tomorrow and get the wave washer as mother Deere wanted $5.00 for 75 cent washer. I went to the Deere dealer today and picked up a pair of gage wheels as the 2 of the 4 were worn out and they were badly wallowed out inside. I also had one of the gage wheel holder bent so a little heat, a vise and so hammering straightened that one all out. After all that I greased the all the gage wheels until I saw grease coming out the near side and put the small caps back on. On the way home I stopped and picked up so GL5 75/90 weight gear oil and did a drain and fill on the gearbox. Now the deck is truly finished as far as I am going with it.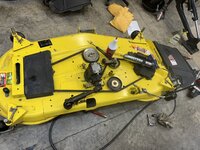

DGersic
Well-known member
Got all of the trim around the new door cut and installed. Lock set installed, too. Needs caulk and paint still, but done for now.
Demo of the old rotted trim on the overhead door.

My Grainger order arrived, so I cleaned up the wiper transmission parts, and assembled the press fit with some of this 660. Waiting for it to cure so I can reassemble.

Spent a while setting up the table saw to cut the drip edge piece (9’ rip on a 20* angle, 1x4 PVC) I need for the garage door trim. The rest is all easy straight square or 45* cuts.
There’s a lot of cleaning and flinging needed. Pile of debris in the driveway needs to be cleaned up. I’ll get to that after I cut all of the remaining pieces.
Demo of the old rotted trim on the overhead door.
My Grainger order arrived, so I cleaned up the wiper transmission parts, and assembled the press fit with some of this 660. Waiting for it to cure so I can reassemble.
Spent a while setting up the table saw to cut the drip edge piece (9’ rip on a 20* angle, 1x4 PVC) I need for the garage door trim. The rest is all easy straight square or 45* cuts.
There’s a lot of cleaning and flinging needed. Pile of debris in the driveway needs to be cleaned up. I’ll get to that after I cut all of the remaining pieces.
oldman_pottering
Well-known member
thanks very muchNot as such. All you need to do is cut 27 identical blocks and glue them together in these shapes:
Those seven puzzle pieces fit together to form the large cube, and any number of other interesting figures.
Some advice if you try it: Make sure all your angles are exact. A little slop in each small block produces a lot of slop in the assembled puzzle. I glue the blocks together with cyanoacrylate and finish with teak oil.
I'd like to see these planter boxes....Glued and nailed enough legs together for three more Elevated Raised Bed Planter Boxes.
I find that building the boxes in batches from interchangeable parts speeds things up.
I will have more room in my Workshop after the repair technician brings and installs the heating element for the electric dryer that will be moved into a rental. The washer and dryer are taking up a 4 X 8 space in my Workshop that is in a Two Car Garage.
Built a rack for artwork.
My daughter's birthday is this week, and she mentioned awhile back that she wanted to buy a rack to store her paintings. I thought I could make something for relatively cheap that would suit her needs.
Anyhow, a learning process for me being a novice woodworker. I found out the hard way that a spade bit is not ideal for this project(especially for drilling 1x2 oak). Ended up bending a good 3/4" spade bit in short time, and ruining some wood.
Bought a cheap set of forstner bits and all is well again. In the end, I probably could have picked up something from Amazon for the same money as I invested. I'm confident that this is a better quality piece though. I still have some sanding to do(glue residual).
There is a LOT to be said for you making it instead of doing an Amazon purchase.
I'm sure she'll treasure this - good thoughts every time she uses it.
oldman_pottering
Well-known member
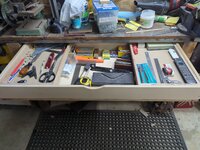
I finally got around to doing some organisation, for a long time now I have been using the French cleat system and as such my shed has become cluttered with tool holders that have been repurposed, modified etc and now I have all sorts of bits and pieces all around the place, this weekend gone I made this drawer with 2 small trays mounted inside it that slide out of the way to access larger things underneath, I still have to do some final organising but already things seem less cluttered and easier to find
No photos because still the damn thing gives me troubles, although I happened to upload a couple of test photos earlier
Edit : see below, apparently I can add photos if I use my phone to take the snap while making the post, it wont work if i try to use a photo that I have stored
No photos because still the damn thing gives me troubles, although I happened to upload a couple of test photos earlier
Edit : see below, apparently I can add photos if I use my phone to take the snap while making the post, it wont work if i try to use a photo that I have stored
Last edited:
oldman_pottering
Well-known member


Prospecter
Well-known member
New tools, and new knowledge. . . priceless.Built a rack for artwork.
My daughter's birthday is this week, and she mentioned awhile back that she wanted to buy a rack to store her paintings. I thought I could make something for relatively cheap that would suit her needs.
Anyhow, a learning process for me being a novice woodworker. I found out the hard way that a spade bit is not ideal for this project(especially for drilling 1x2 oak). Ended up bending a good 3/4" spade bit in short time, and ruining some wood.
Bought a cheap set of forstner bits and all is well again. In the end, I probably could have picked up something from Amazon for the same money as I invested. I'm confident that this is a better quality piece though. I still have some sanding to do(glue residual).
sailor_lou
Active member
Replaced the coolant in the motorhome (29 qts) and only managed to spill about an ounce.
rd65
Well-known member
Tuesday I restocked the beer fridge. Last night after work I sat in my shop chair and enjoyed a couple. And unboxed the muching plug for the mower. I will test fit it tonight, wont try mulching until at least late July.
ODIS
Well-known member
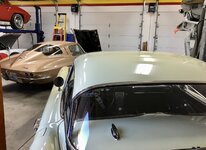
A little more tuning on the ‘63:
cody1325
Well-known member
Welp, found out why my ratchet drawer wouldn't close well.
Pretty much all of this was stuck behind the drawer somehow.
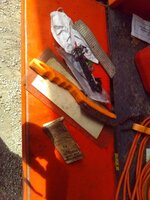
Some of the more i
The garage toolbox was, originally, my Granddad's work toolbox before the current car garage was built in the '90s. He kept the diagrams to a lot of stuff he had to work on in it.
Wiring diagram for an Owens Manufacturing (compaany got bought out YEARS ago) belt starter.
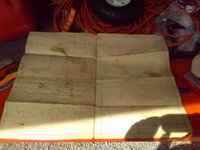
Old Chapman catalog.
I swear by their products. Granddad bought several kits, and kept them everywhere. I'm currently in the process of replacing the soft packs for hard cases, and adding things like Torx.


Pretty much all of this was stuck behind the drawer somehow.
Some of the more i
The garage toolbox was, originally, my Granddad's work toolbox before the current car garage was built in the '90s. He kept the diagrams to a lot of stuff he had to work on in it.
Wiring diagram for an Owens Manufacturing (compaany got bought out YEARS ago) belt starter.
Old Chapman catalog.
I swear by their products. Granddad bought several kits, and kept them everywhere. I'm currently in the process of replacing the soft packs for hard cases, and adding things like Torx.
GreenIron
Well-known member
I fabricated a parking-stand for the rear blade.

I'll try to find time today to install it on the rear blade frame.
- A length of scrap pipe
- A few pieces of scrape flat plate
- A structural pipe clamp
- 1/2" nut & bolt
I'll try to find time today to install it on the rear blade frame.

nadogail
Well-known member
Assembled two end panels for the elevated raised bed planter boxes. I am presently debating as to wether I want to move my van to unload more fence pickets, or wait until tomorrow when someone else can do it for me.
oldman_pottering
Well-known member
Looks like you have a nice collection of cars ! I could cry when I think of the cars and bikes I let go in my misspent youthA little more tuning on the ‘63:
ODIS
Well-known member
Thank you. Sold one of the collection cars to a fellow here on GJ, but, it moved on to others...... Not what I was expecting. Try to keep all of them now and that is a bit of a problem with storage. Thanks for your post.Looks like you have a nice collection of cars ! I could cry when I think of the cars and bikes I let go in my misspent youth


ZRX61
Well-known member
Nothing at all.
I had a visit to City of Hope where some chap stuck what felt like a baseball bat up my chimney & took biopsy samples with a hedge trimmer.
(Worst dentist ever)
I had a visit to City of Hope where some chap stuck what felt like a baseball bat up my chimney & took biopsy samples with a hedge trimmer.
(Worst dentist ever)
kaymccampbell
Well-known member
Dropped a bunch of new **** on the bench.