To avoid these ads, REGISTER NOW!

What did you do "IN" your garage today?

Blue Chips

Well-known member
Joined
Jan 25, 2012
Messages
199
Location
Maine
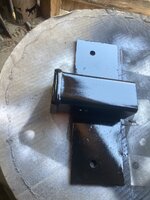
Today I prepped and painted a replacement cross-member for the 1954 Dodge M37 that I'm restoring.

I also welded/repaired four bullet holes in the floor of the tool box that goes under the bed of the M37.

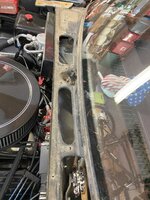
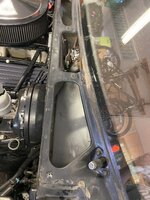
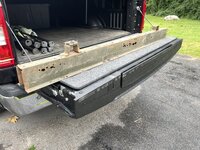
First, the replacement cross member: My M37 is amazingly rust free, but there are a couple of places that tend to rust out on most of these beasts. One of those places is the front bed support cross-member, which tends to collect dirt and water inside it, leaving the cross-member perpetually filled with mud. Here's the rusted cross-member:
IMG_2130.JPG

IMG_2132.JPG

I was all set to start fabricating a new cross-member, but then I spied a reproduction cross-member at Midwest Military for what I thought was a reasonable price considering the work involved, and it frees me up to do other restoration tasks that are more interesting.

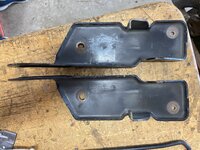
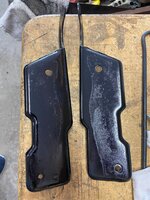
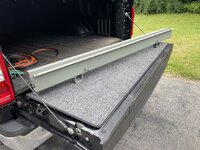
Below is the new cross-member after relieving the sharp edges with a sanding block (to hold paint better), thoroughly scrubbing it with mineral spirits and acetone, and priming it with self-etching primer. I always insert temporary bolts into nuts or threaded holes before painting to keep paint out of the threads.
IMG_1796.JPG

IMG_1798.JPG

After I took the above photo, I painted the cross-member Marine Corps green (no photo) and it's now drying.

Now, some repairs:

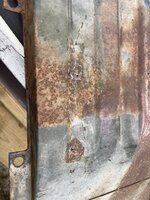
Today, I repaired some 'drain holes' in the floor of the under-bed tool box. I'm guessing that these drain holes were added to the bed and tool box by a soldier in the field with whatever tool that was at hand, and in this case, I suspect that the handy 'tool' was something like an M1 Garand or perhaps some later model.

IMG_2125.JPG

IMG_2127.JPG

First, I closed up the holes a bit with a hammer and dolly:
IMG_2129.JPG

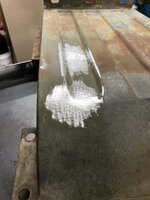
Then I cleaned the area around the holes, welded them shut, and ground the welds. Here are a couple of the welded-up holes after the initial rough grinding:
holes-after-welding-and-rough-grinding-smaller-image.jpg

And then a coat of temporary primer, just to check the surface where I repaired the holes:

holes-after-rough-grinding-and-temporary-primer.jpg

The next step is to repair a damaged mounting flange on this piece, and then abrasive blast it to get it all down to clean bare metal.

I'm looking around for a local blasting company. I have a small blasting cabinet, but this is way too large for it. I do have a wet-blasting attachment for my pressure washer, but it's very messy to use, although I'll resort to that if I can't find any reasonably priced local sandblasting services.
 
Last edited:
To avoid these ads, REGISTER NOW!

RivennHewn

Well-known member
Joined
Jun 4, 2011
Messages
10,381
Location
PNW
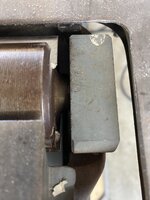
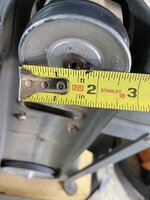
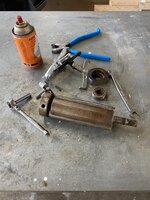
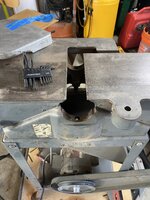
Time for an upgrade.

Had to dismantle it to confirm dimensions.

Will place order for the new Byrd cutter head tomorrow.


Attachments

  • IMG_1184.jpeg
    IMG_1184.jpeg
    869.7 KB · Views: 25
  • IMG_1185.jpeg
    IMG_1185.jpeg
    1.3 MB · Views: 22
  • IMG_1186.jpeg
    IMG_1186.jpeg
    618 KB · Views: 22
  • IMG_1189.jpeg
    IMG_1189.jpeg
    628.9 KB · Views: 20
  • IMG_1193.jpeg
    IMG_1193.jpeg
    1.2 MB · Views: 19
  • IMG_1194.jpeg
    IMG_1194.jpeg
    966 KB · Views: 19
  • IMG_1195.jpeg
    IMG_1195.jpeg
    892.3 KB · Views: 23

DGersic

Well-known member
Joined
Mar 12, 2017
Messages
6,369
Location
DeKalb, IL
Well done! Table looks great.
I was going to ask about the size of the bit hole but you answered that.
What is the purpose of the two round disks that are in the table slots behind the fence?

I was trying to keep the bit hole small. Didn’t want it to be any larger than needed. Easier to make it bigger than to make it smaller.

I'm not sure what to call those disks. Depth stops, I guess. The project I’m making this for initially is to make some cabinet doors. They’ll be plywood due to size. I need a 3/8” x 3/8” rabbet around the outside edges. Not being sure that I want to cut that in one pass, I thought I might want to set the fence for the final pass. Use the two pucks to establish that position, then push the fence forward to make a 1/2 or 1/3 deep pass. Once that’s done, I can then move the fence back to its final location for the last pass. They may or may not get used, a test cut today on scrap going full 3/8” deep was fine.
 

Motorman55

Well-known member
Joined
Apr 10, 2016
Messages
2,646
Location
South Jersey
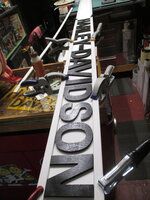
Today I got back to working on my garage 'theme'. Using one of my favorite 1960's-70's era Harley logo decals as referance, I started making a simple 3-D version sign of it.

Part 1.....Starting with a 6"W x 3/4" T x 8' L white painted board I laid out some basic wood letters which I painted black a couple weeks earlier. Next I clamped down a couple of 8' long plastic white strips for a top/bottom guide followed up by placing and spacing the black painted wood letters between them. Once that was done it was just a matter of gluing each letter down, removing the plastic top/bottom spacer and trimming the 8' board to size.

In Step 2, I'll replicate both the black and white outlines around the main sign with painted trim board.

In Step 3, I will use the leftover cut off piece from the 8' board to make the orange colored top and bottom rockers and attach them to the sign with addition white trim. Probably add a couple of eye lag screws to the top of long ends so I can hang it from the ceiling. 1720490973260.jpeg1720490947681.jpeg1720490893389.jpeg
Not one to leave well enough alone...and before I move on to Step 2, I decided to replicate the Harley-Davidson lettering on the other side of the sign board so as to be able to view it from both sides when its hanging from it the ceiling.

Now onto Step 2, the framing of the sign board.
 
Last edited:
bugnut

ALLIANCE MEMBER
Joined
Jul 14, 2012
Messages
3,981
Location
Central Ohio
Had a couple days work on the 2 Yamaha atvs. Small one, tried to install a chicom carb and did not like it. So cleaned and flossed the original Mikuni and installed works like a charm. The larger atv would not roll, dreading this as I was thinking wheel bearing. Put it on jackstands, right front not rolling. Started tear down to locate the issue. Backed off the brake and readjusted, rolls free now and bearing was a okay. Looking close something may have impacted the rf. Reinstalled parts. Then LOF for both, including all of the differentials. So it looks like we're good to go!
 

budo55

Well-known member
Joined
Sep 25, 2010
Messages
107
Location
Pure Michigan
Not much. I can‘t beat the heat in the garage, it’s always there now.
I just plan to work on something before the temp goes from hot to surface of the sun.

Repaired and relocated some irrigation drip lines.
Ran out of stakes to hold the lines in place on the ground. No the home store pieces sold for this purpose won’t pound into most of my ground.

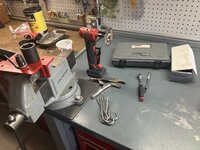
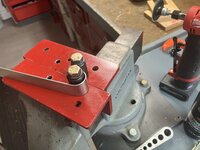
Used my recently built bender and a length of 3/16” rod to bend up 8 or 10 more stakes.
IMG_4541.jpeg
This is the smallest radius bend I can get with 1/2” drive sockets.
Might try to modify the bender to accept 3/8” drive sockets. When it cools off……
Love the bender! What are the sockets attacthe bottom? looks like the angle sits flat on the vise jaws so it's flush on the bottom?
 

Jgaz

Well-known member
Joined
Dec 16, 2016
Messages
1,695
Location
AZ
@budo55 Thanks.

The link below should should my bender details. If not, it starts on post #683

Note: Since the original build I’ve shortened the pegs to make it possible to use the shorter 1/2” drive sockets. Some sockets are easier to use then others depending on how they are broached.
Im also currently modifying the angles to allow use of 3/8” sockets (Smaller radius bends)
 
Last edited:
Motorman55

Well-known member
Joined
Apr 10, 2016
Messages
2,646
Location
South Jersey
Not one to leave well enough alone...and before I move on to Step 2, I decided to replicate the Harley-Davidson lettering on the other side of the sign board so as to be able to view it from both sides when its hanging from it the ceiling.

Now onto Step 2, the framing of the sign board.

Not one to leave well enough alone...and before I move on to Step 2, I decided to replicate the Harley-Davidson lettering on the other side of the sign board so as to be able to view it from both sides when its hanging from it the ceiling.

Now onto Step 2, the framing of the sign board.
Today I cut the 1-1/2" wide framing boards to size and painted them black for around Harley-Davidson sign. Once the paint is dried, these will get glued and nailed around the 3/4" thick white sign board leaving about 3/8" proud on each side as shown in the photo completing Part 1 of Step 2.
Part 2 of Step 2 will be adding another 1-1/2' wide strip of framing in white paint around the black frame. Then its on to the final Step 3. Moving along.1f60e.png 1720903818405.jpeg1720903794664.jpeg
 
To avoid these ads, REGISTER NOW!

welder4956

Well-known member
Joined
Apr 8, 2010
Messages
3,073
Location
Birmingham, AL USA
In and out getting tools to replace our Ring doorbell camera. The old one was about 6 or 7 years old and the lens was getting very cloudy and craze cracking. New one appears to be a better lens. I pulled a new power cable to the right side of the door and drilled a hole in the aluminum door frame to hide the wire running it down and under the threshhold. Took the opportunity to remove some water damaged siding under the threshold and prep it for a new piece. Too hot to finish the siding today, will try to get back on it in the morning while it is cooler and shaded.
 

Burt Shaver

Well-known member
Joined
Dec 7, 2023
Messages
1,269
Location
Iroquois, Ontario Canada
4e857fec-cf97-4bef-b96c-acc5f3ae7321-jpeg.2146759
822F7B3D-285F-4E2D-90E4-7AA73D1119D9.jpegBBD927D5-A6C1-4F8E-9CCF-749DDE4372C1.jpeg386CD5A7-80BB-4D55-85CD-12C535E0D01E.jpeg2E19095F-FE66-41ED-B8A6-98DEC737BD6A.jpeg7A334AA0-DF59-4E6C-921C-FF8672B23756.jpeg
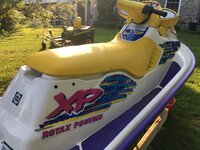
Put a new seat cover on my Seadoo, last week I stripped the graphics, wet sanded the body and hull, went at it with some heavy, medium and fine cut, put some new graphics on and waxed it, just about ready for some fun.
 

Attachments

  • 4E857FEC-CF97-4BEF-B96C-ACC5F3AE7321.jpeg
    4E857FEC-CF97-4BEF-B96C-ACC5F3AE7321.jpeg
    64.2 KB · Views: 323

dwasifar

Well-known member
Joined
May 28, 2017
Messages
2,098
This is sort of a combination New Tool Day and What Did You Do day.

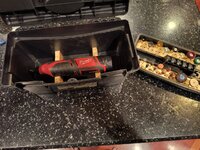
I customized a little HF toolbox to hold my new Milwaukee M12 rotary tool:

photo_2024-07-13_21-58-06.jpg

I made wooden inserts to hold the accessories. When the tray is out, they pop up:

photo_2024-07-13_21-58-06 (2).jpg

When it's in the box, they drop down and are kept captive by the lid, so they don't fall out if the box is tilted:

photo_2024-07-13_21-58-06 (3).jpg

photo_2024-07-13_21-58-06 (4).jpg
 
Last edited:

ZRX61

Well-known member
Joined
Aug 15, 2006
Messages
28,716
Location
Solar Blight Valley, SoCal
After over a week of 110+deg temps it absolutely pissed down over night. That cooled off the valley enough to be outside for a while before it heats back up to 106deg later.
Rain had already evaporated by 9am so I took the opportunity to roll around under the F350 a bit. I snugged up the M6 flange bolts on the ****** pan. A few of them weren't quite tight enough which may explain the evidence of a weep/slight drip from the rear of the pan. Also did a bit more cleaning under there.

May go grind out some more gelcoat stress cracks while the F350 is outside.
(edit: Too late...)
 
Last edited:

Magnum440d100

Well-known member
Joined
Dec 2, 2018
Messages
3,581
Location
Indiana
The leak finally got bad enough to leave puddles.

The shop truck (1995 Chevy 1 ton) goes through about a gallon and a half a week. We’ve been doin that for a couple months.

Then my Cummins truck started leaking from the hydro boost as well.

I’m not about to spend $40/week in fluid.

So I got a remanned unit to put in. IMG_4551.jpeg

I know I need a reservoir. That’s next on the list.

Old one boxed up and ready to be sent in as a core IMG_4550.jpeg

Still early in the day, I might do more, I don’t know. Gotta let my back pop back in place, after becoming a contortionist momentarily.


It’s hot/humid as HECK over here. Stay cool everyone!
 

rcktpwrd

Well-known member
Joined
Mar 5, 2008
Messages
1,098
Location
Raleigh, NC
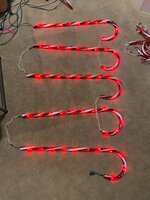
Worked in the garage today, instead of the living room like I have been on the Christmas lights, had to take the hood off the wife's truck. Getting a new windshield installed tomorrow and the cowl induction hood won't allow the drivers side wiper arm to swing up enough to be removed. 😞 The wipers have to come off to take the cowl grille off so the window can be removed. Glass isn't cracked but has years of sandblasting/pitting. She is getting the windows retinted including the windshield.

This led to other work while it's apart. Cleaned the cowl area of many years of dirt. The hood hinges looked terrible, so took them off and gave them a quick clean/scuff and spray paint. We put the hood upside down in the bed of the truck and the wife gave the underside a good cleaning.
 

Attachments

  • IMG_7054.jpg
    IMG_7054.jpg
    853.3 KB · Views: 26
  • IMG_7049.jpg
    IMG_7049.jpg
    1,004.3 KB · Views: 24
  • IMG_7051.jpg
    IMG_7051.jpg
    988.8 KB · Views: 24
  • IMG_7052.jpg
    IMG_7052.jpg
    967.1 KB · Views: 23
  • IMG_7055.jpg
    IMG_7055.jpg
    1 MB · Views: 22
  • IMG_7056.jpg
    IMG_7056.jpg
    1 MB · Views: 22
  • IMG_7058.jpg
    IMG_7058.jpg
    1.4 MB · Views: 22
  • IMG_7066.jpg
    IMG_7066.jpg
    965.3 KB · Views: 20
  • IMG_7069.jpg
    IMG_7069.jpg
    1.1 MB · Views: 19

Motorman55

Well-known member
Joined
Apr 10, 2016
Messages
2,646
Location
South Jersey
Today I cut the 1-1/2" wide framing boards to size and painted them black for around Harley-Davidson sign. Once the paint is dried, these will get glued and nailed around the 3/4" thick white sign board leaving about 3/8" proud on each side as shown in the photo completing Part 1 of Step 2.
Part 2 of Step 2 will be adding another 1-1/2' wide strip of framing in white paint around the black frame. Then its on to the final Step 3. Moving along.1f60e.png 1720903818405.jpeg1720903794664.jpeg
With the black paint dried, today I finished Part 1, Step 2 by glueing and nailing the black outline strips on the main sign board. You can see better in these pics the 3/8" overhang on either side I mentioned yeterday.

Damn hot weather and rain has slowed up my progress, but I'm going to try and get the white frame boards done later today also. Have to do all the wood cutting outside. Any luck and maybe I'll have another post later tonight.1720988301323.jpeg1720988177728.jpeg1720988112536.jpeg
 
Last edited:

Boilerhouse

Well-known member
Joined
Mar 20, 2012
Messages
1,321
Location
Muskoka
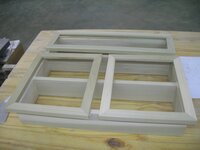
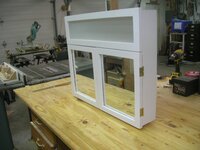
Finished up a cabinet which will go above the bathroom vanity at the cottage. Started as a bit of a screw up, - had it dry fitted ready for glue and was planning the door when I realized the wall height was much less than standard, and, there was a light already in place above the vanity that I had forgotten to allow for. (Fire,... Ready,... Aim)
So, revamped the project so the top shelf area will accommodate the light. Made the light shade frame so it attaches with 2 dowels and 2 magnets so it is easily removable. Inset frosted glass.
Cabinet doors also latch with a couple rare earth magnets. Inset mirrors.
Made from poplar, painted with enamel paint exterior and oil stain for the cabinet interior. This should be the last of the wood working projects for a while. Log splitter and cement mixer are standing on deck, waiting for overhauls.

1.jpeg2.jpeg3.jpeg4.jpeg
 
To avoid these ads, REGISTER NOW!
Top Bottom