To avoid these ads, REGISTER NOW!

What did you do "IN" your garage today?

Snip's

Well-known member
Joined
Apr 29, 2017
Messages
1,863
Location
Ohio
Not a big project... It was hot and humid as heck... Lots of trips inside with the AC and ice water...
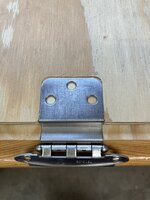
Outside next to the garage was a no longer used, keyed security alarm switch plate...
I removed the obsolete switch plate and was greeted with a nasty hogged out hole...
IMG_3936.jpg

Cleaned up the hole...
IMG_3937.jpg

Installed a wood patch... Tomorrow, after the glue dries, I'll sand it flush...
IMG_3938.jpg
 
Last edited:
To avoid these ads, REGISTER NOW!

Motorman55

Well-known member
Joined
Apr 10, 2016
Messages
2,646
Location
South Jersey
With the black paint dried, today I finished Part 1, Step 2 by glueing and nailing the black outline strips on the main sign board. You can see better in these pics the 3/8" overhang on either side I mentioned yeterday.

Damn hot weather and rain has slowed up my progress, but I'm going to try and get the white frame boards done later today also. Have to do all the wood cutting outside. Any luck and maybe I'll have another post later tonight.1720988301323.jpeg1720988177728.jpeg1720988112536.jpeg
With the black paint dried, today I finished Part 1, Step 2 by glueing and nailing the black outline strips on the main sign board. You can see better in these pics the 3/8" overhang on either side I mentioned yeterday.

Damn hot weather and rain has slowed up my progress, but I'm going to try and get the white frame boards done later today also. Have to do all the wood cutting outside. Any luck and maybe I'll have another post later tonight.1720988301323.jpeg1720988177728.jpeg1720988112536.jpeg
And just like that the sun came and I was able to finish Step 2 with the attaching of the white trim around the black trim.

Now onto the last Step 3. But before i can do that I will have to pick up another wide white board as the leftover piece will not measure out as expected. Also have to pick up some paint for the elongated orange arrows. 1721006830992.jpeg
1721006598144-jpeg.2147249


1721006830992.jpeg
 

Attachments

  • 1721006598144.jpeg
    1721006598144.jpeg
    786.6 KB · Views: 455

Metallitubby

Well-known member
Joined
Aug 12, 2019
Messages
25,921
Location
ATL OTP North
Stripped the Korrado interior, and found 20+ .22LR shells under the carpet, along with about $6.00 in coins. I ended up contacting a local VW "junkyard" that wanted the pleather interior in its entirety, so I packed the Ridgeline and drove it over to him today. He was extremely grateful for the parts.
 

Bessy

Well-known member
Joined
Dec 18, 2012
Messages
995
Location
Ontario, Canada
Finishing up the bandsaw/drill press station bright and early this morning, by drilling and tapping the second auxiliary leveling foot. Re-positioned and levelled the mobile base, using the new additional leveling feet and used my air shim to plumb the toolbox that the DP sits on. Once I'm sure it's how I like it, I'll sink two holes into the top and bolt it down. I'm considering adding some kind of organizer to the left of the drill press base, but that's a future project.

I need to get the 3D printers re-trammed and print a spacer to place between the tool box and the bandsaw. Should be an interesting test of my abilities in Fusion to match the profile of the back of the bandsaw, and the angles, for a reasonably tight fit.

Lastly, I got a few things moved around enough to lay down the foam floor tiles around the DP/BS station, and moved the table saw onto the old mobile base I had previously under the BS. Those tiles make it so much nicer to work in the shop, as far as my back, neck and hips are concerned. Tried for far too long to get the table saw levelled, but it was being temperamental. Using the mobile base I think i need to remove the wheels and two leveling feet that came standard on the saw and then place it on the mobile base (being that they're redundant anyway). That will be tomorrow's job, after work.
 

welder4956

Well-known member
Joined
Apr 8, 2010
Messages
3,073
Location
Birmingham, AL USA
Yesterday - not much, it was way to hot out there with a high of 99 F and 40% humidity. I went in and out a few times getting things to repair AC ductwork in the attic. Yeah, it was too hot to work in the garage, so I worked in the even hotter attic. When I changed the AC filter last week I noticed several placed where the tape was peeling off the ductwork and allowing cool air to escape into the attic. The upstairs AC has been running every day all day long without shutting off, so I thought I better try to repair it as soon as possible. I went up there around 9:00 am and cut loose tape away, wiped the surfaces with rubbing alcohol, and retaped the joints. Found a couple of areas that were poorly attached when the unit was replaced about 10 years ago that were leaking badly. My clothes were soaked in sweat by the time I was done and I had to cool down and rehydrate for a couple of hours before I could do anything else. That garage is looking a lot cooler to me now!
 

Duisky

Well-known member
Joined
Jul 27, 2015
Messages
135
Location
Scotland
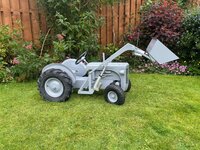
A little Massey Ferguson made over the past couple of months. Dogs for scale!

Fabricated completely from steel and powered by a 24v mobility scooter transaxle in the rear; it will punt an adult about swiftly enough. The loader is removable, and is controlled by a 3 liner actuators - 2 on the arms, 1 on the bucket- operated via joystick. I did weld up a deck and use the components of a battery mower to allow it to cut grass but that will need further tweaking for it to work acceptably in practice. Recreating a tractor isn't a particularly easy task given its aesthetics are largely driven by 'form following function' which doesn't translate well to a smaller scale when using electricity as a power source; I just feel it looks rather austere without the visual depth and character that a proper engine would provide. I'll try and get a video once i've rounded up some kids! PS. I have no idea what happened with the welds in the inside seam of the bucket, they look awful in the image! I'll rectify them at somepoint.

IMG_1233 (1).jpegIMG_1245.jpegIMG_1246.jpegIMG_1249.jpeg
 

larry4406

Well-known member
Joined
Jan 27, 2006
Messages
19,510
Location
Northern Virginia
A little Massey Ferguson made over the past couple of months. Dogs for scale!

Fabricated completely from steel and powered by a 24v mobility scooter transaxle in the rear; it will punt an adult about swiftly enough. The loader is removable, and is controlled by a 3 liner actuators - 2 on the arms, 1 on the bucket- operated via joystick. I did weld up a deck and use the components of a battery mower to allow it to cut grass but that will need further tweaking for it to work acceptably in practice. Recreating a tractor isn't a particularly easy task given its aesthetics are largely driven by 'form following function' which doesn't translate well to a smaller scale when using electricity as a power source; I just feel it looks rather austere without the visual depth and character that a proper engine would provide. I'll try and get a video once i've rounded up some kids! PS. I have no idea what happened with the welds in the inside seam of the bucket, they look awful in the image! I'll rectify them at somepoint.

IMG_1233 (1).jpegIMG_1245.jpegIMG_1246.jpegIMG_1249.jpeg
That looks awesome! Nice job!
 

Motorman55

Well-known member
Joined
Apr 10, 2016
Messages
2,646
Location
South Jersey
And just like that the sun came and I was able to finish Step 2 with the attaching of the white trim around the black trim.

Now onto the last Step 3. But before i can do that I will have to pick up another wide white board as the leftover piece will not measure out as expected. Also have to pick up some paint for the elongated orange arrows. 1721006830992.jpeg
1721006598144-jpeg.2147249


1721006830992.jpeg
Today I started Step 3. Despite the 96+ heat & humidity outside and a couple of mishaps, like dropping my portable miter saw and breaking off one of the legs, belt sander schredding its last belt, realizing I gave away my old circular saw ( when I didn't find it in the last place I looked ) and haven't bought the new one yet, I somehow still managed to cut out the arrows with a cheap HF jig saw and sand the top edges of the cut smooth with a cheap HF hand held belt sander.

Here's one of the arrows dry fitted with the top trim. I'll trim the ends to size and add the small vertical pieces to match the design of the decal. Meanwhile I picked up some orange paint at HD with some chain and hooks, etc to hang the sign from the ceiling when its done.1721095789959.jpeg1721095766622.jpeg1721095731162.jpeg
 
Last edited:
To avoid these ads, REGISTER NOW!

bugnut

ALLIANCE MEMBER
Joined
Jul 14, 2012
Messages
3,981
Location
Central Ohio
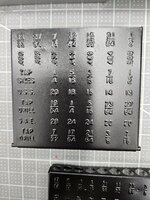
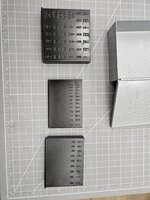
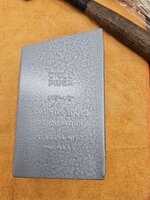
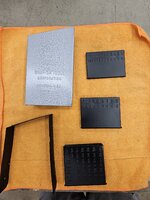
A couple weeks back went to an auction. I happened to see a mostly filled drill index. Upon looking at the rusty old timer I noted it was a Snap-On branded box. When the bidding ended for a grand total of $8 I was the owner. It looked rough but most of the drills were made in USA. So I thought I'd send it through the ultrasonic with some evaporust and see if it would clean up.
After 15 minutes in the bath a majority of the paint was coming off. One thing led to another so it got a full refinish and I had the hammered silver paint left over from another project. Done ready to reload!
 

Attachments

  • 20240629_143404.jpg
    20240629_143404.jpg
    1.1 MB · Views: 44
  • 20240629_141537.jpg
    20240629_141537.jpg
    1.1 MB · Views: 42
  • 20240629_141513.jpg
    20240629_141513.jpg
    1.1 MB · Views: 41
  • 20240629_145014.jpg
    20240629_145014.jpg
    922.2 KB · Views: 39
  • 20240629_143410.jpg
    20240629_143410.jpg
    1.3 MB · Views: 38
  • 20240629_143709.jpg
    20240629_143709.jpg
    1.1 MB · Views: 37
  • 20240629_144919.jpg
    20240629_144919.jpg
    684.9 KB · Views: 33
  • 20240629_144943.jpg
    20240629_144943.jpg
    760.8 KB · Views: 33
  • 20240629_145019.jpg
    20240629_145019.jpg
    1 MB · Views: 47

Jeff Ivers

Well-known member
Joined
Apr 9, 2010
Messages
2,565
Location
Oklahoma
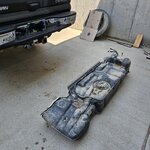
Finished pulling all the staples out of the cartons the new trailer wheels came in and cutting down the cardboard for recycling.
found receiver 2 r.jpg
Then turned my attention to this, that I found on a Sunday morning bike ride - obviously someone did not have their pin secured.
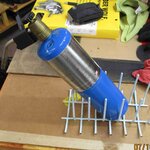
torch stand r.jpg
Needed to apply some heat to get the ball off the insert. A section of discarded dishwasher drawer made a fine torch stand.
 

mopar66

Well-known member
Joined
Feb 15, 2011
Messages
595
Location
RI
Sold a tool cabinet I had listed on CL. Guy communicated well, was on time, brought help to load. Paid my asking price. Went smooth and easy.
I sold a lift table today on CL. Had it listed for a month with little to no interest. Lowered the price a little still no interest. Also had some smaller cheaper items for sale with no interest. Decided to pull down the small items and just get rid of them. Just not worth the effort. Instead, I added them to the lift table ad on Sunday. Guy reached out yesterday, showed up today a little early. Paid my asking price. Again, smooth and easy. Surprisingly good luck selling on CL.
 
Last edited:

welder4956

Well-known member
Joined
Apr 8, 2010
Messages
3,073
Location
Birmingham, AL USA
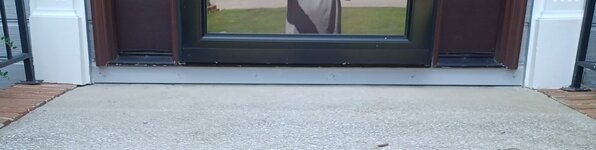
Went in to grab the caulk gun to work on the siding repair under the front door. I caulked under the door threshold to fill all the gaps, then filled a gap between the concrete and flashing with Sikaflex self-leveling sealant. The concrete on the front porch was poured against the siding and after I cleaned out the water damaged siding there was a 1/2" deep x 1/2" wide gap. Then I cut a piece of 1" x 3" PVC trim to replace the damaged section of siding, painted it gray to match, then nailed it in place and caulked the top and sides. I still need a piece of brick molding under the threshold to finish it up. Too hot to do much more out there today.

20240716_143119.jpg
 

Jeff Ivers

Well-known member
Joined
Apr 9, 2010
Messages
2,565
Location
Oklahoma
Do you toss those staples into your scrap metal pile(s)? I was thinking those were headed to the copper world until I sorted a messy scrap pile a few weeks back, and my magnet taught me they were copper-coated steel.
Yeah, I checked these and verified they were copper colored steel. They will go in the appropriate recycle bucket.
 

micromind

Well-known member
Joined
Sep 24, 2023
Messages
3,088
Location
Fernley, Nevada, about 30 miles east of Reno.
Do you toss those staples into your scrap metal pile(s)? I was thinking those were headed to the copper world until I sorted a messy scrap pile a few weeks back, and my magnet taught me they were copper-coated steel.

I do. I will recycle as much stuff as I reasonably can.

I'm no environut but if it's fairly easy, recycling makes sense.
 

Squankum

Well-known member
Joined
Mar 28, 2011
Messages
7,816
Location
Southeast
I do. I will recycle as much stuff as I reasonably can.

I'm no environut but if it's fairly easy, recycling makes sense.

It's going somewhere useful, that's for sure. Had a buddy who worked in a "mini mill" steel mill, their main input was just scrap steel and they melted it down and made new big rectangular logs of steel. The building next door turned it into rebar.
 

Jgaz

Well-known member
Joined
Dec 16, 2016
Messages
1,697
Location
AZ
Over the last few days I built three drawer boxes for a neighbor’s Toy Hauler RV.
I used 1/2 Baltic birch plywood and finger joints for the replacement boxes.
Forgot to get a picture. It was really hot in the afternoon when I took them out of the clamps.

I know it’s not news to anyone here but the RV manufacture(s) should be ashamed of their construction techniques.
Particle board, a few staples, and sometimes very poorly applied glue!

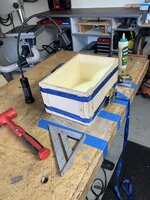
Anyway, today I took some of the leftover pieces, grabbed some 1/4” MDF from the shed for the bottom, and made a storage box for my small metal cutoffs.
IMG_4545.jpeg
BTW: Glue sets up FAST in this heat!
 

niget2002

Well-known member
Joined
Oct 2, 2012
Messages
11,213
Location
Josephine, TX
This should go in the 'what did you cook today' thread too...

We're making french dip sandwiches for dinner in a crock pot. I got tired of smelling the food cooking in the house (and the subsequent snacking), so I moved the slow cooker out to the garage and put it on top of the deep freeze to finish cooking.
 

welder4956

Well-known member
Joined
Apr 8, 2010
Messages
3,073
Location
Birmingham, AL USA
Made a run to the box store for brick molding, then cut the final piece of PVC trim to go under the front door for the siding repair, predrilled the nail holes, put on 2 coats of paint, then got it installed between rain showers. Not perfect, but much better than the water damaged siding that was there before:

20240717_105253.jpg

20240717_135824.jpg

In between coats of paint, I was able to mount my Fathers Day present on the wall:

20240717_123551.jpg
 
To avoid these ads, REGISTER NOW!
Top Bottom