To avoid these ads, REGISTER NOW!

What did you do "IN" your garage today?

To avoid these ads, REGISTER NOW!

Burt Shaver

Well-known member
Joined
Dec 7, 2023
Messages
1,280
Location
Iroquois, Ontario Canada
B1D42921-5C63-4828-BE89-9240DAD35715.jpeg
Stenciled the Seadoo logo onto the new seat cover I installed in this 95XP I’ve done a mini restoration on. Loved the SEM purple vinyl paint but did get a little paint bleed past the stencil, I’m still happy with it though. Next time I’m going to take a little more time pressing the stencil in with a little heat from a hair dryer F996543C-0BBA-4E0C-A6E9-18D36F44D9FC.jpeg
 

KwikFab

Well-known member
Joined
Jul 27, 2024
Messages
1,225
Location
Central Valley, CA
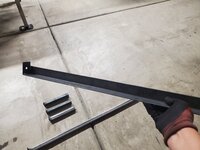
Super small job; neighbor offered to pay but I declined.

Had to cut off about 8-10" off each of these crossbars and weld new tabs on.
20240813_110400.jpg

20240813_112820.jpg

20240813_115047.jpg

Now for a backstory - this neighbor (now friend) was actually my first paid welding job above $200. Call it, my first real paid welding job.

To add to that, I had just started welding and fabrication so I was as green as they come.

We had just bought a new house and it was finally done being built (3 years ago), and being freshly retired, I had the time to take up and learn new things.

After we got to know each other, he immediately asked if I'd take on a job for him to make him a large 8' x 10' assembly for a platform to set up diagnosing/build stations as he has his own business in IT/networking/computer repairs and builds.

Here's that old job; you'll notice the big difference in the garage as we had just moved into the area and I didn't really have much outside of my old tools.

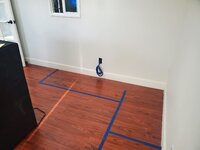
The room in his building he wanted to occupy. I used painter's tape to section off the area and gather dimensions in my binder (again, I was new to all this).
20221104_094224.jpg

20221104_094239.jpg

So onto cutting!

You'll notice I transferred those dimensions to my own garage floor.

20221106_121851.jpg

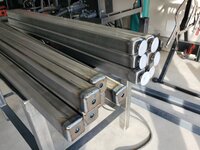
He did mention that his floor wasn't exactly as "level as it can be" so I opted to add adjustable feet. Again, these things were all completely new to me so I was learning as I went.
20221117_151133.jpg

I didn't even have a real welding table so I tried my best to square everything up as best as I could.

20221227_143122.jpg

20221227_144042.jpg

And here it was all done and in place!

This was of course, before he chopped off the ends of the counter top.

20221227_160554.jpg

He loved that I made it "modular" in that the center comes out and the end pieces can stand on their own.

Since the business had to move location, he asked if I could cut down the cross bars as he needed to make one section a bit smaller to properly fit.
 

Magnum440d100

Well-known member
Joined
Dec 2, 2018
Messages
3,581
Location
Indiana
Minimal clean up. Threw some obvious trash away.


Moved some core lawn mower engines off the concrete floor and under the workbench for now.


Contemplating ordering some organizers to start emptying my pack-outs. I have one pack out bolt bin full of drill bits. I’ve pulled from them and refilled my index with fresh bits.

But I’m contemplating getting a drawer from Huot or vevor for the bench top.

On one hand, I’ll be emptying my pack-out and probably sell them to get room, and on the other hand I’ll be taking up workbench room with a stack of drawers.


But on the other hand, I’ll have easy access to drills near my drill press.

Ugh hahaha
 

Levaughn

Well-known member
Joined
Feb 17, 2015
Messages
1,408
Location
NY
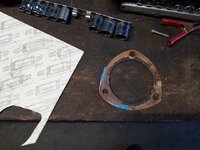
After almost 35 years, the starter in my 62 Impala finally went. It was never a daily driver and the starter came from another car. I replaced it with a new high torque one I bought about 12 years ago from a Flea Market ($35) It spins over so fast now I thought the planetary gear wasn't engaged to the fly wheel. This one has a heat shield over the solenoid I bolted on. I had to remove the header because the starter bolts in front ways. Loosening the exhaust flange made the gasket crack into pieces. I have lots of flange gaskets but didn't have that one. I had to piece it back together from another old gasket for now. I will cut out some new ones later.
 

Attachments

  • thumbnail-1.jpeg
    thumbnail-1.jpeg
    120 KB · Views: 28
Last edited:

oldman_pottering

Well-known member
Joined
Jun 3, 2024
Messages
421
Location
Tinonee, NSW Australia
On one hand, I’ll be emptying my pack-out and probably sell them to get room, and on the other hand I’ll be taking up workbench room with a stack of drawers.


But on the other hand, I’ll have easy access to drills near my drill press.

Ugh hahaha
it's always a tradeoff
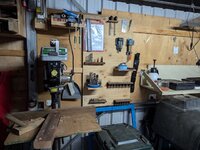
My drill bits and accessories are stored on a board mounted to french cleats at my drill press for easy access
drill press.jpg
 

niget2002

Well-known member
Joined
Oct 2, 2012
Messages
11,253
Location
Josephine, TX
My new spokeshave came in, so I went outside to try it out on the Kayak.

Discovered quickly I didn't know what I was doing, so I came back in and watched a YouTube video on how to tune it. Then went back out and mostly finished one side of the bow.

I'll go back out after dinner and finish the bow and maybe start on the stern.

I took too much off the top, but I'll work on blending it better.

1000003011.jpg
 

rcktpwrd

Well-known member
Joined
Mar 5, 2008
Messages
1,102
Location
Raleigh, NC
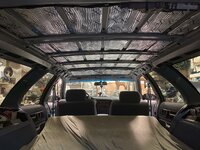
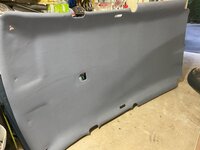
Had some left over Rattle Trap Extreme from another project a while back, so I cut and the wife installed it. Covered the roof of the wagon and a couple other open spots. Might not do much but we had the stuff and it only took about an hour...
IMG_7259.jpg


She also picked up the recovered headliner
IMG_7260.jpg

Still waiting on the well nuts to finish the roof rack, hopefully tomorrow, then she/we can put the interior panels and headliner back in.
 
To avoid these ads, REGISTER NOW!

Mr.zippy

Well-known member
Joined
Apr 27, 2020
Messages
2,221
Location
Wyoming
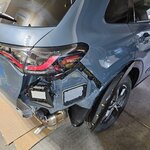
Some disassembly on my daughters brand new car. Some asswipe tagged the rear of her car in a parking lot. So new the car even had temporary tags on it. Of course they just split. She has a pretty high deductible so I am taking the damaged parts to the body shop for repair, and I will put it back together when completed. 20240813_181155.jpg
 

Snip's

Well-known member
Joined
Apr 29, 2017
Messages
1,866
Location
Ohio
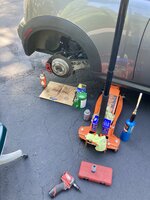
Well... Just outside the garage because my garage is too small...
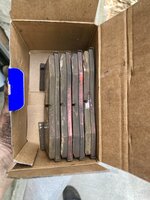
My MINI Cooper got a brake fluid flush, new brake pads, tire rotation...
And I cleared out all of the nannies on the computer...
IMG_4075.jpg

IMG_4076.jpg

Used a pressure pot fluid flush... Didn't need anyone to pump the brake pedal...
IMG_4077.jpg

The wear sensor on the pads were leaving quite a bit of material...IMG_4081.jpg Probably could have gone another 5,000 miles... :dunno:
IMG_4080.JPG
 

oldman_pottering

Well-known member
Joined
Jun 3, 2024
Messages
421
Location
Tinonee, NSW Australia
Getting this toolbox ready to be mounted back under the tray of my ute, I had a piece of marine ply cut to size to match the inside of the top of the box basically to sandwich it for better mounting but I never sealed the bolts and after time the timber rotted and the box came loose, that was about 7 months ago. I have finally decided to put it back. On top of the box are 2 aluminium pieces of square tube to act as spacers, last night I used urethane to secure a new piece of wood inside and to secure the spacers while also sealing them. This morning I go out to fit the box up and the planets have not aligned or the bolt holes so it will be a bit more fiddling this evening and then I can pack all the necessary ropes etc away instead of lying on the passenger floor
toolbox.jpg
 

Metallitubby

Well-known member
Joined
Aug 12, 2019
Messages
26,052
Location
ATL OTP North
You should never get rid of an Element......

I agree, but I've reached the end with this project, and now it's taking up space in the shop. It doesn't get driven nearly as much as it should. It's gonna take a very special individual who sees the value of having a rallycross Element that is still daily-able.
 

Outlawmws

Well-known member
Joined
Aug 9, 2011
Messages
39,328
Location
The Badlands
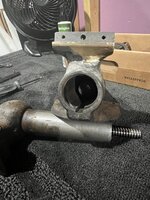
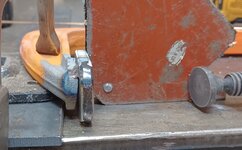
cleaned bench top, repaired a cheap cast iron C-clamp that had a twist in it,

FYI Most C-clamps are pretty easy to bend back straight. I've done it many times.

Won’t the c clamp just keep twisting when you tighten it down?

It really depends on if its gripping straight. Most I've straightened were over-tightened and twisted. Clamp 'em in a Vise, and get a big crescent on them. I can only recall breaking one A cheap grey CI Sears import that just snapped. My attitude is if the bent, they can be straightened, and if they break, they were junk anyway.
 

welder4956

Well-known member
Joined
Apr 8, 2010
Messages
3,084
Location
Birmingham, AL USA
FYI Most C-clamps are pretty easy to bend back straight. I've done it many times.


It really depends on if its gripping straight. Most I've straightened were over-tightened and twisted. Clamp 'em in a Vise, and get a big crescent on them. I can only recall breaking one A cheap grey CI Sears import that just snapped. My attitude is if the bent, they can be straightened, and if they break, they were junk anyway.
This one is clearly cheap gray cast iron junk, so bending it back was not an option. It will wind up in the trash when it twists again or breaks, but the cost to repair was minimal for me so I welded a new pad on it to square it back up and get a little more use out of it.(y)
 
To avoid these ads, REGISTER NOW!
Top Bottom