To avoid these ads, REGISTER NOW!

What did you do "IN" your garage today?

To avoid these ads, REGISTER NOW!

Snip's

Well-known member
Joined
Apr 29, 2017
Messages
1,863
Location
Ohio
Those look barely broke in to me - your "wear sensors" were bent in by someone...

See that cut groove? that can be gone and you are OK....
My MINI is 15 YO now and I've done all of the maintenance and pad changes... It's always been this way... Plenty of pad left..
The sensor wasn't damaged... Just a poor design at the point of sensor activation...
It's a 2 stage sensor... As soon as the embedded wire loop makes contact with the disc, the warning indicates "Service"...
If you ignore it, eventually the wire loop is worn through and the circuit is broken... The warning becomes more attention getting and serious... That point is just at the bottom of the slot in the pad if I remember correctly.. . Yet, still more pad left...
In the past, I've just clipped the sensor off, soldered the wires together with heat shrink tubing and attached the loose end to the strut...
MINI sells new sensors at $25.00 each x 2...
It's becomes a mental problem gnawing at me... I should pull the wheel and check the pad thickness... Nope, plenty left... Rinse and repeat...
Got tired of that and just put new sensors on... waiting for the service light to activate...
It's just bad engineering... Good for MINI service, bad for MINI owners...
Pick your poison... :dunno:
 

Prospecter

Well-known member
Joined
May 16, 2015
Messages
2,443
Location
Maine
My MINI is 15 YO now and I've done all of the maintenance and pad changes... It's always been this way... Plenty of pad left..
The sensor wasn't damaged... Just a poor design at the point of sensor activation...
It's a 2 stage sensor... As soon as the embedded wire loop makes contact with the disc, the warning indicates "Service"...
If you ignore it, eventually the wire loop is worn through and the circuit is broken... The warning becomes more attention getting and serious... That point is just at the bottom of the slot in the pad if I remember correctly.. . Yet, still more pad left...
In the past, I've just clipped the sensor off, soldered the wires together with heat shrink tubing and attached the loose end to the strut...
MINI sells new sensors at $25.00 each x 2...
It's becomes a mental problem gnawing at me... I should pull the wheel and check the pad thickness... Nope, plenty left... Rinse and repeat...
Got tired of that and just put new sensors on... waiting for the service light to activate...
It's just bad engineering... Good for MINI service, bad for MINI owners...
Pick your poison... :dunno:
When we do our own service, we can do it any way that makes us happy. :beer:
 

Magnum440d100

Well-known member
Joined
Dec 2, 2018
Messages
3,581
Location
Indiana
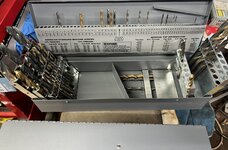
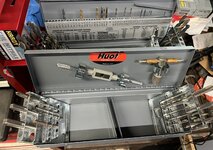
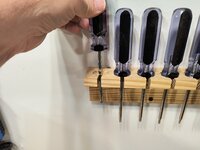
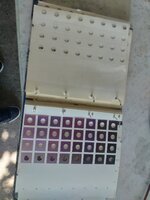
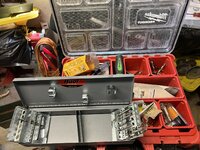
Got a Huot tap index.

Now to start sorting through my drill bit pack out and fill this up.

This’ll be nice near the drill press.


Still bouncing back and forth on the Huot drawer organizers. I have plenty excess of each.

I’m still getting used to the notion that I won’t be working out of these packouts again, hopefully. The plan is to get everything to meld seamlessly into “my” shop. And out of the way. IMG_4690.jpeg


I’ll get organized. Eventually.
 

Magnum440d100

Well-known member
Joined
Dec 2, 2018
Messages
3,581
Location
Indiana
That went quicker than I thought haha

Decided to make some headway into my drill bit drawer as well IMG_4691.jpeg

Got it mostly sorted and into the Huot drill index. I know I’m missing some, but as soon as I finish sorting, I’ll know exactly WHAT to order. I still have a tool box of drill bits I need to organize. Dang.IMG_4692.jpeg

Went through my pack out and my drawer and added to the tap index.IMG_4693.jpeg

Still need to sort and put in more taps and the appropriate drills. But that’s a tomorrow project. I have a puppy that decided to poop and roll around in it. So, GOTTA GO FOR NOW!
 

Magnum440d100

Well-known member
Joined
Dec 2, 2018
Messages
3,581
Location
Indiana
I have a Kennedy 520 box crammed with taps, dies, handles for both and E-Zouts... still not all of them and none of the pipe stuff..'
That’s a LOT.

I’m only probably going to hang onto the commons at home.

At work I have access to any and all I want/need.

Here at my house, I’m just trying to get some semblance of organization goin.
 

rcktpwrd

Well-known member
Joined
Mar 5, 2008
Messages
1,098
Location
Raleigh, NC
Package of well nuts showed up today 🙂 so we installed the needed ones and the last to ribs. Then we got out the hose and soaked/sprayed the roof rack parts and there were no leaks! 😃 We did have to replace a few of the well nuts that we installed the other day, the brass insert was pulled out or they didn't compress nicely.

IMG_7263.jpg

rest of interior will go back in over the weekend...
 

kaymccampbell

Well-known member
Joined
Feb 27, 2015
Messages
29,603
Location
Upstate New York
Package of well nuts showed up today 🙂 so we installed the needed ones and the last to ribs. Then we got out the hose and soaked/sprayed the roof rack parts and there were no leaks! 😃 We did have to replace a few of the well nuts that we installed the other day, the brass insert was pulled out or they didn't compress nicely.

IMG_7263.jpg

rest of interior will go back in over the weekend...
I love those road whales.
 

rd65

Well-known member
Joined
Sep 29, 2017
Messages
2,819
Location
Granite Falls, WA
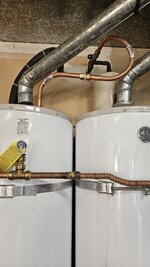
Came home to my wife looking hard at the water heaters and a sizeable puddle coming from that area. Not the way I was wanting to spend my evening. We have 2 - 55 gallon units plumbed in series, master bath has a ridiculously large jetted tub. I know diddly about plumbing, wife called the youngest to come over to assist, he spent a couple of years as a plumbers helper. Tried to move the flex copper line from the leaker to the other tank, it was too short and I put a decent kink in it. Off to the hardware store. 15" & 18" flexible copper lines, 3/4" close ******, 3/4" shark bite, dope. Tried to add the 15" line to the original but there was a pinhole leak in the kinked line. Plan B - cut off original flex pipe at the T and installed shark bite. That pipe is pretty thin and it squared up a bit and leaked at first attempt. Tapped shark bite on a bit more to seat it and it seams to be working....for now. Hopefully it doesnt all blow apart before I can get the tank replaced, need a new shut off valve too.
 

rd65

Well-known member
Joined
Sep 29, 2017
Messages
2,819
Location
Granite Falls, WA
Came home to my wife looking hard at the water heaters and a sizeable puddle coming from that area. Not the way I was wanting to spend my evening. We have 2 - 55 gallon units plumbed in series, master bath has a ridiculously large jetted tub. I know diddly about plumbing, wife called the youngest to come over to assist, he spent a couple of years as a plumbers helper. Tried to move the flex copper line from the leaker to the other tank, it was too short and I put a decent kink in it. Off to the hardware store. 15" & 18" flexible copper lines, 3/4" close ******, 3/4" shark bite, dope. Tried to add the 15" line to the original but there was a pinhole leak in the kinked line. Plan B - cut off original flex pipe at the T and installed shark bite. That pipe is pretty thin and it squared up a bit and leaked at first attempt. Tapped shark bite on a bit more to seat it and it seams to be working....for now. Hopefully it doesnt all blow apart before I can get the tank replaced, need a new shut off valve too.
 

Attachments

  • 20240814_191214.jpg
    20240814_191214.jpg
    537.8 KB · Views: 58

Motorman55

Well-known member
Joined
Apr 10, 2016
Messages
2,647
Location
South Jersey
UPDATE...Over the last couple days I was able to sand, stain and apply a couple coats of clear. I went with Varathane's 'Classic Black' wood stain topped with a couple coats of MinWax Clear Polyurethane. I wiped off some of the stain from the front to lighten it and show the grain and left the circles and edges darker.

Today I sanded the front of the plaques to smooth the clear coat finish and applied a coat of Howard's Feed-n-Wax Bees Wax. ( I don't want a new shiney finish, instead I'm going for an aged look. Perfectly imperfect is the look I want on these considering they will be for the 'Vintage Motorcycle' catagory of the Show. ) After that I hot glued the metal motorcycle medallions in place. 1723222983724.jpeg

I'll add another couple coats of the Bees Wax to finish before adding the engraved info plates on the front and black felt to the backside. Those two items I still have to order. Getting close to the finish line on this project. 1723222777587.jpegView attachment 2162131
UPDATE.....The black felt came in the mail so yesterday I applied it to the three plaques. Only thing left now is to add the metal engraving plates once I get them.

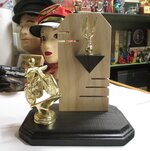
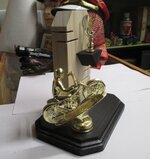
Meanwhile, I made another motorcycle trophy for our Car Show. The cast metal motorcycle topper and eagle are vintage metal pieces.

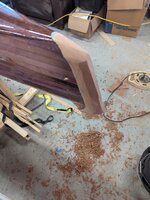
I stained the bottom plate the same 'Classic Black' as the three plaques and clear polyeurthane the base. I used my miter saw to make the horizontal slat cuts to the vertical piece to represent motorcycle cylinder fins and trimmed the top with a couple angle cuts to represent a motors head.

I used one of the cut off pieces to make the eagle perch which I also stained with the 'Classic Black' then glued it to the vertial piece. I left the vertical piece natural pine and just polished it and the perch with the Howard's Feed-n-Wax. Lastly I added the black felt to the bottom. Just have to add a brass engraving plate.

Still a few more trophies to make....1723693572035.jpeg1723693542993.jpeg1723693511113.jpeg
 

DGersic

Well-known member
Joined
Mar 12, 2017
Messages
6,371
Location
DeKalb, IL
Making sawdust. I made a crosscut sled out of scraps I had on hand.

IMG_5694.jpeg

I need to make the final kerf cut, tomorrow after the glue dries. I need this for one set of cuts on the drawer boxes. But it’ll be handy to have in the future too.

Also, cut a set of drawer front/back/sides. New 90T blade on the mitre saw made butter smooth cuts.

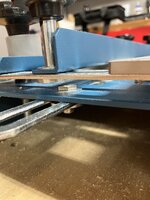
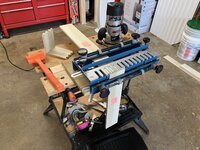
Making sparks. The HF dovetail jig really doesn’t want to be set up for thinner than 1/2” stock. The drawers are being made with actual 7/16” stock (poplar 1/2 x 4 x 8). So these two adjustment bolts got thinner heads.

IMG_5696.jpeg
IMG_5697.jpeg

Now the adjusters for the depth fence clear the thinned bolt heads for the side guides. I also had to remove and file the template brackets to allow it to move back about 1/16” more than stock.

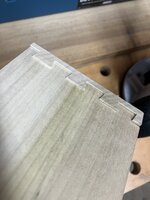
Making more sawdust. Cutting some dovetails in scrap.

IMG_5698.jpeg

The depth fence needs to be adjusted slightly.
 

Mikeske

Well-known member
Joined
Apr 28, 2017
Messages
2,131
Location
Washington State
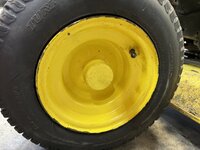
Yesterday I noticed that the left front wheel on my garden tractor was low. I air it up to 14 PSI and then decide to monitor it. This morning it was 11.5 PSI. Well off it comes and ****** the wheel and tire down to the tire store and have them tube the wheel tire combination and get rid of the problem. I found no nails or anything to cause the wheel to leak but around the bead on the inside. Tubed it and then greased inside the center of the wheel and reinstalled the wheel. This wheel has sealed wheel bearings so the reason I grease the inside of it is so it comes off the next time without a issue as I know who be working on this in the future and that's me.IMG_1804.jpeg
 
To avoid these ads, REGISTER NOW!

DGersic

Well-known member
Joined
Mar 12, 2017
Messages
6,371
Location
DeKalb, IL
Made the kerf cut in the crosscut sled. Then used it to make some clearance cuts in these.

IMG_5699.jpeg
IMG_5700.jpeg

I need to sand them slightly smaller to fit the slots on my table saw.

Made a bunch of sawdust.

IMG_5701.jpeg
IMG_5703.jpeg

But now I’m somewhat back to the drawing board. These poplar boards are x4, so actually 3 1/2”. They really need to be a full 4”, so the dovetails end up right. The directions do say that the pieces need to a full multiple of 1” high. So I need to go up to a x6 and rip down to 4” actual.

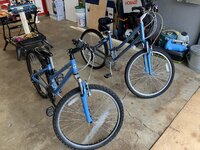
Sold a bike.

IMG_5702.jpeg

So that’s cash in pocket, and one more thing out of my storage shed.
 

XJSuperman

Well-known member
Joined
Jan 26, 2018
Messages
3,088
Location
Central Iowa
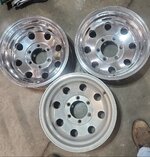
Put away a handful of tools and set to work polishing wheels again. I've got two done and two to go in this set, but one more for a spare for the truck. Im learning as I go and a mix of Summershine products and HarborFreight stuff seems to be working. Its not perfect by any means, but its miles ahead of where I started and at this point its going to make the truck body look worse lol.
Screenshot_20240815_231125_Gallery.jpg
 

Snip's

Well-known member
Joined
Apr 29, 2017
Messages
1,863
Location
Ohio
Well darn it... Apparently I should have asked about this on GJ before placing my order for the bird spikes...
I mentioned to my wife about the responses from the site...
In about 2 seconds she says... "Just eliminate the ledge and the birds won't have a place to sit"...
Whaaaaaattt???
"Just cap the ledge with an angled piece of wood so the birds slide off the ledge, and the spikes idea won't hurt them"
I feel like a failure...

troll-face-went-too-far-with-stepsister-amateur-farm-boys-8.png
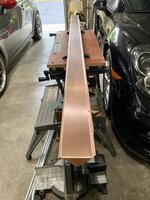
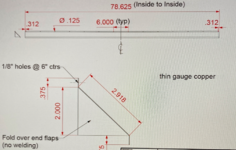
Took some measurements, made a CAD drawing, and went down to my old shop to get my "Anti-Bird Roost" copper trim made...
I chose 110 Copper alloy in a .0625" thickness...
Screen Shot 2024-08-16 at 10.41.43 AM.png

Parts were ready this morning and I did a little copper cleanup in my garage...
IMG_4086.jpg

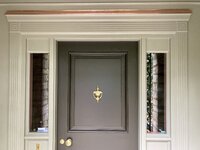
Installed...
IMG_4088.jpg

I'm thinking this should solve my bird problem...
 
Last edited:

KwikFab

Well-known member
Joined
Jul 27, 2024
Messages
1,214
Location
Central Valley, CA
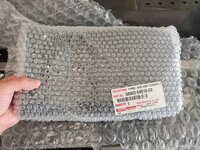
Received a package yesterday afternoon from a repeat customer.

Made sense to purchase it and have it sent to me before I made something for it and send it all out to him (he's in Alaska).

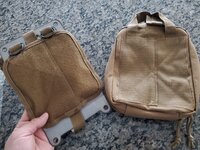
He wanted a molle panel for the rear center console cover as one person used to make them some years back; he has since shut down his website and disappeared so I got to mocking it up today.

Here's the panel -

20240815_112036.jpg

The kit was advertised as being a means of carrying a first aid kit, specifically the tear-away Orca Tactical pack found on Amazon so I found it appropriate to buy one myself for mock reasons -

20240815_112219.jpg

Quick cardboard mock up -

20240815_134943.jpg

20240815_134959.jpg

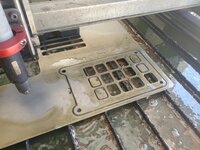
The design is super simple so it took a minute or two to draw up and get to cutting -

20240816_111936.jpg

Here it is after it was cut, and bent on the press brake -

20240816_114829.jpg

Perfect -

20240816_114903.jpg

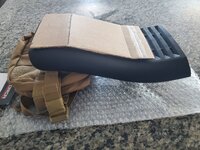
Here's the tear away action; the rear of the kit is secured nice and tight to the molle panel -

20240816_115644.jpg

Not bad for a quick first attempt -

20240816_115731.jpg

Have to say, I've used molle both in the military and in training and I remember just how secure the stuff is on your carrier and whatnot.

However, this was the first time cutting a template on steel.

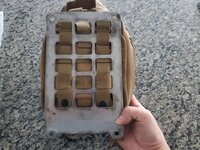
Looking at how the rear looped through the panel, I may want to adjust the holes and spacing for the molle panel but that may take longer than it did making this whole thing.

Might have to toy with it tonight on CAD.
 

ZRX61

Well-known member
Joined
Aug 15, 2006
Messages
28,716
Location
Solar Blight Valley, SoCal
Took two pieces of 4x4in 10g steel & drilled two 3/8 holes in each one. Then de-burred the holes with a step drill. Next up they will get painted, used as templates to drill holes in the F350 bed & then take up residence as backer plates for the tie downs that I got from Horrible Fright (after buying, rejecting & returning several from Amazon which were either far too small or could have used to moor an ocean liner.)
 

BlakeTheCarGuy

ALLIANCE MEMBER
Joined
Oct 10, 2018
Messages
9,384
Location
Roanoke Virginia
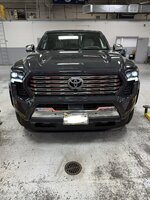
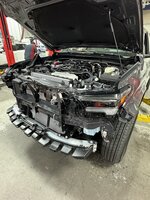
Dealt with the idiot lube tech at work. Car (2024 RAV4) towed back in from side of interstate 81 with 4 loose wheels. Removed lug nuts and found all the studs had stretched and were slathered in anti seize and had been way over tightened. Every single one of them snapped off when trying to remove them except one which was stretched. He tightened them down on his full speed setting Matco impact gun and then went over them with a torque wrench. So 20 lug studs and lug nuts later. Car was back on the road. Worst part is 5,000 miles only on car. We had to get the studs from one AutoZone location, two Advance Auto locations and two O’Reilly locations to find all of them in town. Thank goodness this guys last day is Friday of next week. Had to order the black lug nuts currently put chrome back on so customer could get the car back. He tried to blame his partner for it all but he always does that. He asked the manager to speak in his office so they did and apparently from what we heard is that he said he was the most qualified tech in the shop to do anything and that he doesn’t make mistakes and blamed everything on his partner. He was mad that the boss would not let him replace the studs. Personally I don’t have respect for someone that doesn’t own up to something they did. I’ve tried gently explaining to this guy that I am willing to help him out to which I got a similar response about him being mister perfect. I still can’t understand why this guy still works here.


Also done a warranty fog light on a 2024 Tacoma with 800 miles. Such a stupid design. Needless to say I think I need a beer this weekend lol. These are the only two pictures I took of the Tacoma but it was much more labor intensive than it looks. It pays 1.9 hours warranty time. Took me 2.4 hours to do but it was a learning experience. Needless to say won’t be volunteering to do that again lol.IMG_0176.jpegIMG_0172.jpeg
 

GX460DIYguy

Well-known member
Joined
Aug 26, 2023
Messages
430
Location
Texas
Dealt with the idiot lube tech at work. Car (2024 RAV4) towed back in from side of interstate 81 with 4 loose wheels. Removed lug nuts and found all the studs had stretched and were slathered in anti seize and had been way over tightened. Every single one of them snapped off when trying to remove them except one which was stretched. He tightened them down on his full speed setting Matco impact gun and then went over them with a torque wrench. So 20 lug studs and lug nuts later. Car was back on the road. Worst part is 5,000 miles only on car. We had to get the studs from one AutoZone location, two Advance Auto locations and two O’Reilly locations to find all of them in town. Thank goodness this guys last day is Friday of next week. Had to order the black lug nuts currently put chrome back on so customer could get the car back. He tried to blame his partner for it all but he always does that. He asked the manager to speak in his office so they did and apparently from what we heard is that he said he was the most qualified tech in the shop to do anything and that he doesn’t make mistakes and blamed everything on his partner. He was mad that the boss would not let him replace the studs. Personally I don’t have respect for someone that doesn’t own up to something they did. I’ve tried gently explaining to this guy that I am willing to help him out to which I got a similar response about him being mister perfect. I still can’t understand why this guy still works here.


Also done a warranty fog light on a 2024 Tacoma with 800 miles. Such a stupid design. Needless to say I think I need a beer this weekend lol. These are the only two pictures I took of the Tacoma but it was much more labor intensive than it looks. It pays 1.9 hours warranty time. Took me 2.4 hours to do but it was a learning experience. Needless to say won’t be volunteering to do that again lol.IMG_0176.jpegIMG_0172.jpeg
It pains me to see that these are the types of people hired by dealerships, but I don’t even get calls for interviews. I don’t know everything, but I do know that that’s not how you install lug nuts and I’m at least honest enough to admit my faults.
 

DGersic

Well-known member
Joined
Mar 12, 2017
Messages
6,371
Location
DeKalb, IL
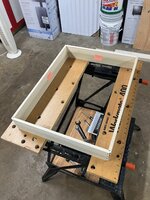
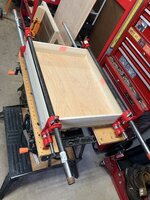
Made the final cuts, then glued up the demo drawer.

IMG_5704.jpeg

There are a few things I’m not happy with, and will correct on the final real drawers.

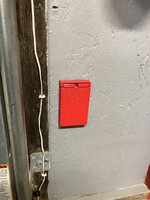
With the glue-up drying, I decided to do some puttering. I cut a pass through hole from inside to outside, and covered it with some ele boxes and weatherproof covers. The inside one I painted red.

IMG_5705.jpeg

I don’t like having to leave the door open when I want an air hose outside. Problem solved. I’m planning a second one for the back wall, so I won’t have to use the window when I want an air hose or extension cord in the back yard.
 

niget2002

Well-known member
Joined
Oct 2, 2012
Messages
11,216
Location
Josephine, TX
Went out while the temps are still in the upper 70s and fixed the hood on the lawn tractor. The plastic where the hinge mounts to the hood has rotted away, so I used some bolts to bolt the hinge directly to the metal tabs.

The metal is kind of thin, so I expect it to vibrate harden over time and will probably develop a stress fracture where it bends. Then I'll probably have to weld new tabs to the hood.
 
To avoid these ads, REGISTER NOW!
Top Bottom