
You are using an out of date browser. It may not display this or other websites correctly.
You should upgrade or use an alternative browser.
You should upgrade or use an alternative browser.
painting raised letters
- Thread starter grannyknot
- Start date

I've wondered this myself. I have wondered if dense foam rubber would work to dab it on .probably would need several coats
or maybe even a pc of cotton glued to the high density foam
K13
Well-known member
Depending on the colour you are going for I find paint markers are the easiest to use.
manwithtools
ALLIANCE MEMBER
Trying as hard as I can, I can't think how a cleaver could be used in this application.In the past I have painted cast in raised letters by hand with so so results, wondering if anyone has come up with a cleaver way to do this job?
Thanks
")
Last edited:
freebirdwelds
Well-known member
My father used to use paper match sticks from a book of matches.

ray h
Active member
I've only done one vise. I took a smooth file and flatten the tops of the letters slightly. I then used a quality artist brush. Next time I'll try the padding method as has been suggested.
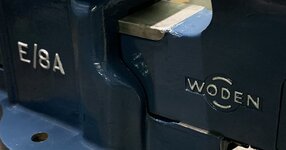
This is an old one I did. a couple of coats of lite grey primer, maybe 2 or 3 coats of black, a couple of coats of grey-green. then I gently removed the green, I think using 0000 wool, this left the black letters with a grey edge. It took a couple of times to have it end like I wanted. its a bit worn now.

OP
grannyknot
Well-known member
Oops, my dyslexia is at it again. I think you mean hard don't you?Trying as had as I can, I can't think how a cleaver could be used in this application.
manwithtools
ALLIANCE MEMBER
That's what I get for being a smart ***Oops, my dyslexia is at it again. I think you mean hard don't you?
I was in too big of a hurry to try to be funny!
OP
grannyknot
Well-known member
Snapmom, very nice! I have tried that technique once before but I couldn't keep the steel wool off of the paint around the lettering so it ended up looking dull with the rest of the paint being glossy.
Some good ideas, hard foam covered with thin cloth would work, also like the idea of filing the tops of the leters
Some good ideas, hard foam covered with thin cloth would work, also like the idea of filing the tops of the leters
Oldtuleguy
Well-known member
- Joined
- Nov 4, 2017
- Messages
- 10,460
I sometimes just sand off the paint on them

RTM
Well-known member
I saw a job where someone used a dense foam roller, think it was appropriated from another area, like crafting stencils or some such, which gave an impressively nice finish. I'm not a fan, so didn't pay much attention, but did respect the craftsmanship that got them there.
Nice even coverage, consistent depth at the edges, looked sharp.
Nice even coverage, consistent depth at the edges, looked sharp.
something like this , a silk screen rollerI saw a job where someone used a dense foam roller, t

4xdog
Well-known member
something like this , a silk screen roller
Good suggestion, @The Cobbler.
I have a couple of brayers with rubber roll coverings of different hardness. I’ve used them for years inking woodblocks or linoleum carvings. I’ll bet they’d work well to highlight raised letters — I’ll have to give that a try.
RegeSullivan
Well-known member
I've had some luck with an ink roller but for uneven/not smooth I'll use a small round tapered artist brush to make the outline then fill in the center. Magnifing glasses help alot to keep the edges sharp.
RTM
Well-known member
Didn't look quite that dense, but maybe what it was.something like this , a silk screen roller
Surface looked more like this, not quite smooth, but not fluffy at all. Ignore the link name, it seems to work.
ZRX61
Well-known member
I've had good results with a blue Scotts paper towel folded multiple times & using the dab method.
I might have used a high number wet paper, I am getting old and can’t rememberSnapmom, very nice! I have tried that technique once before but I couldn't keep the steel wool off of the paint around the lettering so it ended up looking dull with the rest of the paint being glossy.
Some good ideas, hard foam covered with thin cloth would work, also like the idea of filing the tops of the leters
Oregon rock crusher
Well-known member
I like the really fine tip paint pens for raised letters. It helps to try the pen on scrap to get the paint load right. I have to do it first thing in the morning before I get the coffee shakes. I also use high power readers for close work like this. On brass tags with raised letters I paint the whole tag and then scrape the tops of the numbers and letters with a scalpel before the paint gets too hard. Sometimes I have to start over. Ed.
Attachments
thehorse13
Well-known member
Let me show you my secret way to make perfect paint jobs on all of your raised letter projects. Available at any Dollar Store at the bargain price of $1.25.

wrenchguy
Well-known member
By hand.
I used a fine artist brush, cut off nearly all the length with just a few very short hairs left for these very small embossed letters, decorations and numerals. Hundreds of them, the size of the embossing will determine your brush tip size. good luck with your project.
I used a fine artist brush, cut off nearly all the length with just a few very short hairs left for these very small embossed letters, decorations and numerals. Hundreds of them, the size of the embossing will determine your brush tip size. good luck with your project.
ArcReactorKC
Well-known member
So I have only done this once but you know the saying "when all you have is a hammer, everything looks like a nail"
I took a piece of cardboard from a diet coke box and a rubber mallet. Laid the cardboard over the letters and embossed the cardboard with the lettering using the mallet.
I then cut the section of box out and scanned it on my flatbed scanner. Traced it in inkscape to make an SVG. Then put that SVG in Orcaslicer and extruded it to be the thickness of the letters height. Printed it on my X1C. Then laid the 3d print over the letters and simply sprayed on rustoleum enamel.
An overdone process but the letters looked perfectly crisp. This was for a finicky customer so I knew I 100% could not freehand it with my shaky hands.
I enjoy overdone processes. I don't know much about the 3-D printer world and I just want to see if I understand. Are you making a mask that covers everything except the the tops of the letters?So I have only done this once but you know the saying "when all you have is a hammer, everything looks like a nail"
I took a piece of cardboard from a diet coke box and a rubber mallet. Laid the cardboard over the letters and embossed the cardboard with the lettering using the mallet.
I then cut the section of box out and scanned it on my flatbed scanner. Traced it in inkscape to make an SVG. Then put that SVG in Orcaslicer and extruded it to be the thickness of the letters height. Printed it on my X1C. Then laid the 3d print over the letters and simply sprayed on rustoleum enamel.
An overdone process but the letters looked perfectly crisp. This was for a finicky customer so I knew I 100% could not freehand it with my shaky hands.
manwithtools
ALLIANCE MEMBER
A mild understatement if there ever was oneAn overdone process
Me, I would of cut the mask in my laser engraver, much simpler

ArcReactorKC
Well-known member
CorrectI enjoy overdone processes. I don't know much about the 3-D printer world and I just want to see if I understand. Are you making a mask that covers everything except the the tops of the letters?
ArcReactorKC
Well-known member
That is what I would do now with my CNC, it would be faster to cut it out of some thin balsa than print.A mild understatement if there ever was one
Me, I would of cut the mask in my laser engraver, much simpler
OP
grannyknot
Well-known member

thehorse13
Well-known member
Another trick is to smooth out the raised lettering during restoration. This will provide a perfect surface for using sponge dabbers or homemade variants of sponge dabbers.So I ended up using the daubing method, turned out ok, the problem is the cast letters are in cursive writing so not a lot of space between the letters and the casting is kind of rough.
Filing the tops of the letters helped.
freebirdwelds
Well-known member
This thread gave me some inspiration today. I'll wet sand and smooth it out in a couple of days and give them another coat. Plus I'll clean up the black. Paint color is Caterpillar #1973.


oldmachinenut
Well-known member

Not show quality but this is my Keller power hacksaw. I sanded the letters and direction arrow flat/smooth before painting the body. I then painted the raised sections with an artists brush.
senlow
Well-known member
That's a beautiful saw!
Tostal
Well-known member
Here's a similar method (with picturesI've had good results with a blue Scotts paper towel folded multiple times & using the dab method.
) :-Painting Raised Letters Pictorial
"Back From The Archives" I get asked a lot what's the best way to paint raised letters? There are as many different ways to do it as there are old machines .... I have used an artist brush, made a stamp out of cork, used a sponge, paint marker, etc. but this is what I've found gives me the best r...
 thepatriotwoodworker.com
Tostal
Well-known member
Maybe a pinstriping tool could be used? :-
 www.beugler.com
Beugler Pinstriping Tool for lining and pinstriping with paint
Beugler Pinstriping Tool for lining and pinstriping with paint, lining with paint, pinstriper, Buegler, Pinstripe it yourself, DIY pinstriping, stripe with paint
PugetDude
ALLIANCE MEMBER
Best suggestion for daubing/painting raised letters was in the Vise Thread.
Cigarette ****, filter end.
Now, if I just knew someone who still smokes.
Cigarette ****, filter end.
Now, if I just knew someone who still smokes.
Yea. And buying a pack is like $10. Harbor Freight should get into the cig and booze business.Best suggestion for daubing/painting raised letters was in the Vise Thread.
Cigarette ****, filter end.
Now, if I just knew someone who still smokes.
RTM
Well-known member
The bad news, if you are painting brown, there are still lots of used ones on the ground, almost anywhereBest suggestion for daubing/painting raised letters was in the Vise Thread.
Cigarette ****, filter end.
Now, if I just knew someone who still smokes.
Tostal
Well-known member
Best suggestion for daubing/painting raised letters was in the Vise Thread.
Cigarette ****, filter end.
Now, if I just knew someone who still smokes.
When I used to 'roll my own', I sometimes used to insert a new filter, these were available in any store that sold cigarette rolling papers, iirc the brand name was Rizla. So no need to touch any dirty butts...The bad news, if you are painting brown, there are still lots of used ones on the ground, almost anywhere