To avoid these ads, REGISTER NOW!

What did you do "IN" your garage today?

tarmy

Well-known member
Joined
May 28, 2014
Messages
4,707
Location
Nor Cal
@tarmy, our 1962 Rambler Classic 400 wagon came with an aluminum block and cast iron overhead valve cylinder head. It was one of the first cars to come with a dual-circuit master cylinder. My father appreciated that feature because we lost the brakes on our 1953 Oldsmobile 98 on the Alaska (ALCAN) highway coming down a mountain. Fortunately the 15-foot travel trailer had electric brakes so we made in the 105 miles to the next gas station. Mechanic fixed the severed brake line in under an hour -- not his first rodeo.
Your response brings back memories long buried in my brain.

We took a 57’ Fairlane with a 15‘ travel trailer up the Alcan as well (Three times!). We were in Dawson Creek for a few days rigging up a rock shield of chicken wire and pipe to try to save the windshield and trailer front back when that was all gravel. As you note…things like hot food and gas stations were far apart and few.
 
To avoid these ads, REGISTER NOW!

cannuck

Well-known member
Joined
Nov 30, 2021
Messages
4,657
Location
Rural SK
I remember some of the buicks had an aluminum v6, they were junk.
They were as Wrench pointed out a V8 that was as far from "junk" as an engine could be. GM did not have the experience in aluminum casting and suffered too high a reject rate, so sold the design and tooling to Rover - and that engine became the "SBC" of the UK and one of the greatest engines around. The GM (i.e. BOP) design had 2 cylinders cut off and became the 3.8 90 degree V6 that was arguably the best engine ever produced by GM (in terms of reliability, durability and flexibility of use). BTW; some of the later/better 3.8 front parts are used to update 215s by directly bolting in place.

I may be a die hard VW guy, but I have a 215 with 300 heads (oh - the 215 was sold but also became an iron block V8) patiently awaiting to get into my MGB.
 
Last edited:

KwikFab

Well-known member
Joined
Jul 27, 2024
Messages
1,217
Location
Central Valley, CA
Beautiful weather had me motivated, so knocked out 6 sets

20241102_122125.jpg

Calling it a day, so I'll weld the nuts tomorrow and they'll be done.

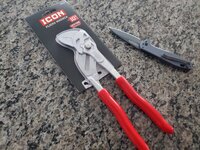
Also got myself a tool yesterday, little small something after spending several hundred on upgrading the kids seat and stroller 🤣

20241101_155130.jpg

The baby seat I sold within half hour, it was never used. And the Doona on the far right was stupidly convenient...had me spoiled as hell.

20241101_165040.jpg

But, kids grow and my lil dude is getting older (close to 2)
 

no704

Well-known member
Joined
Apr 27, 2016
Messages
5,229
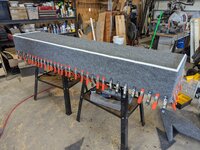
Worked on the ramps I built a few months ago for oil changes. While they have been very useful - the usual scenario is that I'm guiding them on while my wife or one of the kids are driving. It can be tricky to get up them without going over - to their credit they have not overshot them yet - but better safe than sorry. So I'm trying to make them easier to climb and harder to overshoot.
Took the belt sander to the bottom board - gave it more of a curve rather than a 45. Will hit the upper board also but the rain moved in so not today. To help with the second step I wanted to add another 3/4" step so it would be easier to roll up. Problem is I have 4 different cars with wildly different tire sizes so I wasn't sure where it needed to start. Also, I like the fact that currently the ramps nestle together so they are only 6 inches thick and no longer than one ramp. Adding an interim step was going to kill that. So I decided to make it removable and adjustable. I plan to add an adjustable and removable backstop as well. The adjustable part probably won't really matter in the end but it wasn't that much more work since they are removable - just a few extra holes to drill.Ramps 2.jpg
Add another chunk of wood at the top end for a wheel stop.
 

Outlawmws

Well-known member
Joined
Aug 9, 2011
Messages
39,321
Location
The Badlands
My Dad had the 1960 Rambler "Rebel" Wagon - V8 and push button auto. My mom learned to drive in it, then had to learn a Simca stick shift...

I never did like that wagon as the seats ahd clear plastic covers to protect the upholstery, adn in the sun it would get so hot you could not sit on it.
 

rcktpwrd

Well-known member
Joined
Mar 5, 2008
Messages
1,101
Location
Raleigh, NC
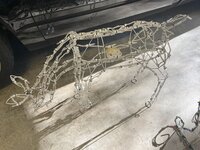
Some work on Christmas display stuff, deer and a sleigh got some PVC pipe feet.

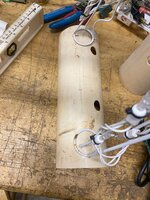
A few years ago we picked up some surplus drainage pipe and I cut it into approximately foot long sections.
IMG_8170.jpg

Then I split them in half to attach to the deer
IMG_8171.jpg

IMG_8169.jpg
I have a bunch of toggle bolts and used them to secure the new feet to the deer, sometime I use zipties, just depends what is handy
IMG_8173.jpg

This gives the deer a much more stable base and also a nice place to use ground anchors as well, it also gets the metal deer off the ground to help reduce GFCI trips.
 

Attachments

  • IMG_8172.jpg
    IMG_8172.jpg
    980.1 KB · Views: 9

ogdawg

Well-known member
Joined
Nov 11, 2009
Messages
74
Location
Jackson County GA
Worked on adding more framing and slatwall. Trying to get everything in place as most storage and workbench plans will be against the wall.
Also hauled a bunch of I joists up the driveway for framing the floor of the upstairs office. Were on sale from Home Depot for 75% off so went ahead and bought them ahead of schedule. IMG_2757.jpegIMG_2758.jpegIMG_2756.jpeg
 

DGersic

Well-known member
Joined
Mar 12, 2017
Messages
6,372
Location
DeKalb, IL
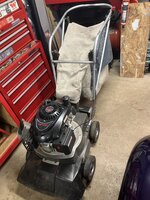
Spent the day on yard cleanup. Overall, my new handle works well and I’m happy with it. But, of course, there’s a problem. The left side brace is interfering with the fabric over the bag air exit, reducing airflow, so it doesn’t “****” as much as it should.

IMG_6162.jpeg

I’m debating how to fix this. Probably I’ll remove or at least cut down the fabric cover. That’ll make the thing blow more dust out, but it already blows out enough dust to require a respirator and goggles, so I don’t think more is going to be really any worse.
 

Old Man Roger

Well-known member
Joined
Apr 6, 2017
Messages
17,812
Location
Palm Coast Florida
Buick 215ci v8 introduced in 1961 ran til 63 in Buick, Pontiac and Olds(Skylark, Tempest, F85) GM later sold the tooling and design to Rover...................

They were as Wrench pointed out a V8 that was as far from "junk" as an engine could be. GM did not have the experience in aluminum casting and suffered too high a reject rate, so sold the design and tooling to Rover - and that engine became the "SBC" of the UK and one of the greatest engines around. The GM (i.e. BOP) design had 2 cylinders cut off and became the 3.8 90 degree V6 that was arguably the best engine ever produced by GM (in terms of reliability, durability and flexibility of use). BTW; some of the later/better 3.8 front parts are used to update 215s by directly bolting in place.

I may be a die hard VW guy, but I have a 215 with 300 heads (oh - the 215 was sold but also became an iron block V8) patiently awaiting to get into my MGB.
Could have sworn there was an aluminum v6 that had overheating issues?
 

Wrench97

Well-known member
Joined
Jun 23, 2018
Messages
12,154
Location
Southeastern Pa
I think it was the 215 that had the over heat issues, the early odd fire v6 was all cast iron.

Edit

The 215 had corrosion issues due the general trend back then of mixing A/Freeze with tap water or straight tap water which caused accelerated corrosion in the block.
 
Last edited:

rcktpwrd

Well-known member
Joined
Mar 5, 2008
Messages
1,101
Location
Raleigh, NC
Had an idea on how to hold up our new mini tree wire frames, so I went out to the garage and whipped this up. Drilled a 5/16 hole through the pipes to let the legs slide through both pieces and a couple spring clamps to test it out.

IMG_8175.jpg


If it doesn't work in the yard, it will at least make wrapping the lights a bit easier...
 
To avoid these ads, REGISTER NOW!

kbeefy

Well-known member
Joined
Sep 14, 2013
Messages
3,456
Location
Harington, Eastern Washington
More work on campervan...

Finished the lift on the front

20241102_135240.jpg

On to the back. Good god these springs are heavy... I have lost alot of strength in the past 20 years

20241102_160440.jpg

I may have hurt myself a little with the first one. I worked smarter on the second one and suffered no additional damage.

20241102_172551.jpg

Just took this picture because I might not ever see these shocks again...

20241102_172600.jpg
 

GrayFlattop

Well-known member
Joined
Jan 18, 2018
Messages
1,051
Location
Chicago
Took apart the heat exchanger from the old boiler to see if there was much metal to take to the scrap yard. I thought there was about 120# of 304 stainless, but it ended up around 70# of SS, a few pounds of insulation and about 45# of copper & bronze. I need to pull together the rest of the copper scrap I have so I can shop two of the local scrap yards for the best price.

Put a new battery in the Sienna - 38 out this morning and that was enough to kill it. 4 years old - it was time.
 

rharman

Well-known member
Joined
Apr 22, 2012
Messages
8,900
Location
SoCal
Gathered tools. Ran the compressor. Dropped tools on the bench. Turned the compressor off.

I'm glad you said something. I forgot to turn mine off

I have a paddle switch with an integrated outlet for mine at about head height on the wall next to the man door. Still easy to forget. Sitting on my bench right now is a lighted plug to install on the existing cord to the compressor. That should help remind me.
 

niget2002

Well-known member
Joined
Oct 2, 2012
Messages
11,231
Location
Josephine, TX
I have a paddle switch with an integrated outlet for mine at about head height on the wall next to the man door. Still easy to forget. Sitting on my bench right now is a lighted plug to install on the existing cord to the compressor. That should help remind me.
My plan is to get a pool pump timer. Set it to always turn off at 10pm. So if I forget, it will turn itself off.
 

Bob Heine

ALLIANCE MEMBER
Joined
Oct 24, 2009
Messages
10,708
Location
Boca Raton, Florida
Your response brings back memories long buried in my brain.

We took a 57’ Fairlane with a 15‘ travel trailer up the Alcan as well (Three times!). We were in Dawson Creek for a few days rigging up a rock shield of chicken wire and pipe to try to save the windshield and trailer front back when that was all gravel. As you note…things like hot food and gas stations were far apart and few.
@tarmy, we started out with a bug/pebble screen and after losing a headlight to a rock dad put plastic bubbles over the headlights. This photo of a stop early on the trip shows gumbo mud sticking to our feet. For the next hour or so we dug the mud out of the trailer's wheel wells. When the trailer started fishtailing we thought it was trailer brake failure. We made about four stops that day to clear the wheel wells. The buildup on the Olds was bad but didn't fill the wheel wells enough to stop the tires from turning.
1957 Gumbo Mud 800.jpg
On the way home we stopped in Dawson Creek for a week to replace the hydraulic lifters in the Rocket V8. The job took a half day but the parts delivery truck from Seattle took about four days. We set up camp in the repair shop parking lot (no water or electric but four scissor jacks kept the trailer nice and level).
 

ATC

Well-known member
Joined
May 12, 2012
Messages
8,341
Location
VA
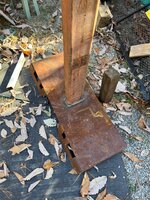
Started on my gin pole project.
3/8” 2x6 tube, beveled the edge and cranked up the Miller 180. Laid a good root pass then two caps. I still have to make gussets for it and put the hook on the end. It’s 8’ long.

And yes, that’s my welding area :cry:


thumbnail_IMG_2693.jpg
 
Last edited:

PhantomEB

Well-known member
Joined
Feb 6, 2006
Messages
6,817
Location
Medicine Hat, AB, Canuckistan
I've never seen chainsaws hanging for storage. Are they drained of fluids? I'd be worried about leaks.
If any, they are small leaks.

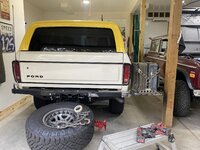
been cleaning the rest up so my time off for recovery will actually be spent working on projects such as the bronco.

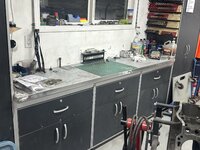
wanted my main bench to be clean for diagrams etc not to mention any honey dos or small projects from the house come about on there.
15B5C198-5BFC-4BAC-80EE-3566CF5D5552.jpeg

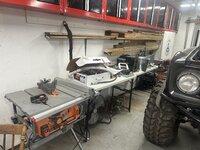
Put the tables out from my cargo trailer into the garage to place all my parts on to. I intend to pick a part up and not put it back. It must go on to the bronco that day.

261620AB-C8A0-470D-9A68-1A6576AC7511.jpeg
The table saw got brought over from my moms garage as I trying to get it clean to shut my sister up about anything on the floor over there. All that’s left is bronco doors and a hood. Wood will be stockpiled as I got a few projects in the works for the front of the house which will really update the curb appeal.
 

TurnipTruck

Well-known member
Joined
Aug 28, 2005
Messages
1,582
Location
Southcentral Alaska
Today, I am recovering from plowing/shoveling/blowing the 10”of mashed potato consistency inaugural snow dump we just got.

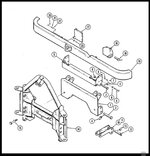
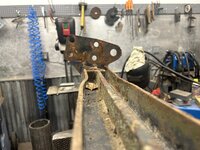
As a change of pace, I started assessing some of my new-to-me Unimog parts. This particular twisted front bumper is part of the Schmidt European implement connection system for snowplows primarily, but snowblowers/augers/pumps/manlifts/dozer blades/etc, too.
This one was pretty badly bent, squeezed and twisted, probably from a heavy chain yank getting the Mog unstuck years ago. I got it a little cheaper because of the damage to mostly use as a pattern to fabricate a good one, but if I can save it, great!

Part number Five is the part in question:
IMG_0836.jpeg


Flattening the webs to try to straighten:
IMG_4939.jpeg
IMG_4940.jpeg


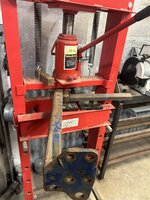
This twist will need bigger tools than I have here.IMG_4937.jpegI plan to take it to work and chuck it into a bolted-down 500-lb vise and see if a 48” pipe wrench hung from the overhead 50-ton crane will do something. Hopefully I can do it cold, or a weedburner at most.
 

kaymccampbell

Well-known member
Joined
Feb 27, 2015
Messages
29,608
Location
Upstate New York
I have a paddle switch with an integrated outlet for mine at about head height on the wall next to the man door. Still easy to forget. Sitting on my bench right now is a lighted plug to install on the existing cord to the compressor. That should help remind me.
Wish it were that easy for mine. The best I could do was stick a big single breaker at eye level in the hall between the two shops. And sometimes my eyes just dance by it.

However, thinking about your lighted plug have me an idea to have some coil driven devices that would only show their presence when the different machines were energized. Then I could present a status board right near the shop doors. Lots to think about.
 

Dixie_Flatline

Well-known member
Joined
Oct 30, 2024
Messages
387
Location
Tennessee
I built myself a simple workbench, then was able to use my miter saw on an appropriate surface for the first time! Feel free to laugh, but that one thing almost made my entire day. Been squatting down cutting on the floor, or using a tailgate, or some wobbly surface laid atop sawhorses for so long that it was like using the machine again for the first time. The second project was to build a stand for my benchtop drill press, so it is not taking up space on the friggin bench like it has been. I have had this piece of Ikea table top tucked away in the corner for a long time, now its serving a higher purpose and is no longer cluttering up the place. I will probably add to my box of wood scraps today and have myself a fire this evening. This is just part of a long overdue cleanup and organization of my shed, the progress I make on it each day just doesn't feel like enough, but I am sure eventually I will reach the finish line and it will all have been worth it!
 
To avoid these ads, REGISTER NOW!
Top Bottom