
You are using an out of date browser. It may not display this or other websites correctly.
You should upgrade or use an alternative browser.
You should upgrade or use an alternative browser.
Between 485 & 705 SQ/FT Jar944's 3car cabinet shop.
- Thread starter jar944
- Start date
Workspaces between 485 and 705 squarefeet.
jollygreengiant
Well-known member
Congrats on the future addition! You most definitely will have a lot less time for projects going forward, but the tradeoff is worth it lol.
Maybe it's a good thing that bedroom coffee bar isn't done yet. It's not to late to redesign it as a baby changing/dressing/bathing station lol.
Maybe it's a good thing that bedroom coffee bar isn't done yet. It's not to late to redesign it as a baby changing/dressing/bathing station lol.
tj675
Well-known member
Congrats! and as always beautiful work! Let me know if you are ready to part with a sliding shaper.
casmurbax
Well-known member
Congratulations on the new addition.
Nice cabinet
Nice cabinet
Well congratulations! Life as you knew it will cease to exist.
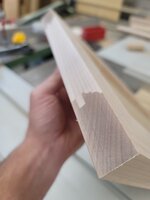
And I learned something new. I had no idea there were inserted router bits. Care to share a manufacturer? Please


Thanks.
The insert bits I use most are amana and cmt.
The one shown above is an amana RC-49492 1/16" radius round over.
The other I use the most is a straight bit 50mm cutting length 3/4 diameter cmt 652.691.11b
Looking currently and they seem to have gone up 100% in price since I bought them 5~ years ago
Seconded.
Congrats fella.
Beautiful work.
Ha, the need for a bedroom coffee machine becomes apparent.
Steve️
Thanks, yeah I expect we will need all the coffee available.
Congrats on the upcoming family addition!
The most relevant tip I've got is get a cheap pack and play for the shop. Nap time in the shop is a great way to give Mom a break and let you have some "quiet" shop time for thinking, drawing future projects, cleaning and putting away.
Thanks I hadn't ever considered that. I'll add it to my list.
Thank you. I've already been thinking about future projects together.Congrats on the future apprentice!
Thanks and thanks.
Congrats! As already said above, now the coffee bar makes more sense.
Also interested in that router bit.
Thanks.
And a link to the bit

Amana Tool RC-49492 In-Tech Insert Corner Round 1/16 Radius x 1-5/64 Inch D x 3/8 CH x 1/4 SHK Router Bit
Get industrial-grade technology at an affordable price with Amana Tool's in-Tech Series router bits. RC-49492 includes two insert knives for longer tool life.
 toolstoday.com
Congrats on the future addition! You most definitely will have a lot less time for projects going forward, but the tradeoff is worth it lol.
Maybe it's a good thing that bedroom coffee bar isn't done yet. It's not to late to redesign it as a baby changing/dressing/bathing station lol.
Thanks.
Lol yeah, baby bottles were actual reason my wife was wishing for a mini-fridge and microwave in the coffee bar. I already had a request for a changing table. Fortunately it's done.


Congrats! and as always beautiful work! Let me know if you are ready to part with a sliding shaper.
Thanks and thanks.
My wife would gladly part with one of my sliding shapers. I'm more on the fence about letting one go. I could use a bit more room though.
Congratulations on the new addition.
Nice cabinet
Thank you, and thanks.
Congrats! The sacrifices will be worth it!
Would you mind doing a beginners level walk thru of your finishing process on those cabinets?
Thanks.
As for finishing its relatively straightforward.
Everything gets sanded to 150 and all corners broken. Any obvious imperfections/holes/issues het filled with bondo glazing/spot putty.
Spray primer, fill and imperfections, sand, spot prime any filled areas, sand again. 180-220g in these steps
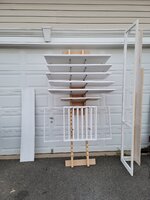

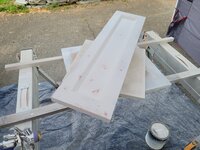
Wipe down/blow off and spray the 1st color coat. Knock down any nibs, spray 2nd color coat, if it's getting a 3rd coat repeat..


casmurbax
Well-known member
great finish
bugnut
ALLIANCE MEMBER
ptt49er
Well-known member
I agree!great finish
It's very apparent you have the process down! That finish looks great!
I'm sure you've covered most of this, but it's difficult to search inside a thread.
What are you spraying with? What nozzles, etc? What primer & finish are you spraying?
Slowly learning my way into the world of spraying finishes, it feels like a pretty step learning curve with lots of "black magic".
I agree!
It's very apparent you have the process down! That finish looks great!
I'm sure you've covered most of this, but it's difficult to search inside a thread.
What are you spraying with? What nozzles, etc? What primer & finish are you spraying?
Slowly learning my way into the world of spraying finishes, it feels like a pretty step learning curve with lots of "black magic".
I'm mostly using a fuji mimi mite 4 and 2qt remote pressure pot. I generally hate spraying with a cup attached to the gun (and you can see why in the video)


Nozzles are primarily 1.5 but depending on what I'm spraying I'll move between a 1.3 and 1.8. I will say 1.8 is really at the limit for a 4 stage turbine.
Finish wise it's mostly been lenmar ultralaq pre cat lacquer for light colors and clear finishes or duralaq lacquer for black/dark and the primer / undercoater is duralaq or BIN shellac if its not a lenmartop coat. I'll also spray bm advance (1.5) thinned 10% with water. Emerald doesn't like being sprayed with a turbine.
I can't recommend lenmar anymore because Benjamin Moore sold the lenmar paint line to Gemini coatings so finding it is all but impossible. I'm actually looking for a new line of paint. I spent a bit of time talking to the sw manager, but left frustrated because while they can order any of their commercial coating lines lacquer or conversion varnish (sherwood,kemvar,etc) they cant tint any of them.
I find that the turbine setup needs more retarder than a compressed air or airless setup because of the extra heat. I usually add a few % of retarder if I'm spraying lacquer in warmer than 65-70 degrees. If I don't it tends to dry spray and or orange peel when it's warm out That few % makes a huge difference in keeping a wet edge while running a reasonable nozzle size. The nice thing about lacquer is you can spray in 40 degree or 90 degree weather and adjust based on the amount of reducer vs retarder.

Attachments

ptt49er
Well-known member
Thanks, again, for taking the time to share you knowledge and experiences!
Pretty sure I'm going to need to upgrade my hazard fraught cheapo single stage HVLP system to get the finish I'm after on these cabinets.
I was able to get some tinted sher-wood kem aqua that I'm starting to mess with.
Pretty sure I'm going to need to upgrade my hazard fraught cheapo single stage HVLP system to get the finish I'm after on these cabinets.
I was able to get some tinted sher-wood kem aqua that I'm starting to mess with.
The router bits aren't that bad considering you get 4 sides to use on the inserts and the regular bit from Amana is $25. I'm glad I'm not the only one who prefers a 1/16 roundover bit on most things. My $9 Yonico is holding up okay but when it starts tearing out I will get the one you use.
They make spiral bits that have replaceable carbide inserts like this: https://spetools.com/products/speto...h-trim-top-bottom-pattern-template-router-bit
They make spiral bits that have replaceable carbide inserts like this: https://spetools.com/products/speto...h-trim-top-bottom-pattern-template-router-bit
cccoltsicehockey
Well-known member
The router bits aren't that bad considering you get 4 sides to use on the inserts and the regular bit from Amana is $25. I'm glad I'm not the only one who prefers a 1/16 roundover bit on most things. My $9 Yonico is holding up okay but when it starts tearing out I will get the one you use.
They make spiral bits that have replaceable carbide inserts like this: https://spetools.com/products/speto...h-trim-top-bottom-pattern-template-router-bit
I actually like a slightly smaller radius. If I could find a .5mm radius it would be perfect. I usually set the depth shallow and just knock the corner off.
I have the shaper version of that spiral router bit.


Here is a old video where im using it on some corbels. Try to ignore the rattle from that grizzly shaper.. it wasn't my best purchase.
Thanks, again, for taking the time to share you knowledge and experiences!
Pretty sure I'm going to need to upgrade my hazard fraught cheapo single stage HVLP system to get the finish I'm after on these cabinets.
I was able to get some tinted sher-wood kem aqua that I'm starting to mess with.
If I were to buy a turbine setup again I would have just gone with the 5 stage. It's not a huge difference but there are enough times when I was trying tonspray something other than lacquer where I wished I had more pressure for better atomization.
I'm considering trying kem aqua. I *think* the semi local SW can tint it. I'm just so used to solvent finished its hard to want to try something completely new.
ptt49er
Well-known member
The clean up was a dream.If I were to buy a turbine setup again I would have just gone with the 5 stage. It's not a huge difference but there are enough times when I was trying tonspray something other than lacquer where I wished I had more pressure for better atomization.
I'm considering trying kem aqua. I *think* the semi local SW can tint it. I'm just so used to solvent finished its hard to want to try something completely new.
Now if only I can get it to spray well, which I'm sure is more of the operator and less on the finish.
Congrats on the soon-to-be apprentice!
Second the comment on a cheap Pack N Play. They're great for younger kids (newborn to young toddler). Definitely recommend finding your local Buy Nothing / Freecycle groups (or equivalent) on social media. Got so much equipment for the kids for free, we saved tons not having to buy them!
Second the comment on a cheap Pack N Play. They're great for younger kids (newborn to young toddler). Definitely recommend finding your local Buy Nothing / Freecycle groups (or equivalent) on social media. Got so much equipment for the kids for free, we saved tons not having to buy them!
PugetDude
ALLIANCE MEMBER
Congratulations!
Boostingaz
Well-known member
Congrats on the soon-to-be apprentice!
Second the comment on a cheap Pack N Play. They're great for younger kids (newborn to young toddler). Definitely recommend finding your local Buy Nothing / Freecycle groups (or equivalent) on social media. Got so much equipment for the kids for free, we saved tons not having to buy them!
Agree. My wife got so much kid stuff off of the Buy Nothing page. Whenever they would outgrown the toys etc we would just put them right back on there.
Bob Heine
ALLIANCE MEMBER
First of all, congratulations on the upcoming new family member. It starts with just the two of you and before you know it there's a mob.We *will* have a coffee bar, it's just unused space currently..
It's an artifact of remodeling the master suite to curve out a laundry room and reworking the doorway. It left a space that we didn't have a use for (that was next to existing plumbing for a sink)
As for making it.. I may not make it. My wife just mentioned we should have planned for a beverage fridge and possibly a microwave.. (not kidding) also not happening.


I have the coffee bar, microwave and beverage fridge in the garage so I understand your reluctance to clutter the master suite. Perhaps something temporary in the laundry room that doesn't require a cabinet:
https://www.amazon.com/MicroChill-C...e-Package/dp/B0DHHL5VYW/?tag=atomicindus08-20
One of the best features of our current home is having the laundry room off the master suite. With just two of us, 90% of the linens and clothing are in the master suite already. The other 10% (my filthy garagio outfits) ferment in the garage until a full load collects. The words "full load" will soon have a new and different meaning for the two of you but won't involve a laundry like it did for us (before disposable diapers were an option).
Boostingaz
Well-known member
This is good for at least an hour and a half sometimes more of good garage time. Get some trucks/tractors etc and just let the kids go wild in your scraps. They love it. Keeps them entertained and also gets any stray scraps collected and in one location for easy disposal of when they are all done  .
.
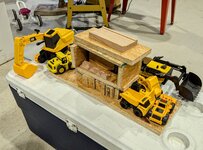
.Congrats on the little one. Can't say much more than what has already been said.
My kids liked to play with scraps when they were little.
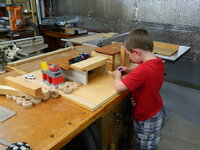 DSCN5688 by bjohnson388, on Flickr
You also have an excuse to make some wooden toys. I made a lot for about 2 years.
 DSCN5441 by bjohnson388, on Flickr
Toy Garage for their hot wheels.
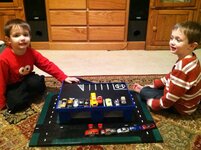 019 by bjohnson388, on Flickr
These 2 were my favorites.
 DSCN3146 by bjohnson388, on Flickr
Bret
My kids liked to play with scraps when they were little.
DSCN5688 by bjohnson388, on FlickrYou also have an excuse to make some wooden toys. I made a lot for about 2 years.
DSCN5441 by bjohnson388, on FlickrToy Garage for their hot wheels.
019 by bjohnson388, on FlickrThese 2 were my favorites.
DSCN3146 by bjohnson388, on FlickrBret
First of all, congratulations on the upcoming new family member. It starts with just the two of you and before you know it there's a mob.
I have the coffee bar, microwave and beverage fridge in the garage so I understand your reluctance to clutter the master suite. Perhaps something temporary in the laundry room that doesn't require a cabinet:
https://www.amazon.com/MicroChill-C...e-Package/dp/B0DHHL5VYW/?tag=atomicindus08-20
One of the best features of our current home is having the laundry room off the master suite. With just two of us, 90% of the linens and clothing are in the master suite already. The other 10% (my filthy garagio outfits) ferment in the garage until a full load collects. The words "full load" will soon have a new and different meaning for the two of you but won't involve a laundry like it did for us (before disposable diapers were an option).
Ha, I never considered a dorm fridge/microwave. I'll have to run that by my wife as a viable temporary option.
Moving the laundry upstairs was one of the better decisions we have made here. Its certainly more convenient.
I'm old enough to remember cloth diapers, but young enough for that to be a distant childhood memory

Congrats on the little one. Can't say much more than what has already been said.
My kids liked to play with scraps when they were little.
You also have an excuse to make some wooden toys. I made a lot for about 2 years.
Toy Garage for their hot wheels.
These 2 were my favorites.
Bret
As a kid my dad was a carpenter and grandfather was a GC/carpenter, I had what felt like unlimited scraps to build stuff with. I was just telling my wife the other day about remembering a dog house / hunting seat I built from plywood offcuts.
Actually as I'm typing this I remember building "cat house" from scrap 2x4s it had a shingle roof, and a door that locked from the outside. Fortunately I don't think any cats were harmed.
I had a bunch of maple offcuts from the latest cabinets. I was thinking about cutting them to a standard length and rounding the edges for some "building blocks"
You have some time still, but this is a great project to make when they start helping in the kitchen. We got some good use out of that and now it's in my brother's house until he no longer needs it.
You have some time still, but this is a great project to make when they start helping in the kitchen. We got some good use out of that and now it's in my brother's house until he no longer needs it.
I just stood on a chair when I was cooking as a kid, but that looks better.


PugetDude
ALLIANCE MEMBER
One of the better garage sale finds I've come across.
I found a usable screwdriver once.

We tried cloth bottoms with washable inserts. That didn't last longI'm old enough to remember cloth diapers, but young enough for that to be a distant childhood memory
Actually as I'm typing this I remember building "cat house" from scrap 2x4s it had a shingle roof, and a door that locked from the outside. Fortunately I don't think any cats were harmed.


When your wife wants it done last week and you've been saying I'll get to it for the last 4-5 years. She hires the Amish cabinetmaker you know.
52" wide nightstands. I drew up the full scale drawing so there wouldn't be any issues. Interesting to see what we do differently.
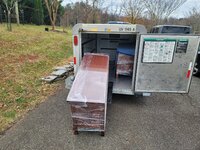


52" wide nightstands. I drew up the full scale drawing so there wouldn't be any issues. Interesting to see what we do differently.
casmurbax
Well-known member
I be interested in knowing how you would have done different making them.
Finallygotit
ALLIANCE MEMBER
Nice work! 
rabakoe
Well-known member
PugetDude
ALLIANCE MEMBER
Use electricity?Interesting to see what we do differently.

You might as well order the shirt: https://www.dudedad.com/collections/t-couple-more-days/products/couple-more-days-construction-grey
I be interested in knowing how you would have done different making them.
It's mostly just small differences.
Had him build this at the same time (I argued against this but lost)
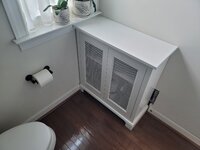
Slightly larger roundover on the doors/frames.
Top/bottom of the cabinet overlaps the sides (I do the opposite)
Sides are recessed 1/2-3/4 back from the face frame opening. I usually set them 1/8" back.
Full length door stop inside at the top of the opening with bumpers and fast cap stops on the bottom. I usually just put the fast cap bumpers on the top and nothing on the bottom. I actually like his way and the top bumpers on the hard stop solve the issue of the door rubbing at the hinges if it's all one depth so basically I'm stealing this..

Dovetail Drawers are pin nailed (I never considered doing that, it's 100% hidden and you can pull them out of the clamps faster. And the bottoms ate stapled in the groove. I glue mine in.


Drawer slides are mounted to the face and back panel, I usually block out the sides and mount them there. He also has hard stops (with bumpers) for the drawers. I've never bothered to do that and just let the blum slides function as the stop.
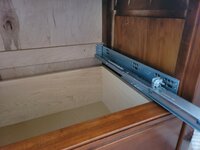
He does stopped rebates for the back panel and I'm usually lazy and do through rebates.
Nothing significant just little things.