To avoid these ads, REGISTER NOW!

VISE REPAIR 101 all vise repairs, lubricants, sources for parts and the tricks to fix

Dreppan

Member
Joined
Dec 15, 2021
Messages
23
Just guessing here but it is probably missing a cylinder with a chamfered end that would be the diameter of the large hole. As you tighten a bolt into the threaded hole it would pull the chamfer of the cylinder against the rotating part of the vise and lock it. I've probably explained that very badly ... it's similar to some bench drill quill locks.
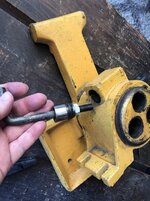
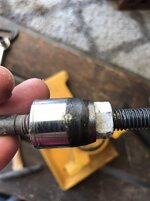
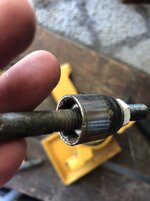
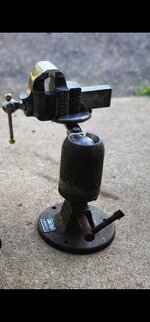
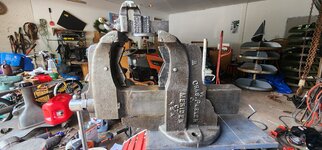
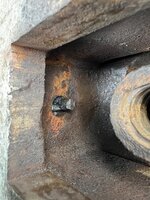
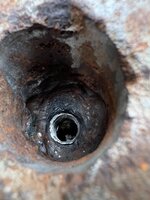
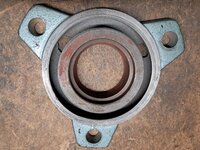
I also bought a Wilton Patternmaker Vise and took pictures of its disassembly - posting images of the rotation lock handle here. Is this a part that would have to be custom-made to replace or is it used on another vise?Rotation_Lock_v1.jpgRotation_Lock_v2.jpgRotation_Lock_v3.jpgRotation_Lock_v4.jpg
 
To avoid these ads, REGISTER NOW!

RTM

Well-known member
Joined
May 13, 2019
Messages
13,257
Location
SF Bay Area
Is this a part that would have to be custom-made to replace
I've never seen it in all 0 of the Wilton vises I've pulled apart, and the dozens I've seen apart here.

Parts for that vise are hard to find, even the parts lists are difficult to find .
 

Dreppan

Member
Joined
Dec 15, 2021
Messages
23
I stumbled upon a possible fix; the carriage lock from my Shopsmith 10er fits both threads and the stopper hole. All it needs is a tapered head all around, not just a wedge.


thumbnail_IMG_8111.jpg
 

Dreppan

Member
Joined
Dec 15, 2021
Messages
23
@Outlawmws - spot on! @454ragtop thanks, this is all fairly new for me. Upon closer inspection of the rotation lock handle, it looks modified. You can see on the pictures the stopping head is a ratchet socket sandwiched between two nuts.
 

RTM

Well-known member
Joined
May 13, 2019
Messages
13,257
Location
SF Bay Area
Here is a link to a post I added to the Drill Press Vise thread on the General side. The vise had a previous repair that might help someone in the future. I just rehabbed the vise, didn't know about the repair prior, so can't take credit for it.


Joined
Aug 18, 2024
Messages
3
Next is the technique of shaping the weld, yes it is much easier if you have a machine shop to work with. Having a surface grinder speeds up the process and gives a more precision fit but that does not say you can not blend welds with a file and carbide burrs. For a surface grinder I indicate in the jaw face, and in a couple of minutes the weld is ground off flat and easly finished with a hand stone. If you have to do it with a file then I like to super glue a SS shim stock (.003) so if you miss a little with the file it will not damage the jaw face. Even filing along the shim stock and use the shim stock as a wear/guide surface to ride your file or stone will give you a nice flat finished surface. I like using diamond files. When done pull the shim stock off and finish the .003 material that is left with a stone quenched in lamp oil of a fine oil that is similiar.

The weld on the under sides are a little tougher, I like using a small carbide burr in my flex handle Dremel, here you have to get real comfortable, and grind a little at a time, work on the repair at different angles. I like to push the burr. Take your time, the biggest problem you will have is the burr catching and rolling around the vise where you do not want to touch. I keep getting comfortable and rotating the work. This will take time to master.

I finish with polishing stones you can buy on e-bay, the stones are like sanding paper, each one is a different grit and bond, but do not worry about getting to picky, You can purchase a handfull of different assortments on e-bay cheap. Keep the stones in a oil bath, like I mentioned I like Lamp Oil. Shape the stone with a bench grinder and finish the polishing/blending of the weld by hand. The secret is to take your time. Good luck.
The jaws are installed and the sides ground flat. I own one of these vises and will be finishing mine when I get more time. I am happy with this repair.
1000011400.jpg
 
Joined
Aug 18, 2024
Messages
3
I just finished repairing and installing new jaws on this Chas Parker #0 2-1/4 jaw width vise. Pat. dates are on one side June 20 1854 and the other side says December 10 1867. I had to fill in damage area and I chose welding. There are many different ways to repair this vise, I chose to do it this way, maybe someone might see a answer to a issue on their own vise. One note, I was real nervous striking the first arc but settled down quickly after seeing how the cast flowed.

The vise had what looks like grind marks that removed a big chunk of the jaw support on the Static and Dynamic jaw support. The customer asked for a new set of jaws but also mentioned if I had a way to fill in the voids then please give it a try, treat it like it is yours he mentioned.

I chose to use Inconal as the filler rod and applying it with my TIG welder. I like using Inconal because it sticks pretty good and ends up a soft weld where a file will cut and shape it easy. What I do not like is the dull color you get from Inconal after shaping the weld. I set the weld currant as low as I can ( currant set to some where around 20 amps) so the Inconal filler metal not only fuses with the vise base metal but also lays on top so not to cause sink at the weld line. I had plenty of practice with this while repairing injection molds. Any one that TIG welds can repair vises like this. The heat settings are the trick along with the angle of the heat source and the way you apply the filler rod.
Do you know when these where made??
 

Mr. Wonderful

Well-known member
Joined
Jan 15, 2018
Messages
1,781
Location
Pacific Northwest
If I could get a GJ collective fingers crossed for this Reed 406 stuck pin I’d be eternally grateful! The drive nut is way frozen in place so pushing from the bottom isn’t an option. This is the only other option I saw. Whatever is in the pin hole isn’t the remnant of the original pin. It’s off center but from the top it’s entirely filled in about 1/2” down and very hard metal. I’m hoping it wasn’t just something jammed in then welded on top of. I drilled and threaded the center of the blockage and I’m going to try to use a bolt to pull it out with some washers underneath. Confidence is not high. Here goes nothing……IMG_1721.jpegIMG_1720.jpeg
 

Shiftless

Well-known member
Joined
Mar 9, 2014
Messages
14,594
Location
East Bay SFO
Good luck.
I‘ll never forget the fight I had with the same model vise…Reed 406…removing the stuck pin. I drilled and tapped the old pin and used a grade 8 bolt for a puller. I used a 24 inch breaker bar.
It let go with a loud pop. GJ member JZiggy was a big help. Thanks again to him.

edit: RTM has a good point. I used a hex head bolt.
 

Mr. Wonderful

Well-known member
Joined
Jan 15, 2018
Messages
1,781
Location
Pacific Northwest
Maybe switch to a hex head bolt instead of Allen head? Give you more bite on the fastener.

Good luck.
I‘ll never forget the fight I had with the same model vise…Reed 406…removing the stuck pin. I drilled and tapped the old pin and used a grade 8 bolt for a puller. I used a 24 inch breaker bar.
It let go with a loud pop. GJ member JZiggy was a big help. Thanks again to him.

edit: RTM has a good point. I used a hex head bolt.
Ok I’m cleaning out the unobstructed portion of the hole. I think I’m going up to the next size bigger bolt. I’m pretty sure that’s weld in there though. I’ll definitely use a hex head too.IMG_1722.jpeg
 
To avoid these ads, REGISTER NOW!

paulsomlo

Well-known member
Joined
Jul 16, 2013
Messages
3,913
Location
Northern Colorado
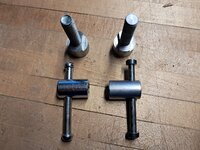
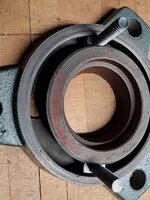
This is an import vise that belongs to a friend, most likely an Alltrade. The hold down for the swivel base consists of a hex bolt up through the bottom, engaging with the usual female threaded cylinder w/cross handle. The original hold down hardware is apparently lost and the hex bolt spins in the base. I volunteered to make a replacement that works - can anyone tell me why the base has three holes on the bottom, with two round and one square? I understand that the original hardware was probably a square with a raised radiused section that was captured in the circular slot of the base - but why the other two round holes?
 

Attachments

  • attachment_1.jpeg
    attachment_1.jpeg
    358.4 KB · Views: 39
  • attachment_2.jpeg
    attachment_2.jpeg
    415.1 KB · Views: 35

454ragtop

Well-known member
Joined
Mar 24, 2008
Messages
5,011
Location
Carver, MA
^ No idea why, but that's a pretty common arrangement. Might try a carriage bolt for the swivel lock bolt, that seems pretty common also.
 

Provincial

Well-known member
Joined
Sep 21, 2011
Messages
6,874
Location
Near Salem, OR
Does the bottom of the vise body have any threaded holes that match the radius of the slot in the base?

It looks like a square-headed bolt was used for the lock. That would fit through the square hole and provide contact with the slot to keep it from turning when tightened. Not very strong, but a common design feature on imports.
 

paulsomlo

Well-known member
Joined
Jul 16, 2013
Messages
3,913
Location
Northern Colorado
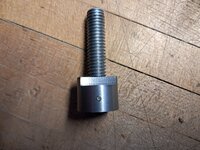
Here's what I came up with, shown with the original (remaining) locking handle - mostly straightforward, other than having to mount the workpiece to a faceplate, in order to turn the radii to match the slot in the base:
 

Attachments

  • attachment_1.jpeg
    attachment_1.jpeg
    357.4 KB · Views: 22
  • attachment_2.jpeg
    attachment_2.jpeg
    243.1 KB · Views: 21
  • attachment (7).jpeg
    attachment (7).jpeg
    336.1 KB · Views: 47

paulsomlo

Well-known member
Joined
Jul 16, 2013
Messages
3,913
Location
Northern Colorado
Even though this poor excuse for a vise isn't mine, I found the floppy handle incredibly annoying. On my Wiltons, I drill and tap the hub, and insert a brass slug, spring, and setscrew. But on this Alltrade, they drilled the hole for the handle very close to the end of the hub, which made the use of an off the shelf setscrew difficult. To save space, I made a hollow setscrew, so that I could nest the spring and most of the brass slug inside it. The threads are 5/16-24, the tpi to get fine adjustment if necessary, and the diameter to accommodate the internal spring. From an aesthetic standpoint, I'm not entirely happy with the machine work on the setscrew, but the owner won't notice or care.
 

Attachments

  • attachment_2.jpeg
    attachment_2.jpeg
    247.1 KB · Views: 36
  • attachment_1.jpeg
    attachment_1.jpeg
    119.2 KB · Views: 44

WatchHobby

Member
Joined
Dec 3, 2024
Messages
17
Sloppy Handle Fixup

First post ever. I'm trying to get an old Reed 204 1/2 tuned up. It's in superb shape other than the main handle has wallered out the hole in the screw ball, so the handle flops arounda ton. There is hardly any backlash in the jaw but you have to flop the handle 30 degrees before it turns due to the hole. Mine has pinned handle end balls so I was thinking I can pull the handle out, build up inside the hole with some mig weld on both sides, then shape it back to a proper size ID with a round file, blue and oil. I thought about replacing with a thicker handle round bar but this one is straight and really nice so I prefer to keep it. Any reason not to try this? Any other ideas?
 

Attachments

  • 20241204_131407_crop.jpg
    20241204_131407_crop.jpg
    518.8 KB · Views: 23

WatchHobby

Member
Joined
Dec 3, 2024
Messages
17
Sloppy Handle Fixup

First post ever. I'm trying to get an old Reed 204 1/2 tuned up. It's in superb shape other than the main handle has wallered out the hole in the screw ball, so the handle flops arounda ton. There is hardly any backlash in the jaw but you have to flop the handle 30 degrees before it turns due to the hole. Mine has pinned handle end balls so I was thinking I can pull the handle out, build up inside the hole with some mig weld on both sides, then shape it back to a proper size ID with a round file, blue and oil. I thought about replacing with a thicker handle round bar but this one is straight and really nice so I prefer to keep it. Any reason not to try this? Any other ideas?
(Hold for after post)
 

Outlawmws

Well-known member
Joined
Aug 9, 2011
Messages
39,331
Location
The Badlands

Rinspeed

Well-known member
Joined
Apr 26, 2020
Messages
1,836
Location
NY
I was going to suggest a bushing as well, seems it would be lot easier than welding it up.
 

WatchHobby

Member
Joined
Dec 3, 2024
Messages
17
Problem is I have plenty of ability to weld it but little ability to drill it. I have a large drill press but no mill. I do have 2 large presses for a sleeve but not sure if drilling would work. The welding seems easy. I'm going to stare at it for another hour and think about it. There's a machine shop nearby maybe I get them to bore it out.
 

Firstram

Well-known member
Joined
May 16, 2017
Messages
1,393
Problem is I have plenty of ability to weld it but little ability to drill it. I have a large drill press but no mill. I do have 2 large presses for a sleeve but not sure if drilling would work. The welding seems easy. I'm going to stare at it for another hour and think about it. There's a machine shop nearby maybe I get them to bore it out.
You could true the hole up with a Bridge Ream in your drill press. the price of an import or used would probably be less than a machine shop!
 

WatchHobby

Member
Joined
Dec 3, 2024
Messages
17
Parker Saddle Bolt Size?

Anyone know the size / threads for the saddle bolt on a C Parker No 23? I'd look myself but the vise is not here yet. Looks like the same saddle used on most of the models.
 

paulsomlo

Well-known member
Joined
Jul 16, 2013
Messages
3,913
Location
Northern Colorado
Sloppy Handle Fixup

First post ever. I'm trying to get an old Reed 204 1/2 tuned up. It's in superb shape other than the main handle has wallered out the hole in the screw ball, so the handle flops arounda ton. There is hardly any backlash in the jaw but you have to flop the handle 30 degrees before it turns due to the hole. Mine has pinned handle end balls so I was thinking I can pull the handle out, build up inside the hole with some mig weld on both sides, then shape it back to a proper size ID with a round file, blue and oil. I thought about replacing with a thicker handle round bar but this one is straight and really nice so I prefer to keep it. Any reason not to try this? Any other ideas?
Fill the hole with babbit or JB Weld, then drill? Or babbit/JB Weld poured around a cylindrical form that has a release agent on it? Not the way I would do it, but those may be options. Really, the right solution involves machining - and if you get involved with machine shops, you'll spend far more than that vise is worth. At this point, you either need a friend with a mill/lathe or you need to part ways with the original handle. Mig welding may very well work, if the weld is soft enough to easily drill. Filling the entire hole may be best from the standpoint of getting a drill started on center - fixturing on the drill press may be a bit challenging.
 

WatchHobby

Member
Joined
Dec 3, 2024
Messages
17
Fill the hole with babbit or JB Weld, then drill? Or babbit/JB Weld poured around a cylindrical form that has a release agent on it? Not the way I would do it, but those may be options. Really, the right solution involves machining - and if you get involved with machine shops, you'll spend far more than that vise is worth. At this point, you either need a friend with a mill/lathe or you need to part ways with the original handle. Mig welding may very well work, if the weld is soft enough to easily drill. Filling the entire hole may be best from the standpoint of getting a drill started on center - fixturing on the drill press may be a bit challenging.
I think I'm going to weld up some fill around the hole on both sides. Not all the way through the shaft but around the outer part. Yes the weld will be super hard, but I can maybe use the suggested reamer or just die grind it. If that all turns out like **** then at least it'll be no worse than it is now, and I can always die grind all the weld off as if it never happened lol.
 

Outlawmws

Well-known member
Joined
Aug 9, 2011
Messages
39,331
Location
The Badlands
WatchHobby Yesterday at 10:24 PM VISE REPAIR 101 all vise repairs, lubricants, sources for parts and the tricks to fix

Clamp the head decently and support the screw sticking out and it will dill just fine. the only "precision" needed is the bore diameter.
 
To avoid these ads, REGISTER NOW!
Top Bottom